Category: Tips

  • Access Option Set Labels in Dynamics CRM OData Feeds via Power Query

    Access Option Set Labels in Dynamics CRM OData Feeds via Power Query

    If you’re using Dynamics CRM Online without direct access to the underlying SQL Server database, there may have been a few occasions when you’ve wished for more flexible options for reporting and customer data analytics than what is possible via configuring CRM charts or developing Fetch XML based reports in Visual Studio. Late last year Microsoft enabled support for accessing the secured OData feeds from CRM Online via the Excel Power Query tool, which opened up some interesting options for building modern BI solutions on top of the CRM data up in the Microsoft cloud.

    CRM_OData_Excel

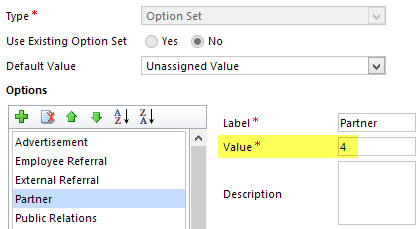
    For a non-developer who hasn’t leveraged OData before it might come as a bit of a surprise that not all of the business data is necessarily readily available via the feeds when examining a particular CRM entity. One crucial thing that’s missing is the option set values. More specifically, it’s the label values that are not accessible via the entity tables retrieved via the OData feed, as all we have access to are the numerical values representing the labels (1, 2, 3, 4… 10001), but not the human readable versions.

    CRM_OptionSet_Value_Label

    From a reporting perspective, it’s very likely that any chart or table that you wish to build is going to leverage one or more option set fields. Formerly known as picklists, these are basically the dropdown fields on CRM entity forms that allow the user to select one value from a list of predefined values. Much more convenient for reporting purposes than free text fields, as I’m sure you’d agree.

    So, what are our options then? We could of course manually create new tables into the Excel workbook that store the mapping of ID values and labels, but that just doesn’t sound like a fun exercise at all. More importantly, that would only give us a static list of option set values that couldn’t adapt to the changes in CRM customizations. Nope, not a good approach from report maintenance perspective, so let’s not go there.

    As a bit more efficient workaround we could be adventurous and import a copy of the CRM solution file containing the entity customizations as an XML data source into Power Query and then pick out the necessary mappings from there. Due to the power of Power Query, this would actually technically work, and we could even set it to reference a file location from where the latest customizations would dynamically be imported upon workbook refresh. Still, that would leave us the burden of setting up an automated export system that would produce the customizations.xml file to reflect the latest changes.

    After a bit of poking around in the OData feed data source, it turns out the optionset labels are actually included there. The tricky part is that they’re not simply a [Record] link that you can drill into and expose the values from your existing entity data set. Nope, they reside in a specific table of their own, called PicklistMappingSet. In this tutorial I’ll show you how to retrieve the data for a “Leads by Source” chart created with Power View, taken from an OData feed data source pointing to Dynamics CRM Online, using Power Query to pull the data into a data model built with Power Pivot.

    1. The Data Source: Power Query

    PowerBI_CRM_Odata_1
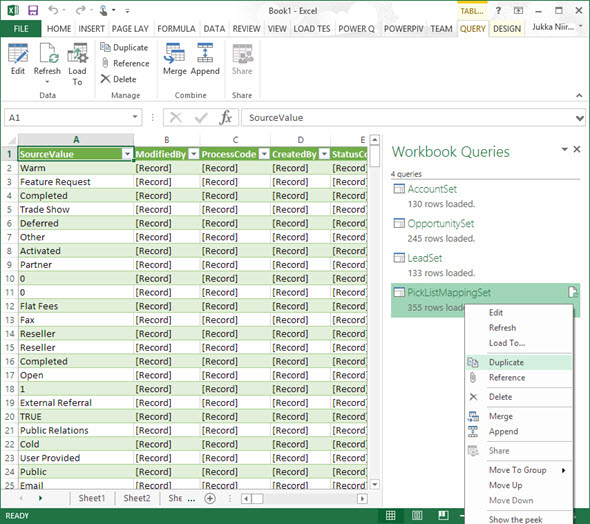
To follow the steps you should have the latest Power Query version installed in your Excel client. I’ve already covered how to access CRM OData feeds from Power Query in a previous article, so please refer to that one if you haven’t done the exercise before. After connecting to the OData feed URL we should select the tables that we want to work with from the data source navigator pane. By minimum you should grab the LeadSet and PicklistMappingSet to build the chart.

    The problem with CRM and OData is that by default the feed will pull down each and every record in the table. The query performance is less than stellar with CRM Online and if you have a high number of leads (status doesn’t matter, also the closed ones will get downloaded), you might be waiting for a while before the query is completed. If you want to move on a bit faster then check out this great tip by Andre Margono on how to set up a query filter for the Dynamics CRM OData query (for example, only active leads).

    The real beauty of Power Query is in the query steps you can use for manipulating the workbook queries. Before we go there, though, let’s create a duplicate of the PicklistMappingSet query. This will make it easier for us to map the values into our actual leads table later on, as well as preserve the original option set value table available for further queries.

    PowerBI_CRM_Odata_2

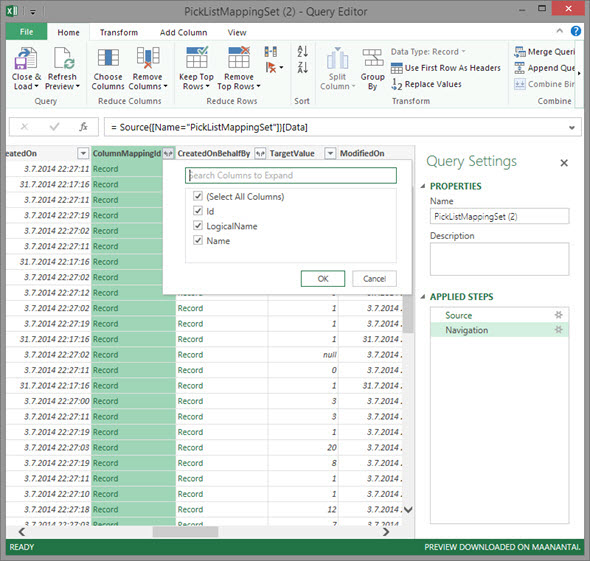
    Open up the new duplicate query you’ve added into the edit mode by double clicking on it, which launches the Power Query query editor (yes, query is the word of the day). The first step we’re going to add for the query involves expanding a column that only shows a green “Record” value by drilling into it from the small icon next to the column label. Do this to the ColumnMappingId column and just load up all the columns found from behind it.

    PowerBI_CRM_Odata_3

    You’ll see the Record column transformed into three new columns as a result of drilling down into the data. The column we’re interested in is ColumnMappingId.Name, which has the names for all option set fields in our source CRM system. For this example we want to see the LeadSource field, so add a new filter for this value, just as you would in a normal Excel data table.

    PowerBI_CRM_Odata_4

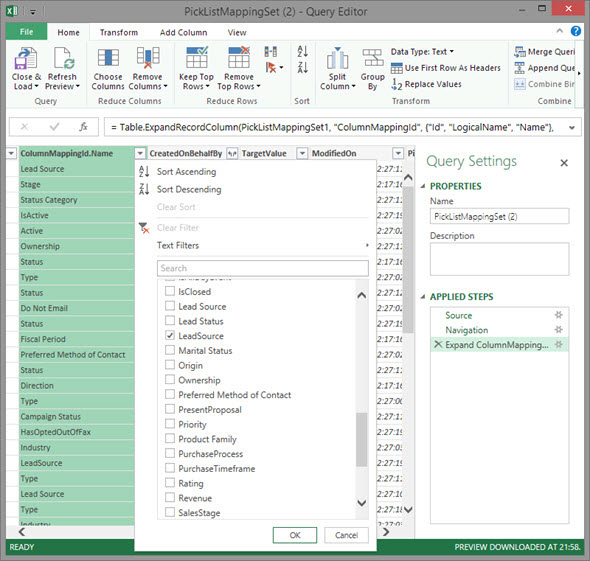
    By now you might have noticed that the Applied Steps box in the Query Settings pane is collecting all of the actions that we’re performing on the query and storing them as steps. If you make an error in your selection, just click the delete symbol next to the steps to get rid of it. (more…)

  • Visualizing Your Progress with CRM Goals

    Dynamics CRM is a great tool for making your business processes more quantifiable. Sure, you can maintain a list of your open sales opportunities in an Excel sheet and plan your customer meetings with your Outlook calendar, as many organizations do. You can get a pretty good understanding of the current status with such personal productivity tools that come with your Office package, so why bother using any other software for it?

    Things become a lot more challenging if you need to be able to track your progress over time, let alone manage a team of individuals who are all using personal tools instead of a shared information repository. “How did we meet the monthly sales targets during the past quarter?” “How many meetings did our sales reps have with current vs. potential customers?” Having an always up to date report of not only the historical results but also estimates of how you’re performing during the current measurement period may become an overwhelming task if you need to create such reports manually.

    CRM_goalsDynamics CRM 2011 introduced the goal management feature that allows you to configure a specific measurement criteria just once, define a target value for a certain time period and user, then just sit back and watch the goal progress chart get updated on a daily basis. It’s a generic feature that can be utilized for calculating pretty much any results that are based on data stored and maintained on CRM entities. Sales quotas are a typical example of leveraging CRM goals, but you shouldn’t look at the goal management feature as something that can only be used for tracking formally agreed targets associated with individual employees. Any metric that can be reflected as a quantity in CRM data can potentially be turned into a goal record.

    Set Your Own Recurring Goals

    There are a few aspects about goal management in Dynamics CRM that may stand in the way of organizations truly starting to leverage the feature. First of them is related to how the goals are by default presented as records that you need to separately create for each and every time period where the measurement should be applied. This means that if you would be interested in tracking a goal on a monthly level, you’d have to enter 12 different records into CRM with mostly the same field values, with the only difference being the “From” and “To” date fields (or alternatively selecting the fiscal period as defined in CRM system settings). Even though you can leverage Excel export/import to create more goal records in bulk, it’s still a tedious sounding step that may keep you from even starting to experiment with the goal management feature.

    If you’re not dealing with a hard variable like a sales quota that will have a concrete effect on someone’s salary, then there’s an easier way to get started with goals. Instead of configuring them for a fixed time period, you can set them to be dynamically measured for the last X months, next Y days and so on. I’ve introduced the topic in a previous post, so I won’t dig into the details here, but basically what you can do to create a continuous goal for a dynamic time period is to set the “From” and “To” values as wide apart as you want and then restricting the measured time period in your Rollup Query definition instead.

    In my example, I wanted to create a goal record that would measure how many web forms have been submitted per month in an online campaign that leverages the ClickDimensions Web Forms for automating the process and, naturally, tracking all of the data into the CRM database directly. What I did was 1) add a new Goal Metric for counting the number of Posted Form records, 2) enter a bogus time period of 6 years, 3) set the target value that I want to achieve for monthly downloads and 4) create a new Rollup Query in which I defined the criteria to be “Created On in last 30 days” and defined a specific Web Form record that I want to track the submissions from.

    CRM_2013_recurring_goal_configuration

    Once I saved the record and clicked on Recalculate, I received the current count of Posted Forms that meet this criteria. From here on to eternity this goal will now show the count of submitted forms in the last 30 days, as well as a percentage indicator of how close or far I am from the monthly target of 10 forms. All it took was a few minutes of configuring the goal, now the system will take care of updating it every 24 hours to show the latest result. Time well spent, eh?

    Make Your Goals Visible

    Another potential pitfall with the goal management feature is that while the calculation engine behind the scenes will now maintain these metrics, there’s no guarantee that the users will remember to pay attention to this data. If they know where to go and look for the data, they can access the goal record in a view that will display target, actual and percentage values. If they are really advanced users, they may even know how to display the goal data on a chart that can be opened up from the right side of this view. And, if they have a great CRM administrator in their organization, he or she may have configured the relevant goals to be shown on their role based dashboards.

    That’s a lot of ifs, though. Unfortunately it is quite common that not all of the skills required to get this process right, from business analysis to CRM system customization, may always be available to produce an outcome that would lead to the business value of goals being fully presented to the end users. As we know, user adoption is typically the bigger challenge that CRM system implementations will face, rather than the technical limitations of the underlying software platforms. If it’s not really, truly obvious for the users how the new system will benefit them and make their everyday lives easier, they are unlikely to invest time in frequently visiting it and browsing through the various views and dashboards to review the information available there. So, with the goals feature, is there any other way we could promote the usefulness of these automatic calculations to the users?

    I’ve recently started working at a company called Digital Illustrated, which delivers solutions based on various Microsoft technologies, including Dynamics CRM. The guys at my new office have developed a cool new app for Windows Phone: CRM Goals. As the name suggests, this is an application that enables you to review your Dynamics CRM goal information via a WP8 smartphone screen. The really cool part about it is that you can select the goals you want to show as a Live Tile right on the Windows Phone start screen! For example, I can select the above mentioned eBook download campaign goal and choose a place for it among my other frequently used apps like Dynamics CRM and Yammer:

    Digital_Illustrated_CRM_Goals_for_Windows_Phone

    Now, instead of me having to remember to review the goal in CRM, it’s available to me one the place I visit tens of times every day: my smartphone start screen. The likelihood of me keeping an eye on the campaign target has increased to a whole new level – even if I was already an active CRM user. Also, the convenient presence of these metrics on my personalized mobile start screen can very easily spark up new ideas of other processes where I could leverage the Dynamics CRM goal management feature. All it took was placing the information from CRM into the context of my existing daily workflow.

    If you’re using CRM Online and have a Windows Phone device, then why not go and grab the free CRM Goals app to better visualize your own personal goals?

  • Dynamics CRM Reminder Workflows Done Right

    A very frequent requirement that customers present for their CRM system functionality is that they will get automatic reminders from it when an item recorded into the database requires their attention after a specific date is reached. This might be a hard, physical date like a contract expiring or a softer variable such as a follow-up date on an open opportunity. Since receiving email notifications from various online services is such a ubiquitous pattern for process reminders these days, it’s only natural that the CRM system is expected to behave the same way.

    What sounds like a straightforward thing to implement with the help of the Dynamics CRM workflow processes isn’t necessarily such an easy task – at least if you want the reminder workflow to operate correctly under all the possible circumstances. In a scenario where the reminder is set by the user via a value entered into a date field there’s a number of other variables that you should take into consideration besides that single data entry. For a developer who is used to dealing with user inputs and exceptions this may be just another routine task of figuring out the logic surrounding the reminder date variable, but for a functional consultant who typically works more directly with the end users and mainly just points & clicks in the CRM customization menus for building out the required functionality this may not be such familiar territory. I’ll be the first to admit that I struggle with workflow logic a lot.

    Dynamics_CRM_reminder_workflows_8Given how much time I’ve spent wondering “how should I do this” when it comes to CRM workflows, the wording of this blog post’s title is pretty bold. Is there really a single right way to build reminder workflows and do I know nearly enough about them to claim the privilege of defining the proper design pattern for them? This is actually just more of a provocation through which I’m hoping to gather feedback on the inevitable shortcomings of this post via the comments section. Another reason behind this choice of the title is that I stand on the shoulders of giants when it comes to my knowledge about CRM workflows, meaning everything I know about them I’ve read from blogs elsewhere and I’ll try my best to highlight the articles deserving most attention via linking to them as we move forward.

    In this post I’ll use a scenario where the opportunity record has been extended with a custom follow-up date field. Entering a date into the field is done by any user who has access to update the opportunity. When the follow-up date is reached, a reminder should be sent to the owner of the opportunity, but only if the record is still in an open status, since won or lost opportunities don’t require reminders anymore. Sounds logical? Good, then let’s start working on implementing all the required business logic onto the Dynamics CRM workflow editor canvas.

    Start conditions

    The first thing we need to decide on when designing workflows is defining the criteria on when should we be performing any actions to begin with. In our scenario, any moment a user could enter a value into our reminder date field is a potential trigger for our workflow logic, so we should have the process started both on the create event of the record as well as the change event of the field in question.

    Since we’re dealing with an optional field that doesn’t necessarily contain any value, we should check this right away. It’s not enough that there is a value in the field, but it also needs to be something we can act upon. There are two general things that interest us: 1) is the record sill active (meaning does it require any reminders) and 2) is the reminder date in the future. There’s no point in us sending an email to a user right away if he or she mistakenly enters a date that’s passed last month already, so better to just ignore any such input values and do nothing in this case.

    Dynamics_CRM_reminder_workflows_1

    Wait conditions and stopping the workflow

    If we’ve determined that there is a valid reason for our workflow to take note of the event to which it has been attached to, the next step is to… just wait. No, I didn’t mean you can just start slacking away with your workflow design! Waiting in itself is a topic deserving your full attention as a CRM customizer, since there are more than just one type of waits in the platform we’re working with. Read this great article by Paul Nieuwelaar for an in-depth discussion on the different options available.

    There are multiple possible outcomes that should cause our workflow process to wake up. It’s not only the events when a follow-up action should be performed but also any path that leads to a state where the workflow is no longer required. After all, you really don’t want to have an ever increasing number of workflow instances left forever waiting in your CRM system, hogging up resources unnecessarily. So, in our scenario, whenever the status of an opportunity changes to something else than “open” before the reminder date is reached, we’ll want to stop our workflow.

    Dynamics_CRM_reminder_workflows_2

    This brings up another best practice regarding Dynamics CRM workflows. We have the option of stopping a workflow with the status values of “Succeeded” or “Cancelled”. As a general rule of thumb, you should always choose to stop your workflow as “Succeeded” unless you have a good reason to do otherwise. This is because a “Cancelled” value is considered an exception in the workflow process job execution and it will leave a permanent record into the system for debugging purposes. If the stopping is just business as usual for your workflow logic, let the system job be deleted by choosing the “Succeeded” option. Only use the “Cancelled” value if you intend to go through and review all the cancelled process instances when testing or debugging your workflows.

    Change of date

    Since our trigger field is just a normal date field on the opportunity form, we need to take into consideration the fact that a user may at any stage go and update the date value. For example, when the opportunity in question gets delayed due to lack of actions from the customer’s decision makers, the opportunity follow-up reminder would naturally also get postponed to a later date. Whether a reminder has already been sent for the record or not doesn’t actually matter to us, since what we’re dealing with in this scenario is a reusable reminder field that should always work reliably and deliver a notification at the time specified by the user.

    Since our start conditions were tied to not just the creation of a new record but also any changes made to the follow-up date field, this will create a new instance of the workflow process whenever the field value is updated. We don’t want to have multiple concurrent waiting workflows for the same record and we most certainly don’t want to send more than one reminder at the follow-up date, so we need a logic to get rid of the old process instance when a new one is created. But how do we tell the existing workflow that a new version has been created? (more…)

  • Accessing “Special” Activity Data with CRM Report Wizard

    Sometimes a data model that is perfectly valid on a logical level does not enable the system end users to actually leverage the data stored in it. One example of such a design is the way Microsoft Dynamics CRM handles the information collected on the standard (uncustomizable) dialog windows used in the case resolution and opportunity close processes. While the information collected here would often be valuable for managing the business process and analyzing the results (“what information was provided to the customer while closing the case?” or “why did exactly we end up losing this opportunity?”), it cannot be easily accessed in a way that would show data from more than a single record at a time.

    CRM_Case_Resolution_Dialog

    This is due to the fact that the case resolution and opportunity close information is not recorded onto the actual business entity itself but rather onto a related activity. There are specific activity types for both of these processes that get created once a user clicks OK on the respective dialog for setting the business record status as closed. This makes sense if we think about the lifecycle of a record like case or opportunity, since the closure is not necessarily a permanent end state. The user can reactivate a case or reopen an opportunity and continue working on it if the circumstances and the business process guidelines dictate this to be the correct route of action, in which case there will eventually be more than one close activity for the business record. The data model therefore needs to support a 1:N relationship between these entities, which is why the design of the out-of-the-box business processes in Dynamics CRM is justified.

    The unfortunate side effect of this design is that the system cannot easily produce views of closed cases with both the question and answer information, as these are stored on separate entities. It is equally difficult to view and analyze information regarding won or lost opportunities, as any comments entered by the opportunity owner during the closure event are not available on the opportunity record itself. What makes the situation even more unfortunate is that the Advanced Find UI does not surface these “special” activity types and make them available for custom views, so even extracting the data from the system for ad-hoc analysis in Excel sheets is not directly possible.

    One approach that I often recommend to customers is to develop additional business logic that will store the information about the latest case resolution or opportunity close onto custom fields on the case/opportunity entity. I’ve also written a blog article earlier about how ISV tools like North52 Business Process Activities (formerly known as Formula Manager) can be used for building a no-code customization to better leverage case resolution data. This of course will not cover any records created prior to deploying the customization, so accessing historical information is still a challenge.

    Reporting on Case Resolution Data

    As always, by developing a custom SQL Server Reporting Services report you could access almost any data in CRM and present it exactly the way you want. You’ll need to use Visual Studio and know a thing or two about how to develop SSRS reports for CRM if you take this approach. In the standard user interface of Dynamics CRM there is only the Report Wizard feature available, which in many cases offers quite limited options for designing reports that would go beyond what the inline charts in CRM views can do. This Wizard was originally introduced back in CRM 4.0 when there was no charting or dashboard capability included in Dynamics CRM yet. Once CRM 2011 brought in these new visualization options, the Report Wizard was pretty much abandoned in terms of new functionality development, so today it remains sitting there in its 2007 outfit and looking a bit outdated as a result.

    One of the lesser known qualities of the Report Wizard is that you can actually access certain entities and fields with it that are off limits to Advanced Find. This comes in quite handy when dealing with a scenario like the one I described earlier. So, let me show you how to build a Report Wizard report that will provide you better access to case resolution data.

    When creating a new report and choosing Report Wizard as the type, you’ll first be taken into a dialog window where you can choose 2 entities that you’re allowed to use in the report. By selecting Activities as the primary record type we’re presented with a list of possible related record types that includes also the “hidden” entities like Opportunity Close or Case Resolution. For our purposes, let’s select the resolutions.

    CRM_Report_Wizard_1

    Now we get to the filter criteria screen. Let’s say that we want to build a report on the billable time information recorded into the case resolution entity. We’ll only be interested in resolved cases and case resolutions that contain data in the Time Spent field (this is where the billable time field data in the case resolution dialog gets stored in). (more…)

  • Configure Outlook Contact Synchronization Settings on Behalf of Your Users

    The ability to get your CRM contacts automatically synchronized to your Outlook address book and mobile phone is a very handy feature in Microsoft Dynamics CRM. Why would you ever manually dial the phone numbers of your customers when you can just set them to appear in your smartphone’s list of contacts? Wouldn’t it also be nice to see the customer’s name instead of just an unfamiliar phone number when he or she calls you after your first meeting? These are examples of everyday benefits that not only save time but can also help drive CRM user adoption by showing tangible benefits of having the customer information managed centrally in a database shared by all employees that are in contact with the customers.

    The new server-side synchronization in CRM 2013 has made the synchronization process independent of the Outlook client, so that updated information flows between your phone and CRM even when your PC is not online. What has not changed, though, is the lack of an administrative control panel for configuring the synchronization settings for the users. Since CRM by default only offers API calls to manipulate the synchronization filters, most users are likely using the default synchronization settings that come with CRM out of the box (unless they’ve received thorough training on how to configure the filters in the personal options menu). These are not always the optimal way to get the most benefit out of the synchronization functionality.

    Once again, XrmToolBox comes to the rescue with its recent Sync Filter Manager addition. This tool gives system administrators the power to create and change the Outlook and offline filters on behalf of the end users. Now you can easily plan the proper synchronization strategy and deploy the correct settings to all users in a controlled manner, instead of needing to visit their PCs or try to get everyone to click the right options.

    Since the concept of synchronization filters and templates may not be so easy to grasp for the CRM admin, I decided to make a tutorial that walks you through a few common scenarios for contact management. These cover enabling more than just the single owner of a contact to have the record synchronized to their address books, as well as how to avoid users in administrative roles from getting thousands and thousands of miscellaneous contacts suddenly appearing in their Outlook and mobile phone. You can view the presentation below or go to SlideShare my Slides archive and download it from there if the embedded slides are not showing up.

    As a great follow up reading, I recommend you to also have a look at the article on contact management best practices that was recently published in the new CRM Virtuosity blog. This will show you how to take the Outlook contact synchronization even further via modifications to the contact form’s Command Bar in CRM 2013, among other things.

  • Working with Price List Items in Dynamics CRM

    Working with Price List Items in Dynamics CRM

    Despite of the recently refreshed user interface of Dynamics CRM 2013 that offers a much more fluid user experience than previous versions, there are still areas in the application that are not very user friendly. Many of these revolve around product and price information, regarding how it is presented and what actions are allowed on it. In this blog post I will drill into a common scenario that organizations who use CRM for managing price list data may run into and present a few options on how to make their lives easier.

    Price List and Price List Item Views

    A pet peeve of mine in Dynamics CRM has always been the UI that the Price List entity offers to the end user. As many of the readers of this blog will surely know, price list items are the way how products, units, price lists and the all important price figures come together in the CRM data model. If you want to leverage the product catalog and any price calculation features in the sales module, you’ll need to work with price list items and create at least one of them per each product you plan to include as line items on your opportunities, quotes, orders and invoices.

    Unless you’ve built a custom integration to a back-end system that will automatically provide the latest pricing information for CRM, there’s quite a bit of work involved in maintaining individual price list item records when prices change or new products or lists are introduced as a normal part of the day to day business. When a CRM user opens a price list record, a reasonable assumption to make would be that he or she is interested in reviewing the pricing information given to the included products. Unfortunately the Dynamics CRM UI does not make such an assumption, rather it thinks the user is interested in only viewing a list of products and their units but not the actual price information in the amount field. Here’s what the default associated view of the price list items gives us:

    Price_List_Item_CRM_2

    Well, that sure looks like a good candidate for some entity customization work. Yes, it does, but there’s a “but”. When you open the customization UI and navigate to the price list item entity, you discover that the views are actually not customizable. Nor can you add any of your own views for that matter, which means you’re stuck with the default UI. If you think that the price list item entity should allow view customization, then there’s a suggestion on Microsoft Connect that you definitely should go and vote for (if you need help in registering to Connect itself, see this post).

    Exporting the Price List Item Data to Excel

    With this limitation in mind, what are our options of producing a true price list view with product and price information shown side by side? For any Dynamics CRM power user the first thing to come to mind will surely be to export the data into Excel. Unfortunately the uncustomizability of the Price List Item entity also means it has been blocked from showing up in Advanced Find, which would normally be our tool of choice for preparing a CRM data export.

    Luckily there’s still an Export to Excel button visible in the ribbon of the price list form when we are viewing the associated price list items view. Clicking this will present us with an option to either export the data in static format (which would just give us the same columns as the current view) or to create a dynamic Excel sheet in two possible formats. Both of the latter options, pivot table and worksheet, present a follow-up dialog where choosing the required columns from the price list item entity and even any parental entity like product is possible.

    Price_List_Item_CRM_3

    When you export the view into a dynamic Excel sheet in an on-premises CRM environment, you can actually go and look at the SQL query that the view is using for pulling the data from CRM to Excel. Just click “Change Data Source – Connection Properties – Definition” and copy the query from the Command Text window into Notepad. With a little tweak that removes the reference to the currently viewed price list record we can use the same dynamic Excel sheet to retrieve price list item data for all the price lists in the system.

    Price_List_Item_CRM_1_small

    In the SQL query you’ve copied to Notepad you’ll find a reference to the price list from under which we exported the related price list items. It will look something like this: where  (“productpricelevel0”.pricelevelid = N’CEA84006-AD7B-E311-9405-00155D6214FA’) . Just remove this whole where clause, thus expanding the query to retrieve all records from the price list items table in CRM, regardless of the associated price list. Then with the Excel pivot table tools you can group and filter the data any way you please, effectively creating a price list report that views the latest information from CRM in a layout that best suits our purposes. (more…)

  • Spring Cleaning for Your Dynamics CRM System

    CRM systems have a tendency to suffer from an increasing amount of entropy as time goes by. Not only does the rate of accurate information available from them decrease as data quality decays over time (especially if no one’s in charge of actively maintaining it), they’re also susceptible to a phenomenon I’d describe as “the illusion of having data”. This is the assumption that simply defining a data model that holds a place for specific attributes or entities would actually result in data being collected into them.

    “Build it & they will come” could be translated to “customize it & they’ll use it” when it comes to CRM systems and it is as good a strategy in designing business information systems as it is in any other walks of life – meaning not very. Sure, during the initial requirements specification phase for a CRM system it may feel like there has to be a field added to the customer’s profile for every possible variable that the business may need in the future. After having used the system for a while you’re very likely to be confronted with the reality that very few if any of the records have any data entered into these fields. Or even worse: you just continue to assume to have customer information that doesn’t really exist, potentially building further process automation and reporting on a very shaky foundation.

    CRM_spring_cleaning_4Since it’s quite a common phase in the lifecycle of a Dynamics CRM organization to sooner or later face a situation where you want to clean up the system from legacy data structures that no longer serve their purpose, I want to highlight a couple of tools that will help you on this journey towards a better organized CRM system.

    Finding Fields Not on Forms

    Persons who may get assigned the role of being the CRM system administrator alongside their “actual work” often approach the application as if it would consist of a set of forms that contain fields and… well, nothing much else. What this means in practice is that whenever a new business requirement comes up where additional information should be captured to serve a new process, product, organization structure or what have you, they’ll typically open either the account or contact entity and start adding new fields onto the forms.

    As this process is repeated over and over again, the number of fields will grow and at some point some of the older ones will probably get removed from the form in an effort to make the system less cluttered. They’ll most likely be left in the system with their Searchable property still set to “Yes”, meaning using Advanced Find can become a nightmare with all the legacy fields listed. Also system views may still be using these fields that can no longer be edited. With the number of fields growing every day, it can simply become overwhelming to identify what’s in use and what’s not.

    A good first step for finding the legacy data structures is to list the fields that are no longer used on any forms of the entity. Since Dynamics CRM by default does not offer tools for such analysis, the next place you should look for a solution is the community tools on CodePlex, starting from the nr. 1 toolkit for a CRM customizer, which is of course XrmToolBox. As it so happens, there’s yet again a tool in there that will help us in achieving our goal. The Metadata Document Generator offers a setting that allows us to export a list of attributes for the selected entities that are NOT contained in any of the forms (remember that there can be more than one per entity).

    CRM_spring_cleaning_2

    By choosing this setting and complementing it with the “include Valid for Advanced Find information” checkbox we can generate Excel sheets per each entity that list the unused fields, at least when it comes to the UI side of things.

    Finding Fields With Little or No Data

    Once we’ve spotted the fields that have potentially become redundant and we’d like to get rid off, the next question in our minds is likely to be how to verify whether there is any actual data stored in them that should be preserved. Similarly, just because a field is present on a form, that hardly proves that it would be populated for the records in the CRM database. These are the kind of questions that we can’t answer via metadata alone, instead we’ll have to dive into the actual data itself.

    A quick way to examine the usage of specific fields without any custom tools or solutions is to use the built-in charts feature of Dynamics CRM. Let’s say we want to see if our users have actually entered data into the “No. of Exployees” field on the account form. By moving to a suitable view like “Active Accounts” (with a suitable filter to remain under the Aggregate Query Limit in terms of number of records), expanding the chart pane on the right side and clicking on the plus icon, we can start to define a new chart to help us in our ad-hoc data analysis needs. For the series we should choose a field that is populated for all of the records (I always use the record GUID field, meaning for the account entity I’d choose the “Account” field). In the category section we’ll then select the field on which we want to analyze the distribution of the data. While we can’t show exact percentages in the Dynamics CRM charts, the good ol’ pie chart visualization will quickly tell us the rough share of records with a “(blank)” value.

    CRM_spring_cleaning_1

    We don’t even need to save our charts to perform the analysis, since in many cases the live preview in the chart editor mode will already tell us how big a piece of the pie goes to blank values. By leaving our mouse cursor in the Category picklist and pressing the up/down arrows we can quickly scroll through different fields and view the distribution of values.

    While this works for a reasonable amount of fields, it doesn’t necessarily produce a very good overview of the level of entropy in the CRM organization unless you write down these statistics manually onto an Excel sheet. To increase our performance in this task we can again look for a community provided tool to help us out.

    Scanning Your Entities for Unused Fields

    Paul Way has created a solution that fits the bill perfectly: CRM Data Detective. By uploading this solution into our CRM organization and simply navigating to [YourCRMorg]/WebResources/way_/detective/detective.htm we can choose any entity in the system and have its database contents analyzed by the Detective. The end result will be a list you can quickly scroll through and view the bar chart for the population rate per each attribute:

    CRM_spring_cleaning_3_small

    This will be a great tool for you in the discussions with business decision makers who’ve originally demanded the fields to be added into the CRM data model. If you’ve got fields on an entity that have a 2% utilization rate, chances are your system would become more valuable by removing such fields. The overall usability of your CRM environment would increase and you also wouldn’t need to suffer from the illusion of having certain data available, just because someone had once created a place for it in the CRM data model.

  • Power User Tips for CRM 2013 Navigation

    Power User Tips for CRM 2013 Navigation

    Multitasking isn’t necessarily the most efficient working method for us humans with only a very limited capacity for concurrent threads in our CPU. The reality however is that the days of an information worker are filled with a never ending dance of switching between apps and windows. With large Full-HD monitors (and soon 40 inch 4K screens) it would simply be a waste of space not to have several applications, documents or web pages open simultaneously, to make it easier to combine information from different sources to get our jobs done.

    CRM 2013 has been redesigned for a single window UI paradigm that kills the need for most popup windows while working in the end user areas of the application. This works great when searching for information related to a particular account, opportunity etc. but there are situations when you need to work with the data in more detail, to compare the contents of multiple records, for example. At times like these you can find yourself wishing you had those multiple CRM windows you could switch between.

    Instead of having to manually open several different sessions of CRM in your browser, you can leverage the built-in navigation paths for popping records open in a new window. In a list view you can right-click on a record to reveal the menu that offers this feature:

    CRM2013_power_user_navigation_1

    If you’ve already clicked open the record you want to continue working with while navigating onto a different part of the application, you’ll find an icon in the top right corner of the form that will allow you to pop the current record open onto a new browser window:

    CRM2013_power_user_navigation_2

    Great, so there are ways to have the individual records open simultaneously. Now, as a person who mainly works with CRM system customization and configuration instead of the data, I often find myself wishing to have two different parts of the application open at any given time: the end user records and the solution management interface. This way I can more easily pinpoint the views, fields, form components etc. from the end user UI that I want to manipulate in the customization UI. Ever since CRM 2013 arrived it has therefore become a routine for me to open two copies of the CRM organization in separate browser tabs, usually by copy-pasting the URL from the first tab onto a brand new one and hitting enter.

    When working with CRM Online organizations I noticed that if you access CRM via the Office 365 Admin portal as a system administrator, you’re by default taken to the CRM Settings area instead of your home page as defined in the Default Pane and Default Tab of your personal settings. The reason is that the URL gets appended with a few additional parameters and ends up looking like this: https://orgname.crm4.dynamics.com/main.aspx?Origin=Portal&page=Settings&area=nav_administration. While I almost never want to go to that Administration page directly, it did give me an idea for a little productivity tweak that I can use for shaving off a few clicks from my average working day.

    As we can see from the URL, there are parameters for variables called “page” and “area”. The last one looks like a sitemap subarea ID (you can review these via several config tools, such as the Sitemap Editor found in XrmToolbox), so the first one must be the sitemap area ID then. Hmm, I wonder if I changed the link to point to the Solutions subarea ID instead, would that take me to the list of solutions that I so frequently need to access? Let’s try https://orgname.crm4.dynamics.com/main.aspx?Origin=Portal&page=Settings&area=nav_solution and see what happens:

    CRM2013_power_user_navigation_3

    Yup, that’s exactly where we land. Now, if only there was a way to make this a generic link that I could apply in any of the zillion CRM organizations that I need to work with… Hey, wait a minute! That’s precisely what I did just a while ago with the global Advanced Find button! All I need to do now is to apply the awesome script from Sonoma Partners’ Blake Scarlavai and create a Javascript bookmark that will take me to the Solutions menu instead of Advanced Find. As we’ve already cracked the URL code, we can now change the part between the last quotation marks to append the CRM URL with our destination of choice:

    javascript:window.open($('#crmContentPanel iframe:not([style*=\"visibility: hidden\"])')[0].contentWindow.Xrm.Page.context.getClientUrl() + "/main.aspx?Origin=Portal&page=Settings&area=nav_solution");

    While we’re at it, let’s also go and build another URL that takes us to the accounts view, which is a fairly safe bet to have as the “get out of the admin land” navigation link (although not every org may have it in the sitemap). Following the same logic as above, our Javascript bookmark contents will be:

    javascript:window.open($('#crmContentPanel iframe:not([style*=\"visibility: hidden\"])')[0].contentWindow.Xrm.Page.context.getClientUrl() + "/main.aspx?Origin=Portal&page=SFA&area=nav_accts");

    Once we paste the scripts into the URL fields of bookmarks on our browser and add them to the toolbar, there’s now a powerful set of quick access buttons to take us to the frequently visited areas of the CRM application in any CRM 2013 organization that we have currently open in the active browser tab.

    CRM2013_power_user_navigation_4

    If you’re not working within the customization area of CRM that much but would rather just have a faster way to switch between different areas and entity lists than what the touch optimized Navigation Bar of CRM 2013 enables, I suggest you take a look at a brand new solution from MVP Scott Durow (of Ribbon Workbench fame) called Start Menu for Microsoft Dynamics CRM 2013. Instead of organization agnostic Javascript bookmarks in a browser, the solution from Scott takes the CRM 2013 Command Bar to where no ribbon has gone before and introduces a true power user menu for accessing any part of the CRM application from (almost) anywhere, by rendering the sitemap contents as a dropdown menu available on all Command Bar enabled entities. Here it is in action:

    CRM2013_StartMenu

    Last but not least, if you have any thoughts on how the CRM 2013 navigation options should be developed further in upcoming releases, be sure to review these links to feature suggestions on Microsoft Connect and cast your vote for the ones that you feel would help your organization’s users to be more productive when working with Dynamics CRM. Thank you.

  • Information Overload: Cleaning Up CRM 2013 Forms

    Today I was working on upgrading the customizations of a CRM 2011 org to CRM 2013 forms and restructuring the layouts to fit the new UI. This environment had a custom entity called “Travel Information”, which was used for storing details related to event travel for employees. Here’s what the form looked like when opening a test record:

    CRM_2013_Form_Information_1

    Hmm, that’s three times the word “information” on the first few lines of the form. With further form sections for “Hotel information”, “Rental car information” etc. it seemed like there’s hardly any room for the actual information among all these labels claiming to be it. So, I decided to clean things up a bit.

    Form Tab Label

    When you create a new custom entity, you’ll get the first tab added on the form by default with the name “General” and quite often it remains the place where the commonly used and business required fields of the entity will get presented. It may be hard to come up with a very descriptive name for such a collection of fields, as was the case here with the “Information” label given to it.

    The form tabs can be used for expanding and collapsing the tabs to show/hide fields, but most of the times it will be unlikely that you’d want the first tab ever to be collapsed on the form. So why do we need the label there in the first place? Let’s navigate into the form customization UI and hide it.

    CRM_2013_Form_Information_2

    By clearing the checkbox for “show the label of this tab on the Form” we can clean up unnecessary text away from the form and help the users focus on the actual field contents instead.

    Form Name

    In situations where there are more than one form for an entity (and the user has access to them), it’s necessary to show the form selector control at the top of the form. But in our example, there is only a single main form for this entity, so why does the form name “Information” still show up there?

    CRM_2013_Form_Information_3

    With the default entities of CRM 2013 there has been a new naming convention introduced to distinguish between the legacy forms from CRM 2011 and the updated entity forms with the new layout and components. For example, the account entity will have a legacy form called “Information” and a new form called “Account”. If the user only has access to the latter one, then the name of the form will actually not be displayed there. Instead you’ll only see the name of the entity, thus avoiding unnecessary repetition like “Account: Account”.

    How could we achieve the same outcome with a custom entity? Simple: we’ll just have to do what the Dynamics CRM product team has done with their default entities and name the form exactly the same way as the entity. In this example, by updating the Form Name attribute found on the Form Properties dialog from “Information” to “Travel Information”, this same behavior should kick in when CRM loads up our custom entity form.

    CRM_2013_Form_Information_4

    Yup, no more form names displaued on the form. As we can see from the end result, we’ve now managed to remove redundant labels from the form quite nicely, leaving only the entity name visible above the primary name field of the entity.

    CRM_2013_Form_Information_5

  • Dynamics CRM OData Feeds and Power Query: What’s the [Record]?

    Dynamics CRM OData Feeds and Power Query: What’s the [Record]?

    Now that Power BI has hit the GA milestone (general availability), I decided to spin up a trial subscription for it and get familiar with the tools that it offers. My previous experiment with connecting to CRM Online OData feed with Excel 2013 Power Query seemed to be one of the very few blog posts that come up when you search for information on the topic. In that article I never bothered to go deeper into actually working with the CRM data as the big news really was that the latest version of Power Query was finally able to access data from CRM Online, thanks to the added support for Office 365 authentication on the OData feed.

    I repeated the steps for connecting my Excel 2013 Power Query to a CRM 2013 organization hosted on CRM Online and started to think about a simple report I could build. Opportunities tend to be a nice entity for demonstrating your typical reporting needs on summing money values based on sales process stage, owner etc. so I selected the OpportunitySet to be included in my workbook query. Scanning through the columns showed that I had every field I needed, but there was one problem: I couldn’t see the actual data in them. Instead of the Estimated Revenue figures or Owner names all I had was a link that read “Record”.

    Dynamics_CRM_Odata_Reporting_1_small

    “Hmm, well, a link’s a link so let’s click on it then. (Click) Okay, so now I’ve drilled down into an individual value. I no longer have a grid of opportunity records and columns, which kinda sucks. Oh, and also I can’t see any Undo button to take me back.”

    Life would be so much easier if you just read the manual before starting to use new tools, but ain’t nobody got time for that in the fast paced IT consulting world, right? After a bit of trial and error I figured out what the procedure for turning that [Record] link into actual data values is. Since it’s not immediately obvious, I decided to write it down onto this blog post, so that anyone else experimenting with using Power Query and Dynamics CRM Odata feeds can move on faster than I did.

    In all the columns that display the record link you can see a small icon with two parting arrows on the right side of the column header. This is where you can drill down to the column contents and choose which attributes for that field you would like to include in your query data. For example, when I click on the CustomerId column on the OpportunitySet query, the following menu opens up:

    Dynamics_CRM_Odata_Reporting_2_small

    Once you click OK, the values for the chosen columns to expand will be shown on the query editor grid. Repeat this for each column you plan to leverage on your report. As you expand more columns, you’ll notice that the Applied Steps dialog in the query settings pane will list each of them as a step. You can also see that these fields will be included on the formula bar, which will read something like Table.ExpandRecordColumn and then a list of our chosen attributes.

    Dynamics_CRM_Odata_Reporting_4_small

    After we’ve expanded all the necessary columns, we can then proceed with using this data in our report. While Power Query is the component in Excel 2013 that pulls the data into our Data Model, it doesn’t necessarily offer all the tools that we’d want to use for working with the data set. Move over to Power Pivot instead to define relationships between different tables, rename the columns, create calculated columns and do any other manipulation with the data before presenting it on a report layout. Then finalize your work on the Power View canvas and design the report that you wanted.

    Dynamics_CRM_Odata_Reporting_5_small

    There’s an excellent tutorial available on the U2U Blog that covers all of the steps in more detail: Dynamics CRM 2013 and Power BI for Office 365 – Part 1 and Part 2. Wish I had also found that earlier on, but better late than never…

    There should also be a Part 3 coming up that will talk about how to upload the report onto Office 365 Power BI for publishing it to the end users. I’m quite interested in seeing what will be the procedure here, because I’ve not seen much information about how to consume OData feeds in the Power BI portal. In fact, this tweet by Jamie Thomson implies that some OData features would have been dropped from the product:

    PowerBI_OData_suppor

    When I click around in the Power BI Admin Center, I don’t see any options for adding a new data source that would be an OData feed. If I’d like my report contents to get updated after I’ve uploaded it, I’d need to set up the Scheduled Data Refresh feature. However, the list of supported data sources doesn’t mention anything about Dynamics CRM. This leads me to believe that the current version of Power BI doesn’t yet support using CRM OData feeds as data sources in reports published on the Power BI portal.

    With an on-premises Dynamics CRM instance you could of course set up a direct SQL Server data source and publish it to Power BI via the Data Management Gateway component. However, the much more interesting cloud scenario of building Power View reports that leverage data from CRM Online directly seems to be beyond the current feature set offered by Power BI, unless I’m mistaken. Let’s hope that we get more information about the possibilities of Power BI for CRM Online customers when Microsoft presents their latest Dynamics product roadmaps at Convergence 2014 in a few weeks time.