Category: Features

  • Voice of the Customer: Conditional Questions

    Voice of the Customer: Conditional Questions

    My favorite podcast by far is CRM Audio. In fact, it’s the only podcast I regularly follow, since whenever I put my headphones on, quite often it will be for playing something from Spotify or Mixcloud to keep me from being distracted by people talking around me. Anyway, the podcasts that Joel, George and Shawn record about the latest news from the Dynamics CRM world together with their guest stars always provide some interesting insights that you can’t catch from the blogosphere. If you haven’t subscribed to it yet, I encourage you to give it a go.

    In episode 21 of CRM Audio, titled “That’s Not A Survey”, these CRM tipsters explored the brand new Voice of the Customer solution and discussed how to position it in relation to other tools like ClickDimensions Surveys and the likes. As you may have noticed from my previous blog post, I’ve also spent a bit of time playing around with VoC, since I see quite a lot of potential with this XRM based survey engine.

    One of the misconceptions around VoC that I’ve come across a few times before was also mentioned in the podcast was about conditional questions in a survey. It’s quite a basic requirement from any more advanced online surveys that the remaining questions should be adapted based on the earlier answers that the user has given. Call it “skip logic” or conditional show/hide, this would be something that a well designed survey would often need to apply, so that it adapts to the customer’s scenario being studied and can branch into different directions if parts of the questions are not relevant in a particular path. The misconception here is that in the Voice of the Customer survey designer UI there doesn’t appear to be a way to define such conditional logic. However, VoC does have this functionality already today.

    Being a very recent addition to Microsoft’s portfolio, and having been delayed from the original CRM 2016 release schedule, the features of VoC aren’t very well documented at the moment, nor is there much training material available for instructing users how to get familiar with the tool. The regular readers of Surviving CRM might recall that VoC was actually called Mojo Surveys when MS acquired it one year ago. This means that documentation does exist, but it just hasn’t been remade into Microsoft’s format yet. Here’s a little tip: Google for mojo surveys filetype:pdf and see what you’ll find…

    How the “skip logic” is done in VoC surveys is via a feature/entity called Response Routing. Found from the related records menu under a survey record, this is where you can define both the response conditions under which the routing  should take place as well as the response actions that should be carried out when the conditions are met (or not met). A condition would be associated with the response given to a particular question and evaluated via “equal/greater/less” type of operators. Below you see a simple example of a single condition per response routing, but you could also group multiple conditions together via AND/OR operator.

    VoC_Response_Routing

    The actions that you can take based on the conditions are split into two categories: client and server. As you may guess, the client side actions are performed during survey runtime, similar to client side scripts on CRM forms. Server actions are not performed until the survey response is submitted into the CRM database (like plugins), at which time it will be too late to affect what questions were presented to the user. So, the most interesting actions will be client side, which allow us to determine show/hide actions for questions or sections of a survey page, skip to a specific page, end the survey or even direct the user to a whole different survey.

    VoC_Response_Action_client

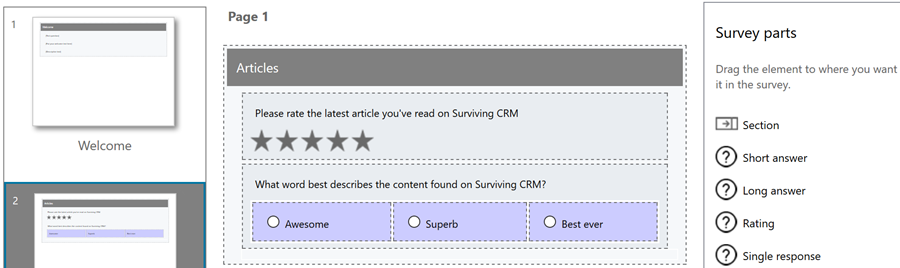
    In the example of the eXtremeCRM MVP Survey which I published together with my previous post, I added a Response Routing on the page 1 question “are  you attending eXtremeCRM 2016 in Warsaw”:

    VoC_Response_Action_demo_1

    If the user selects the answer option “Definitely!” then a further set of three questions will be revealed underneath that question on the same page. Similarly, because I also built response actions for the reversed scenario, if they change the answer value and click “I’ll have to skip it” then these additional questions are again hidden in real time on the survey page.

    VoC_Response_Action_demo_2

    As you can see, VoC does already contain quite nice functionality in the first version that’s been released now. There are many more features to discover, such as piping dynamic data fields into surveys, so let’s hope that Microsoft will publish tutorials that showcase the real potential of these VoC surveys – not to mention the possibilities of what you can do with the response data as it flows into your XRM environment!

    VoC_Piping_dynamics_fields

    One word of warning is in order here: currently there’s a known issue with the Voice of the Customer solution that will break the CRM v8.0 OData feeds (the new OData v4 endpoint) if you install it into your environment. If you then try to build a report with Power BI Desktop and want to use CRM Online as the data source, you may run into an error dialog saying “The field ‘regardingobjectid_msdyn_surveyresponse’ already exists in the record.” Microsoft is aware of this bug and is working on a fix, but if you are relying on Power BI for your production CRM Online reporting, then it’s maybe better not to deploy VoC outside of your sandbox environment just yet. (more…)

  • CRM 2016 Solution Segmentation for The Rest of Us

    CRM 2016 Solution Segmentation for The Rest of Us

    There’s been a significant enhancement to the Dynamics CRM solution framework in the 2016 release. Here’s what the TechNet article on CRM solution segmentation promises us:

    To gain tighter control over what you distribute in solutions and solution patches, use solution segmentation. With Microsoft Dynamics CRM solution segmentation, you can export solutions with selected entity assets, such as entity fields, forms, and views, rather than entire entities with all the assets. To create the segmented solutions and patches, you can use the CRM user interface, without writing code.

    Sounds pretty cool, doesn’t it? I’m sure there’s hardly a CRM customizer out there who wouldn’t have encountered the challenges with the lack of granularity when it comes to how Dynamics CRM defines some of the solution components to be inseparable from their parent entity. For example, if you just wanted to add a custom chart or modify a system view you always had to include the whole entity into your solution to distribute it from your development environment to other CRM orgs. With this type of “all or nothing” approach, it’s very easy to end up overwriting customizations in the target organization for components that you had no intention of modifying. The worst part really is that you can never be sure if you’ve done some damage after clicking on “publish solution”.

    The TechNet article immediately starts talking about concepts like patching and cloning solutions, so it’s important to note here that these really are mostly relevant only to people who ship managed solutions. If you’re an ISV developing an add-on product or work in a large enterprise developer team with automated release processes, this will surely be what you do all day everyday. If, on the other hand, your work is more focused on customizing and configuring Dynamics CRM environments in projects that don’t contain a large amount of custom code and only target a single customer specific production instance, I bet you’re dealing a lot with unmanaged solutions. I know I am, since the price you pay for deploying unmanaged solutions is most often a lot lower than what you’d face when committing to the path of the managed solutions (and crossing that scary point of no return while at it).

    What makes the new solution segmentation concept important to understand for any CRM customizer is that each and every one of you will come across it when adding default entities into your solution in CRM 2016 and beyond. After you select an entity like the opportunity, for instance, you’ll be presented with a brand new screen asking you to “select entity assets to include in the solution”:

    CRM_2016_solution_segmentation_01

    This is where you now can pick just the components that you wish to ship with your solution once you export it out from the development environment. You could choose just a specific set of fields, for example, or go to the views tab and click the top left corner of the grid to mark all the assets of type “view” to be included in the solution. Want to see how it can be used in practice? Okay, let’s go ahead and pick from the opportunity entity just the Sales Pipeline chart into our solution, so we can modify it.

    Let’s say we want to change the pipeline chart to use weighted revenue instead of estimated revenue values. So, where do we get those fields? You create them! CRM doesn’t ship with a weighted revenue field OoB but instead it contains the tools for building it, thanks to the great calculated fields feature introduced in CRM 2015. We’ll therefore need to create a new currency field and set its formula as “estimated revenue * (probability / 100)”. Even though we’re referencing other fields in the formula, there’s no requirement to include them in our solution, as these system fields will be in place in the target environment regardless of our actions. What we might want to pay attention to is something that the solution segmentation engine doesn’t worry about, which is including the system generated “Weighted Revenue (Base)” field into the solution, as that’s where the base currency version of our calculation will be automatically stored. Better safe than sorry! Furthermore, the new solution segmentation model means we can remove any individual component from the solution if we later deem it unnecessary (as shown below).

    CRM_2016_solution_segmentation_02

    Now that we’ve got our Weighted Revenue field, we can update the Sales Pipeline chart to use this new value. To test the segmented solutions functionality in more depth, let’s also pick another system component into our package: the Sales Activity Social Dashboard. We’ll update the elements of this dashboard and see how they transfer into the target organization. Once we’re ready, let’s export the solution as an unmanaged package like we’ve always done. We’ll get the warnings on missing dependencies (again, like we always do), but since the whole exercise is about updating just selected pieces of the CRM puzzle, we don’t need to worry about any of those.

    Upon importing the solution .zip file into the target org, there are no differences to how things worked with non-segmented solutions. If we want to peek inside solution details before hitting publish, we’re only presented with the high level components, which means there’s no way to tell at this point if the package contains the entire opportunity entity or just a couple of fields from it. If I was importing an ISV solution received from an external source, I would actually like to know what’s included on a very detailed level, but for now we’ll just need to keep on trusting the publisher.

    CRM_2016_solution_segmentation_03

    Let’s see what happens to our updated dashboard now. As a starting point I have a CRM Online demo environment from my previous post regarding “preferred vendor solutions” offered by Microsoft. As you can see, one of these solutions (probably FieldOne) has turned the flat CRM 2016 funnel chart into a retro 2011 style 3D version. Yeah, that’s precisely why solution segmentation makes a big difference, as you no longer need to overwrite things just to add new things.

    CRM_2016_solution_segmentation_04

    Once we import our new solution and publish the changes, we’ll see that the funnel chart has now been restored to the flat version that we exported from another CRM 2016 org. More importantly, the stages are now different as we’re mapping the opportunities into the pipeline based on our custom field Weighted Revenue instead of Estimated Revenue. The Top Opportunities chart has also been replaced by another custom chart I included into the solution. Looks like our segmentation is working great so far!

    CRM_2016_solution_segmentation_05

    Picking the entity assets one by one is perfectly fine for a scenario where you are deploying a very specific change like the one presented here. However, when you aren’t just performing minor tweaks to an existing CRM environment but rather deploying a brand new CRM system for a customer, you’re likely going to be touching a very large number of components. For instance, this week I’ve been working on a deployment project where the current sprint focuses on sales process management functionality. The number of tweaks I’ve done during two straight days of CRM customization is pretty massive, when you start from an out-of-the-box Dynamics CRM environment and turn it into something that actually works the way the users expect. If I would have had to plan in advance which components I need to be touching, or alternatively adding them into the solution one by one as I realize they need to be customized, I would have probably spent ~20 days instead of 2 while waiting for the CRM Online customization dialog windows to open.

    What I’m saying is that while having the full granularity of solution components available to you is awesome, there are common scenarios where you actually may want to keep on working the way you’re used to – adding the whole big entity chunk into your solution. Let’s say I’m building a “base customizations” solution package in a development environment which should contain all the core data model and UI customizations for a new CRM org. I know I’ll be messing with the opportunity entity big time, so I want to ensure every change to the OoB configuration is covered. Instead of picking the individual assets, I can tick the box in the top right corner to “add all assets” into the solution at once.

    CRM_2016_solution_segmentation_07

    Nice, now I’ve got the best of both worlds! My base customizations package looks like things were before CRM 2016 so I’m comfortable with building the customer specific solution with it. So, with that I’ll conclude my feature overview of a CRM 2016 highlight…

    “Wait, hold on just a moment there! Are you telling me there’s not a single “gotcha” discussed in this blog post? This is Surviving CRM! You never do a happy path walkthrough of CRM features without finding some issues in them.” Okay, you got me. I wasn’t really going to stop there. Let’s keep exploring this segmentation path a little deeper, shall we? (more…)

  • CRM 2015 Rollup Fields: The Gotchas

    CRM 2015 Rollup Fields: The Gotchas

    In an earlier blog post in December, I described one use case for the new Rollup Fields feature introduced in Microsoft Dynamics CRM 2015. This example involved rolling up data from email events tracked via ClickDimensions and summarizing this on the contact’s form, so you’ll want to check out the steps listed there if you don’t have any hands-on experience about this new feature yet. In this post I’m going to dig deeper into the details about how Rollup Fields actually work behind the scenes and what limitations you should be aware of when considering whether they are the right tool for the job in your own use cases.

    Rollup Schedules

    The first thing you need to understand about Rollup Fields is that they are not updated in real time. If you’re familiar with the difference between the real time workflows introduced in CRM 2013 and the asynchronous versions that were available in earlier versions, then this is something a bit like that, but not quite. As you might know, the traditional background workflows were triggered by an event that took place on a CRM record and the resulting workflow instance was scheduled to be executed by the asynchronous process running on the CRM server at the earliest possible date (depending on the overall workload on the server). Whereas this usually meant a delay of perhaps a minute or two at most, the new Rollup Fields are even further from real time than this.

    As we saw in my earlier post, when you create a new Rollup Field, a new mass calculation job will be created for the field in question. This will be scheduled 12 hours into the future, based on the assumption that this will most likely fall outside the office hours when actual CRM end users are working with the system. (Because us CRM customizers or system admins never work during the night, right? Yeah, what a funny assumption that is, but anyway…) The reason for such precaution is that the very first calculation job will have to populate each and every record that exists for that entity, which could be up into the millions, depending on what type of data you manage in your CRM.

    CRM_2015_rollup_system_job

    So, does this mean the Rollup Fields only get updated once per day, during that nocturnal schedule? No, actually they get updated once every hour. If you go to the Settings – System Jobs menu you’ll see that there are jobs of type “calculate rollup field” type running for each of your entities that have one or more Rollup Fields defined for them. They are not scheduled to start at exactly the same time, but they all run at one hour intervals. Another thing worth noting in the Rollup Field implementation architecture is that these calculation jobs are only applied to records that were created, updated or deleted after the last job finished. No point in processing a million records if only a handful of them could possibly have new values to be calculated, right? This is why the initial rollup and the recurring rollup requests are handled by different system jobs in the CRM platform.

    Rollups and Workflows

    Now that we know the Rollup Fields may not show a current values in the UI for quite some time, the next logical question to ask is: anything we can do to speed the calculations up? As an end user, you could go and look at any Rollup Fields that have been added onto an entity form which you have the necessary rights to view, then hover over the field and click the “recycle” icon to force the recalculation of the Rollup Field value. As a developer, you also have the option to force a Rollup Field to be recalculated on demand via a plugin, by using the CalculateRollupField message. As a system customizer… Well, there’s not much you can do, at least in the CRM 2015 version. (more…)

  • Analyzing Customer Behavior Data with CRM 2015 Rollup Fields

    CRM_2015_field_type_rollup
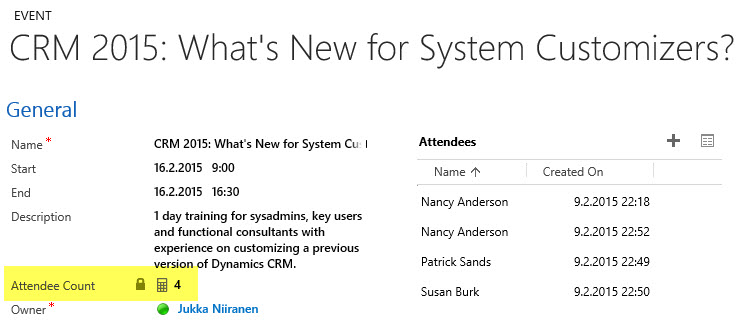
From a system customizer perspective, one of the most intriguing new features in Dynamics CRM 2015 is the addition of two new  field types. Alongside the traditional “simple” fields we can now define our custom attributes to be somewhat more “complex”, by choosing to create them as either calculated fields or rollup fields. These new field type options allow us to create point & click solutions to cover scenarios that would have previously required custom code.

    Microsoft haven’t been advertising this feature much in their “what’s new” materials for the CRM 2015 version release, but great blog articles have already been written on the topic, like this one by Peter Majer on the Sonoma Partners blog. There are also articles on Technet for both rollup fields and calculated fields, which provide all the details you need for getting the new feature implemented in you CRM Online or CRM 2015 on-premises organization.

    Rather than repeating this documentation, I’ll be exploring the different scenarios where the new complex field types can be leveraged, as well as the considerations and limitations to be aware of. In this first blog post I’ll demonstrate how the rollup fields can give us better insights on how our customers are reacting to email marketing campaigns sent to them.

    Summarize Marketing Automation Data for Contacts

    When our own CRM Online production organization received the 2015 update, the first use case I had on my mind for the shiny new features was to apply the rollup field functionality to the online marketing data that our ClickDimensions solution has been storing into the CRM database. If you’re not familiar with ClickDimensions, it’s a marketing automation service that allows you to send and track email campaigns, collect website visitor data, publish web forms integrated with CRM fields, configure automatic nurture programs for new leads, among other things (see this page for a detailed feature listing).

    What makes ClickDimensions particularly interesting in this case is that all of the behavior data is available inside the CRM application, in the dedicated custom entities contained in the managed CD solution package. For example, a page view transaction from a website with the CD tracking script deployed will be stored as a record for the Page View entity and then linked to either an anonymous visitor or an existing lead or contact record in CRM. Since it’s an “XRM” solution that you install as an add-in to Dynamics CRM, rather than an external marketing database that would be just synchronized with CRM, we can leverage all of the CRM platform functionality for showing and analyzing the data, automating related business processes with workflows and so on.

    Now with CRM 2015, the rollup and calculated fields have been added to our marketing automation toolkit. So, what do they allow us to do that would have previously been difficult/expensive to implement? As mentioned, all of the events tracked by ClickDimensions are linked to a CRM contact or lead record when the person performing the actions can be identified from browser cookies, unique id’s in links or submitted form data. If we would now like to view this data from the perspective of an individual contact, the rollup fields provide a way to summarize the data from related entities into fields available directly on the contact form.

    Creating Rollup Fields for Contact’s Email Link Clicks

    Let’s go ahead and add a new field for the contact entity. Yes, it must be a completely new field as you cannot convert existing standard or custom fields into calculated or rollup fields. Not a problem in our scenario, as we’re building a brand new feature into our CRM organization. The first field will be called Total Clicks and we’ll use it to count the number of related records found, so whole number is a suitable data type for us. By setting the field type as “Rollup” we’re given the option to edit the rollup formula.

    CRM_2015_rollup_field_Clicks_1

    In the rollup field definition editor we must now choose the related entity from which we wish to roll the data up to the contact entity. As we’re dealing with email link clicks, these are stored in the Email Event entity in the ClickDimensions solution, so that will be our choice. However, since the entity also contains data about events other than link clicks, we’ll need to add a filter into the related entity section and define that only email events where the field “type” equals “click” should be included in our rollup. As a final step, in the aggregation section we select “count” as the function that will provide the actual value for this new field on the contact record.

    CRM_2015_rollup_field_Clicks_2

    Let’s repeat the process for another new field: Latest Click. Instead of counting records, we’ll be looking at the date values on the related records, retrieving the highest date available and storing it into our rollup field. This means the data type should now be “date and time”. The rollup field definition is otherwise the same as with the first field, but in the aggregation section we’ll now have a different list of functions available for this data type. Let’s pick the Max function and apply it on the creation date of the email event records associated with the contact.

    CRM_2015_rollup_field_Clicks_3

    Alright, let’s save these fields and get them published! Oh, by the way, did you notice the yellow notification bar down in the rollup field definition editor window? That’s actually very useful information to be aware of once we move on to the next stage of our customization process.

    Displaying the Rollup Field Data for Contacts

    There are two main places where fields are presented in Dynamics CRM: forms and views. Let’s start from the contact form and include our new rollup fields there. In my scenario, we already have a suitable custom form available for the contact entity, which has been used for summarizing all the ClickDimensions data related to an individual contact record. Notice those fancy embedded charts and subgrids showing the email events for this test contact record of mine? That’s actually something you’ve been able to do already since the CRM 2011 version, so not exactly related to our agenda of the day, but a good reminder about how you can leverage the XRM capabilities of the Dynamics CRM platform to present data in a format that’s easier for end users to consume. (Check out my 10 tips for better CRM user experience for more discussion on that topic.)

    CRM_2015_rollup_field_Clicks_4

    I’ve added the Latest Clicks and Total Clicks on the contact form, below the existing chart and subgrid. But wait a minute: why are they empty? Did we do a mistake in the rollup field definitions? Don’t worry, this is exactly the expected result after creating a rollup field. If you took a moment to read that yellow notification bar I mentioned earlier, you’ll know that a mass calculation job was created by the CRM system after you added the rollup fields for the contact entity. Also, since it was by default scheduled to be run 12 hours after the field creation, we’re not going to see the whole magic until the next day in many cases.

    If you’d rather validate that the new customizations you’ve created are working as planned, instead of just taking my word for it, open up a contact record form and hover over the rollup field. You’ll see a “recycle” icon that you can click on, after which CRM will perform the rollup calculation for that field, for only the currently selected record. (more…)

  • Dynamics CRM 2013 in Retrospect

    Dynamics CRM 2013 was released only a bit over year ago, on October 8th 2013 to be exact. With CRM 2015 already knocking at the door, this seems like ages ago already, even though the actual time between these two major releases is shorter than their marketing names imply.

    Since the discussions in the Dynamics CRM community will inevitably be moving towards the latest 2015 version as the year turns, it’s a good moment to reflect back a bit and recap what the previous release gave us. I took a look at some of the blog posts I’ve personally written regarding CRM 2013 specific functionality since the version came out. By analyzing the page view stats from my blog, the following articles came out on top as the five hottest topics that you, the readers, were interested in reading about.  If you missed any of the articles, now’s the time to do a quick catch up before CRM 2015 steals all the attention.

    Synchronization vs. Tracking: Understanding Activity Management Options

    (Article link)

    CRM_2013_Server-side_SyncCRM 2013 introduced a new feature called server-side synchronization, which allowed the CRM server to communicate directly with the Exchange server for the first time in the product’s history. Upon first look it might have appeared like the long dependency on Dynamics CRM Outlook client was about to be history. However, in our brave new “cloud first, mobile first” world there are many more aspects to managing activity data in relation to CRM records that you need to understand.

    While the synchronization options for activities and contacts were indeed expanded with CRM 2013, the tracking options were not. In addition, the combinations supported email client and server applications for each entity and action type were quite a maze to navigate in. Since this is not such an easy topic to grasp nor explain, I ended up building a support matrix of my own, so that I was able to clearly communicate the various synchronization and tracking options to our customers.

    Getting Your Head Around Dynamics CRM 2013 Processes

    (Article link)

    CRM_2013_Process_Automation_smallChanges in the application’s UI may have grabbed most of the attention when it came to the CRM 2013 release, but there were also notable enhancements made to platform capabilities behind the scenes. Business Rules and Real-time Workflows opened up a whole new world of possibilities for the system customizers to create custom business logic that had previously required JavaScript or plug-in development.

    The one process type that was highly visible to the users, Business Process Flow (BPF), was also perhaps the most demanding one when it came to applying it in real world scenarios. Since BPF’s themselves don’t provide any automation but rather rely on the other process types to work in conjunction with the BPF process stages and steps, understanding the role of each of these components will require a fair bit of experimentation. This is why I wrote a two-part article where I tried to lay out the big picture of process automation in CRM 2013.

    Connecting to CRM Online OData Feed with Excel 2013 Power Query

    (Article link)

    CRM_OData_feed_Excel_Power_Query_4While the CRM 2013 release itself didn’t provide any dedicated feature for the Power BI tools announced by Microsoft a bit earlier, there were updates made to the Power Query component in Excel 2013 that made it very interesting for CRM Online customers. More specifically, the December 2013 version of Power Query finally delivered the ability to connect to OData feeds what utilize Office 365 authentication – with CRM Online being such an application.

    There isn’t a whole lot of official documentation available on the topic of how to leverage CRM Online OData feeds to build reports utilizing the Power BI toolkit. The process isn’t necessarily very straightforward and requires a fair bit of experimentation with the various Excel components (Power Query, Power Pivot, Power View). In addition to the OData feed connection part, I also wrote a couple other posts on what to do once you have the CRM data flowing into Excel via Power Query.

    Setting Up a Microsoft Dynamics CRM 2013 Development Server on Azure

    (Article link)

    Azure_MSDN_benefitRunning Dynamics CRM in the cloud via CRM Online is a popular option these days, but for performing testing and development tasks it’s often more convenient to have your own sandbox where you can control each and every part of the system. Azure has evolved into quite an attractive option for running virtual machines, especially with MSDN subscription credits and discounts for development environments.

    I’m not an infrastructure specialist that enjoys configuring servers very much, but when new versions of Dynamics CRM become available as preview/beta versions, it’s a good exercise to set up your own sandbox server. To better remember what the minimum steps are to be able to install the Dynamics CRM server application, I decided to document the process via screenshots and make it available on SlideShare for anyone else wanting to complete the same task.

    Expanding Add Activity Options on CRM 2013 Forms

    (Article link)

    CRM2013_Activities_2In the course of the UI refresh performed in CRM 2013, the number of menu options visible to the end users were optimized to cover only a single way to perform many of the options that previously might have had alternative route options. While the intention was noble, this did create a few situations where the navigation path required to perform an action may have not been the optimal one.

    The great thing about Dynamics CRM is that it’s a customizable platform that allows you to adjust the data model, forms and also the menu options to the specific use cases required by the customer organization – as long as you know how. With awesome community contributed tools like the Ribbon Workbench these tasks can be completed with a few clicks of a mouse, which is what I illustrated in this post where I added a new flyout menu onto the CRM 2013 Command Bar to access standard as well as custom activity records, and even launching a dialog process directly from the menu.

  • Don’t Merge Your Forms in CRM 2013

    If you have been using Dynamics CRM before the 2013 version was released, you may have something in your system called “information forms”. This is not a very descriptive term for them, since of course all the entity forms are about presenting “information” to the end user. These forms actually date back to a time in the Dynamics CRM platform history when there was only a single form available per entity. Times have changed quite a lot since then, as entities can now have role based forms, mobile forms, quick create forms and quick view forms.

    Although not a specific form type in itself, CRM 2013 introduced a whole new layout for the default entity forms as a part of the UI refresh. Instead of the traditional & boring two column layout, the new CRM 2013 forms are made up of three columns that can consist of not just entity fields but also related entity subgrids, the social pane, Bing Maps component and other exciting new features. Whereas the old default forms were called “Information”, the names of these new forms follow the entity names. So, the account entity will have a new form labelled “Account”, as an example. (By the way: check this tip for optimizing your form naming convention.)

    Merge Forms Feature

    Since the new forms are designed to make better use of the new navigation paradigm of CRM 2013 as well as present the data in a much richer way than the old “ERP style” forms of past CRM versions, customers who are upgrading their Dynamics CRM deployment to the latest version are advised to migrate into using these new forms. In fact, Microsoft has stated that the next major version (CRM 2015) would no longer support the use of the old “information forms”.

    To make this transition easier, Microsoft has provided a feature called “Merge Forms”. This new button available on the form editor in the CRM customization UI (which still utilizes the old CRM 2011 style layout even in CRM 2015, by the way) is intended to be used for bringing the tabs, sections and fields from your old forms onto the new forms with as little clicks as possible.

    CRM_merge_forms

    The process is described in the article “Update your forms to Microsoft Dynamics CRM 2013 or Microsoft Dynamics CRM Online Fall ’13”. Even more detailed steps can be found from the PDF document “How to Prepare for the CRM Online Fall ’13 Service Update”. Basically what the feature does is bring in the contents of the old form to the end of the currently open form, with the intention of making it faster to rearrange your customized fields and sections to align with the new default form’s content and layout.

    Sounds like a handy feature, right? There’s only one slight problem with it: it doesn’t work.

    Conflicting ID Values

    “What do you mean it doesn’t work? I have used the button to bring in my custom fields and it did just what I expected.” Well, maybe I should rather say that it works partially. If you never export your CRM customizations into a solution file and move it to a different environment, you may not notice that anything is wrong with your forms. However, if you do want to move the customizations between development, test and production organizations, you might run into the below error message during the solution import process.

    CRM_import_solution_error_after_form_merge

    After the error, if you download the log file and open it, you’ll see a message like this:

    Error code 0x8004F658. The label ‘E-mail 2′, id: ’87dc7c9c-94c1-3953-e490-11413b31d0ad’ already exists. Supply unique labelid values.

    What the system is telling us is that we’re trying to insert an item into the customization metadata that has a non-unique ID. Depending on the scenario, the item could be a field or section label. But how did the ID end up being a duplicate? After all, we don’t assign these GUID values in the customization UI, rather the CRM platform generates them. What could have caused the system to violate its own rules?

    The answer can be found from this thread on the MSDN forums: CRM 2013 Solution Import. A Microsoft support engineer has confirmed that the error is caused by a design mistake in the Merge Forms feature. Apparently in the process of merging form content from the old form onto the new one there is more data carried over than is needed. Not only do you get the form components exactly the way they are configured in the original form, but you also get the same ID’s. Now, since the old form also exists in the system, this will cause an error message when you try to import your solution file from the source system to the target environment, like from development to test environment, for example.

    The Workaround

    The system where I ran into this problem was running Dynamics CRM 2013 Service Pack 1 (6.1.0.581) with no Update Rollups (see this earlier blog post for help on understanding the different updates and version numbering). The forum thread above does not indicate that a hotfix for the form merge bug would have been included in one of the released updates so far, so I’m assuming that all CRM 2013 environments are affected by it during the time of writing.

    The suggested workaround in the forum discussion was basically “start all over”, meaning removing the merged content from the form and re-adding the components back there one by one. In the environment I was working on this would have required many hours of work with using the form editor on a number of entities , which I wasn’t too keen on spending there. I had just migrated a copy of the CRM 2011 production organization database onto a CRM 2013 test server and was in the process of testing the upgrade steps before the final go-live, so re-doing the customizations at this stage just sounded like both a schedule challenge as well as a potential source for new issues.

    I extracted the CRM solution zip file and poked around the customization.xml file for a while, trying to think of a way out of this situation. After I realized that trying to edit the XML manually would only land me into a deeper hole, it occurred to me that there was another feature in CRM that performed something similar than the broken Merge Forms: the “Save As” button. Copying entity forms to create new variations was something that I had used many times with no issues, so perhaps I could rely on it here as well?

    I proceeded with creating a copy of each of the entity forms where I had used the Merge Forms feature. Since the new form versions created via “Save As” are able to co-exist with the original forms without causing any conflicts, this must mean that the CRM platform assigns the required new ID’s to the form components. Based on this reasoning, I therefore assumed that once I deleted the original merged form and renamed the new copy (as well as configured the form order and security roles), I would have a clean solution file with unique ID values. After testing the solution import I was extremely glad to see that this was in fact the case, as no more error messages appeared during the import. Saved by the “Save As”!

    Don’t Just Merge – Design

    So, with the above workaround and a potential upcoming hotfix, is there any reason not to use the Merge Forms feature? In my humble opinion, the merge process is not a best practice but rather just a quick’n dirty way of getting the custom fields to appear on the entity forms. If you don’t in practice know how to customize your Dynamics CRM environment but need to cope with the updated UI of the new version, then the merge will technically make it possible to keep using your CRM data. What it will not do is produce a system that your end users will enjoy.

    The merge will bring over a lot of duplicate content (all the default fields) that you may forget to clean away from the new form. It will also create very confusing components for the system administrators, such as the old “What’s New” section vs. the new Social Pane, which require a deeper understanding of the Dynamics CRM platform evolution to really figure out. The biggest risk is that the form content designed for the old version UI will end up living alongside the content that is specifically made for the post CRM 2013 world, creating a disconnected and illogical application that works differently depending on the area where the user navigates to.

    Instead of taking the shortcut and doing a quick content merge, I recommend investing a bit more time and effort in planning what’s the best way to present the data and how to make it as easy as possible for the users to interact with it through the UI. If you need some ideas for improving the user experience of your Microsoft Dynamics CRM environment, take a look at my previous post that listed 10 tips for designing a great user experience in Dynamics CRM.

  • Dynamics CRM Platform Evolution Revisited

    Dynamics CRM Platform Evolution Revisited

    MVP_year_2_cakeIn celebration of receiving my second Microsoft Dynamics CRM MVP award today (thanks to the whole #MSDYNCRM community for your support!), I’m publishing an article series on the Microsoft Dynamics CRM 2013 Customization and the Platform Evolution.

    For the regular readers of my blog this title may sound eerily familiar, and you are correct. This is indeed a re-release of my earlier webcast topic that I presented in May for MSDynamicsWorld.com. I’ve previously shared the links to the live recording and the slide deck, but this time I decided to put it all down in writing. I had a huge pile of speaker notes, so I tidied them up a bit and published them as articles on this site.

    Why bother revisiting the same old story? Well, it all comes down to my own behavioral patterns and personal preferences. You see, even though there’s an ever increasing number of webcasts, podcasts and other forms of streaming content published these days on highly interesting topics and shared all over the social networks I hang out at, I very rarely find myself actually consuming any of that content. Jeffry van der Goot nicely captured the underlying issue in his recent tweet:

    Stop_the_videos

    Recordings of people presenting on a topic that they claim to be experts in just isn’t a very effective method of online knowledge sharing, if you ask me. Sure, you might be able to convey your message a lot more effectively with the help of audio and video, but the problem is that I, the audience, have a difficult time in assessing whether the content you’ve prepared really is worth my precious time (my precious free time in most of the occasions, I might add).

    It’s not just that all of us can read much faster than we can listen. It’s the avenue of opportunities that a piece of information receives when it’s put down in writing. The audience will be given the chance the glance at the content from a higher level, scan through for highlights that capture their attention and, most importantly, easily revisit any of the words transmitted in this form of communication. The content producer, the presenter of words, also gets to enjoy the same benefits when reviewing his or her own thoughts in a structured manner and designing the detailed message that is to be delivered. Last but not least, written content is infinitely more discoverable via the tools we all now turn to when in need of answers to our everyday questions – the mighty search engines.

    Now that I’ve explained the “why” behind the content strategy, it’s time to return back to the “what”. The Platform Evolution article series is about exploring some of the key themes that are shaping the process of how we can deliver customized business solutions on top of the Microsoft Dynamics CRM 2013 platform. The discussion is broken down into four parts:

    • Part 1: The History. Where does Dynamics CRM as a product originate from and how did we get to where we are now with the CRM 2013 version?
    • Part 2: Mobile Computing. How has the evolution of client devices affected the CRM platform and what should you know about the new client options?
    • Part 3: Customizing CRM Today. What is the difference between a traditional CRM system and a modern business application built to match the CRM 2013 design language?
    • Part 4:  Delivering Responsive Solutions. How could we optimize the user experience of our application without diving into the sea of custom code?

    Hope you find something of interest in these articles, but as said, they are there for you to conveniently scan through and judge for yourself. Because life’s just too short for sitting at your computer, watching long recordings that in the end didn’t quite deliver what you had expected.

  • CRM 2013 SP1: Case Creation and Routing – The Details

    In my previous post about the new functionality included in CRM 2013 SP1 / Spring ’14 release I laid out the big picture of how case creation and routing rules relate to cases and queues in Dynamics CRM. Now it’s time to take a more detailed look at how you would actually configure these rules to automate your case creation process. There are a few limitations that it’s good to be aware of before you jump into applying these new tools in your service management scenarios.

    Case Creation Rules

    As illustrated in the big picture of queue and case management in my previous article, Case Creation Rules are specific to a single queue. Also, you can only have one Case Creation Rule per queue – per channel. It is nevertheless a 1:N relationship between queues and rules, since a queue can have a Case Creation Rule both for email and social activities (the latter of which are not yet leveraged in this release). The Command Bar buttons on the updated queue form, labelled “Email To Case Settings” and “Social To Case Settings”, take you to the respective rule record.

    CRM2013SP1_queue_settings

    The Case Creation Rule form allows you to configure predefined conditions for case creation. Emails from unknown senders can be filtered away from case creation. Also the existence of a valid entitlement for the sender (contact) or the senders company (parent account) can be used as a filter. Finally, email related to an already resolved case can be set to generate a new case record, with a configurable “quarantine” time period. So, if you resolve a case today and the customer replies “thanks for your help”, this probably shouldn’t generate a new case, but a reply sent after 3 days to the same email thread might warrant opening up a whole new case record.

    CRM2013SP1_case_creation_rule

    That’s all the conditions you can apply for the automatic case creation. There’s an additional entity called Case Creation Rule Item that’s found in the “Specify Case Details” subgrid. What this feature allows you to do is specify a condition on the activity record (email or social activity) and set values for the newly created case’s fields. As an example, if the email subject contains word X, you could populate the case subject lookup field with value Y. So, you can’t use these Rule Items to determine whether a case will be created or not, but you can pass along some variables from the originating activity.

    CRM2013SP1_case_creation_rule_item

    The entity fields you can access in the Conditions box are limited to those directly related to the email (or social) activity. There is however one welcome exception and that is the Senders Account. This means that when the email is coming from a known contact, there’s a way to reach into the fields of the account related to the contact (related to the activity), to check variables like relationship status, customer category or other important pieces of information in a B2B service scenario. (more…)

  • CRM 2013 SP1: Case Creation and Routing – The Big Picture

    The latest Dynamics CRM Online Spring ’14 release is now rolling out to existing and new customers (starting from the US data centers) and the on-premises equivalent of CRM 2013 Service Pack 1 will soon follow is now available from MS Download Center (here’s the KB article for more details about SP1). The quickest way to check if your CRM Online organization is already updated to the latest release is on the About screen, accessible via the gear icon in the top right corner. If your version reads 6.1.0.575 (or 6.1.anything) then you’ve got the Spring ’14 release available and you can proceed to the Install Product Updates menu to enable the new features.

    CRM2013SP1_version

    This release, previously known by the codename “Leo”, focuses on enhancing the service management capabilities of Dynamics CRM. There’s a great “What’s New” page on CRM Customer Center that provides a detailed listing of the new features launched now, including an eBook of the changes in service management. Instead of repeating all of this information, I’ll try and provide an overview of how the features align with one another and specifically how they could be applied in real world scenarios for managing incoming service cases from customers.

    Enhancements in Case Creation and Queues

    I guess we’ll still need to first list the new options we need to be aware of when configuring the service module in CRM 2013 SP1 to handle emails and cases  via queues. First off, there is now support for server side synchronization of emails (and other activities) between CRM Online and Exchange Online, without having to use the old Email Router technology (no support for hybrid deployments, though). Then there’s a new feature called Case Creation Rule that allows you to automatically convert an email message or a social activity record placed in a queue into a new case record. Finally, we have Routing Rules that can be leveraged for moving items into queues.

    The following is my own interpretation of how these three areas are aligned in CRM 2013 Spring ´14 Update / Service Pack 1. The picture illustrates how an email message from the customer would flow through the system automatically based on the configuration of the aforementioned features. It also includes a few bullet points about the supported actions for each component. (Feel free to click on the image to view a bigger version that won’t stress your eyes so much.)

    CRM2013SP1_Queue_Case_Configuration_small

    When going through the Leo release features I found it a bit challenging to get a clear view of the logical order in which the different functional areas found under the new Service Management settings menu should be applied. Also the relationships between them and the restrictions imposed on the number of records was something I only learned through trial and error. Hopefully this illustration makes it easier to identify the roles of case creation rules and case routing rules in the new release.

    Rules vs. Workflows & Plugins

    Looking at the picture, someone who has previously configured Dynamics CRM to be used in an email, queue and case based support process will surely find many familiar actions from the list. At the end of the day, pretty much everything here has already been possible with previous CRM versions. With those you just needed to leverage the workflow engine in the CRM platform to configure the case creation and routing activities. So, what’s really new here and why has Microsoft built this into the latest product release?

    Behind the scenes, what the case creation and routing rules do is they create the workflow processes for you. This can be seen from the release documentation where the administrator of those rules is reminded about the requirement to have sufficient security roles for performing the corresponding actions via workflows. So, taking a very simplistic view, you could think of these new features available in the Service Management as a dedicated UI for configuring common process automation actions for customer service scenarios.

    There’s definitely value in having these new features available right inside the core product. In previous versions, it has been far from trivial to build the necessary functionality for frequently encountered requirements, such as “email to case”. Several ISV add-ons have been developed to deliver such functionality and system customizers have surely spent a ton of time pushing the CRM workflow editor to its limits in an effort to automate the common tasks that a service organization would need to perform when managing cases in Dynamics CRM. Now there’s a new standard way to implement these processes via a method that is fully supported by Microsoft, which in turn will lead to far more customers taking a serious look at these case management capabilities in their business application platform.

    CRM2013SP1_Service_Management_Settings

    It’s important to keep in mind that these new features don’t replace any of the existing CRM platform functionality. They offer a default method to configure common features, but they will not cover every possible scenario that you’ll come across in real life implementation scenarios. That means you can still use workflows and plugins to extend the process automation for service case management. For example, while a case creation rule provides the possibility to set an auto response email to be sent to the customer upon case creation, there’s nothing stopping you from doing this via familiar workflow process if more complex business logic is needed than what the new Service Management UI in CRM makes available.

    In the next blog post I will take a more detailed look at how the case creation and routing features can be leveraged in practice, so stay tuned!

  • Synchronization vs. Tracking: Understanding Activity Management Options in Dynamics CRM

    Synchronization vs. Tracking: Understanding Activity Management Options in Dynamics CRM

    Long before a company has any CRM system in place they will already have a bunch of customer facing activities like emails and appointments in the personal mailboxes and calendars of their employees. Once a CRM system is implemented, these activities will not magically disappear but rather they will continue to be a key element in how the customer relationships is managed on a practical, day-to-day level. Typically companies would like to have these communications stored in the CRM database to accumulate a better understanding of both which customers are being contacted by which representatives of the company as well as the detailed information of what’s been said and agreed with the customer in these acts of communication.

    CRM_2013_Activities

    Maintaining two separate systems for entering the same information is never an attractive option for information workers who just wish to stay on top of their daily agenda and commitments, without having to worry about keeping multiple calendars in sync manually. Rather than entering an appointment in your own calendar first, then entering the same data into your CRM system for activity tracking purposes, every single user would rather have the ability to promote their selected calendar entries related to customers into their CRM system for meeting the activity reporting requirements expected by their managers. Similarly, instead of copy-pasting information from their inbox onto forms in a CRM system, anyone presented with the option to click one button in their inbox and get the full message tracked into CRM would surely prefer to take this route.

    This has been one of the founding principles behind the design of Microsoft’s CRM system since day one. With the market dominance of Microsoft’s activity management related software both on the client (Outlook) and server side (Exchange), making the flow of this data across different systems as seamless as possible can be seen as a low hanging fruit to grab when entering the CRM market with the Dynamics product. Looking back, offering users the possibility of remaining within their familiar and personal Outlook inbox and tracking information into the organization-wide CRM database has been a very compelling user experience at best. Yes, regardless of the countless hours I’ve had to spend solving Outlook related issues during my professional career in CRM, I’m still perfectly willing to admit that this type of UX is definitely worthy of pursuing in a CRM product, because it’s simply how it should work.

    How Dynamics CRM actually tracks your data

    What most organizations planning to deploy Dynamics CRM often find surprising is that up until CRM 2013 there hasn’t been much functionality on the server side related to managing the flow of activities between different systems. Even though Microsoft owns both Outlook and Exchange, they have decided to build deep hooks only onto the client side of Outlook and not the server side of Exchange. The positive side of this is that you don’t necessarily need an Exchange server for leveraging most of the activity management features of Dynamics CRM. The downside has been that you very much need the CRM Outlook client in place for things to work as you’d expect.

    When it comes to sending and receiving email, the CRM Outlook client can act as the component that takes care of all the inbound and outbound emails for CRM. However, for any organization that needs to have emails flowing directly into CRM (such as a customer support email address that feeds items into a CRM support queue) or relies on workflow based email notifications to go out even when the Outlook client of an individual user is not connected to a network, the deployment of the Dynamics CRM Email Router has been in practice a compulsory step to take. Again, this component is independent of Exchange server and can be used also with other email systems via SMTP or POP3 connections. The Email Router can replace some of the email management features of the CRM Outlook client (but not all, we’ll get to that later) and basically “email enable” your Dynamics CRM server, so that it can independently communicate with the outside world via email.

    One thing to note is that even customers who’ve chosen CRM Online as their deployment model instead of deploying an on-premises Dynamics CRM server have needed to separately deploy the CRM Email Router if they wish to send/receive email from/to CRM Online without routing all of the messages via the individual Outlook clients of their CRM users. Microsoft doesn’t offer an “Email Router in the cloud”, so you’ll either need to have a local machine available for deploying the router (doesn’t even need to be a Windows Server, also client OS like Vista or Windows 7 are supported) or get a virtual machine from some hosting service, such as Windows Azure. You can leverage the Exchange Online service in your Office 365 subscription for the actual email delivery, but the CRM Email Router cannot be purchased as a service directly from Office 365.

    CRM_2013_Server-side_SyncWith the latest CRM 2013 release Microsoft has started to address these challenges of dependency on either client machine components (Outlook client) or on-premises servers (Email Router) by introducing a feature called Server-Side Synchronization. This allows the Dynamics CRM server to communicate directly with the Exchange server, effectively replacing the email sending and delivery features of the CRM Email Router. In addition to that, server-side sync can also handle other Exchange items like appointments, tasks and contacts, which can also now flow between the CRM database and the users’ calendars and address books on various devices without any central dependency on a client-side component like the CRM Outlook client.

    Great! CRM 2013 server-side sync solves all our problems! End of blog post! Well, not quite. We’re actually just getting to the reason why I’m writing this post, which is the surprising complexity behind understanding the detailed feature sets of the various components that aim to deliver the seamless one-click UX that I was talking about earlier on. Based on what we’ve discussed so far, here’s how the big picture of synchronization methods for CRM 2013 looks like:

    CRM_2013_Synchronization_Methods_small

    As is often the case, the devil is in the details, so let’s proceed with pointing out the “gotchas” that you need to be aware when planning on managing activities in a Dynamics CRM environment. (more…)