What more could be said about XrmToolBox that hasn’t already been posted online? The year is soon 2026 and XTB remains a critical part of Power Platform – built and maintained by the community.
One area where the long history of XrmToolBox reveals itself is in the user interface of the application itself. As well as the official website of xrmtoolbox.com that is built on a legacy version of Power Pages. Technically, all the information is there. In practice, the UX can be challenging – especially for newcomers to this ecosystem.
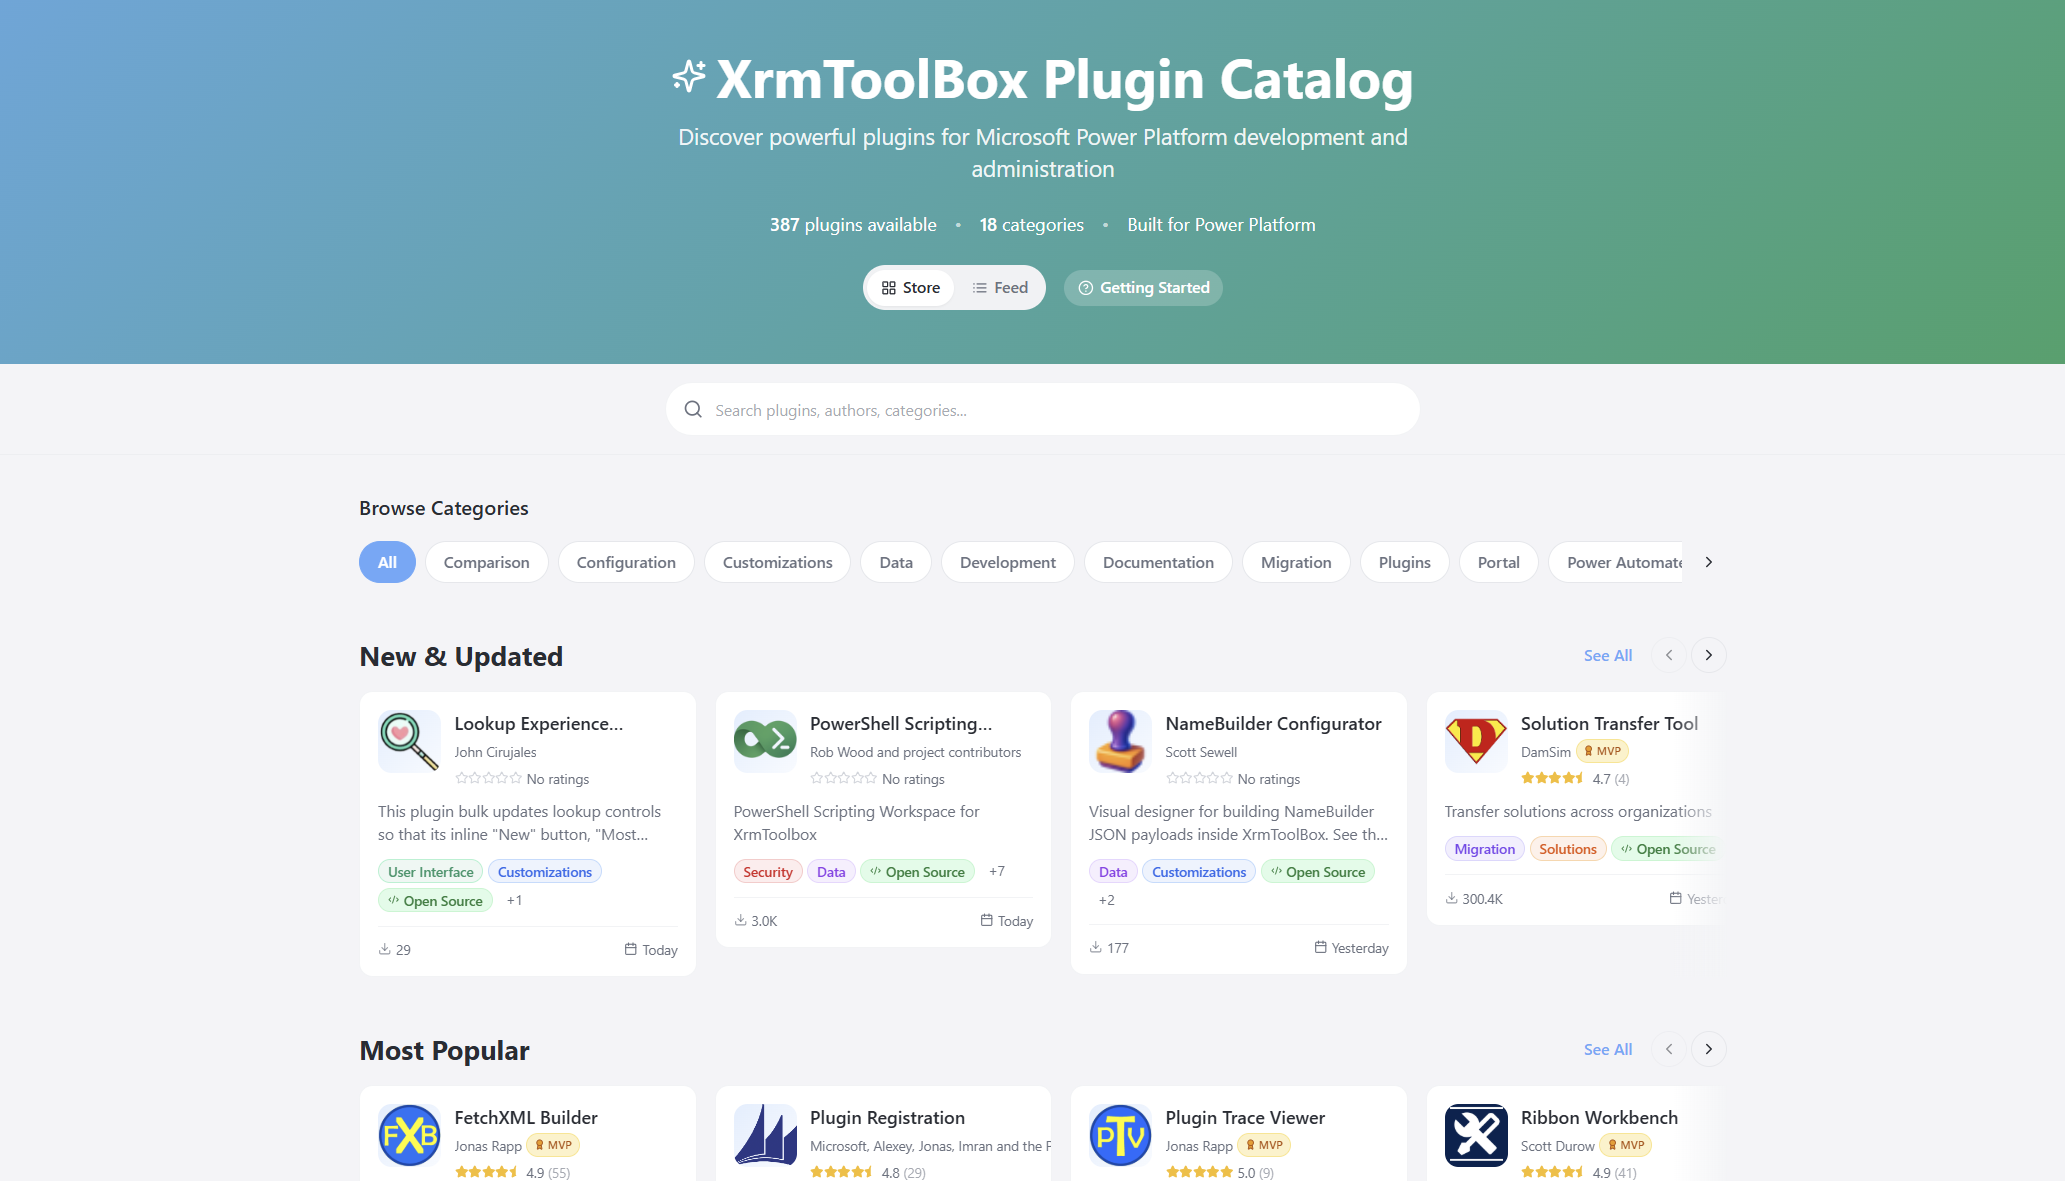
I wanted to see if I could do something about this. That’s how the XrmToolBox Plugin Catalog came to be:
The live site URL is xrm.jukkan.com. In short, it’s a vibe-coded website on top of the list of 387+ XrmToolBox plugins that have been developed and published by various community members. You can browse by category, search by name/description/author, see the latest release notes, discover more plugins from the same author, and so on. There’s even a short getting started section for those who are new to XrmToolBox.
It’s worth noting that there’s no new data used here. All the dynamic information comes from the official Power Pages site of XrmToolBox, via one daily data sync of the Plugins table rows in Dataverse. The XrmToolBox Plugin Catalog is hosted on GitHub pages and the data is pulled via an OData feed using GitHub Actions. So, both are running on acquired Microsoft technology (Power Pages comes from Adxstudio Portals, GitHub comes from… GitHub).
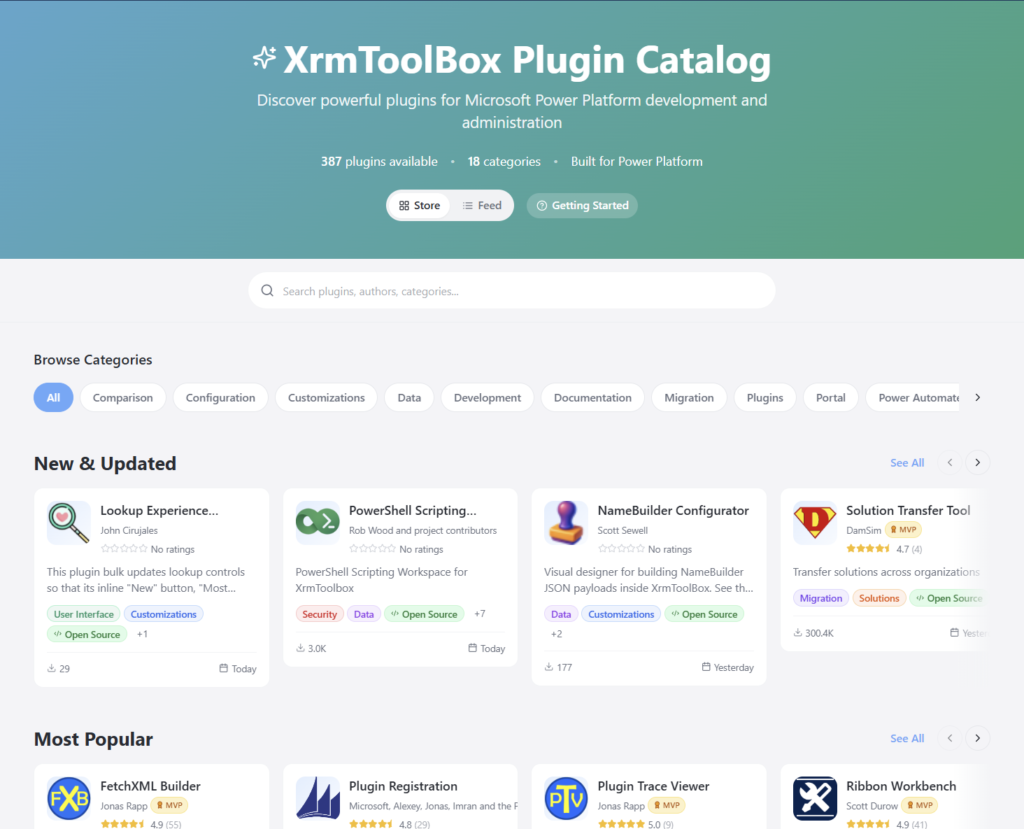
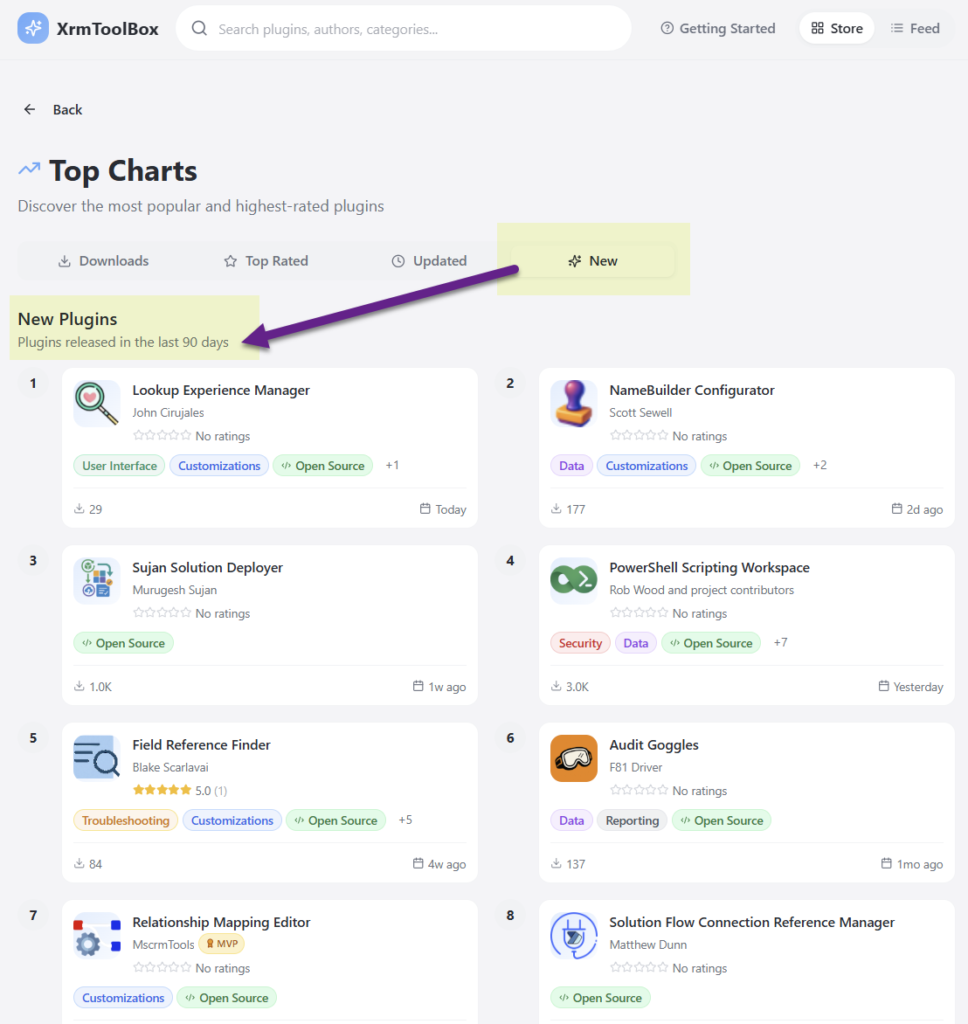
It’s just the same data, presented in a different way. Visually, it’s a React-based site that behaves like you’d expect a website to behave today. But it’s not just about rounded corner boxes and gradients. It’s also about prioritizing content in a way that serves the user better. Such as the Top Charts that allow anyone to check the recently added or updated XrmToolBox plugins from the past 90 days:
I wrote about the launch of XrmToolBox Plugin Catalog in a recent newsletter issue. I didn’t want to repeat myself, yet I was interested in seeing an alternative format for describing the “what”, “how” and “why” of this initaitive. So, I gave the text to Google NotebookLM and asked it to create a presentation out of it. I think it did a pretty nice job:
The site’s repo is on GitHub, obviously. You’re welcome to open an issue there if you encounter problems with the site or have ideas about improvements!
Oh, and don’t forget to support Tanguy Touzard and the makers of all the tools in the ‘Box. The Real Developers who have put in the hard work of writing all the code. Long before LLMs democratized code to such a level where I can today just prompt AI coding assistants and ask them to build pretty websites for me.
I wish I could start this post by “the first time I used Excel…” But that’s impossible since it feels like Excel has always been there. Not on my very first 386sx PC in the early 90s, no. Back then I was mostly doing games, music, and the occasional pre-internet discussions in different forums (my previous post is all about that). When I started my business studies and when I got my first job roles, though, Excel was just how things got done. A lot of things.
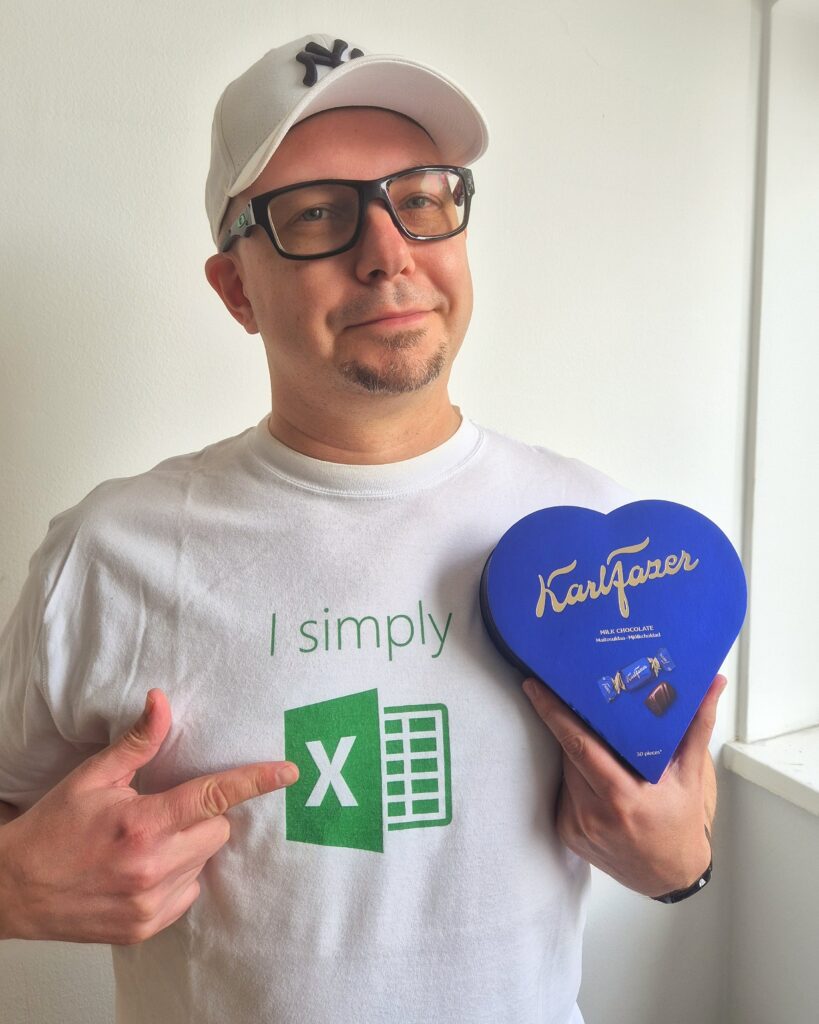
When I got the chance to visit Redmond for the first time as part of the Microsoft MVP Summit, of course I bought a souvenir from the Microsoft company store that was about Excel. Today, I’m still extremely happy to wear this beautiful shirt:
The significance of Microsoft Excel and spreadsheet software in general can hardly be overstated. It is truly the nr. 1 business app. Many people could easily do without the other MS Office products, replacing them with Google’s apps or whatever modern tools have emerged in the past couple of decades. But Excel? So many folks would simply hate having to use anything else.
Why is Excel so unbeatable? Why do so many companies try to fight it nevertheless? Let’s reflect on that.
Trying to fight Excel
I started working with customer data analytics and direct marketing at the turn of the millennium. Back in 2000, there was no SaaS. Instead, companies invested in server software and hardware to do things that today’s Excel workbooks with 1 million row limit could easily handle. This scarcity of apps also meant that everything which did not have a dedicated server + client combo in place was done with Excel.
The Holy Grail of “Customer 360” required a central database for customer information, which meant years/decades of trying to migrate the Excel-based business processes into CRM systems. At the start of such a journey, everyone was quick to agree that “yeah, this thing shouldn’t really be in Excel workbooks”. Once a system was in place, however, the question turned to “can I export this info into Excel?”
“In the analytics industry there is a standing joke that “Export to Excel” is the most used feature of any analytics software.”
Why do people want to go back to the world of spreadsheet after they have deployed a purpose built business application for the data in question? Because FREEDOM!!!
Sure, the apps that are designed for specific business processes can give readymade views into the data that you can open with a click. They usually also offer automation that could perform actions like data updates, notifications, summaries, integration, and all sorts of tasks that would be much more laborious when working with spreadsheets.
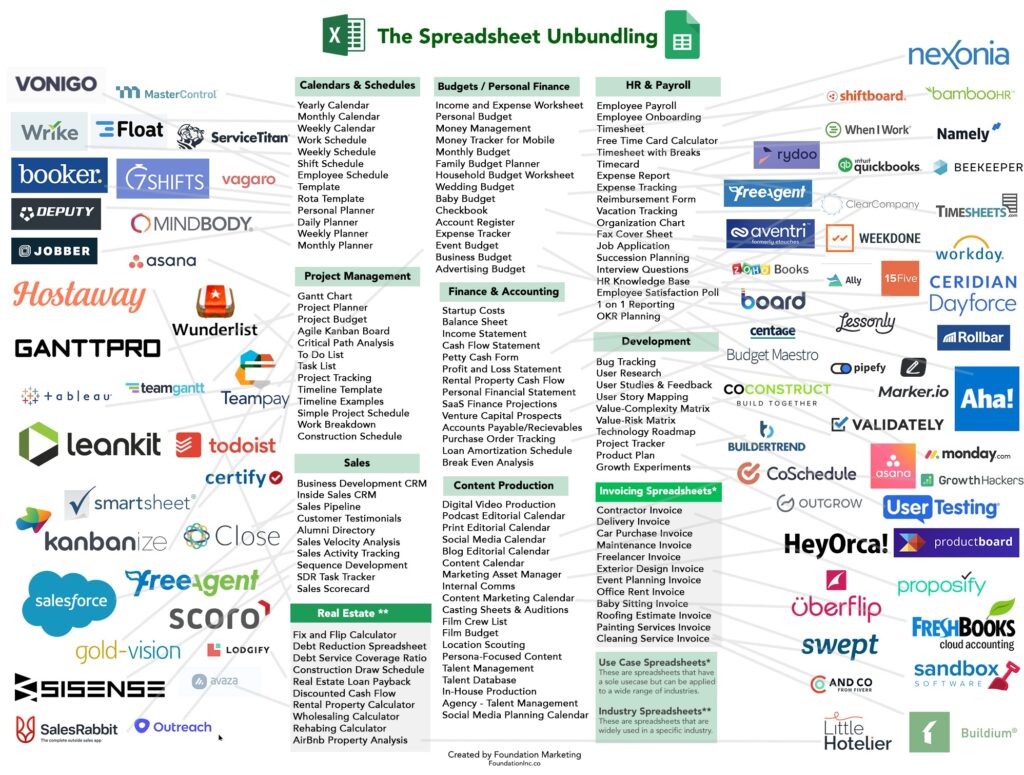
It all sounds incredibly useful, especially before you have any such apps in place. The idea of being able to rely on a tool from developers that have already figured out what you’d want the computer to do is just beautiful. Everybody wants to spend less time thinking about “how do I do this” and would rather have “an app for that”. This has given birth to countless SaaS solutions that are simply unbundling Excel spreadsheets into dedicated apps:
And yet none of the apps can escape the “I wish this worked like Excel” request from the users. Inevitably there will come a time when either the features of the app feel like a constraint that gets in the way – or the users just can’t figure out the intended process of how to do things in this specific, unique application that they’ve not used for this purpose before.
Why Excel rocks
For a business applications guy like me, it’s natural to see a process managed with Excel and immediately jump into thinking what data models, interfaces, automations and integrations could be put in place to make everything more efficient. Starting from CRM, the assignments I have been given usually always include the “M” – managing things. Not just for a single PC user but for a group of users, sometimes spanning to thousands of individuals.
Business apps with a clear separation of the server-side database and logic from the client-side UI are indeed a better way to managing things involving many users. Yet we often forget that it’s not enough to cover 80% of the tasks with built-in features of our slick, modern web apps. The employees who are in charge of end-to-end processes must complete 100% of what their role requires. If our minimum viable product doesn’t have complete coverage, the users need to figure out a way to get the remaining work done.
That’s where Excel is the hero. It adapts to the needs of the user unlike anything else available to typical information workers. Whereas Word documents are often just digital versions of paper docs, Excel introduces dimensions not found from the physical office tools. Its UI invites the users to model their problem domain in a 2D digital canvas – much like a box of Legos will invite kids (and grown ups) to build abstract plastic versions of real-world things.
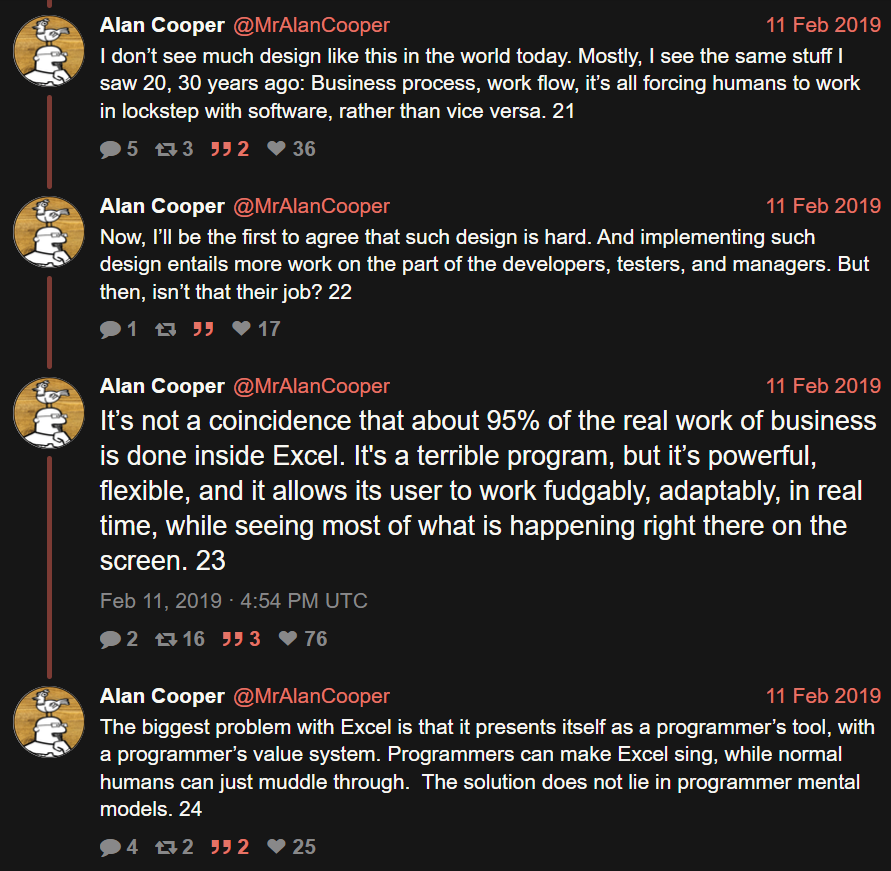
Mr. Alan Cooper, the father of Visual Basic, calls this the fudgability of software. “[Excel is] a terrible program, but it’s powerful, flexible, and it allows its users to work fudgably, adaptably, in real time, while seeing most of what is happening right there on the screen.”
Sometimes we need rigidity in business processes. We want to have repeatable outcomes that aren’t different based on who is operating the tools, or where & when. Business apps are excellent for facilitating a common way of working. At the same time, we must remember that a significant portion of information work consists of ad-hoc requirements and fuzzy processes adapting to incomplete data.
That’s when we rely on the humans to understand what should be done. They, in turn, will rely on available tools that allow them to tackle data processing needs without unnecessary limitations. Meaning spreadsheets in most cases. Yeah, I wish more people were able to turn those repeatedly used Excel sheets into low-code solutions with Power Platform tools, yet that’s a bit too much to ask from individual workers most of the time. Most often, Excel is just a better fit.
LLMs only wish they could be like Excel
AI is supposedly eating the software world. It certainly is eating all of the available capital (and more) in trying to turn computers that used to be reliable into something that’s… not. The advantages of having the computer understand natural language and being able to respond to any question are of course huge. If only there wasn’t that minor inconvenience that we can’t know if the response is correct or not.
The area where creativity and conceptual problem solving could be very useful is in designing how to get from an Excel into an app. I’m optimistic about the LLM-based Maker features accelerating and expanding the possible Power Platform solutions that can be built for varying types of business problems. If we don’t expect AI to work the same way every time, but rather use it as a force multiplier for fudgability, the risks of hallucinations breaking the business processes should be much lower.
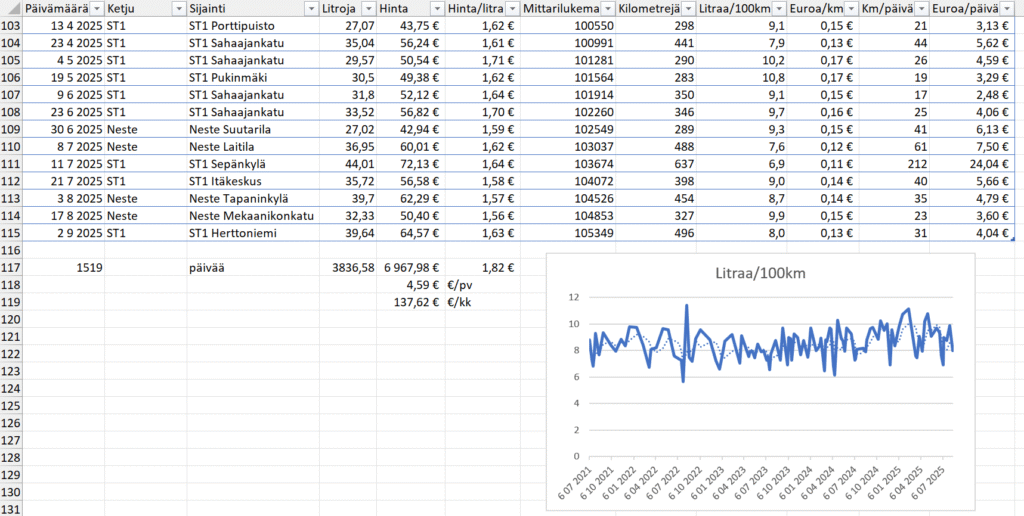
Let’s look at one case where I’d like to see AI replace Excel in my personal life. For 4 years now, I’ve been tracking the expenses related to my car using an Excel workbook. Fuel amount, cost, mileage are an example of what I’ve entered there after every visit to the gas station:
Many, many times, I’ve thought to myself “I should turn this into an app”. After all, what kind of a Power Platform evangelist would just keep working on an Excel file for years without modernizing the process? Yet whenever I started to think about the details of what should be there to replicate everything my workbook provides (there are other sheets there, too), I realized it’s a heck of a lot of work to achieve parity with what Excel gives me. No rational reason ever existed for me to put in all the work to achieve something that I’d be happier using. It could have been a community demo, sure, but I always had other stuff to work on.
Now, when we are living in the age of agentic AI, surely it’s about time to replace the Excel? Well, if I could just give that file to an AI tool and make the machine modernize it for me, why not. Last week, when Lovable announced their file uploads feature and claimed “you can now drop files directly into Lovable and turn them into apps and websites”, I decided to try it out. Sure enough, the vibe-coding tool was able to generate a web app from the .xlsx file:
The only problem? The data is not correct. Like, I only wish my 2019 Ford Focus 1.5 EcoBoost was able to run 100 km on 0.8L… In reality, the React app generated by Lovable was not able to handle the “big data” of around 200+ lines of data in the Excel workbook and instead chose to read only parts of it. The AI chatbot of course will claim this app has “real calculations from your Excel”, but we all should know at this point how LLMs are just manipulation machines that you shouldn’t spend time arguing with.
I never have to worry if Excel is trying to manipulate me. It may not always understand what I’m trying to do, yet the machine never pretends that it did the work it promised to do while giving out a bogus number instead. The math is not based on vibes. Today, we have LLM-based AI features inside our spreadsheets that are sometimes able to call deterministic tools like Python to do real calculations. But we have no certainty that AI would always resort to such tools when needed, instead of just making shit up.
That doesn’t stop companies from trying to make AI in Excel work. OpenAI has funded startups like Endex that develop Excel add-ins for injecting LLM magic into spreadsheets. Microsoft is also aiming beyond Excel Copilot with their recent preview launch of Agent Mode in Excel. Could these tools already replace a financial analyst creating Excel workbooks with formulas and business metrics? I decided to give Agent Mode a try on the day it came out:
You can check out the experience and end results from the video. In short: Excel Agent Mode ain’t necessarily a tool you should yet rely on…
If you can’t beat them, join them
Instead of seeing Excel as something that should be replaced, perhaps a better strategy is trying to accept the fact that Excel files will always exist. Because people want to experience the control that Excel gives them, instead of limiting themselves to the GUI prison of your business app. Similarly, they’d prefer if the numbers that get shown to them would be based on verifiable math rather than on-demand hallucinations of “vibe working” tools.
I’m somewhat biased here because this is the route we have taken when building FinModeler. A SaaS application that helps business founders or financial advisors to create detailed financial models with its simple web-based wizard UI. And then, producing an Excel workbook for you, complete with dynamic formulas that allow you to adjust the model with the tool you know and love.
It’s not your typical product built on Power Platform. Not simply because of the full-fidelity Excel workbook generator feature. But rather the whole SaaS delivery model of offering a canvas app that requires zero installation differs from the expected way of partners shipping products on Microsoft’s low-code platform. In many ways, this is not how business apps are supposed to work – but we’ve done it anyway!
Today, anyone can check out how this combination of Power Platform + Excel works in practice by signing up for a free 14d trial of the FinModeler app. There’s a lot more that we can do in future versions of the product, besides just creating extensive Excel workbooks. The fact that the financial model data is stored in a structured Dataverse database is a much better position to build new features than if we’d need to rely on Excel files alone. Still, it’s essential that the users have the possibility to interact with the model that offers them the ultimate level of control and confidence.
Spreadsheets are forever
The moral of the story is: it’s not either/or. We are all better off when there are different types of tools available for working with business data and processes. Both structured apps and fudgable spreadsheets serve a clear purpose. Similarly, we have room for both deterministic, reliable software as well as creative and unpredictable AI. Trying to force people into choosing just one tool never works.
Recent estimates say Excel is used by over a billion human users. In the near future, there will be countless AI agents built that will also try their best to learn how to work with Excel spreadsheets. What I’ve learned is that while you can (and often should) go beyond spreadsheets to evolve and improve your processes, it’s foolish to think that you could replace Excel entirely. Turn it around instead and think of all the data manipulation and calculation features you don’t have to build into your own software, thanks to Excel being there to handle it with ease.
After 25 years of working professionally in the field of customer data and business applications, I’m proud to once again add a sticker onto my laptop that celebrates the magical powers of Excel:
When you’re starting to use a brand new computer or phone, usually one of the first things you’re presented with are these questions:
What language do you want me to speak?
Where are you located?
This allows the device to understand not just the preferred UI language and your physical location. It also enables it to make educated guesses on:
Which formats make sense to you for number, date and time fields.
What time zone you are living in.
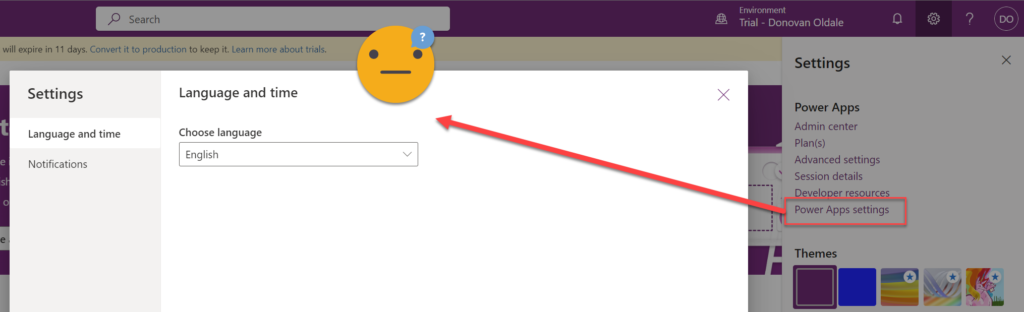
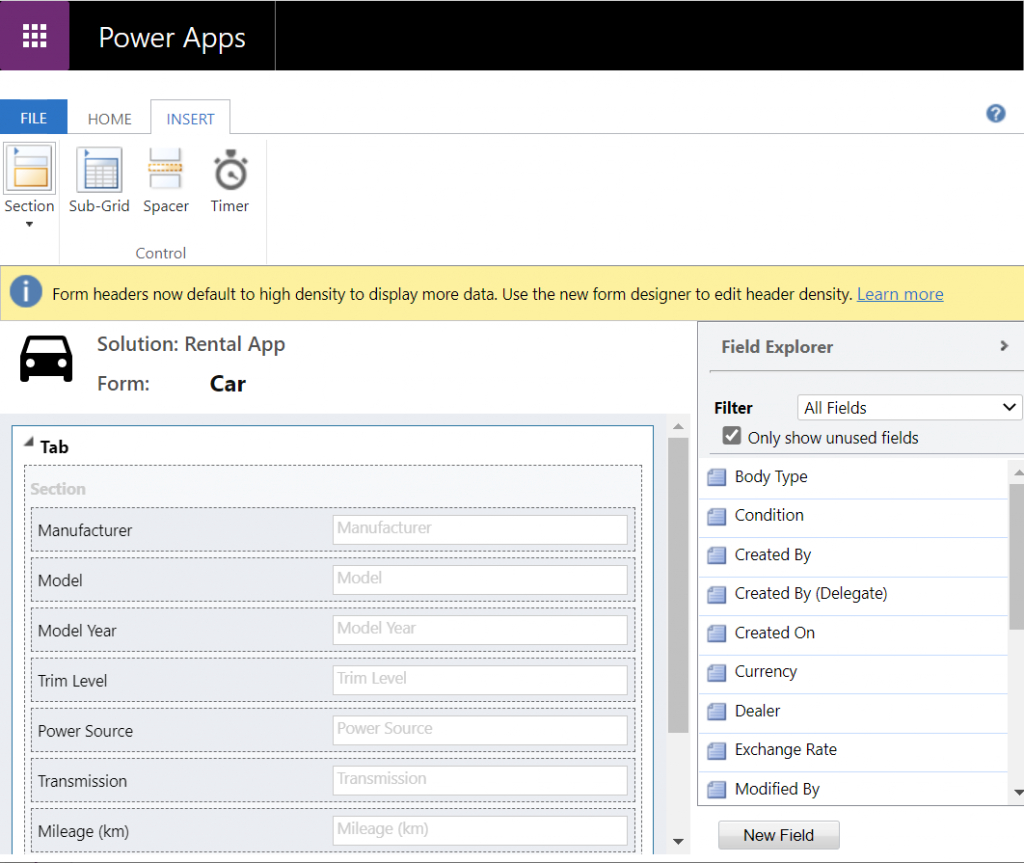
Now, let’s move from devices to software, namely model-driven Power Apps. Do you recall seeing similar onboarding prompts when starting to use (or build) apps? Nope, Microsoft doesn’t ask such questions.
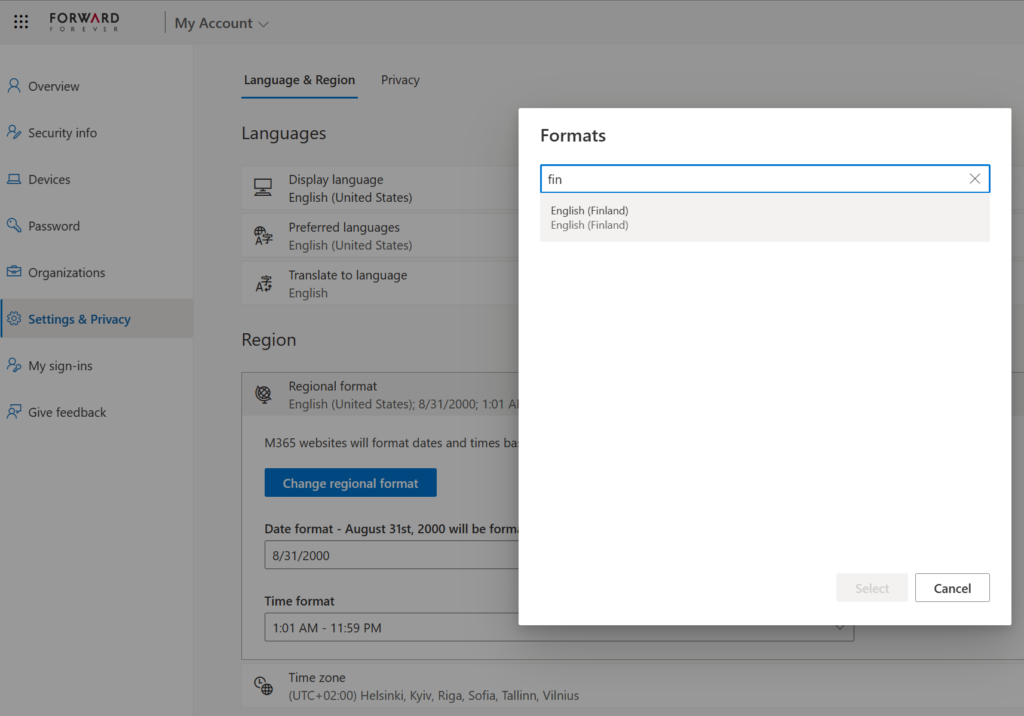
“I guess they already have that information and are automatically setting things up the way I want them.” Yeah, you might think so. That’s a false assumption, unfortunately. Changing your Microsoft 365 account settings for your tenant isn’t going to get synchronized down to the business applications used in the MS cloud. Meaning, this selector here has no impact on the apps that live in Power Platform environments:
Power Apps canvas apps follow the regional settings from the user’s browser. This can lead to confusion as well, but at least the field formats should be something the users encounter on other websites. In canvas apps there is also the ability for the app maker to force specific locale settings per each control in the app UI. See examples in this article.
Model-driven Power Apps include Dynamics 365 apps from the CRM side. I would guess that for a sizable share of model-driven Power Apps users their settings are likely to be at least partially incorrect. What’s worse is:
Fixing them is quite unintuitive.
Admins can’t do much to help users with this.
In this post I will explain the parts of the Power Platform user settings management story that are broken today. My intention is to spread awareness on issues that many app makers and admins may have ignored, and which their app end users may be suffering from.
In a follow-up post I’ll provide an example of a solution that could make life easier for everyone who uses, deploys or administers Power Apps.
First: blame CRM
There are many great benefits that Power Apps has gained from being merged into another Microsoft platform that first saw the light of day as Dynamics CRM (well, “Microsoft CRM”, to be precise). User settings management is not one of them, unfortunately.
The user settings functionality probably served its purpose back in the on-premises days of CRM servers. Today, this legacy from around two decades ago creates some incomprehensible experiences for an audience many times the size of that which ever interacted with Dynamics CRM.
Power Apps, be it canvas or model-driven apps, live inside Power Platform environments. It is becoming a standard feature that such environments include a Dataverse database. This is essentially what one CRM database was back in the days. Today, larger tenants may easily have hundreds of such database instances.
Dataverse hosts many essential parts of Microsoft’s low-code platform. It provides the solution framework for moving apps and related components across dev-test-prod environments, for example.
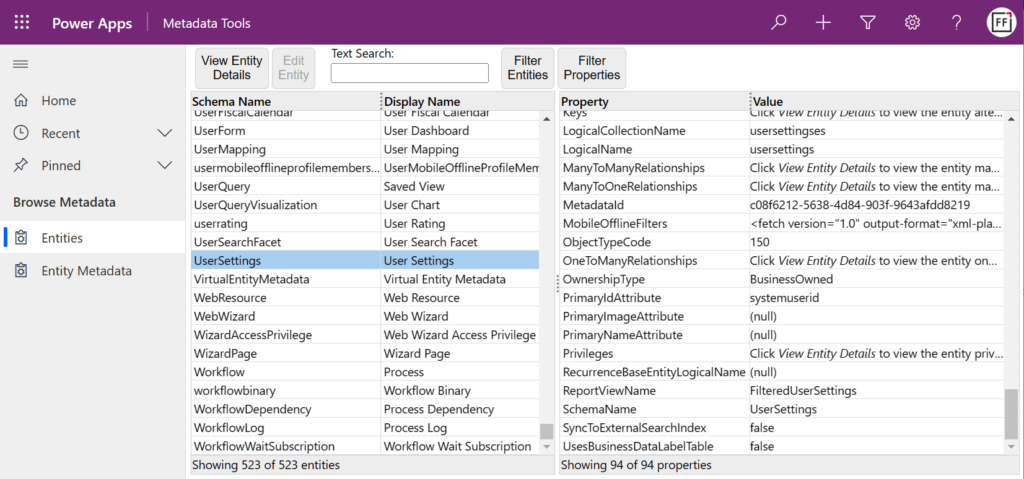
There are hundreds of tables (previously “entities”) in the standard schema, with some being meant for storing business data and others for data needed by the system itself. The User Settings table is what the topic of this blog post revolves around.
Each to their own (format)
When your app is connecting to tables in Dataverse and presenting it to the user, the decision of the number, currency, date and time field formats is made on the server side. It defines whether your app UI shows “one million dollars” as:
$1,000,000.00
1 000 000,00 $
$1.000.000,00
Or any other variation. The place and purpose of dots, commas, spaces, currency symbols depends on what the format has been set to on the database side. For each user account.
That’s the important part: it’s not a global setting of the database/environment. Every user may see different things. We are all different as human beings, and it’s a wonderful feature for the system to reflect that as well.
Us humans are also wonderful in our abilities to interpret what the format being used by the system might be. All the three examples above would say “one million dollars” to most people, even if only one format is the official sequence of strings used in whichever region they live in.
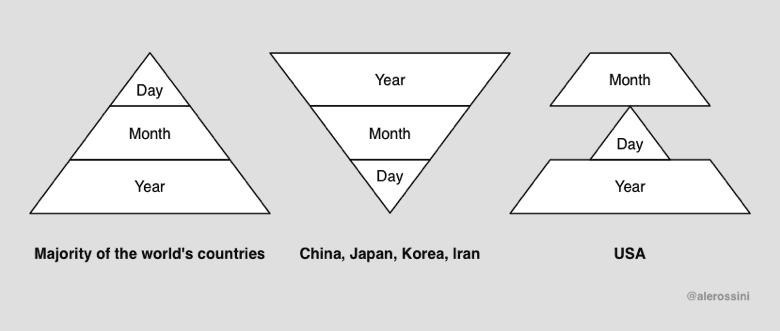
With dates, it can be a bigger struggle. Today when writing this blog post, the date is 2/3/2023 – for some part of the world. If you come from the land of Microsoft, it means February 3rd. For basically everyone outside the US, it would mean March 2nd (which is the correct value here). ISO 8601 would be the best format from a logic perspective, yet for some reason 2023-03-02 hasn’t become the norm. Oh well.
We may be able to guess the right date format based on context. Where it gets really dangerous, though, is with time zones. They are invisible to the app user and you’ll have no way to know whether you’re seeing the correct value in any date field of the app.
Why’s that? Because dates in Dataverse are often stored in date and time columns. This means that while the clock on my PC currently says “2023-03-02 21:10”, the user looking at a record in Power Apps may see:
2023-03-02, or
2023-03-03
In Finland it’s March 2nd, but in India it’s already March 3rd. Not only is the value that’s shown to the user determined based on their time zone setting. It also affects the value that is written to the database when the said user enters new/updated data.
There are ways to get around this dilemma, using Date Only or Time-Zone Independent columns in Dataverse. That’s not going to help the app end user, though, since A) the column type it’s not visible to them nor B) configurable for their preferences.
One classic gotcha of the time zone settings is that they affect all user accounts – also calls made via the API instead of the UI. If you’re writing integrations to or code running inside Dataverse, you’ll need to dig a lot deeper into the topic than the shovel that I can give you is good for. Head towards a blog like Scott Durow’s and learn from the master.
Setting the user’s own settings
Now that we’ve established that user settings like time zone and field format are very important things, let’s look at how a user can make sure that they are indeed set correctly.
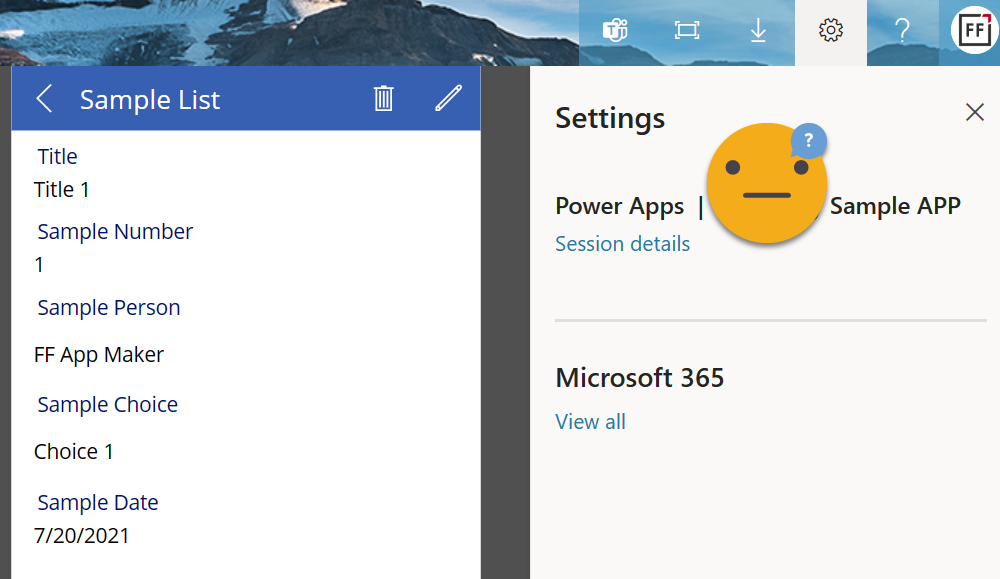
Say you’re using a Power Apps canvas app and want to check your user settings. Where do you click in the app? That’s the neat part: you don’t. Even if you have the Power Apps navigation bar visible (which might have been hidden intentionally), none of the menu options give you access to the user settings used by the app.
OK, let’s assume that you have been granted maker level access to the environment hosting this app (end users often will not have this option). We go to the Maker portal on make.powerapps.com and click around the similar cogwheels.
From under “Power Apps settings” we get to a promising menu dialog that has a “language and time” tab. Unfortunately, there’s nothing related to time in there. Furthermore, we’re not looking to change our language settings, rather the regional format.
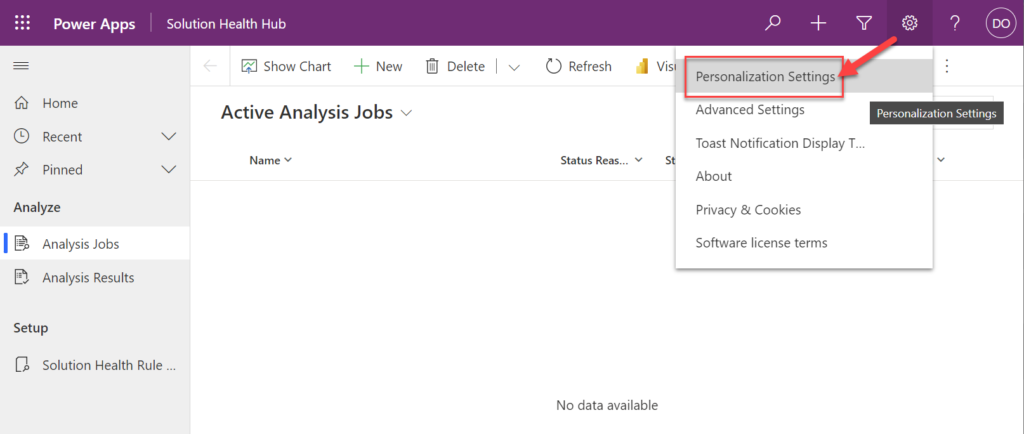
Most people will have already given up at this point. Yet if you’re not afraid to click on obscure menu options, you might find a model-driven app in the same environment. Like the omnipresent Solution Health Hub that Microsoft wants to provision everywhere without asking for permission. This time we’re actually lucky to have it as the only model-driven app in our environment.
Let’s open it up. Don’t worry about that “Active Analysis Jobs” view that opens by default, no one understand what these things are about. What we’re really hunting for is cogwheels and we luckily do discover a new one, in the exact same place as the earlier ones. This opens with a promising menu option: “personalization settings”.
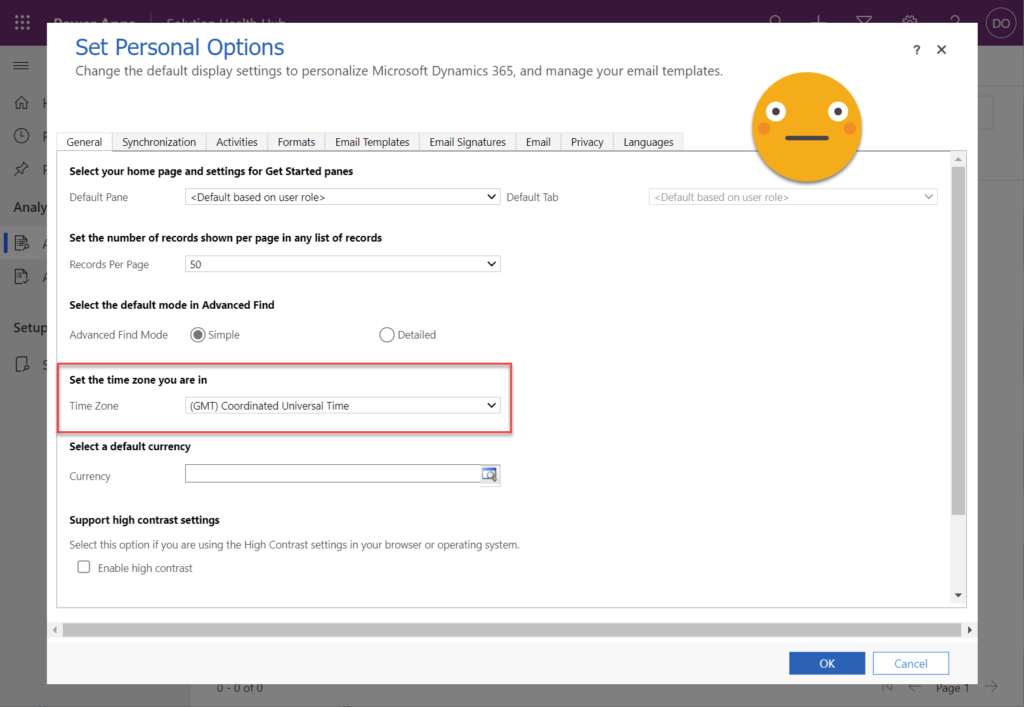
“NOOO!!! MY EYES!!! WHAT IS THIS THING?!?!?” No, don’t panic. You’re in the right place – even though it looks like nothing you’ve encountered in Microsoft 365 apps. What we have here is the classic Dynamics CRM web client UI presented inside a modal dialog window of the Unified Interface. Yes, it reads “Dynamics 365” everywhere but trust me, this is part of Power Apps.
On the General tab you’ll find the Time Zone dropdown menu. If it reads something else than you expected, change the value now. Then hop over to the Formats tab and do the same check/change for the Current Format field.
Click OK. Close the window. Take a deep breath. You made it.
Just don’t forget what exactly you did to get to the user settings screen. Because these settings are environment specific. The next time an internal app is deployed in your organization, it may well be hosted inside a different Power Platform environment. With user settings that are completely independent from the ones you just updated.
“As an administrator, I want to end the pain…”
Given how many potential blockers there are for a Power Apps end user to ever discover nor even be allowed to navigate to the user settings screen, this is something the Power Platform administrators should definitely look into. Is there a way to change the settings on behalf of another user?
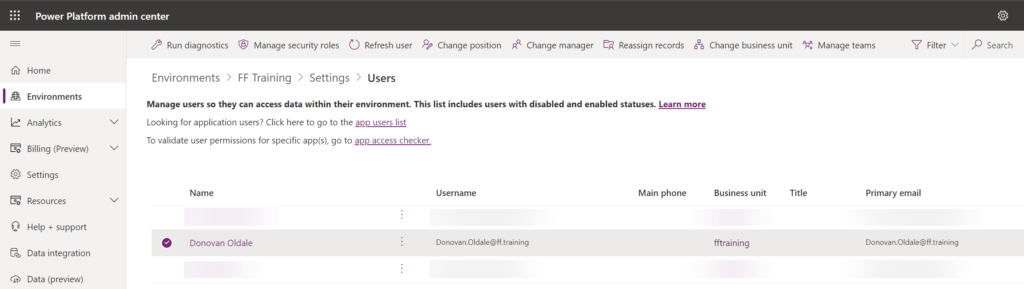
Let’s find out. We’ll go to PPAC (Power Platform Admin Center) and navigate to the environment. From the Users list we open up one user account and study the options available.
We see a nice flyout menu that resembles Microsoft 365 admin center experience in many ways. Unfortunately it doesn’t contain anything related to time zone or format settings. Behind the three dots, there’s a “Manage user in Dynamics 365” option. By now we’ve already become aware of how broadly Power Platform relies on things that say “Dynamics” so we know we probably have to click on it.
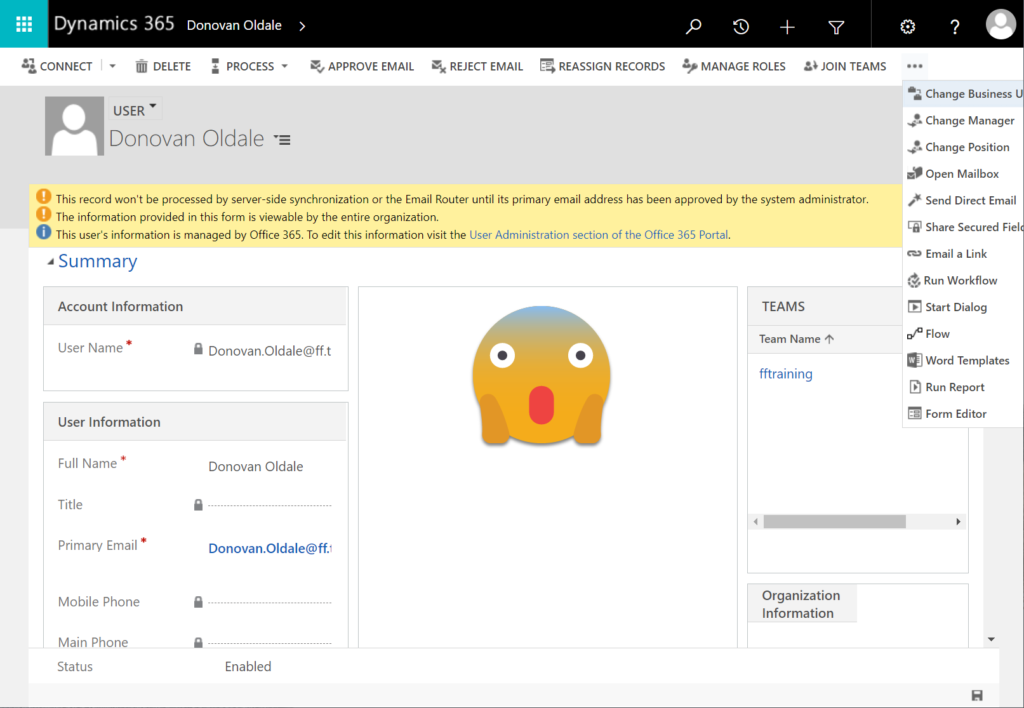
The initial loading of the page may take a few seconds/minutes/weeks, but once it opens up we see… OH DEAR LORD!!! Not only did we move to Dynamics 365, we actually travelled back in time into CRM 2013 user interface.
We’re presented with notification banners shouting scary things at us. We have a form that contains fields, grids and feeds that seem to be design to just confuse us. We have an endless menu bar with options like “reject email” (wouldn’t we all want to reject it?) and “change position” (would fetal position be a good option right now?).
What we don’t have is access to any of the user settings. This is by design. Sure, no one said it’s a good design, but it is what it is. The answer to our original question is: there is no out-of-the-box option for system administrators to change user level settings on behalf of another user.
It’s design like this that has given inspiration to a countless number of community tools, many of which are available in XrmToolBox. If you need to administer Power Apps that have any dependencies to Dataverse, the first thing on your To Do list should be installing this software on your local PC.
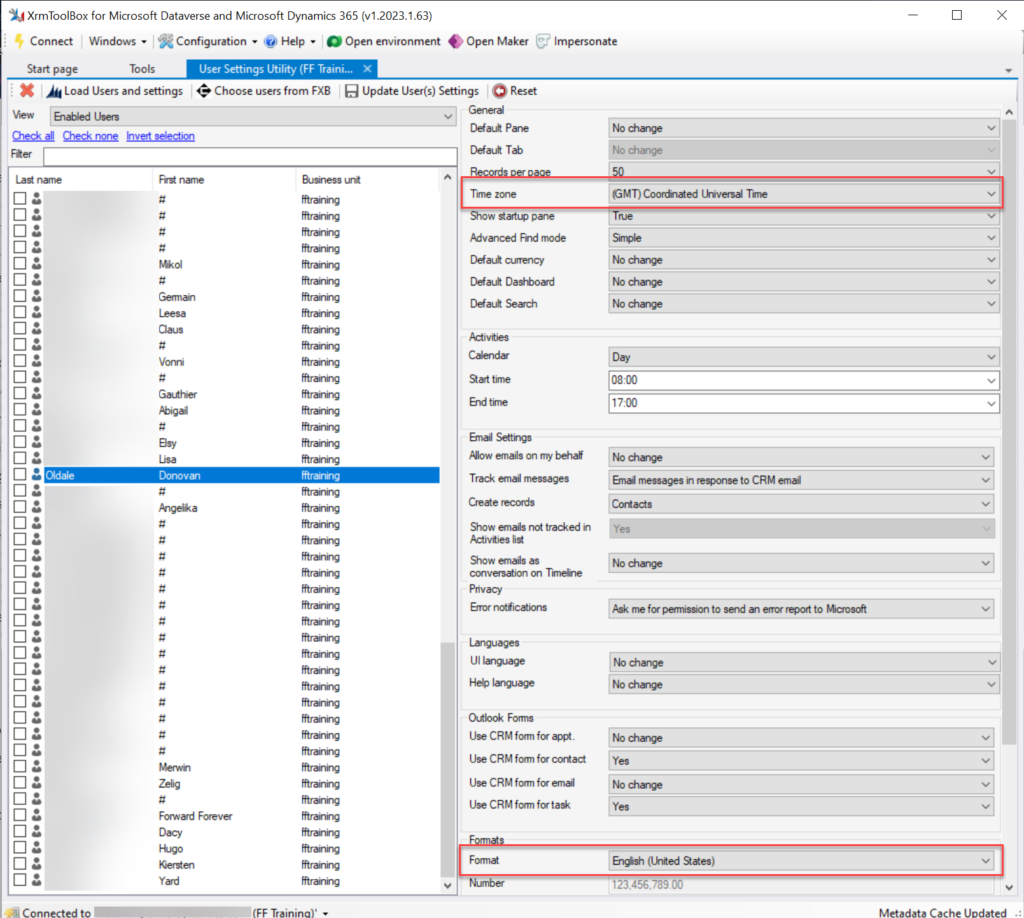
XrmToolBox User Settings Utility is the plugin you’ll want to reach for in the toolbox. Once you establish a connection to a Power Platform environment (always choose the “Microsoft Login Control” option, btw), you can click “load users and settings” to see every user account in the environment. Select one of them to check the current values.
Not only can you modify the settings (time zone, format and many more) for another user. You can also do this in bulk for all selected users. “Woohoo! Now the settings are fixed!”
Until the next user comes along. Or you have a new Power Platform environment that needs equal treatment. Again and again. Being a desktop application, you unfortunately can’t automate the actions that XrmToolBox does. Well, unless you go crazy with Power Automate desktop and build an RPA bot for this…
Is there any better way?
The bright side of having the user settings data stored in a Dataverse table is that we are empowered to use the platform’s tools to build user interfaces and automations for managing it. With low-code.
I have come across a few blog post with examples of how to use Power Automate cloud flows and/or Power Apps canvas apps to update the user settings. For example, my colleague at Forward Forever, MVP Timo Pertilä, recently wrote an article about how to set the number formatting for model-driven Power Apps (auto-translated from Finnish).
As it just so happens, I had also started exploring these possibilities at the exact same time as Timo. My approach is a bit different, since the goal was to resolve the issue not just on a single environment level. So, I’ve created a tool that allows any user to go and update their own settings across multiple environments. Stay tuned for my next blog post where I present the solution.
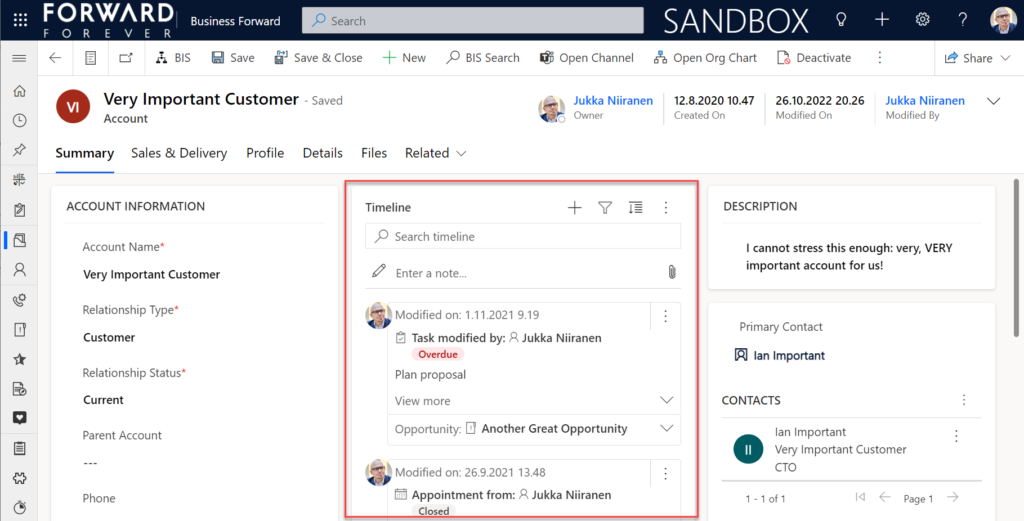
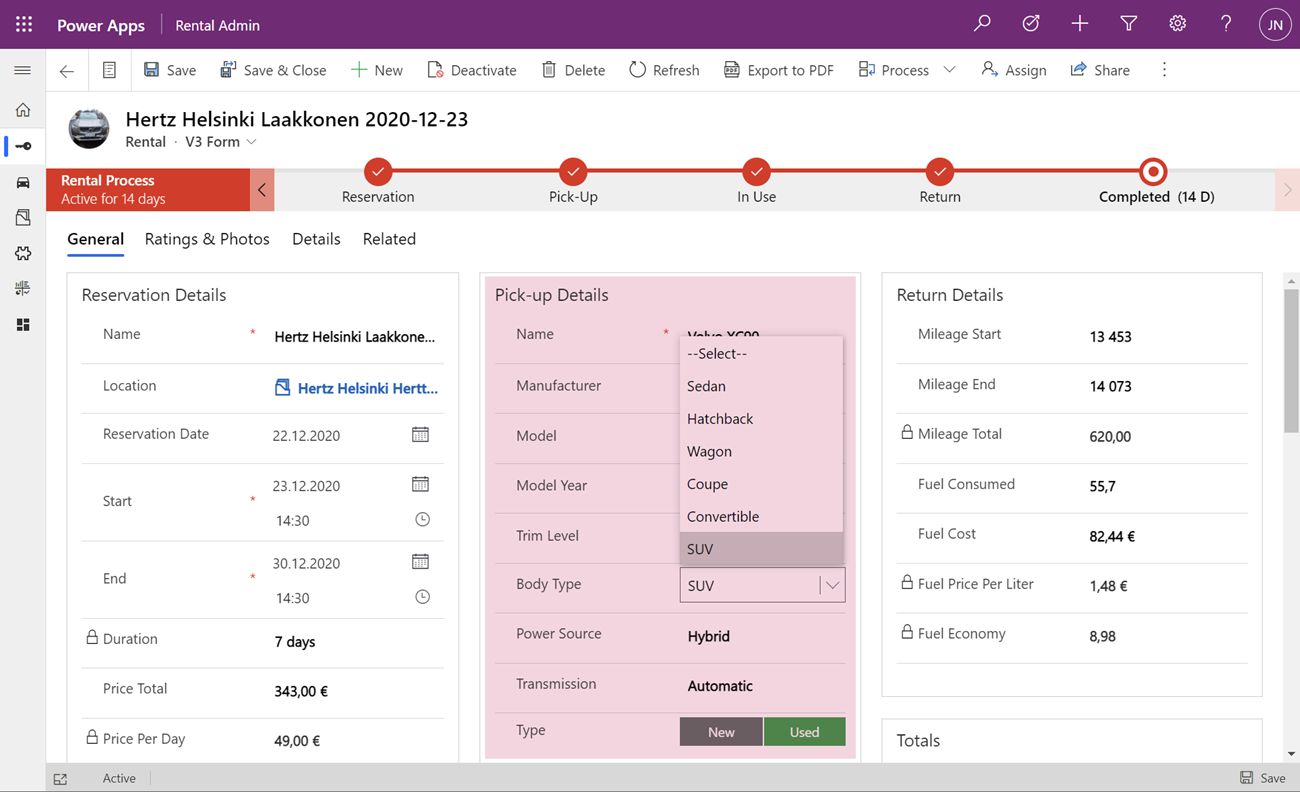
In the default form components arrangement for tables in model-driven Power Apps or Dynamics 365 CE apps, the Timeline is usually front and center. This makes perfecet sense. Scenarios that revolve around accounts and contacts typically include the need to show activities and notes related to these records.
Compared to how things used to be just a few years ago, meaning mostly hard coded, we now have an amazing amount of configuration options for the Timeline control. This is reflected in the MS Learn article “set up the Timeline control” which has an estimated reading time of 32 minutes! And that’s just the “how” part of official documentation, not the “why” that you’ll learn as the settings are applied in real world business application context.
This blog post is my attempt to highlight the recent, most useful features that the modern Timeline form component enables for improving the user experience of your model-driven apps.
Rolling up the notes
The one huge feature that 2022 Release Wave 2 has delivered for model-driven Power Apps has been buried deep into the release plan. It seems almost like an intentional “let’s hope no one notices this” move since the feature is listed under Dynamics 365 Customer Service and called “Improve agent productivity with timeline enhancements”:
“Notes that work like other activities and roll up on contact, account, and opportunity form timelines.“
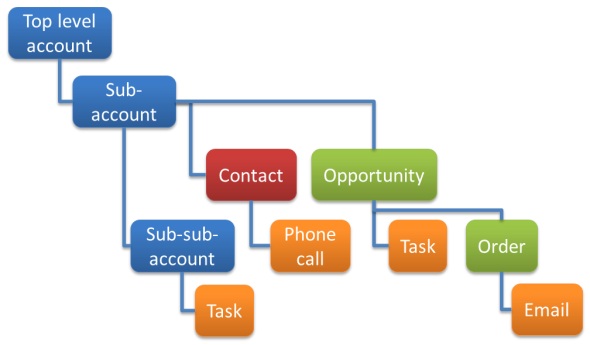
Woohoo! We’ve been waiting for this feature close to 2 decades already! If you haven’t experienced the Dynamics CRM era, then the significance of the rollup capability in the platform may not be immediately obvious. I won’t go deep into it now, instead I’ll dig up an illustration that I created 11 years ago for a blog post I wrote about the native activities associated views vs. form subgrids:
Unlike other standard or custom tables in Dataverse, activities have one superpower: they can be shown not just from the directly related child records but also rolled up from deeper in the hierarchy across many different record types (tables, entities, you pick the terminology). This means that in the account Timeline you’re able to see tasks, phone calls, emails, appointments that are set regarding a child record, like an opportunity where that account is the potential customer.
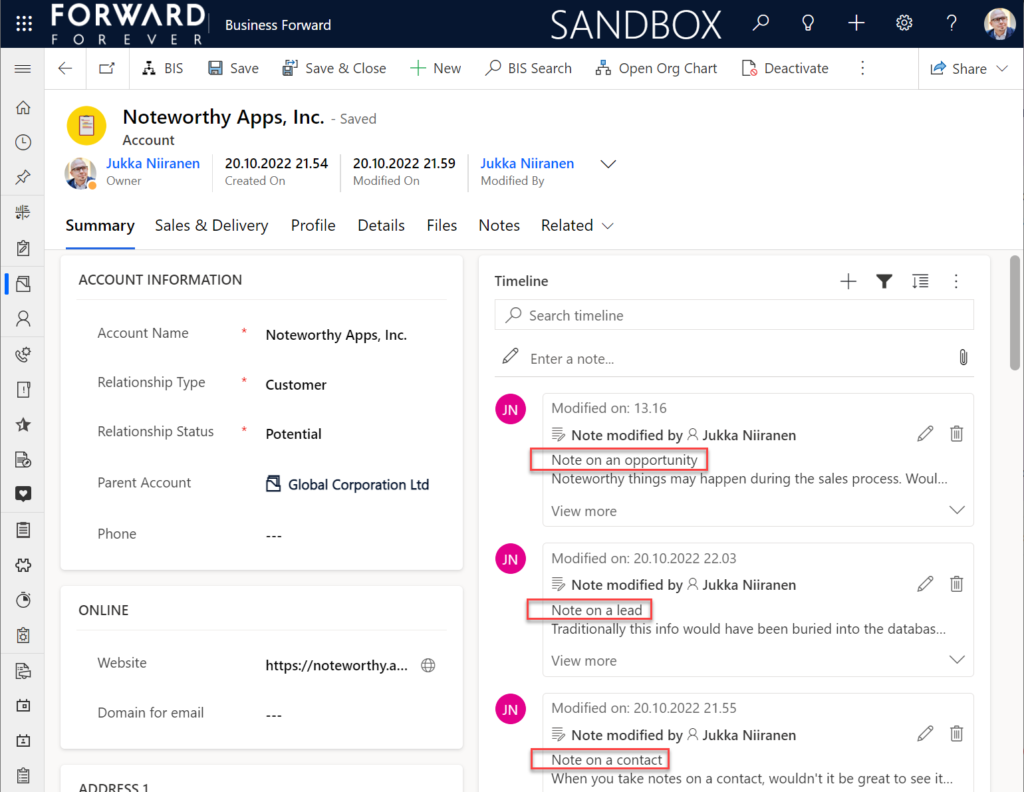
While the same form component has been used to display both activities and notes (and activity feed posts, in case someone’s still using them), the rollup functionality has been exclusive to activity data. This has lead to a classic CRM functional gap where a note record added onto a lead will not be carried over once the lead is qualified and becomes an account/contact/opportunity. Notes have been “sticky” in the sense that you slap them on a specific record and that’s where they’ll forever stay.
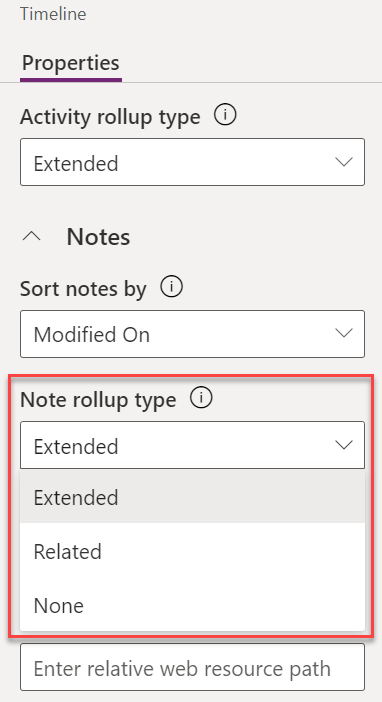
Well not anymore! While the official docs on Learn are still pending to be updated to describe the feature in more detail, the “Notes rollup type” setting already appears on the Timeline component properties:
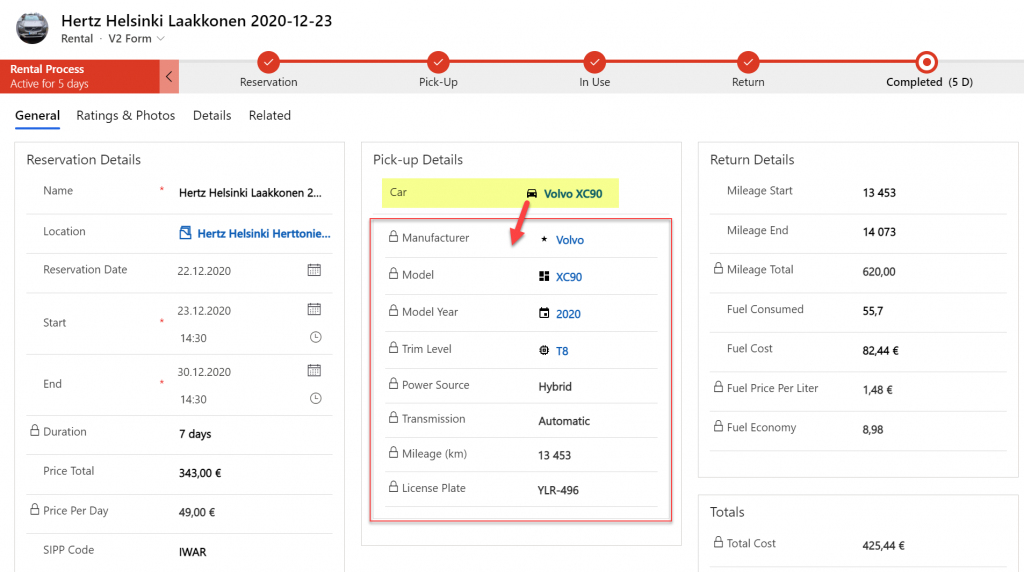
Setting this to “Extended” for the Timeline control on the account means that we’ll now see notes that have been added to the originating lead, any of the account’s contacts or opportunities. Here’s an example where there are zero notes on the account itself, yet we can see 3 notes on the Timeline:
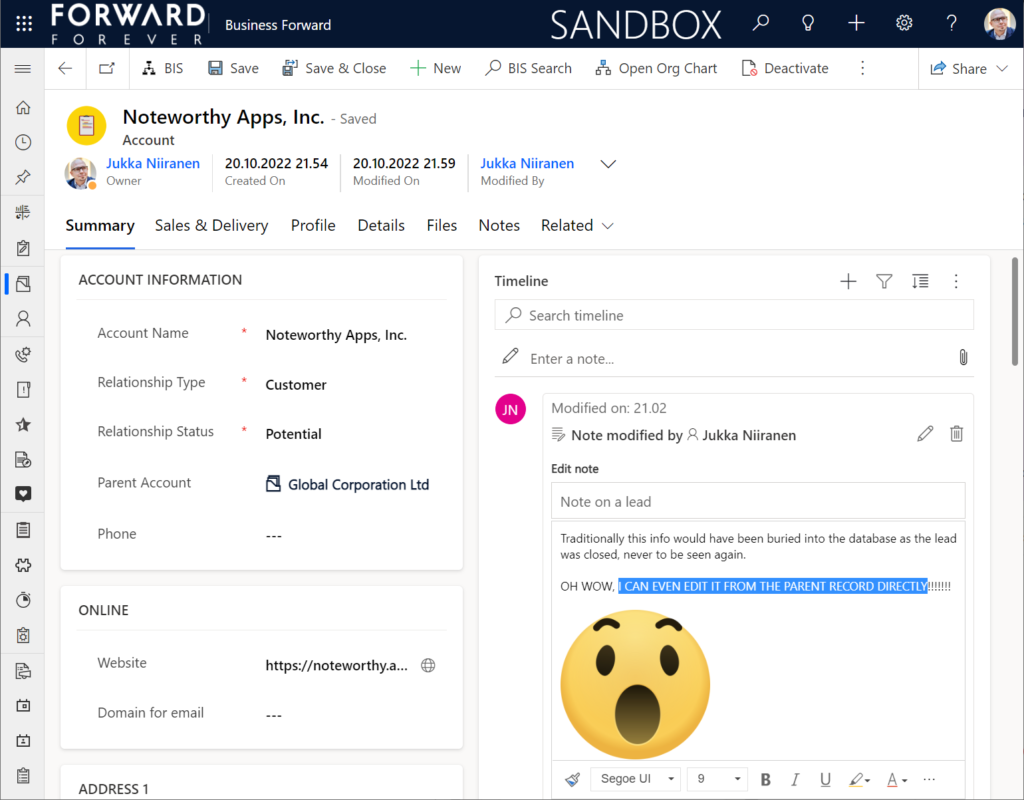
All the notes from these child records appear just as like they were the traditional notes on the account record itself. In fact, you can simply click the pen icon to start editing a note on the account form Timeline, even if it has originally been added via a different record:
This can be a bit confusing for the user, since there’s no visual indication on the Timeline card on which exactly is the original hosting record of that note. Which probably is due to the Dataverse data model that doesn’t treat the notes (annotation) table as something where the users could freely set the Regarding record information. With such a non-standard implementation it might be tricky even for the team developing the Timeline to surface this information in the UI.
You need to keep in mind that this notes rollup isn’t applicable to custom tables, nor across all system tables either. Just like the activity rollup, this is feature of showing relational data from beyond a single relationship “hop” is not a generic platform capability in Dataverse. It works in these basic CRM style scenarios using predefined record types. And when it does, it can be hugely beneficial to end users.
Alternative Timelines
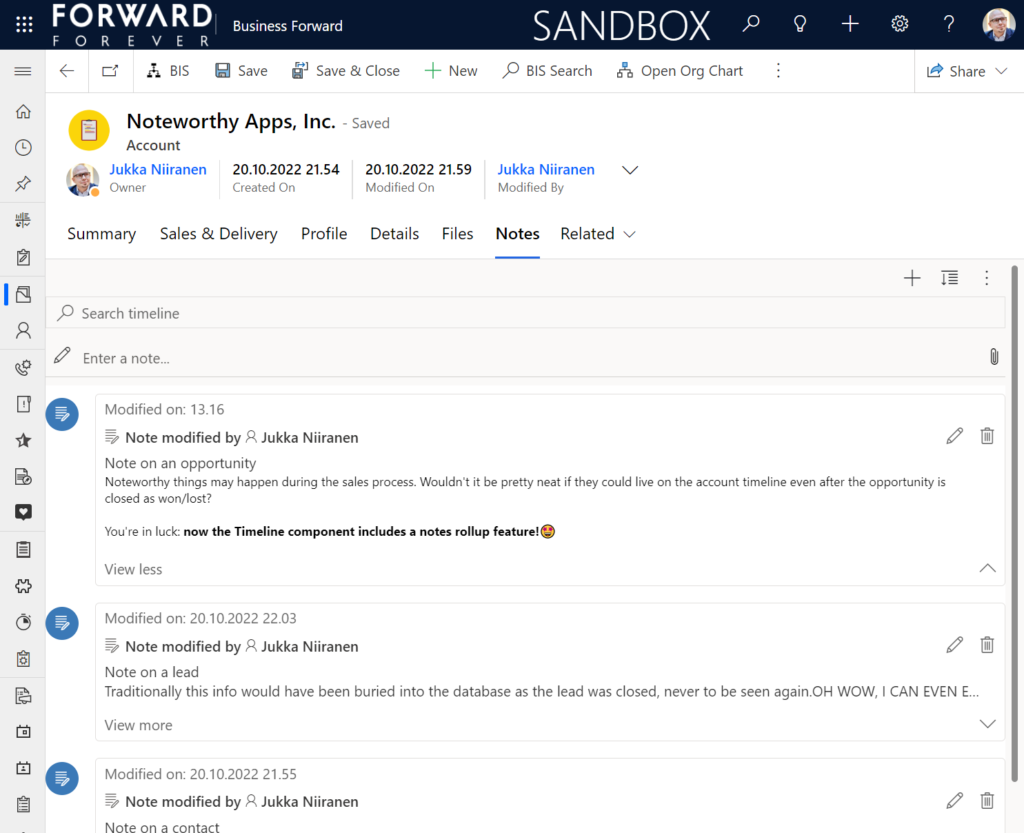
There are more goodies in 2022 Release Wave 2 under the release item “Try enhancements to timeline maker experience”. One of them is the support for having multiple Timelines on a single form. This means you could add a dedicated “Notes” tab on the account form and configure it to include only notes data, not activities or posts. The benefit from this would be to tailor the display settings in the main Timeline differently than in the Timeline dedicated for notes only.
In the example above I’ve ticked the box “expand first component to full tab” in the tab settings. This removes all the whitespace and labels around the Timeline, giving it maximum space. Yeah, it’s not the prettiest tab in the world when applying this technique to the Timeline. Yet from a purely functional perspective it’s an option worth trying out.
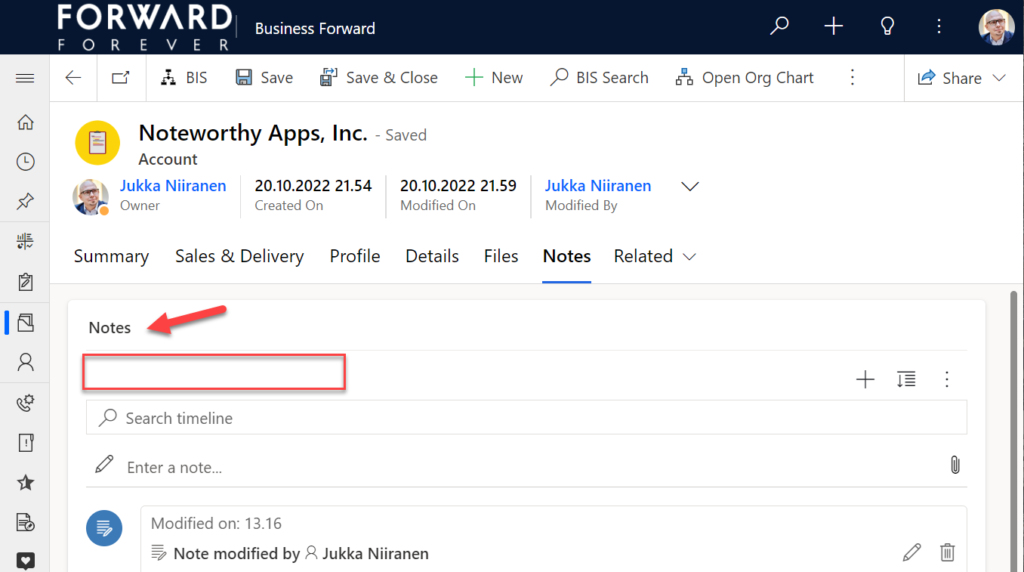
One common question from customers who want to customize their CRM system’s terminology has been “can we rename the Timeline to something else”? The answer is still: no. However, now that you can have multiple Timelines on a form, the workaround you can apply is this: 1) under Timeline – Properties – Advanced – Additional Settings, check the box “Hide Timeline label”, 2) set your form column label to show the string you want.
Now the custom text will appear and the place where it used to read “Timeline” is blank:
Native controls like search or options menu will still use the timeline terminology, though. It’s always worth asking a few times whether it’s absolutely necessary to try and change such native features of a SaaS product like Dynamics 365. (The argument “because we had it like that in our previous system” is always the wrong answer.)
Timeline forms and actions
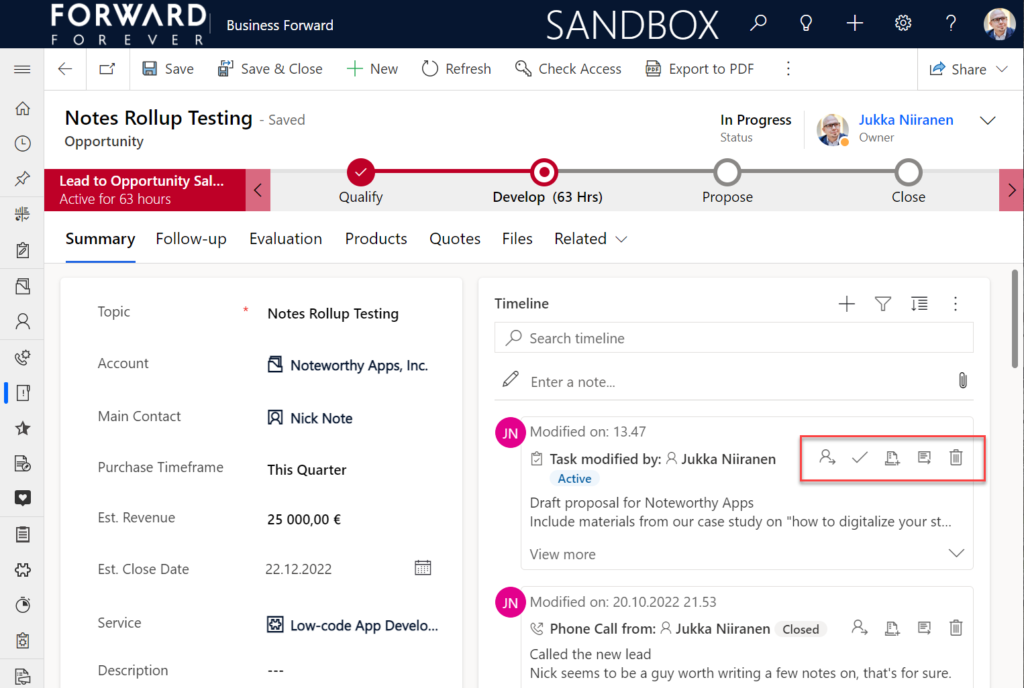
An area of the Timeline that has really exploded in terms of configuration options is the forms used for interacting with records shown on or created from the Timeline. Let’s look at one example of how the default functionality for tasks could be optimized on the opportunity form Timeline. Without any customizations, it looks like this:
Looking at the standard Timeline, there’s a bunch of command buttons available for every activity. Problem 1 is: it’s not easy to spot which icon opens the task’s detail form (at least I’ve never learned to immediately pick the right one). Problem 2: when we open the task, it takes us to a whole different web page, thus we lose the context of the original business record (opportunity).
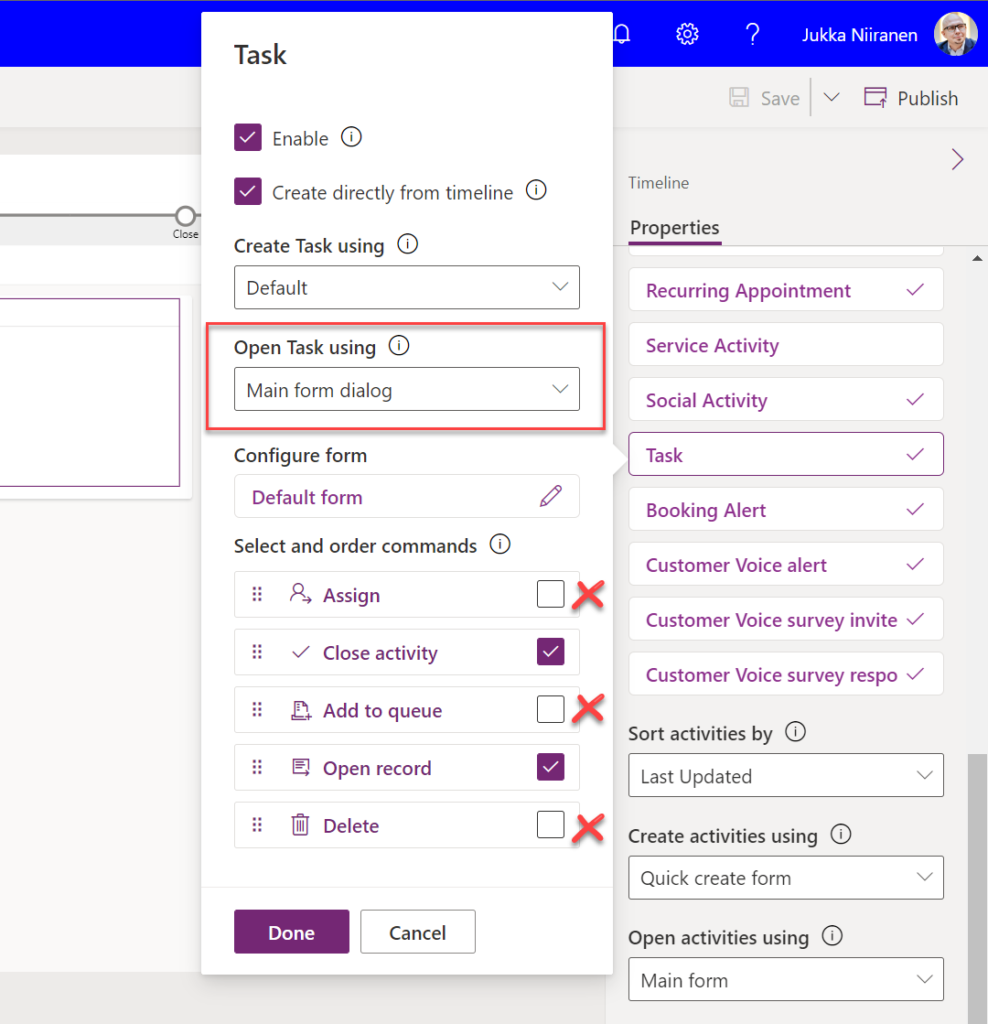
The Timeline allows us to fix both these problems by changing the settings just a bit. By going to Record settings – Activities and clicking on Task, we get a flyout pane with options specific to that activity type in this specific Timeline instance. Problem 1 can be fixed by disabling rarely needed actions like “Assign”, “Add to queue” (who uses queues anyway?) and “Delete” (deletion of data in CRM does not need to be easy!).
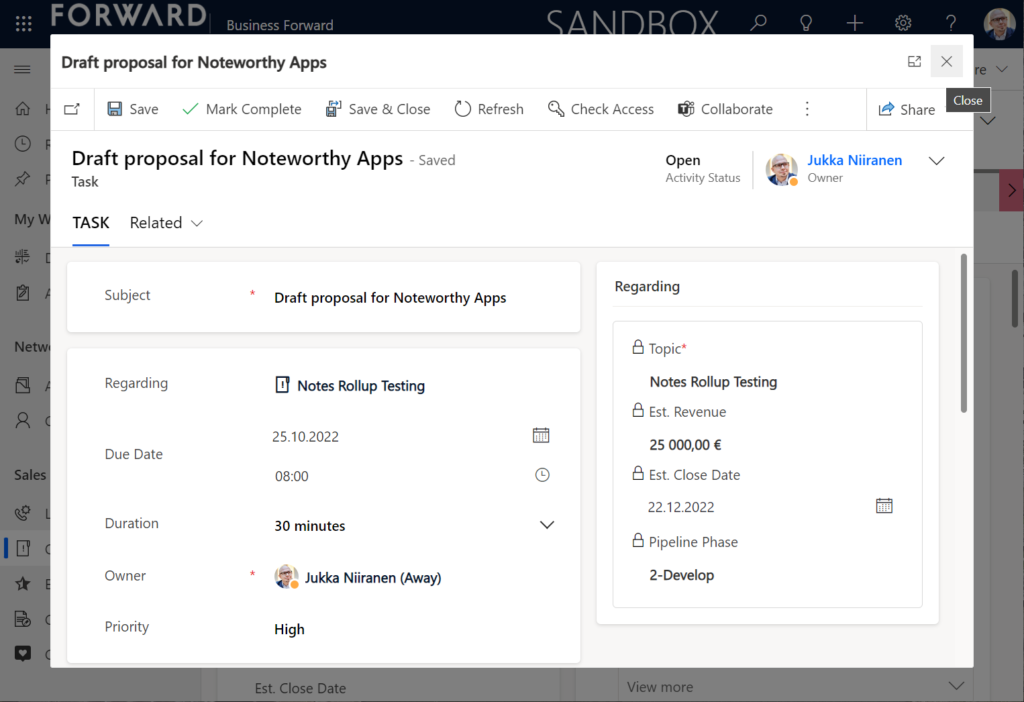
Problem 2 is resolved by changing the “Open Task using” setting to “Main form dialog”. What does that do exactly? It gives you a modal window on top of the current record, which is a much less jarring experience than bouncing between full forms. Closing it from the X icon will allow you to keep working on the opportunity without forcing any page refresh.
Want to learn about the Power Apps main form dialog? Read my earlier blog post on how to leverage MFDs for making it easier to work with relational data.
Timeline configuration sprawl
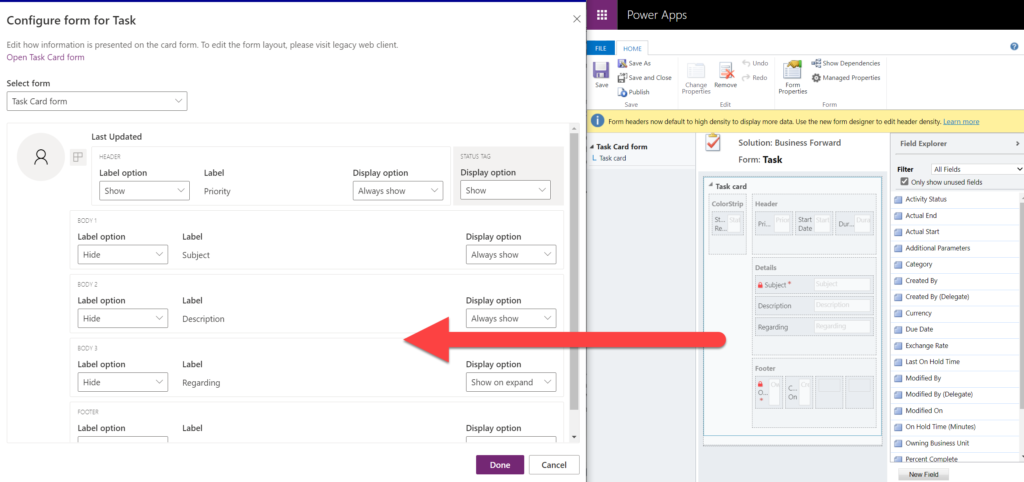
The one caveat of all this configurability that we’ve received via the modern Timeline control is that we now have a huge number of different settings we must remember to change. Performing any of the above mentioned changes is relatively easy as an isolated task, but we need to do it for all the tables and their forms where the Timeline control is used. There is no global system setting or “apply to all” option to help us. With any larger business application you’ll quickly need your own Excel sheet just to keep track of all the N settings and N forms that you must manually harmonize.
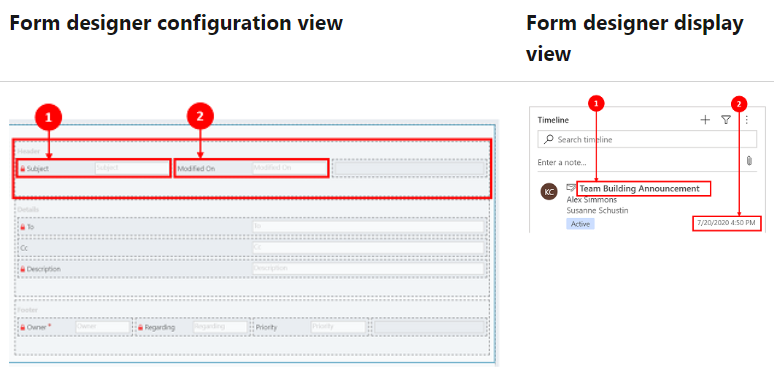
Where things can potentially get really laborious is modifications to the card forms used for displaying activity and note data on the Timeline. If the standard date fields aren’t what we want to show, for example (created on vs. modified on vs. due date etc.), there’s a way to change most of them. However, as you can quickly see after browsing through the documentation, the card form editor from the CRM 2011 era and the modern Timeline control have nothing in common when it comes to rendering the visible UI:
If you want to include some custom columns from your activity tables into the Timeline cards, the good news is that it’s supported. The bad news is, you’ll likely need to keep the documentation on one screen as a reference, the form editor one the second screen, and the card form legacy editor on the third one. Good luck doing these tweaks from only your laptop screen while working away from the office!
These configuration tasks start to quickly add up. Let’s say we need to change one date field on the task card and configure its display options and label options. Perhaps our application has 20 tables where the Timeline is used for showing this activity type. Maybe we’ve also created role based forms and targeted them via different model-driven app modules, like “Sales” and “Admin”. That single requirement could mean updating the settings on maybe 30 different forms. With all the loading, saving and navigating in the Maker portal – it could easily take more than an hour to complete.
Now, let’s say that in a Dynamics 365 project you’ve been assigned the responsibility to take care of all the details for activity and notes management features on every Timeline in the system. Sorting, filtering, control display options, supported activity types, form types per activity, actions per activity… Planning, configuring and validating all these changes will quickly consume many days, even in an SMB level CRM system. And because it’s so easy to miss a few clicks in performing this repetitive work over & over again, you’ll also need to reserve time for fixing the things that were missed.
Achieving a consistent user experience requires plenty of work – this simple truth has not changed from the early days of Dynamics CRM projects. As Microsoft invests money in modernizing their client controls and introducing more no-code configuration options, the customers must also do their part in ensuring the changes and new possibilities in the evergreen cloud platform are taken into use in a controlled manner. Striking a balance between what can be customized and what should be customized – this remains the eternal question.
Whether you are configuring Dynamics 365 Customer Engagement apps from Microsoft or building custom applications with Power Apps, often the solution design and implementation focuses too much on the data entry experience and not enough on data discovery. Yet it’s the process of searching for information rather than entering new records that consumes far more time in the lives of information workers.
Throughout the history of my blog (originally “Surviving CRM”), topics such as the Advanced Find feature or configuration of views in XRM/CDS/Dataverse have been the most popular ones. To put it another way: a lot of people search for information on how to make search better in Microsoft business apps.
While they are nothing like Google, Microsoft still has a wealth of R&D budget spent on search related services. Just because Bing isn’t what you’re likely using in your private life, that doesn’t mean you couldn’t benefit from the Microsoft Search infrastructure. Today we’ll explore how data from Dataverse environments can now be exposed in Microsoft Search.
Enabling Dynamics 365 results in Microsoft Search
The feature for showing Dataverse results in Microsoft Search was originally promised at Ignite 2021 in November, but on the release plans it has been postponed a few times. Now the ability for enabling search federation has appeared and the roadmap item for it says “GA in June 2022”. The feature appeared in a couple of tenants, so it’s time for a test drive.
First you should ensure that these prerequisites for configuration are met. The modern Dataverse search needs to be enabled for the environment you want to target. Second, the search admin user account that you’re using to run the configuration must have both admin access and a valid Dynamics 365 license for the environment.
Next you can proceed to Microsoft 365 Admin center. Go to “All admin centers”, choose “Search & Intelligence” and select the “Data sources” tab. You should see the section “Microsoft apps and services” that allows you to add a new app for search federation.
What if that section does not appear? It may be that you don’t have a paid Dynamics 365 subscription in the tenant. The detailed requirements haven’t been documented by Microsoft yet, but based on my experiments, having just Dataverse with Power Apps premium licensing is not enough. Neither is a trial subscription for Dynamics 365.
In the configuration section for Microsoft apps and services, it says that “connections to these data sources do not count toward your index quota limits.” If you’re not familiar with Microsoft Search, then the data sources accessible via Microsoft Graph connectors are indeed a paid service. With Dynamics 365 we’re seeing the search capability bundled into the product, but for things like Azure Data Lake, Azure DevOps or third party services like Salesforce or ServiceNow, you’ll need a Microsoft Search paid license.
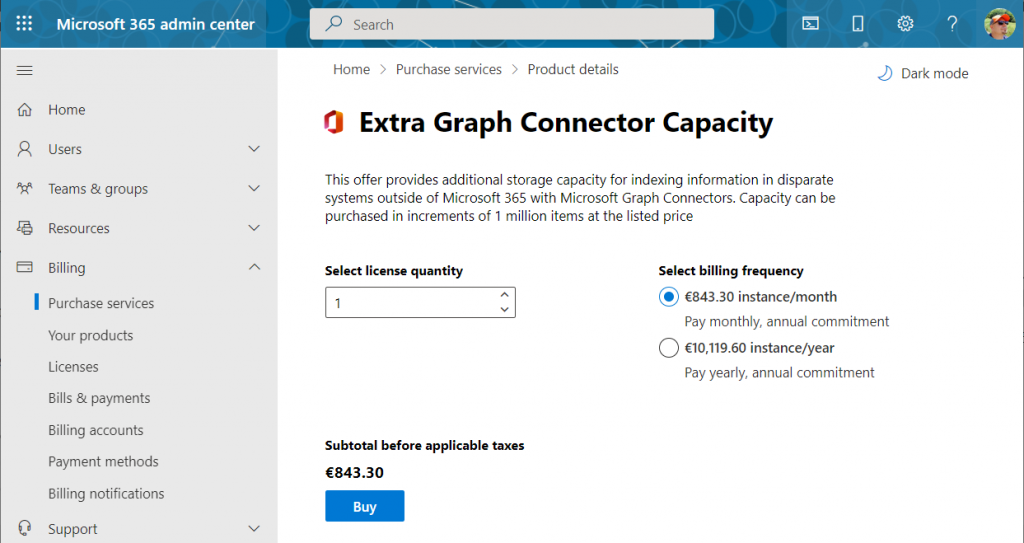
If we were to use the paid features, how much would it cost? The required product can be found under “purchase services” in the M365 admin center – although not with any generic term like “search”, of course. You’ll need to know that SKU name is “Extra Graph Connector Capacity”. The minimum purchase is 1 million items and that would be around $1.000 per month, or in euro prices these sums below:
If you had Microsoft 365 E5 or Office 365 E5 licenses, those would also accrue some index quota per each licensed seat, as shown here.
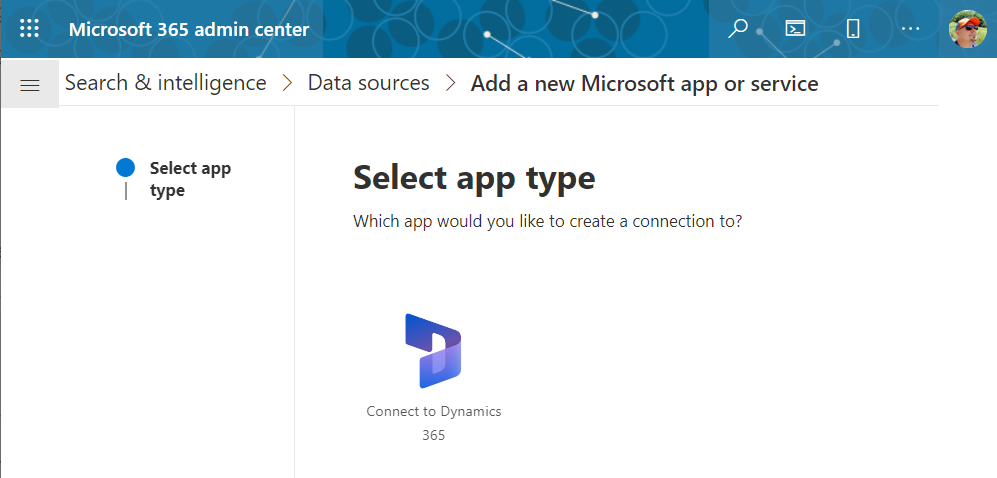
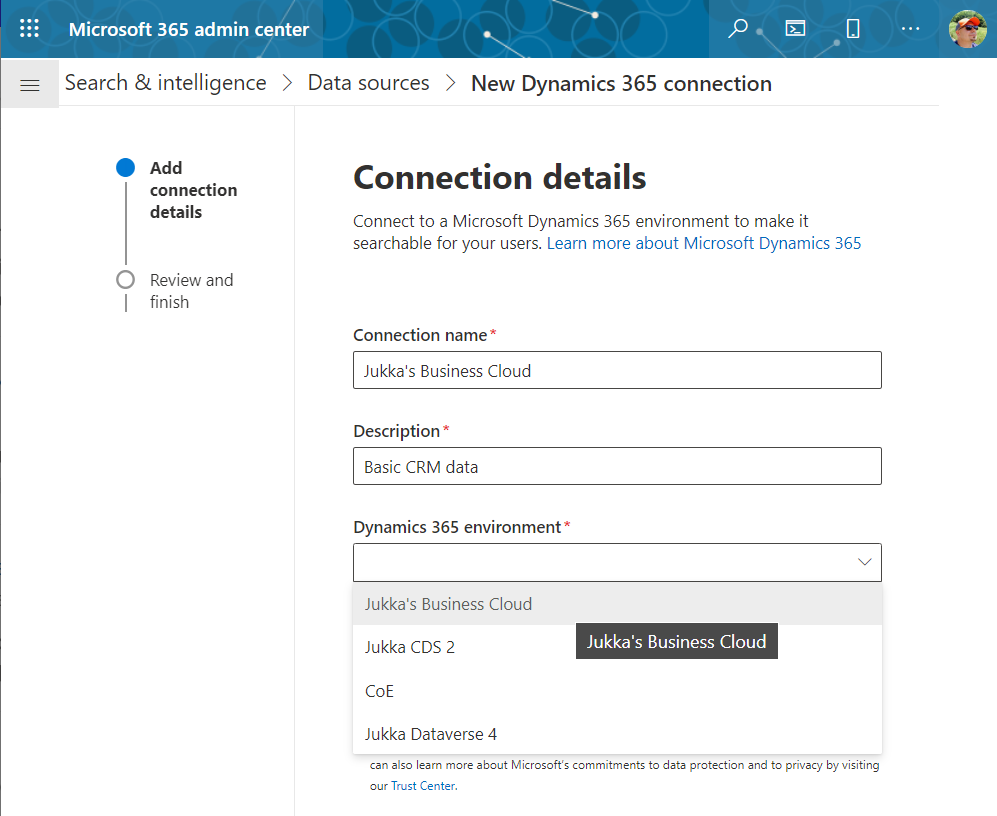
Luckily we don’t need to make purchases since our tenant has Dynamics 365 Customer Engagement licenses in place. We can proceed to adding a new app under the Search & Intelligence data sources, by selecting the only supported MS app at this time: Dynamics 365.
Next we get to choose the Dataverse environment. Except not all your environments may be listed here. Why? I did not discover a valid explanation for it in my initial tests. Neither the environment type (sandbox/production) nor existence of Dynamics 365 apps was the reason why environments didn’t always show up. Oh well, let’s proceed with what we’ve got and pick “Jukka’s Business Cloud” that contains the core CRM data in this tenant.
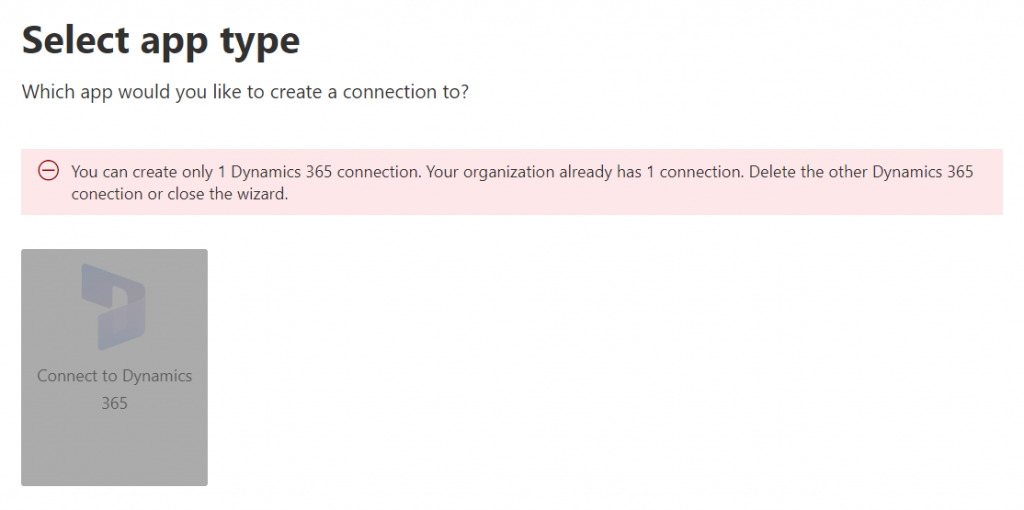
If you’re wondering whether you could configure data from multiple Dataverse environments from your tenant to show up in the Microsoft Search results, the answer currently is: no.
Once you’ve added the data source, it can take a while before the results will appear in the search experience. In our production tenant this took less than 30 minutes, in my personal tenant it’s been ~2h and nothing yet. MS says it can take 24 hours before the indexing is complete. Patience is a virtue – if you’ve got some to spare. I’ll just hop over to the production tenant now and explore the end user experience.
How Dataverse records show up in Microsoft Search
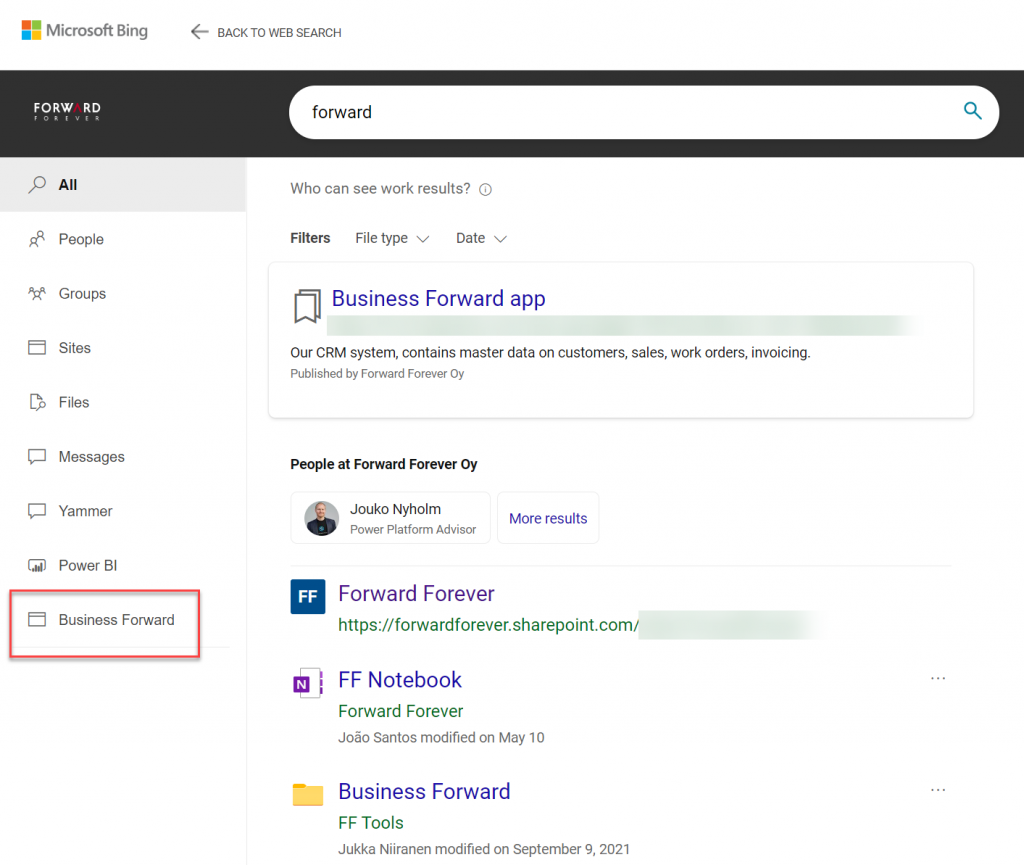
The users will discover the results from the previously configured Dynamics 365 connection when they access search either in Office.com, SharePoint Online or Bing. The UI to get to those results varies slightly, but the listed results from the Microsoft Graph connector seem to be identical.
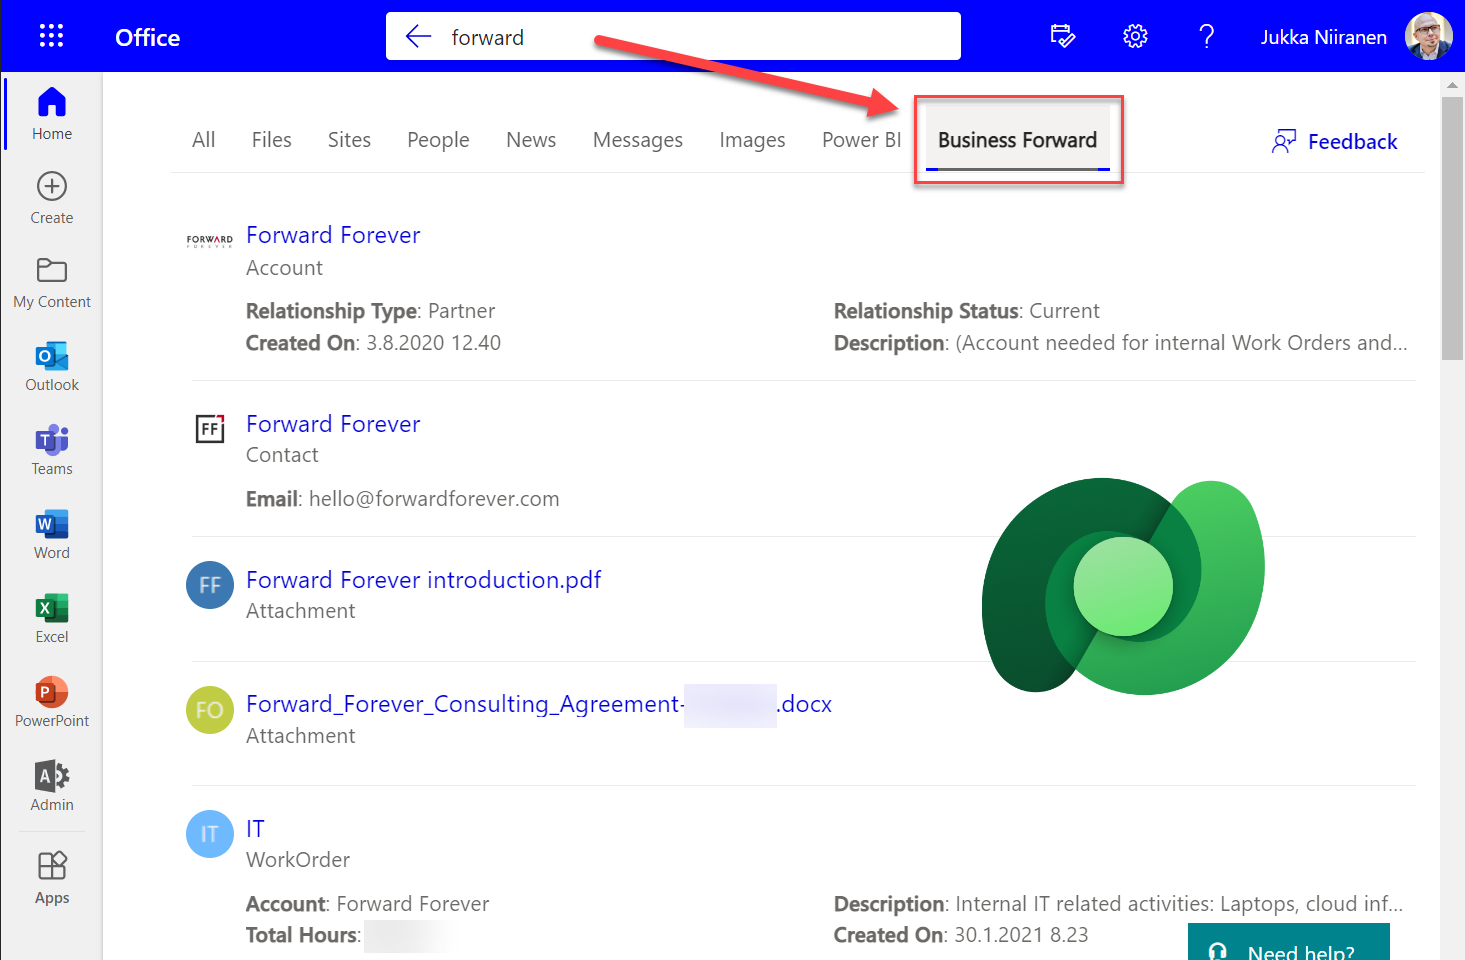
Obviously in Bing you need to be signed in and access the Work tab that switches you from the public web search to the internal results from your work tenant. In addition to all the regular results, plus custom search bookmarks like the one you see below, there will be a new tab to represent the “search vertical”. In the case of our production tenant, I named it “Business Forward” as it is the primary app used in our production Dataverse environment.
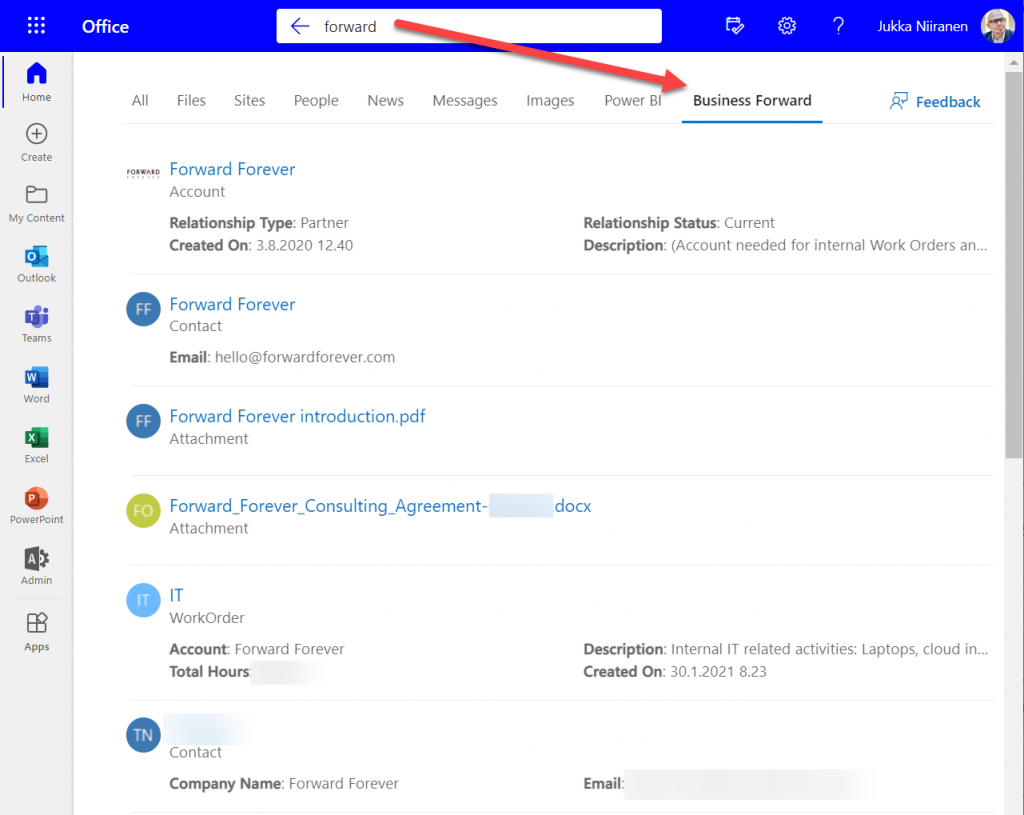
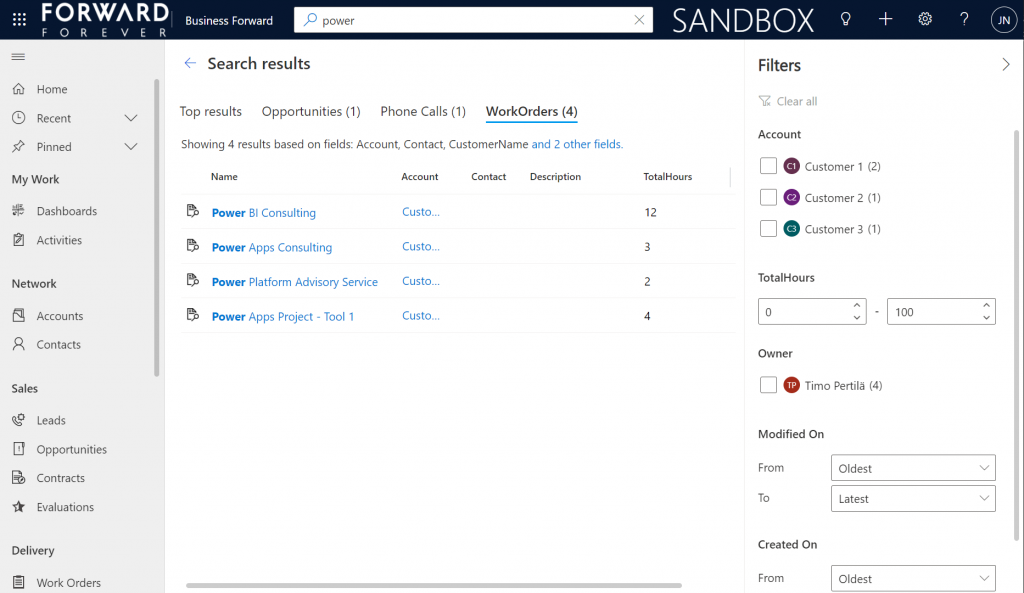
I personally am more likely to leverage these search results from under Office.com. Here’s an example of what data is pulled from the Dataverse environment for a basic query term “forward”:
We immediately see that the results cover both standard tables from CDM like accounts and contacts, but also custom tables like our work orders that are managed in Dataverse. We see a preview of fields from the matching records, which varies based on what columns are non-empty for each row in the corresponding Quick Find View.
Configuration of the searchable fields is done in the Dataverse search settings, which the Microsoft Graph connector for Dynamics 365 then respects for each table. This means there’s very little to be configured on the Microsoft Search experience specifically. You really only decide A) which 1 environment to point it at, and B) what name do you want to show in the search vertical in Office.com, SharePoint, Bing.
Dataverse in-app search vs. Microsoft Search experience
Now that we have enabled the discovery of Dataverse data from within Microsoft Search, should that become the recommended entry point for all your business data searching needs? The answer to this is: through Microsoft Search you’ll only get a subset of search features that are available in a full model-driven Power App. Whereas with Microsoft Search you may well get close enough results, the detailed search capabilities are better within Power Apps native Dataverse search.
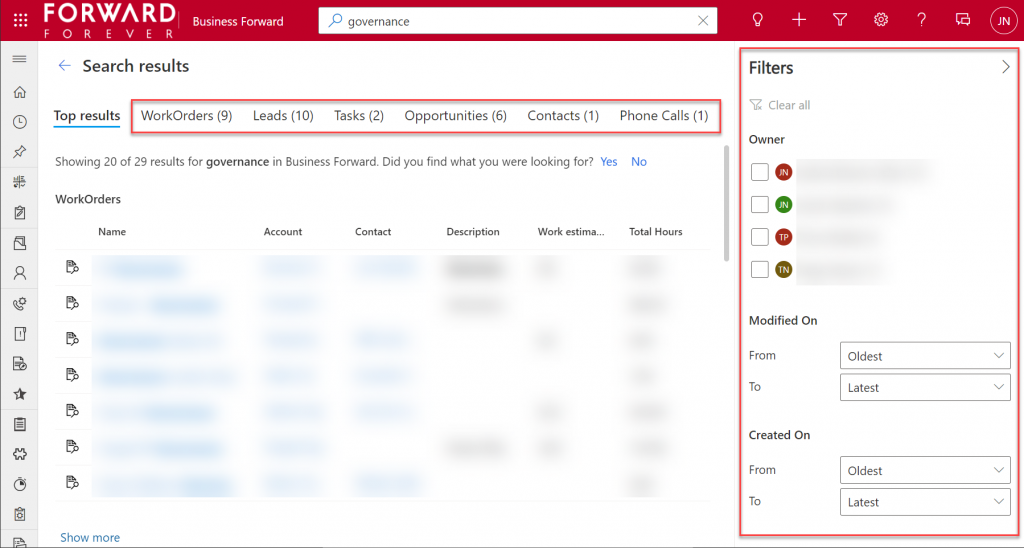
If I enter a search term like “governance” into Office.com search bar, I’ll get a long list of results that I can not filter nor sort in any way. When I do the same search inside our Business Forward app (a model-driven Power App on Dataverse), I get the results tabbed per specific tables that allow me to narrow the query by record type. Also the filter pane gives access to owner and date filters, which get even more detailed as I select one specific table from the results.
Another feature that can be a welcome addition is that the Dataverse search within the app UI covers only the tables included in that app. This can lead to search challenges in a larger Dynamics 365 environment that covers multiple different processes.
For example, our production environment covers not only our CRM info on customers, sales etc. but it also hosts our internal IT Asset Management solution and its data. Now, if I search for “Nokia”, the results could include both the account management data related to Nokia Corporation as well as Nokia smartphones (from HMD Global) that our team members have registered as their IT assets. Sure, all results are filtered based on security roles and won’t reveal any data to unauthorized users, but anyone with broader access to Dataverse will also get broader, nonfilterable results with Microsoft Search.
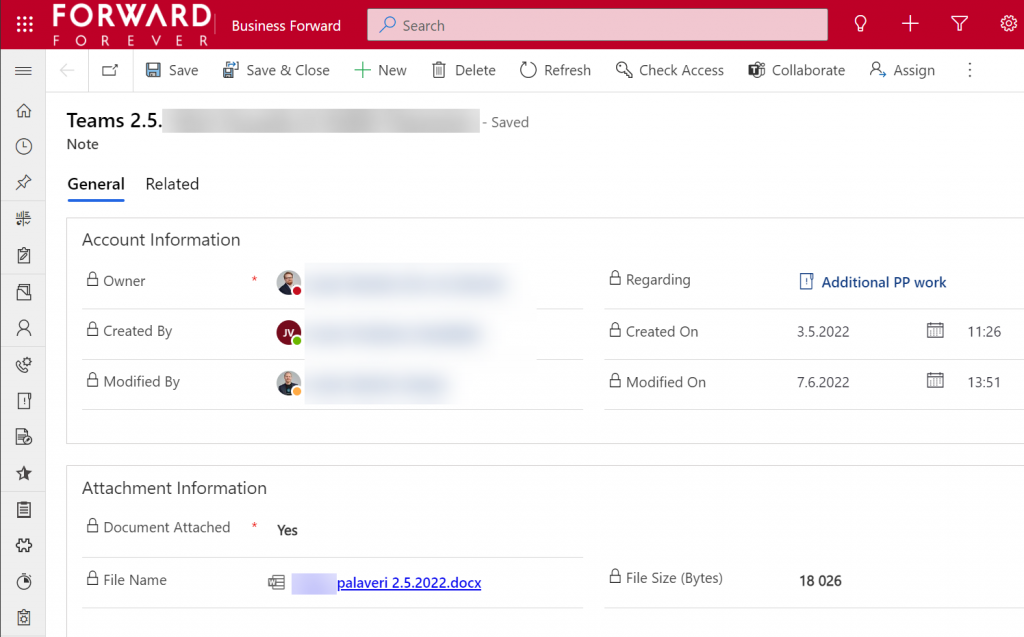
Sometimes you may get more results from Microsoft Search than from within Power Apps, because of the way documents stored in notes and attachments get indexed. I even discovered that the note record (annotation) which traditionally hasn’t had any user accessible table form in the native UI can actually be opened independent of the parent record. The form of a note is very nice and readable, providing a link to the related document:
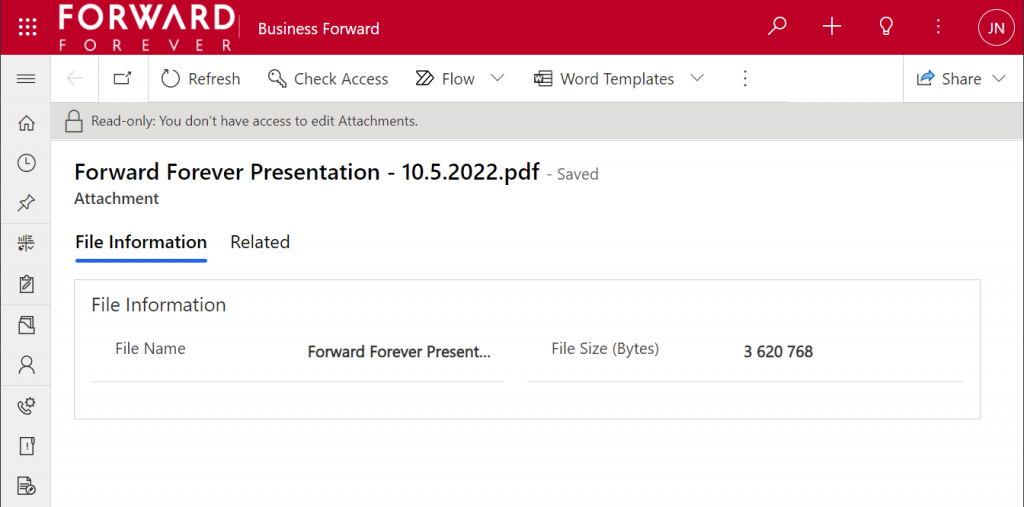
Things aren’t quite as awesome when it comes to attachments of email records. While these also open a form within a model-driven app, the attachment table form doesn’t offer any link to either the document or the related email message from where the file could be opened.
The many faces of Dataverse search experiences
It’s really awesome that we’re now seeing the mainstream search capabilities in Microsoft cloud services reaching into the domain of business applications with these out-of-the-box capabilities. The investments that Microsoft has made into Dataverse Search as a service that isn’t just for doing freetext search inside your CRM system is starting to pay off. Just like makers can tap into Dataverse Search from within Power Automate actions, now information workers can do simple queries into enterprise systems from within Office experiences.
In its current state, with support only for Dynamics 365 customers and only a single environment per tenant, the Microsoft Search experience isn’t yet as powerful as it could become. Covering the Power Platform use cases where business data is managed in various environments and via specific custom apps would be a logical direction to broaden Microsoft Search with a true low-code platform story.
The way I see it, the search experiences for business data managed within Dataverse are being developed in three separate areas:
Free text search: building search indexes that cover several sources/tables, with multiple entry points (in-app, Office, flow, APIs), evolving into support for natural language queries and supporting conversational UIs (Teams chatbots etc.). This is the area where Dataverse Search and Microsoft Search are operating.
Structured queries: building complex query criteria to filter the rows in a specific Dataverse table. “Show accounts with orders in last X months and no activities from members of sales team Y”. The Advanced Find feature and the FetchXML query language have traditionally covered this front. The modern advanced find experience is making these filters easier for casual app users to approach, while FetchXML is still alive (now available for download in the UI) and can help flow makers design complex queries more efficiently, for example.
References: the next generation of “set regarding” features are aiming to broaden the traditional scenario of associating emails in Outlook with records from CRM. If the MS vision for Context IQ comes to life, we should be able to at-mention basically any record from a Dataverse environment and collaborate interactively on it via Loop components. Similar to the Microsoft Search initial limitations, it will be interesting to see how the lookup field experience can be optimized with machine learning algorithms when all records in a large tenant are behind a single @ symbol…
Returning back to what I mentioned at the start of this blog post, as a solution designer it’s very important to understand all these different means through which users can search for your business application’s data. There’s a lot you can do by configuring the settings in Dataverse views to make the experience enjoyable for the user.
Studying the Dataverse search documentation is a good start. However, it’s all just theory until you have some actual data and real user interfaces to test the usability of your search configuration with. What this means is that you’re unlikely to ever get all the settings right in the V1 release of your app. In practice the user experience for business data search requires attention throughout the lifecycle of your app. Microsoft will continue to change and expand the ways in which search queries and results are handled, so you better keep up with these new features and explore what configuration options are being introduced in the future, too.
The single most powerful end user feature of Dynamics CRM, XRM, CDS and Dataverse was always Advanced Find. Period.
There, now that we’ve settled that argument, it’s time to move forward and see what life is going to look like when Dataverse no longer includes Advanced Find. Yes, there will still be the broad capabilities of advanced find, but I will refer to it without capitalization. This is in line with the fresh new documentation on a very important feature that aims to take the place of Advanced Find: modern advanced find.
So modern you can barely see it
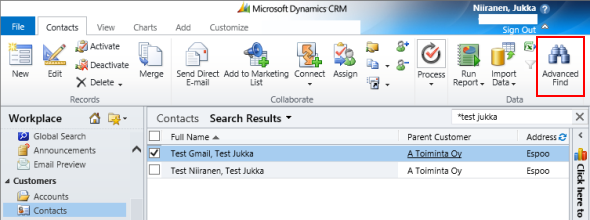
Advanced Find was always its own UI in a separate popup window. This was perfectly in line with the Dynamics CRM 2011 UI – which was the last time there were any material changes to the visible features. Let’s have one last look at Advanced Find’s glorious Ribbon icon before we move on:
OK, so this wasn’t actually the last time Microsoft touched the user experience for this feature. The CRM 2013 release did a complete overhaul of the application UI (I’d say a more visible change than Unified Interface even), which lead to the Advanced Find buttons getting either hidden or missing from parts of the app navigation. I had to write a blog post called “Finding Advanced Find in CRM 2013” to help out users who were worried that the feature had been removed from the product entirely.
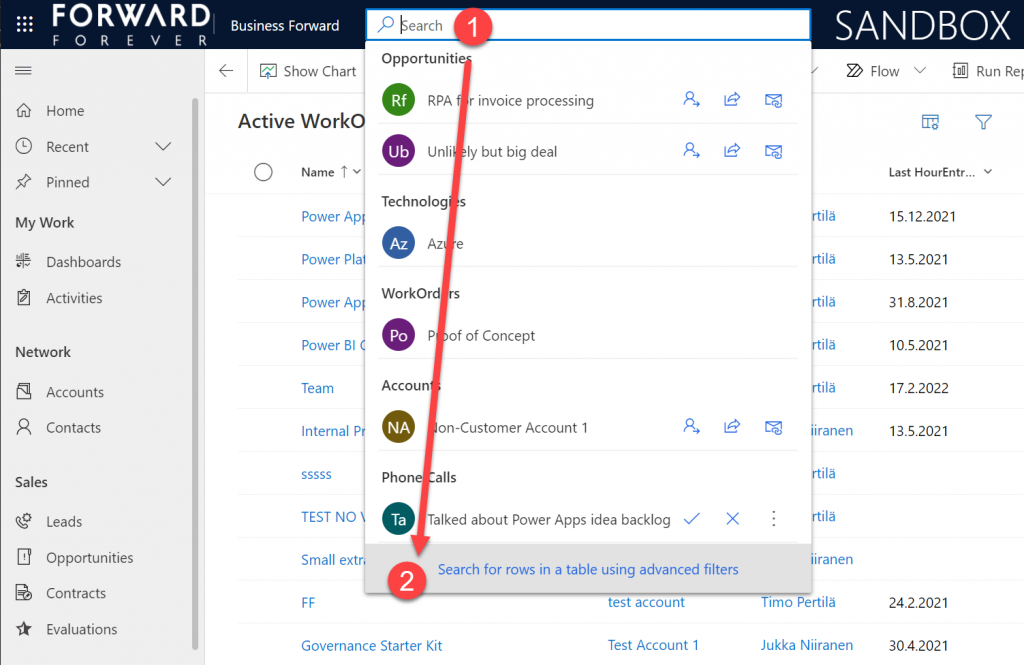
The modern advanced find that has been introduced as a preview feature in February 2022 takes the hiding game to a whole new level. You see, the entry point to modern advanced find is hidden within the global search bar. You have to 1) click the bar and then 2) click“search for rows in a table using advanced filters”.
Be sure to not enter any search text into the bar, because that will hide this new option. Also, whatever you do, do not press enter after this text – otherwise you’ll be taken to the global search results page. There’s no way to “go advanced” from here, it’s a completely different search experience.
Search “any” table
A big new feature in the modern advanced find is what happens after you click on the new button within the search bar. (I already forgot the name of that button since it wasn’t anything as nearly catchy as “advanced find”, so I’ll refrain from scrolling up this post to see what it was and just move on instead.)
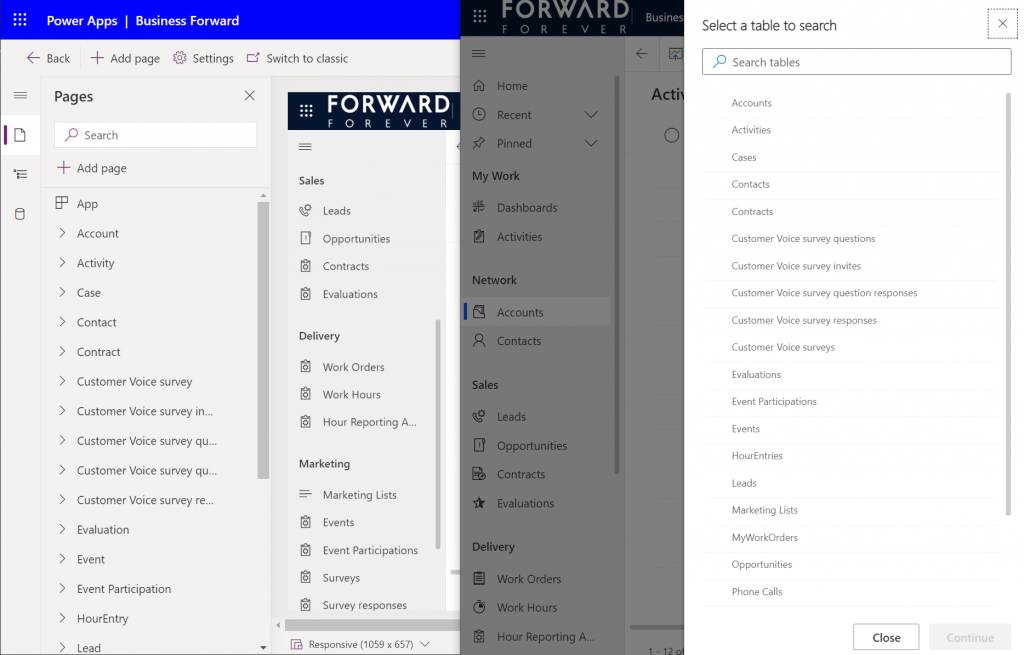
You will see a sidebar saying “select a table to search”. Cool, just like in good ol’ Advanced Find! The difference you need to understand, though, is that it’s not a list of all the tables in the environment. Yes, it will likely be a longer list that what your Model-driven app’s sitemap navigation contains. This is because modern advanced find covers all the table’s that your app’s maker has chosen to include in the app module when working with the Model-driven app designer.
There are pros and cons to this approach. The obvious upside is the ease of use for the casual data finder. He/she doesn’t need to confront the ever growing list of both standard and custom tables in a Dataverse environment (especially those with many Dynamics 365 apps installed in them). Things are quite different now compared to back when Advanced Find was originally designed for a simple CRM systems. Showing hundreds of cryptic tables isn’t a great UX to most users, so cutting down the noise of the underlying data model is understandable.
How about those users who DO understand the data model, or even work in configuring and extending it? The advanced app makers, consultants and developers will most likely be frustrated by this limitation whenever they need to examine the detailed contents of an environment. Quite often I myself need to build new views and filters just to understand what data has been entered into the system (that has been designed by someone else).
Sounds to me like there will be a growing demand for a “Super Advanced Find” type of a tool to be introduced in XrmToolBox. If you’ve already got a favorite tool for ad-hoc data exploration needs, be sure to leave a comment below.
Query criteria remains the key criteria
The one area where an advanced search feature in Dataverse simply has to perform well is the creation of complex query criteria across the relational data model of the environment. One of the most read articles on my blog has been Advanced Queries with Advanced Find, which illustrates both the possibilities of the tool as well as the demand for such advanced query criteria in real-life business scenarios.
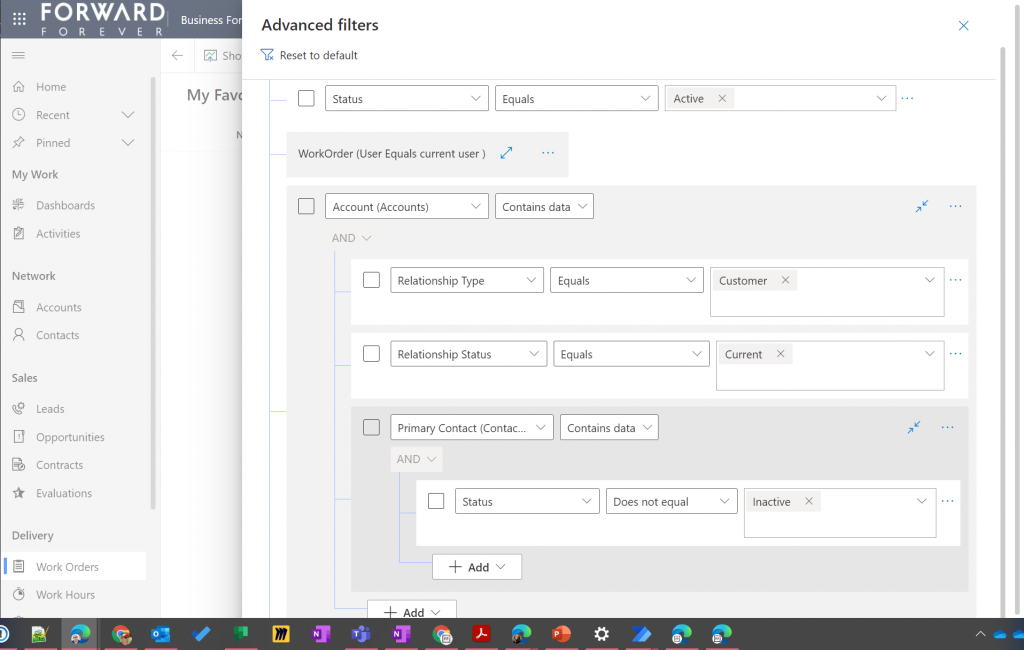
Luckily this is already included in the non-preview feature set of Model-driven Power Apps. The filter editor that you can find in any table view today is a very worthy replacement for what Advanced Find used to offer. Although I haven’t done a detailed comparison, I couldn’t easily spot any missing capability from the tools available for defining the view filters in modern advanced find vs. the classic pop-up query editor for Advanced Find.
Just imagine if it was this easy to define the filter criteria for Dataverse tables on the modern automation side, too – not just views? Perhaps one day something similar will be made available for Power Automate cloud flows, based on what is being planned for SharePoint data sources in 2022 wave 1 (because priorities). Until then, luckily we have great articles and reference guides created by the community to copy-paste our “flow code” from while we wait for a GUI to arrive.
Actually viewing the data
Far too often I’ve seen people put all their effort in defining the correct query criteria and then being lazy when it comes to actually showing the results of that query. You could say I wrote the book on the importance of Dynamics CRM view design back in the 2013 era, so you can image how such user experience oversights have irritated me over the years.
Smart choice of view columns and sort order are what defines the user experience outcome. Query filters are merely table stakes.
Jukka Niiranen, in this blog post right here.
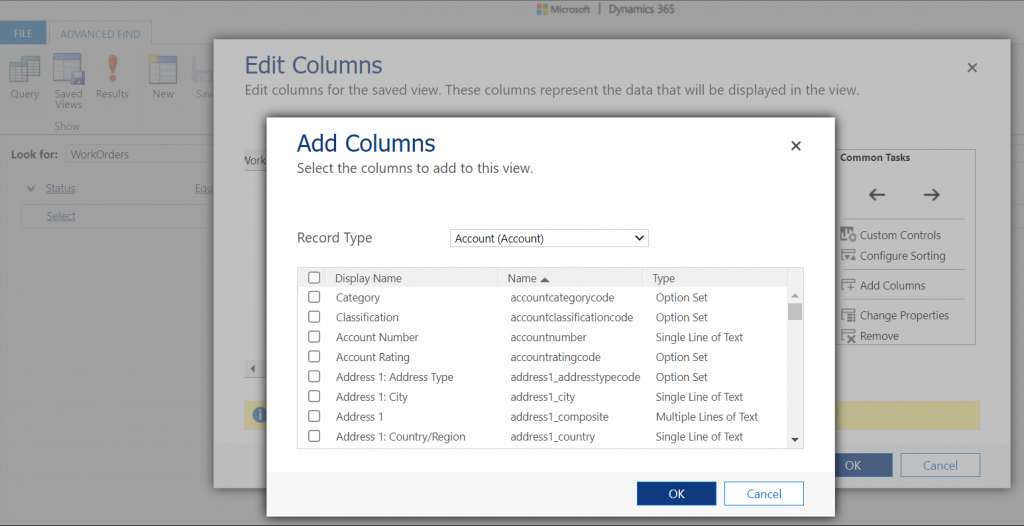
As a data exploration tool, Advanced Find wasn’t always perfect, but us consultants learned to make the most of it. When needing to dig up data from columns that weren’t readily available in the system views, it was easy to just go and add all columns into an exploration view. Whereas when building more targeted we had two useful features in the “add columns” screen of Advanced Find: sort by name, sort by data type.
Unfortunately this is where the modern advanced find is a little behind on the classic Advanced Find. Let’s look at what the column editor experience is like.
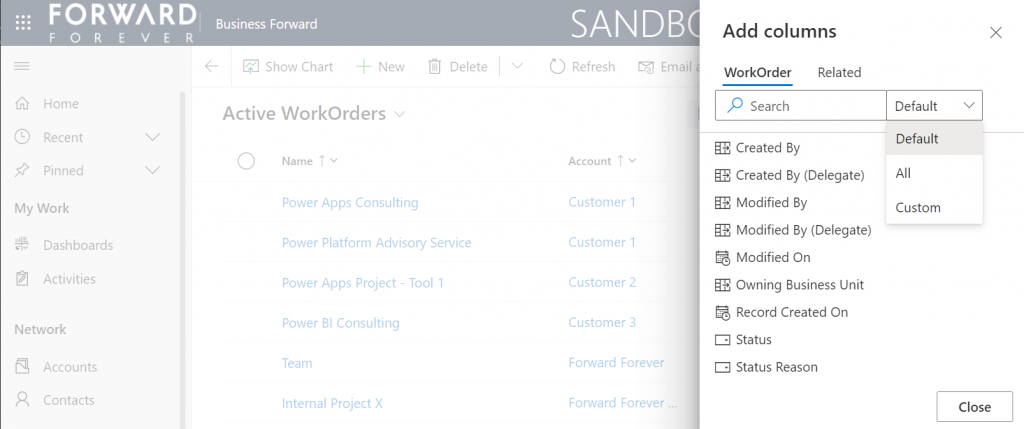
First of all, the editor includes the very same modern stumbling block that you might have noticed when working in the Power Apps Maker portal and searching for table columns. When you open the “add columns” side pane, the list of available columns doesn’t cover everything that the table contains. Instead you are defaulted to a “Default” filter that’s easy to miss. Switch to “All” and you’ll finally see that field you wanted to include in your view.
What exactly does “Default” mean in this context and how is it defined? No one can tell, not even Microsoft. It appears to be one of those good intentions in tidying up the menus of what should be a citizen developer friendly platform yet also serves huge enterprise CRM systems. A tough balance to get right, that’s for sure.
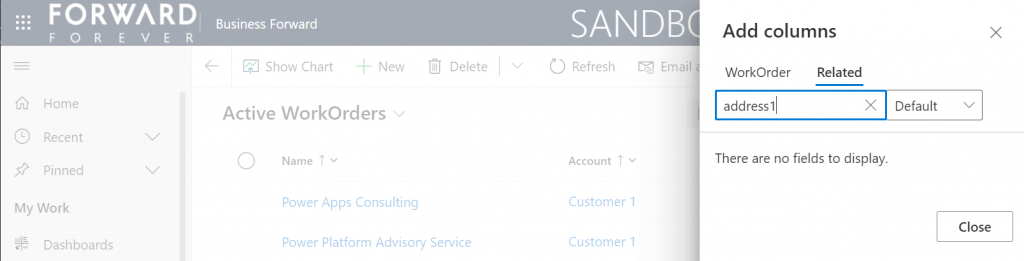
One very nice improvement in the modern advanced find (as well as the Maker portal) is the ability to search for things while you are configuring those very things. Narrowing down the long list of available columns with a free text search term could be especially handy when you’re looking for information stored on a related parental ent… table.
What could make such a feature even better? I’ve got one idea: extend the search index to include also the schema names. Believe it or not, the display names of f… columns can become quite misleading when you eventually need to adjust them for the places in the app UI where they can’t be customized (which just happens to mainly be: VIEWS!).
Anyway, often the schema name may have a pattern that makes it easier to logically group columns, which in turn makes the app maker more productive as he/she finds them more easily when defining the views. Right now that’s something the modern advanced find doesn’t yet support. If you think it should, then go and vote for it.
So, you’ve created a hundred and one views…
If there was something that the classic Advanced Find feature really didn’t handle well at all, it was the process of managing the views created with it. The way how the Ribbon UI managed to both hide the feature and yet make it highly misleading at the same time was something… special.
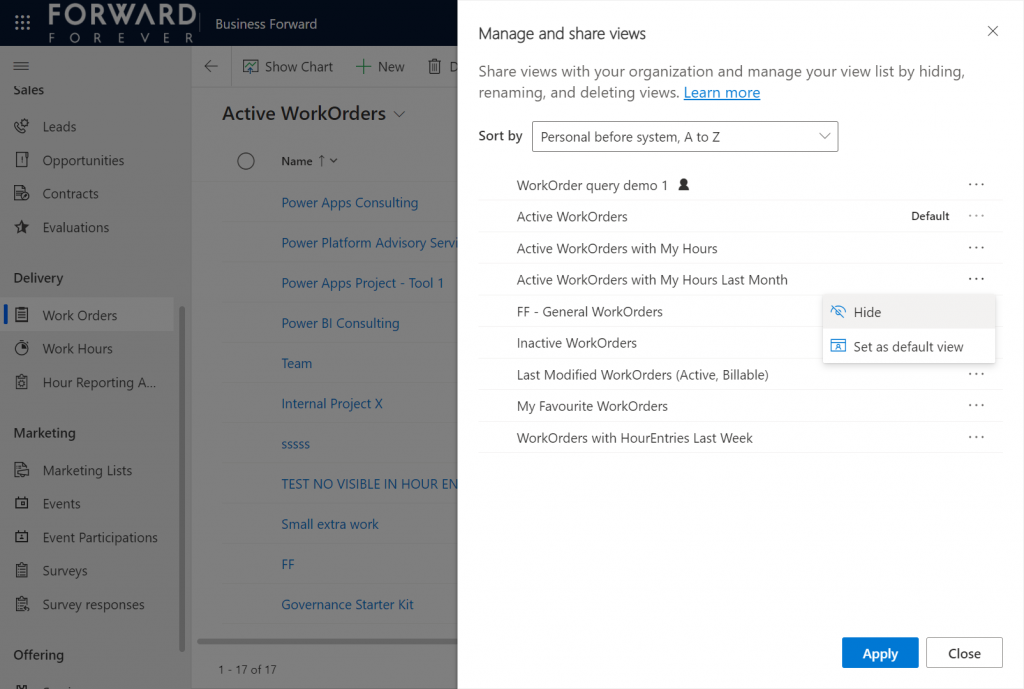
Compared to what we used to have in Advanced Find, the enanced personal view management now launched in preview is a thing of beauty. Changing the sort order and hiding unnecessary views are very welcome additions to how the power users will be able to take control of their business app UI details.
“Hiding a view is a way to personalize the view list and reduce clutter by making views not be visible in the view selector. A view may be needed for a specific purpose periodically or a view could be shared with you that you may not need it anymore. In such instances, hiding enables you to manage your view list by seeing only the views that are most important for you.”
This probably won’t solve all the pain associated with view management as their number grows in “busy” tables used for different kinds of analysis, both via system and personal views. Yet it’s a simple, user-driven concept to offer personalization within Model-driven apps.
Closing the Advanced Find popup
We’ve known for quite some time that eventually the legacy web client popup with Advanced Find will not be supported anymore. This modern advanced find feature in 2022 release wave 1 aims to include the necessary features to allow deprecating a very central part of the product. It does a pretty good job and the general principles in modern advanced find are quite justified.
Will I miss the good ol’ Advanced Find once the new feature is enabled and the icon to the classic experience is gone? Of course I will. Like with many of the modernization efforts around Power Apps as a business app platform, the new experiences always take away something that used to allow XRM veterans like myself to be productive. Often we get less information density in the screens, blocking the use of multiple tabs, slower loading times due to new API dependencies, more options hidden/missing due to simplification efforts…
Enough with the complaining already! Things weren’t better before, they were just different. What used to be a single app in a single service is now a cloud where traditional boundaries are vanishing at an astonishing rate. Now everyone really can make apps, and there can be a thousand “XRMs” in an organization. Both the audience and the purpose of these tools is forever evolving – and so must their features.
Update 2022-06-08: Microsoft has started to roll out an enhancement to the view filter editing screen. There will be a button to download the FetchXML definition of the view filters. Also, export to Excel will now honor the filter modifications done, without requiring the view to be saved. Just like in the good ol’ Advanced Find days then.😊
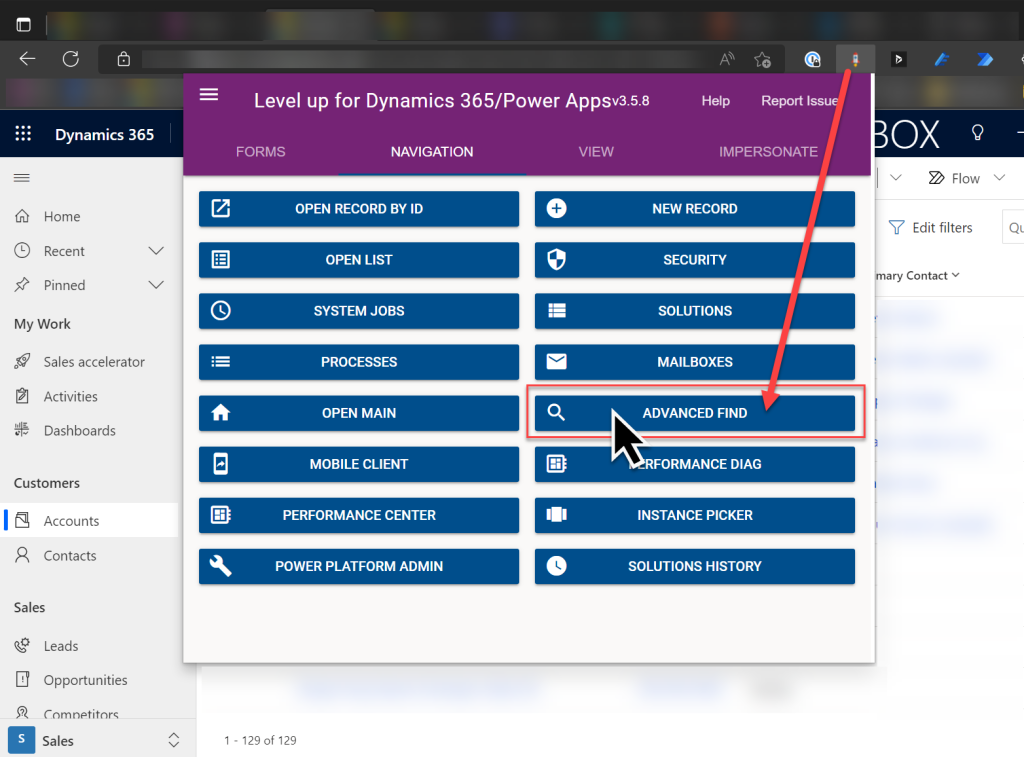
Update 2022-08-02: As we get closer to 2022 Release Wave 2 when the classic Advanced Find button will be hidden from the UI for everyone (see Modern advanced find turned on by default), you should keep in mind that there is still a way to open the Advance Find page with the direct URL. You can (and should) install the LevelUp extension for Chrome/Edge/Firefox to have access to this dynamic URL. This will hopefully work for as long as Microsoft keeps the legacy web client page infrastructure alive.
So far in my experiments with Power Fx and the modern commanding preview in Model-driven Power Apps, I’ve worked with changing record status and cloning a set of existing records. This time I’ll create a custom button for another common CRM scenario: viewing the contact’s LinkedIn profile information.
In our internal CRM application (Business Forward app) I’ve earlier added a custom field “LinkedIn URL” for contact records, which can be used for storing the reference to the contact’s profile. Not all contacts will of course have this field filled, which is why it’s a common need to go and search for the information on linkedin.com. Could we save a few clicks in this manual process with a simple button? We certainly can!
This scenario is straightforward enough that you could well use it as your first custom command bar button in your Model-driven Power App or Dynamics 365 CE app.
Button 1: LinkedIn Search
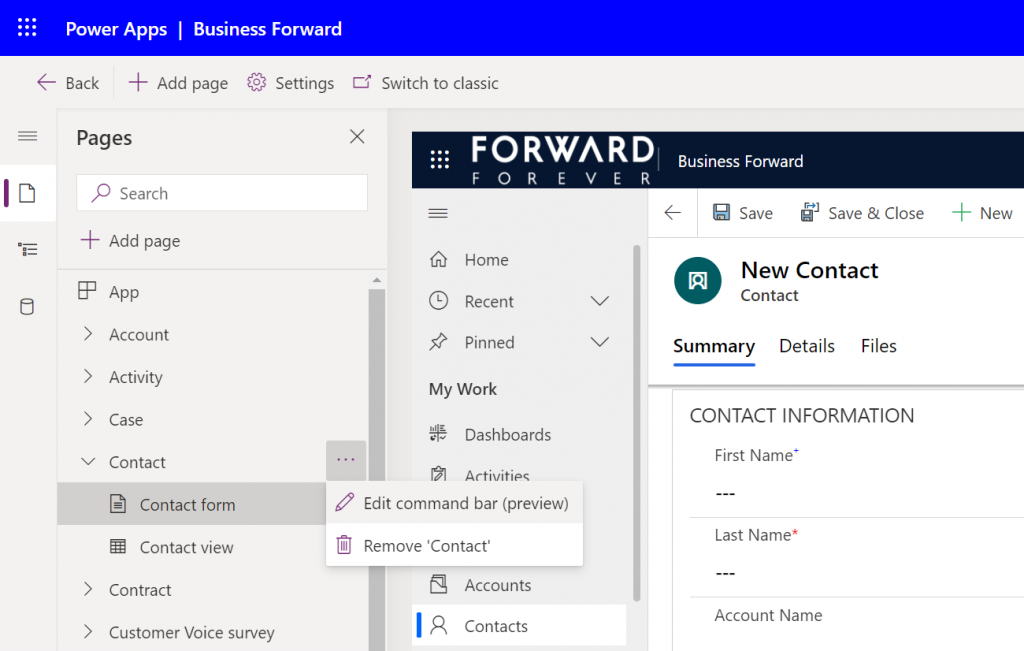
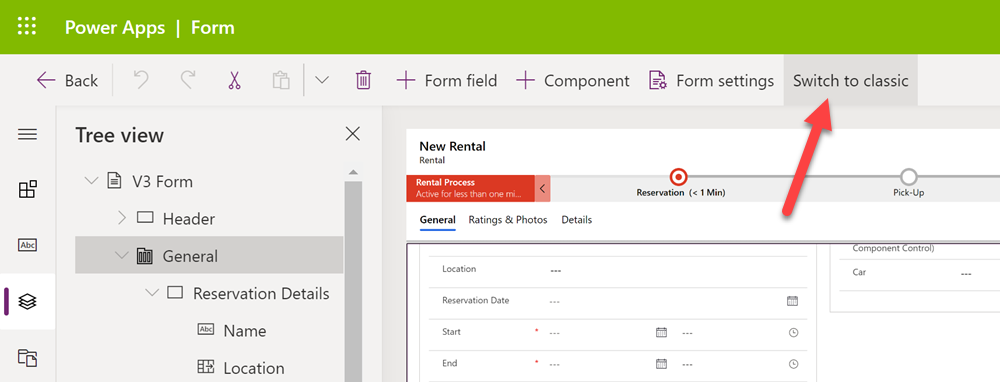
Open up your Model-driven app in the preview editor that allows you to access the list of pages in the app. Then for the contact page select the three dots and click “edit command bar (preview)”:
Select the contact’s main form as the target and the command designer will open. Pick a suitable spot in the existing list of commands and add a new button called “LinkedIn Search”. You can choose the out-of-the-box “LinkedInLogo” icon for it.
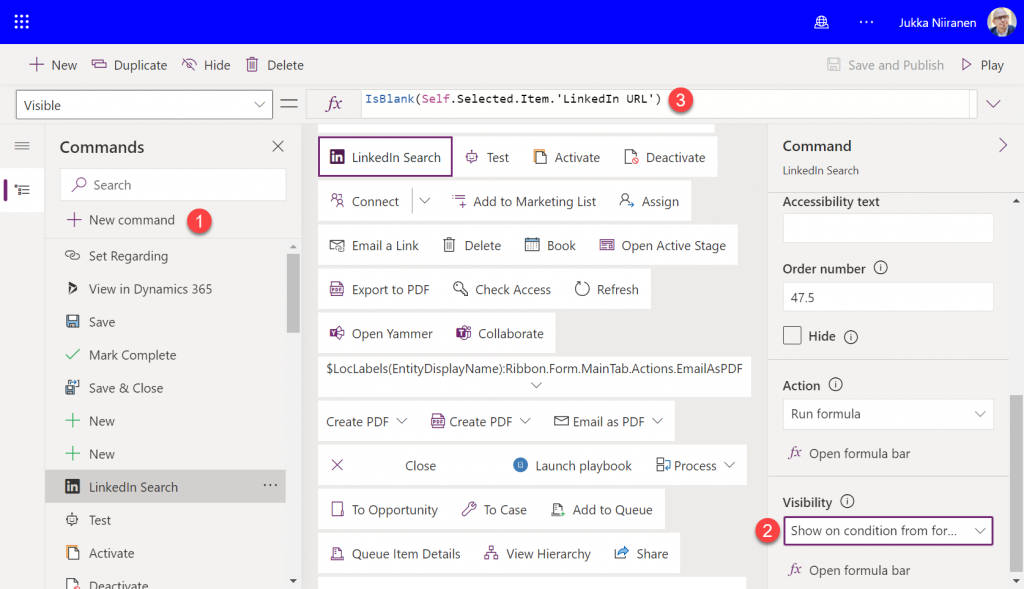
We will want to have a visibility rule that will conditionally show/hide the button, based on whether the contact’s custom text field “LinkedIn URL” contains data or not. The IsBlank function will return a true value when the field is empty, so we can directly input that into the Visible property of our button:
IsBlank(Self.Selected.Item.'LinkedIn URL')
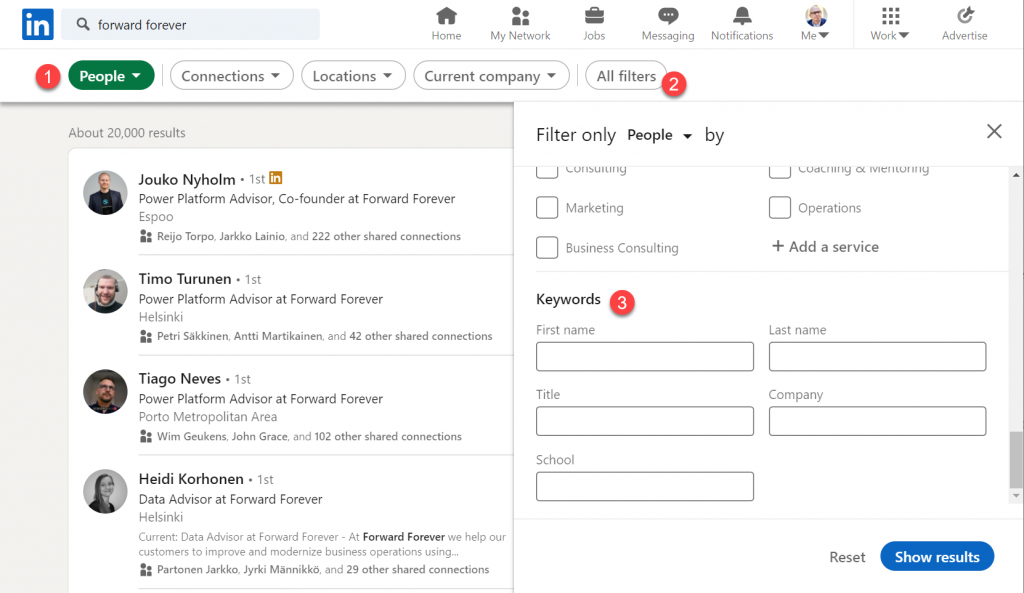
Next, let’s go over to LinkedIn website and study how their search actually works. There is of course the global search box in the top navigation bar, but when looking at the search results page we discover additional options for applying specific filters.
This is the faceted search page, which allows us to specify that we are interested in finding people (1) rather than companies or content. Clicking on “all filters” (2) reveals an even more granular search experience, allowing us to enter keywords (3) for fields like “first name” and “last name”.
If we were to search for Satya Nadella as an example, the result page URL would turn into this:
This is a great scenario for using Power Fx to manipulate a text string for our app’s purposes and inject some dynamic values in there. We can now start designing our OnSelect formula needed for our LinkedIn Search button. It should do these things:
Open the LinkedIn search page in a new browser tab
Insert the contact’s name information into firstName and lastName query parameters
Ensure that any spaces in the name fields don’t mess up our URL validity
The Launch function will take care of opening the browser tab. For joining the static and dynamic parts of the URL together, we use the string concatenation operator “&”. As for handling any non-URL friendly characters, we can use the EncodeURL function and pass the contact’s first & last name fields to it.
Let’s save and publish these button configurations, which will generate a component library called “OurAppName_DefaultCommandLibrary” into our solution. Be sure to publish all customizations for your solution and also hit refresh a few times on the Power Apps application screen to make things come alive. (Note: you may also get an error the first time you click a custom command bar button, at least for me that happens every time, but then clears away.)
Now when we open a contact record that doesn’t have a value in the “LinkedIn URL” field, the new button should be visible. Clicking on it will open up the LinkedIn people search page with results where the first & last name match the contact’s information:
That was pretty easy!
Button 2: LinkedIn Profile
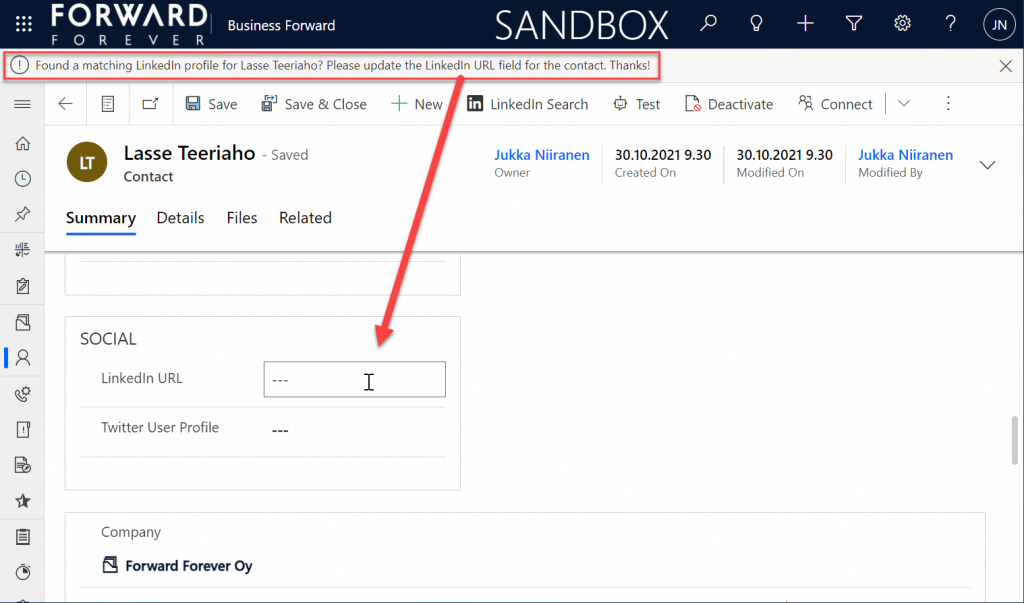
It would be nice if the next user of our CRM system wouldn’t have to browser through the people search results page to repeat the same query. Unfortunately there’s nothing we could grab with Power Fx from the first user’s new browser tab automatically, so we’ll need to ask the user to copy the URL and past it into our contact’s custom field.
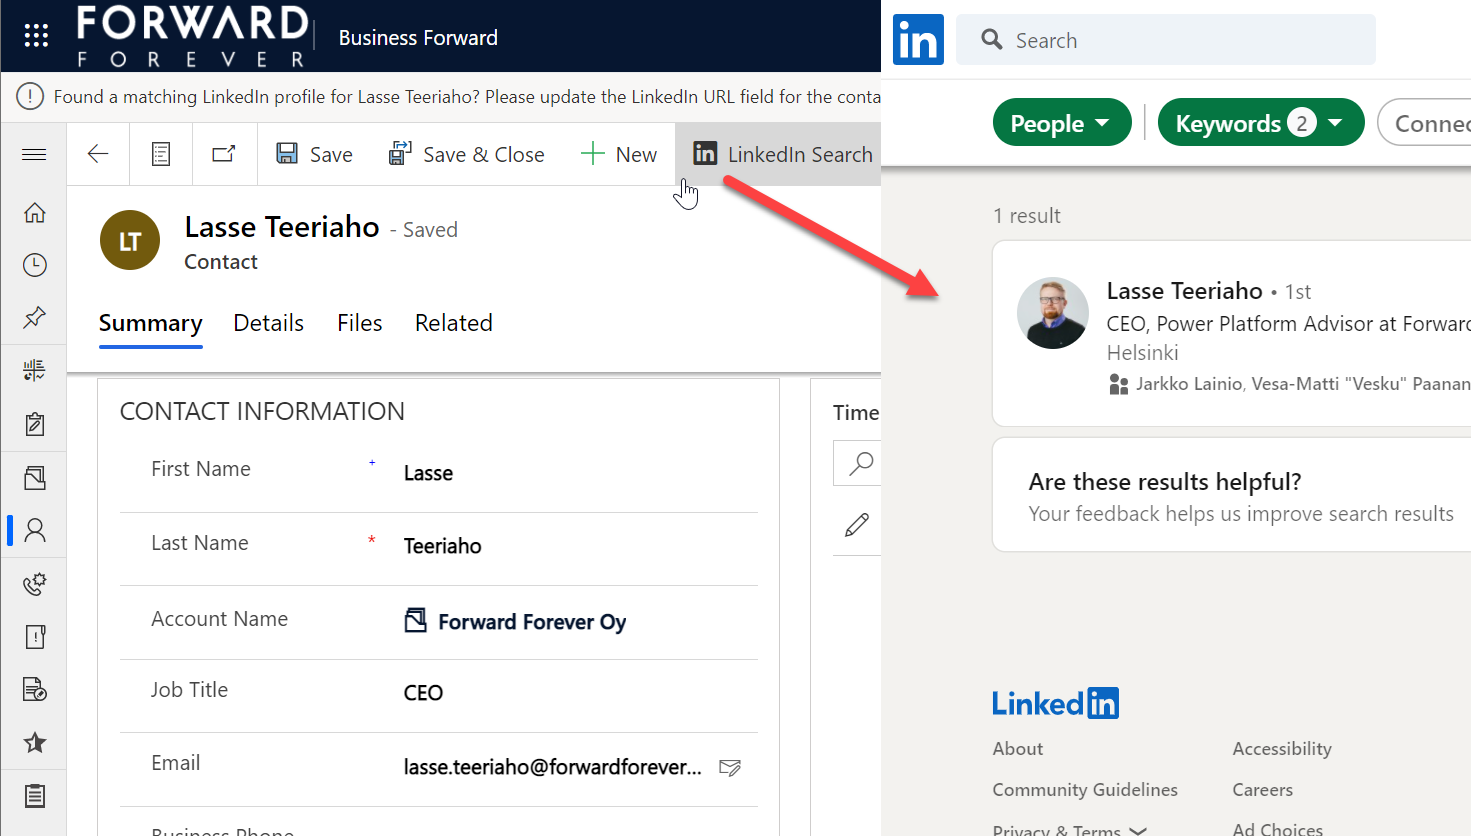
To remind them about the importance of updating CRM contact data, let’s show a notification bar that’s waiting for the user once they return back to the Power Apps tab:
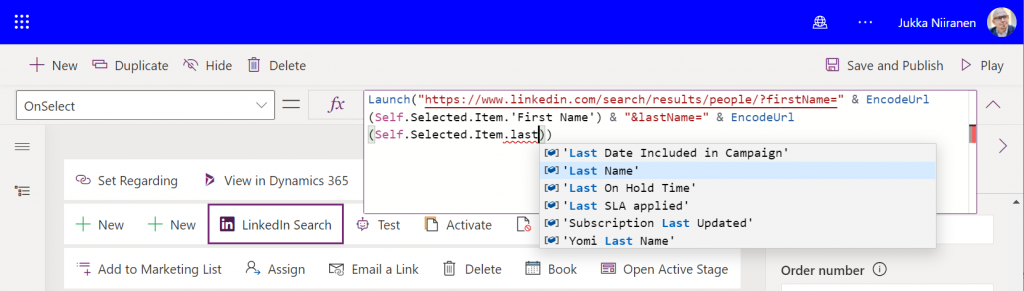
With this additional step, the OnSave event of our button 1 will therefore have two actions: launch and notify.
Launch("https://www.linkedin.com/search/results/people/?firstName=" & EncodeUrl(Self.Selected.Item.'First Name') & "&lastName=" & EncodeUrl(Self.Selected.Item.'Last Name'));
Notify("Found a matching LinkedIn profile for " & Self.Selected.Item.'First Name' & " " & Self.Selected.Item.'Last Name' & "? Please update the LinkedIn URL field for the contact. Thanks!")
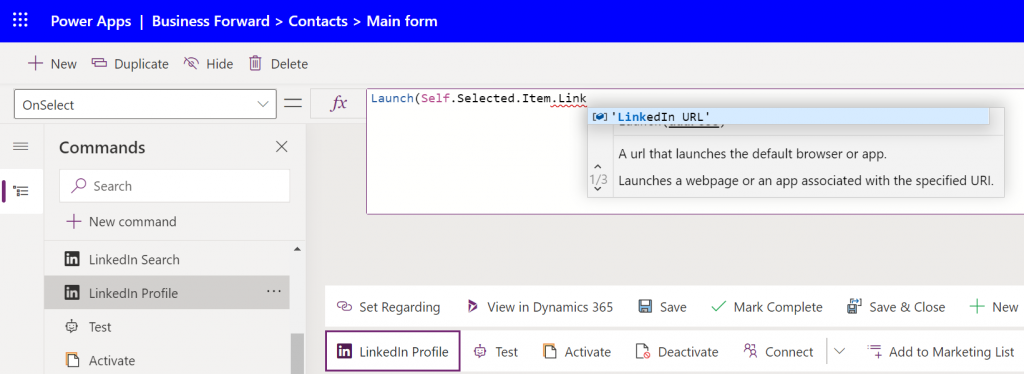
Now we can move on to button number 2. If the contact record already has a LinkedIn URL, we’d of course want to skip the unnecessary search part and open the profile page directly.
Let’s add another command bar button called “LinkedIn Profile”. The OnSelect property will be very simple this time: we just pass the Launch function a parameter containing the value of the “LinkedIn URL” field.
This second button should be visible only when the first button is not, to cover the two possible scenarios of the URL field having a value or not. While we could have conditional logic in our Power Fx to handle either scenario with a single formula, we don’t have the possibility to dynamically change the display names (or other properties) of the command bar buttons. So, two buttons with a similar feature is the approach we need to take.
How do we reverse the visibility rule? For some reason adding a simple exclamation mark before the function doesn’t work as a negation operator in a custom button Power Fx formula like it would in a Canvas app formula, so I wrote the Visible formula of the new button in a less pretty format:
Save, publish, hit F5 a few times & wait. Now let’s open a contact record that already has the URL field filled. We see that instead of “LinkedIn Search” the command bar button now says “LinkedIn Profile”. Clicking on it takes us straight into the correct profile page:
That’s all there’s to it!
Closing thoughts
I would have actually wanted to write a bit more complex formula than this, but there are a number of limitations in the current modern commanding preview feature that have blocked my other scenarios.
For instance, there doesn’t seem to be any way currently to access the parent account information of a contact. Since under the hood it’s a customer lookup, meaning a polymorphic relationship that can reference either an account or contact record, we’d need to use the AsType function. That doesn’t appear to be supported for command bar buttons, so I couldn’t even grab the name of the company to be injected into the LinkedIn search URL to get better matches. Not a showstopper, but definitely something to add into the button once it becomes supported.
Due to its preview status, some things in custom commands that used to work earlier aren’t working anymore. The record cloning example I built three weeks ago used the Set function, but today that has been removed from the modern commanding preview supported functions. Now that we can’t use any variables, the resulting Power Fx formulas would have to be constructed via the With function. In the custom button scenarios I had originally planned to build, I can’t easily see how to build them without variables and not causing a headache for myself, so they are currently on hold until the feature matures a bit.
One question that comes to mind when building this example LinkedIn button is “why do we have to do it ourselves?” After all, Microsoft owns LinkedIn, so it would kinda make sense if there was some built-in integration at least between Dynamics 365 and LinkedIn to cover such simple profile matching scenarios. In fact, back in the April 2019 release wave an out-of-the-box integration for Dynamics 365 contacts was initially promised, but later cancelled:
It's a shame this basic LinkedIn integration feature never landed in Dynamics 365 and we still need to open Outlook on the web to see the matching LI profile😕 https://t.co/2gz2PIgjP2
— Jukka Niiranen mstdn.social/@jukkan (@jukkan) January 21, 2020
Sure, there is the Relationship Sales package available at $162/user/month for those who need a hardcore social selling tool with Dynamics 365 Sales and LinkedIn Sales Navigator. Alternatively, there’s the “$0” feature built into Outlook that will show the matching LinkedIn profile previews for the contacts stored in your address book.
In between, there’s… nothing. It was interesting to reflect back on this topic by reading my own blog post from 2013 on LinkedIn, Dynamics CRM and Social Selling. The world has of course changed a lot from those days, with data privacy concerns as well as legislation affecting the ways in which this type of contact information can be exposed for commercial purposes. All the old iFrame options and LinkedIn APIs have been shut down, meaning pretty much all you can do without the paid LinkedIn plan is to create a low-code shortcut button like the one I showed in this article.
In my previous post I built my very first command bar button based on the modern commanding feature currently in preview. This time we’ll continue creating similar generic features often requested yet missing in the standard Model-driven Power Apps or Dynamics 365 Customer Engagement apps.
Repeated entry of data that already exists in the system should always be a task we aim to minimize in the business applications we build, to increase the likelihood of A) the data being recorded in the first place and B) reducing errors resulting from manual data entry. Sometimes there may be a perfectly valid business need why several nearly identical records should exist in the Dataverse database. In such scenarios, it’s common that users will at some point request a “clone this record” feature to be added into the app when they get tired of typing in the same values over and over again.
Such functionality has traditionally been implemented via a custom command bar button added with Ribbon Workbench, which then runs JavaScript & possibly a plugin. You could also perform the action with an on-demand XRM workflow. How about the modern command designer, could we do all this in Power Fx? Let’s find out!
Power Fx for cloning asset records
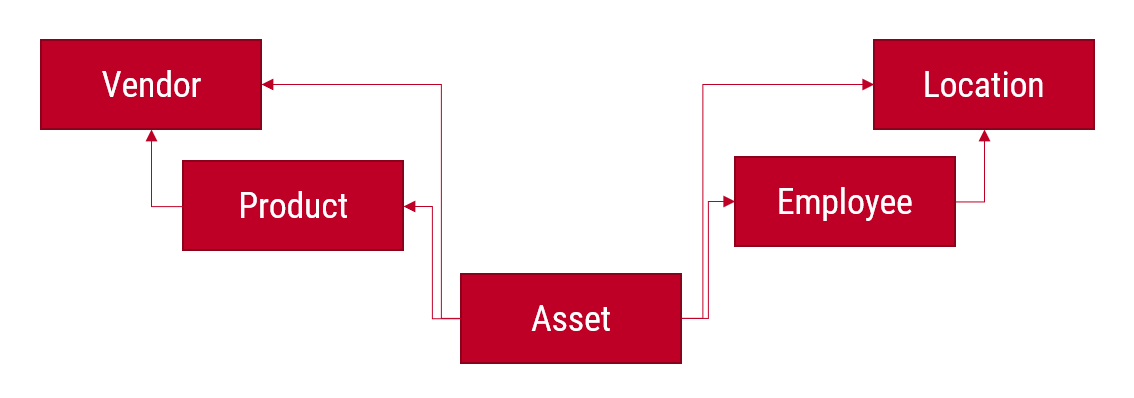
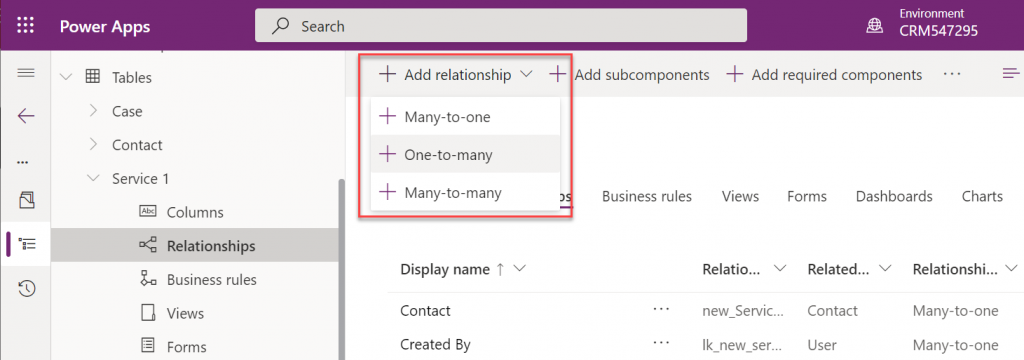
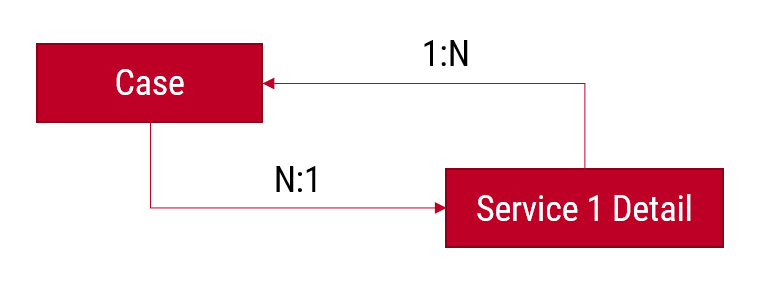
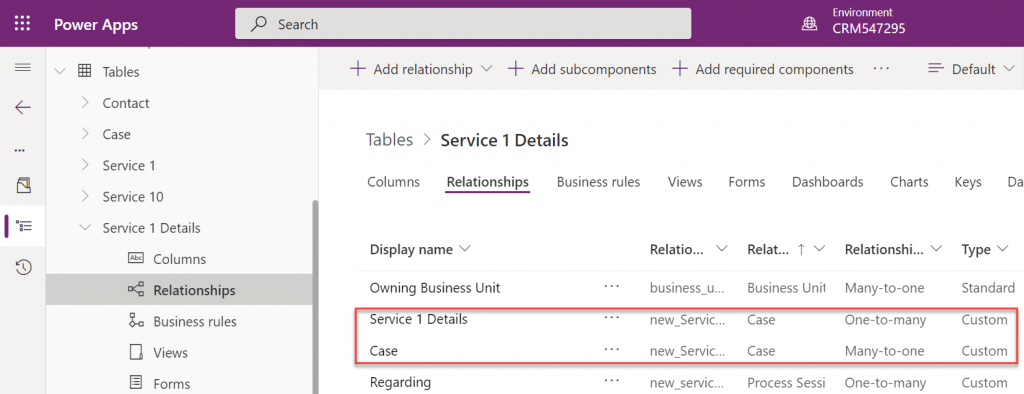
In our scenario we are working with a custom IT asset management app that has the following Dataverse tables and relationships:
Let’s say that we often provide our employees the same phone model and we’d therefore want to make it faster to add these as asset records by being able to clone an existing asset as the starting point.
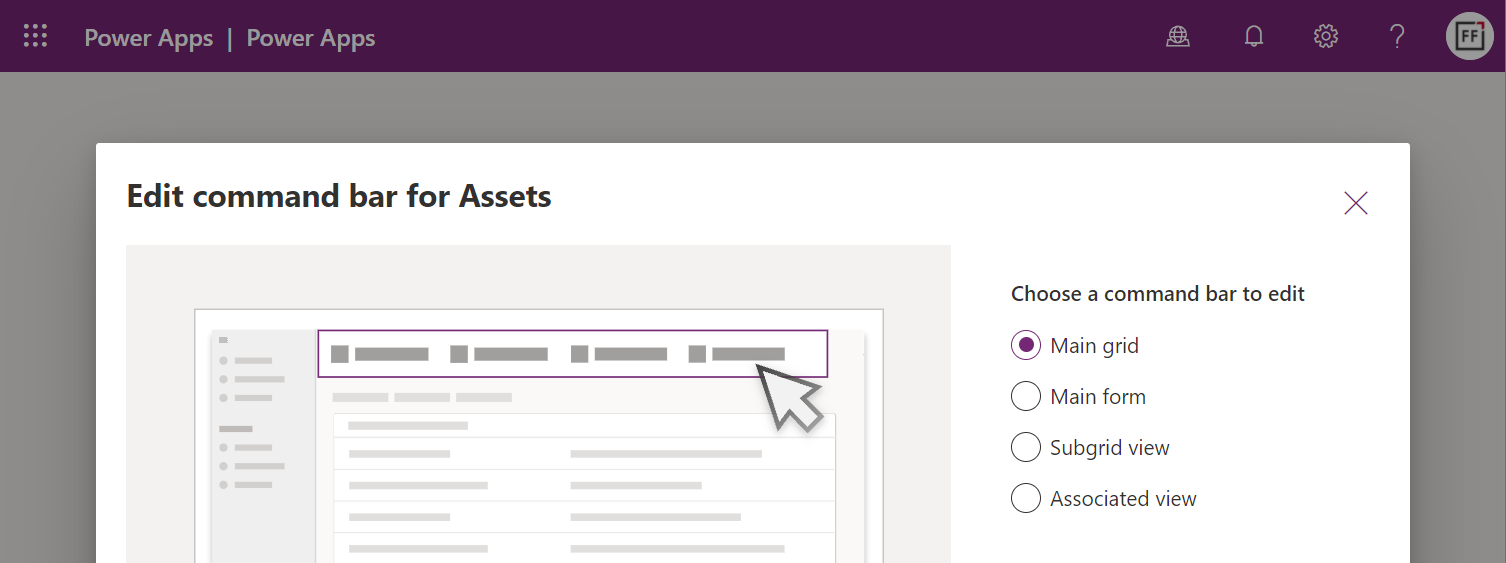
First we’ll launch the preview version of the Model-driven app designer and choose to edit the command bar for the asset table. This time we’ll target the main grid:
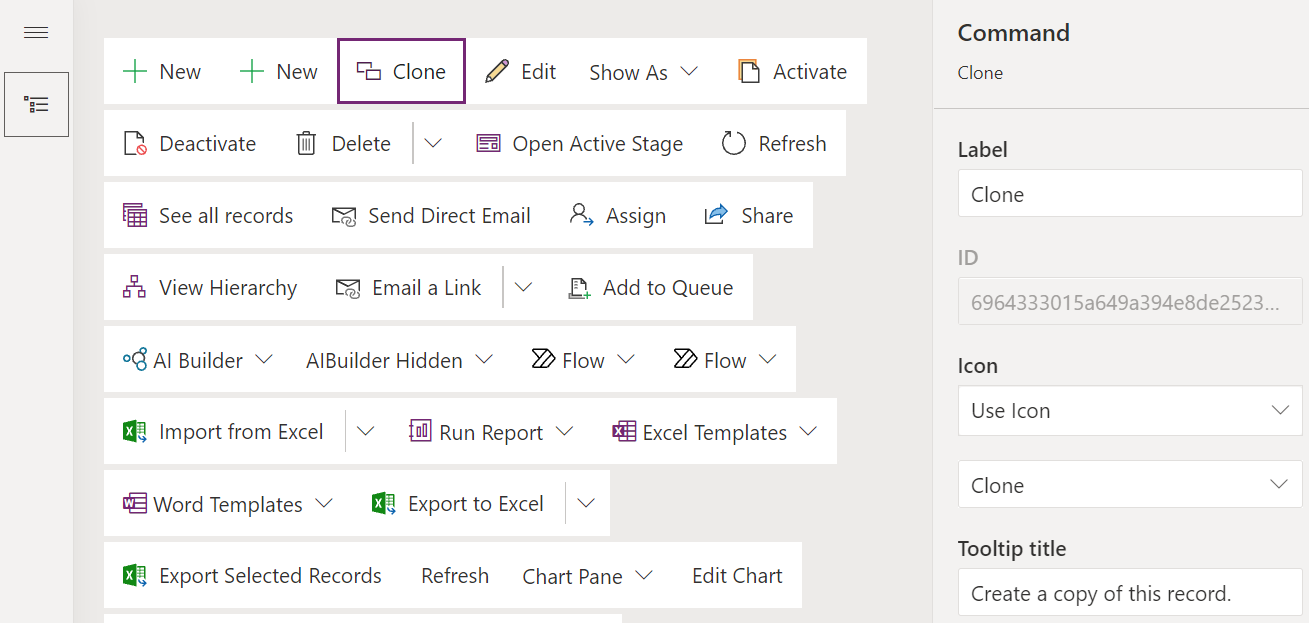
In the command designer, let’s add a new command bar button called “Clone” and start thinking about the required configuration for it.
We’re going to want to do a similar limitation of scope as in the previous article, by supporting only a single record at a time. Multi-record selection is beyond what we can currently process, so a visibility rule is needed for us to ensure that the button is clickable only when a single record from the table main grid has been selected. The way to achieve this is:
CountRows(Self.Selected.AllItems) = 1
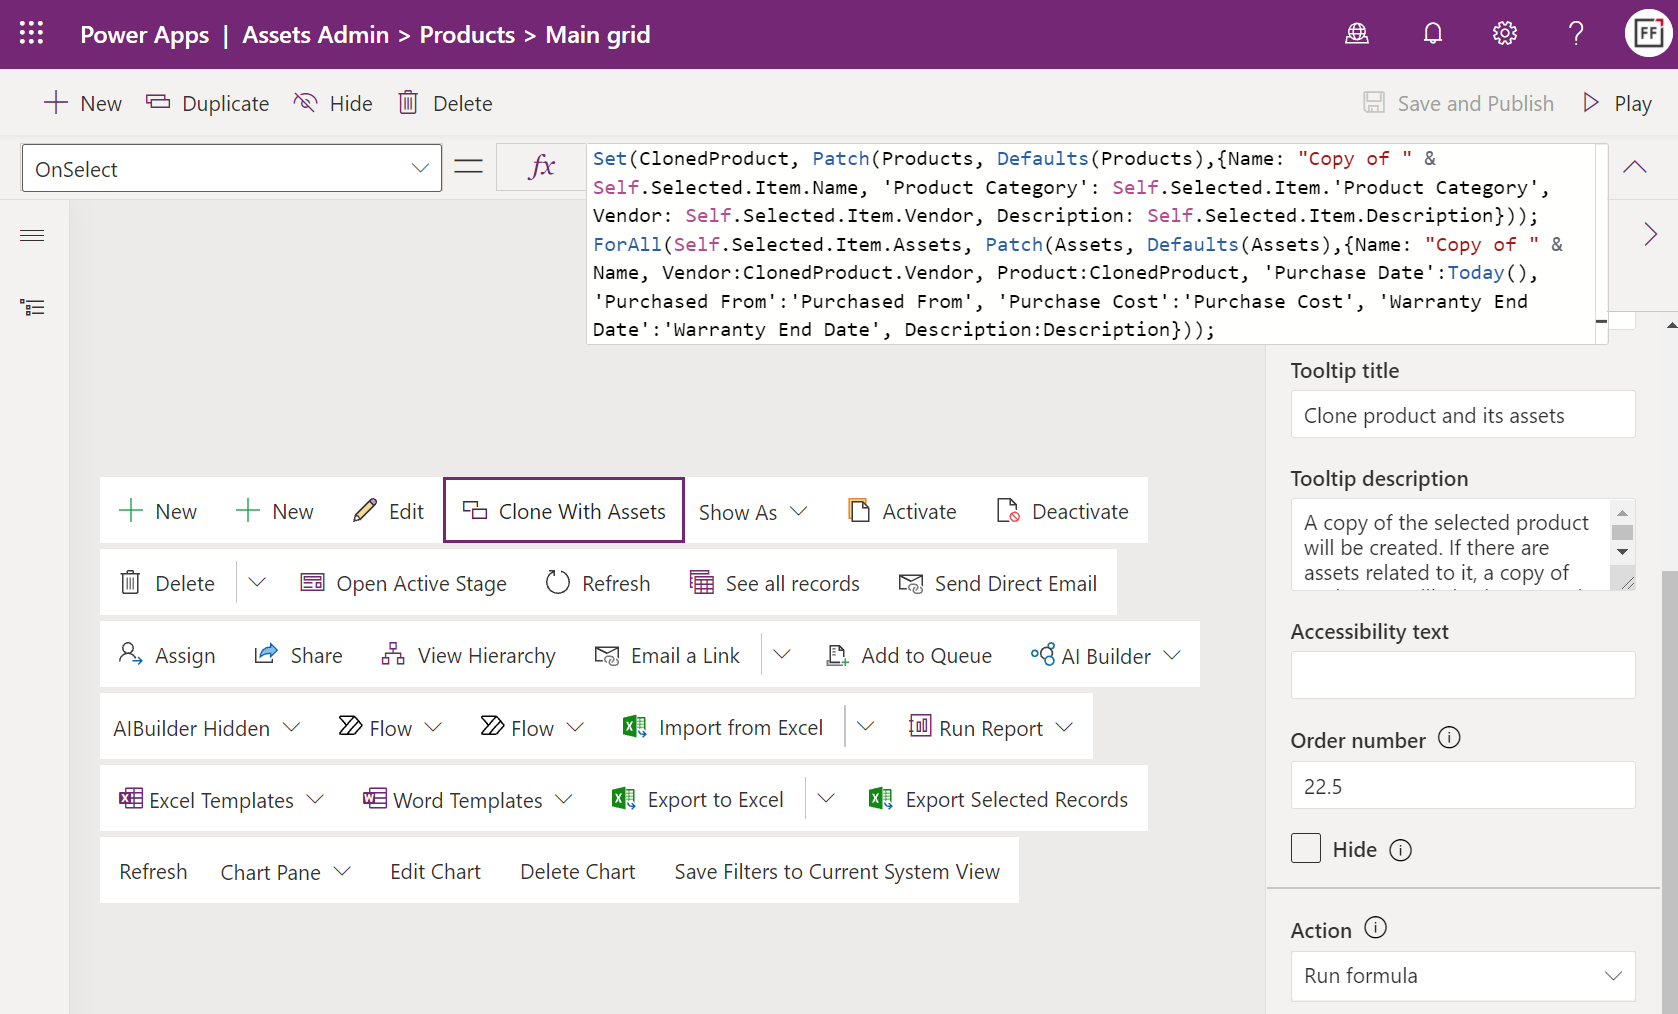
Then for the button’s action part. The end result of what we need to create looks like this:
Unlike in the previous article, we are now not updating the currently selected record but rather creating a brand new one. We’re able to use the exact same kind of Patch formula that any Canvas app would leverage when adding Dataverse records and not using the built-in create forms.
Our assets table has fields than can be directly copied from the earlier asset record. These include text fields like description and lookup fields like vendor and product. The syntax for the formula is very straightforward for all these: just use “Self.Selected.Item.[YourFieldNameHere]” to populate the field on the new record to be patched.
We can of course manipulate the field values for our cloned record via simple tweaks in the Power Fx formula. Let’s set the asset’s purchased date value to Today() and add a “Copy of” prefix to the asset name field. This ease of modifying the field values based on evolving business requirements is one of the key benefits from having the logic defined with a low-code programming language that a citizen developer can use with confidence.
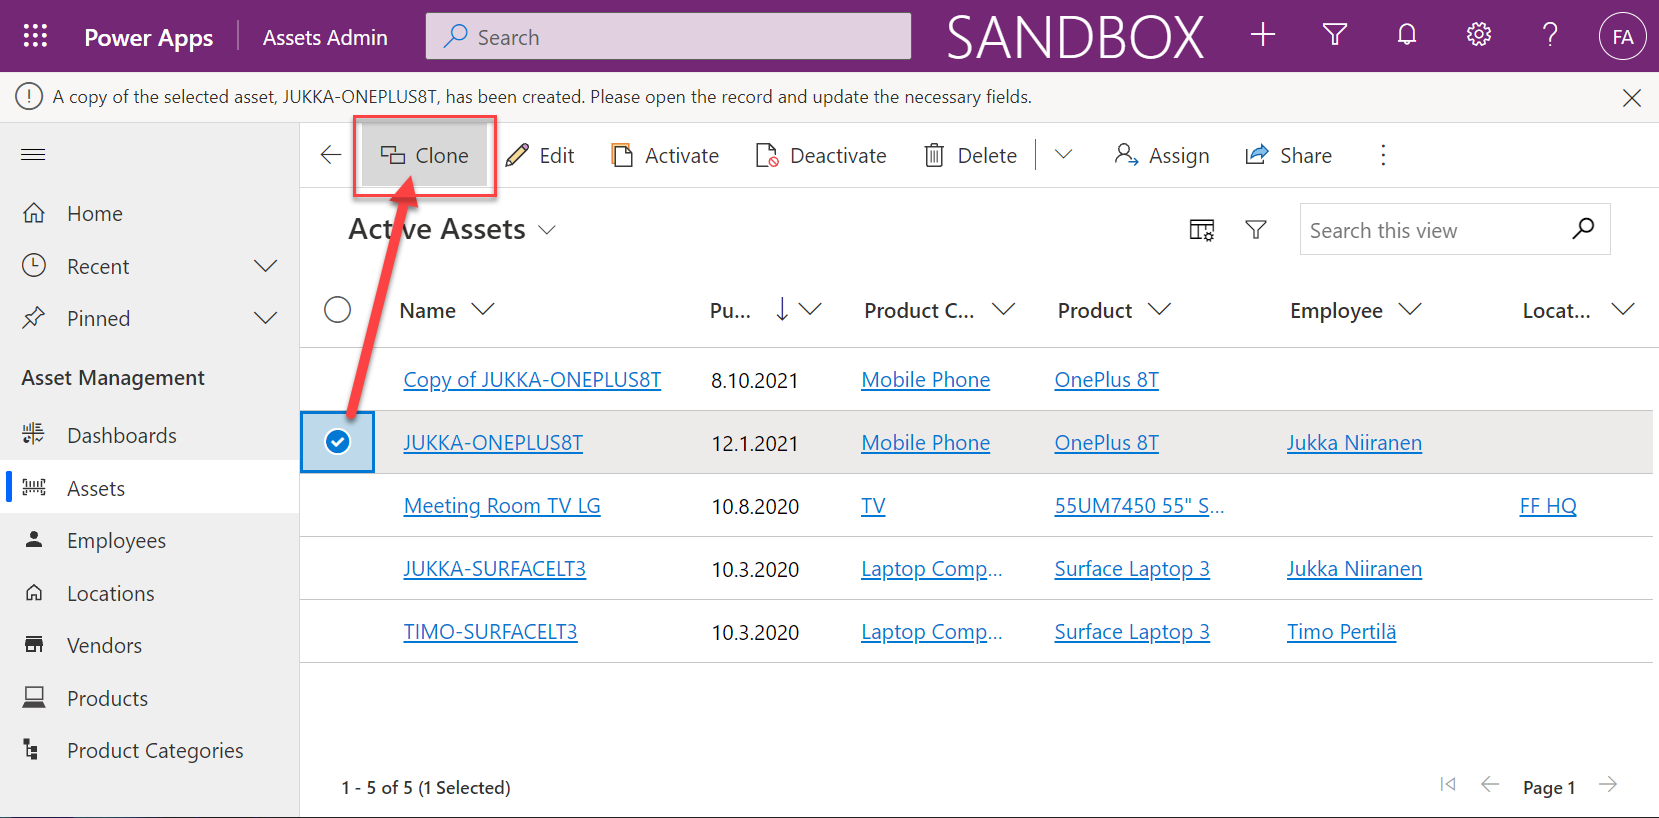
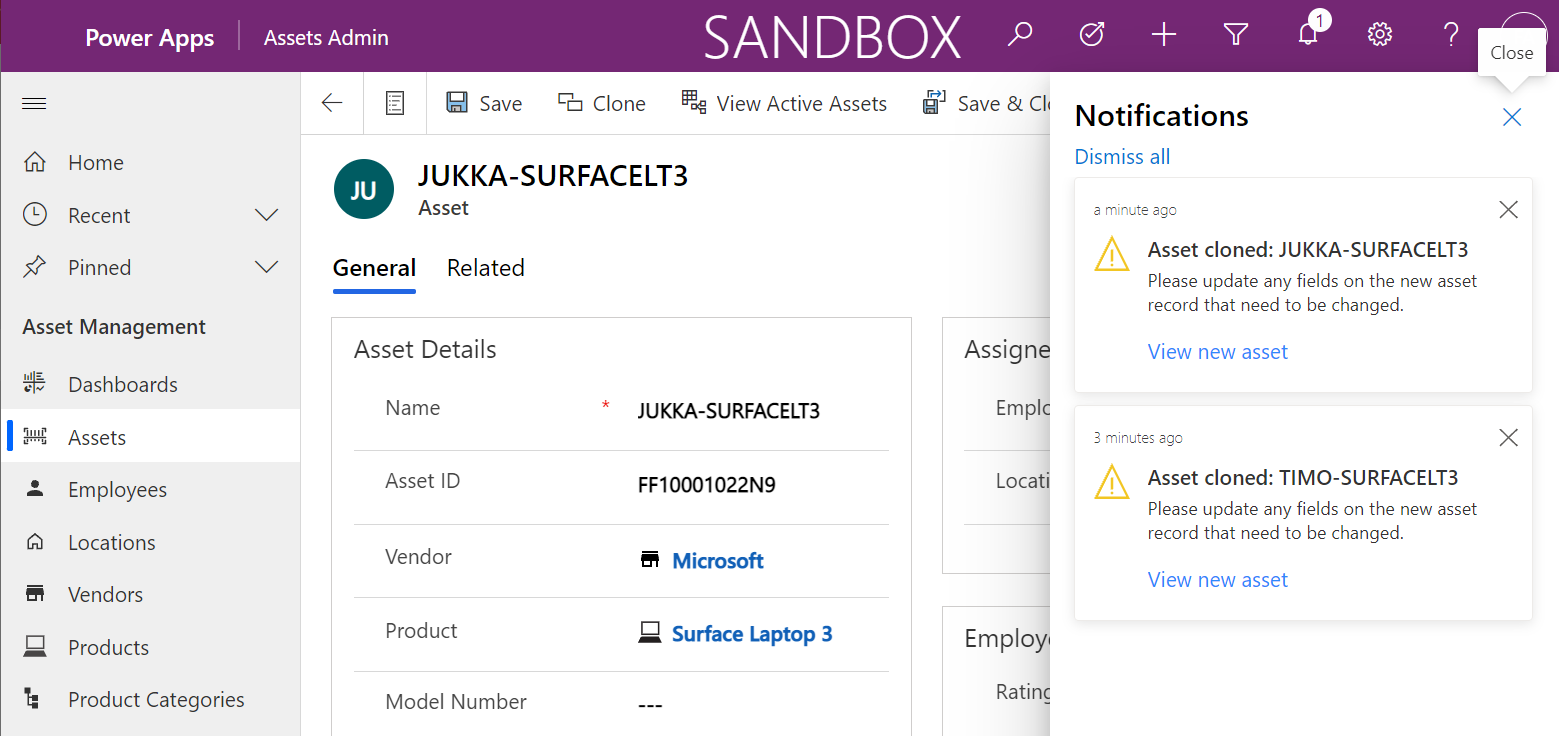
After the patch, we can call up the notification bar in the Model-driven app to display a confirmation message from the clone operation. That’s pretty much all there’s to it, so here’s our formula:
Patch(Assets, Defaults(Assets),{Name: "Copy of " & Self.Selected.Item.Name, Vendor:Self.Selected.Item.Vendor, Product:Self.Selected.Item.Product, 'Purchase Date':Today(), 'Purchased From':Self.Selected.Item.'Purchased From', 'Purchase Cost':Self.Selected.Item.'Purchase Cost', 'Warranty End Date':Self.Selected.Item.'Warranty End Date', Description:Self.Selected.Item.Description});
Notify("A copy of the selected asset, " & Self.Selected.Item.Name & ", has been created. Please open the record and update the necessary fields.")
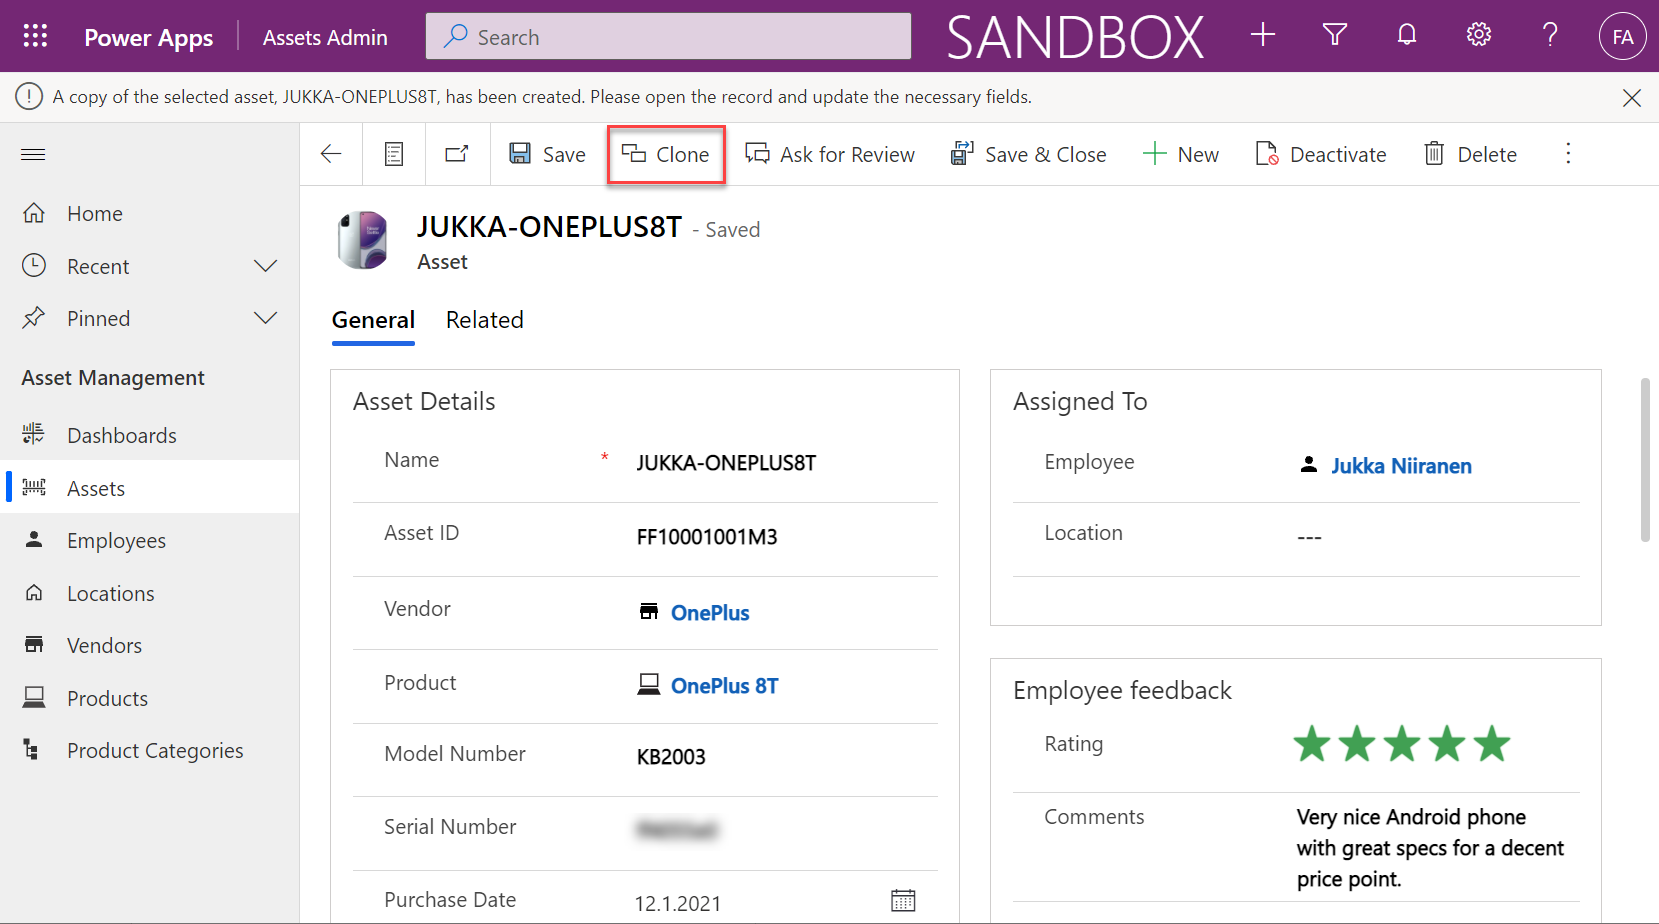
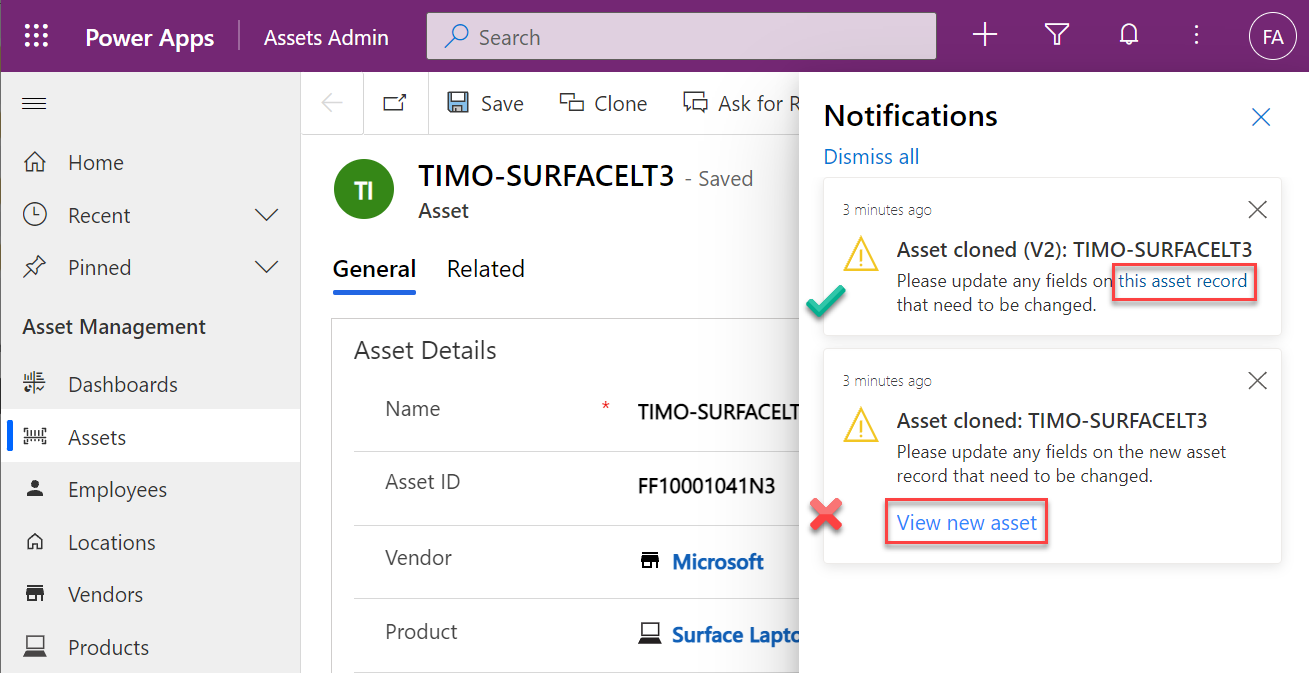
Here’s the resulting end user experience for cloning a record from the main grid:
Not too bad at all for a relatively simple formula, added as a command bar button via a visual editor available in the platform.
Limitations of Power Fx commands today
To be honest, the first cloning scenario that I actually set out to build was targeting the main form. Adding the custom button here is just as simple as the main grid. Actually, since you don’t even have to think about the visibility rules and multiple selection, it would be the logical place for any new Power Fx user to start customizing their Model-driven app command bar. However, I didn’t get exactly the result I hoped for there.
The general cloning logic works on the form, too, but there is an unfortunate user experience issue. Can you spot it?
In the above image, we have already clicked on the Clone button. We have a notification bar as a confirmation. However, we are still sitting on the original record form, not the cloned version of it. If a user would for a moment think that “ok here’s the new cloned record, let’s modify a few fields” the business data would be messed up.
Could we take the user to the form of the newly created record instead? In theory, yes. In practice, nothing I’ve tried works as of today. The Navigate function that should be supported for custom command buttons doesn’t want to co-exist with any other function in the same action of a custom button. It doesn’t want to accept the newly patched record as the target to be navigated to. Even if we’d navigate to the view for all active assets after creating a new record, the UI will still return to the original record after everything in our button’s action formula has been run.
With this current limitation in mind, I started to explore if we’d have any other method to take the user away from the original record form. Navigating to a dedicated “Cloned Assets” view was out of the question, due to the aforementioned feature/bug. Using the Model-driven app notification bar to display and action button with a link seems to not be an option since the documentation says the Notify function available in the command bar is actually that from the Canvas world. This doesn’t have the same action property as addGlobalNotification on the XRM side that can show a clickable link.
One thing I really hoped would work is the new in-app notifications for Model-driven apps. This is such an excellent scenario for leveraging Power Fx to construct a rich message aimed at the specific user with targeted actions and helpful information. It could work the way shown below:
But in the case of the command bar, it doesn’t work today. You see, the above examples of in-app notifications have been triggered from a dummy Canvas app I used for testing the notification feature in general. I took the Power Fx code from the awesome blog post by Diana Birkelbach that describes how to send in-app notifications from Custom Pages.
The reason why you can’t make this work (at least to my knowledge) inside the command bar is the lack of support for collections. You see, in order to construct the JSON data needed for adding an action button into the notification, you would in practice need to feed a collection into the JSON function in your Power Fx. This will result in a “formula within canvas component manipulates collection” warning inside the command designer and this part of your formula will silently fail upon clicking the button.
Update 2021-10-10: Scott Durow gave me a great tip over on LinkedIn, reminding that the in-app notification body text actually supports Markdown syntax. This way you could include a dynamic link that points to the newly created record clone, without having to insert the more complex strings needed for displaying proper action buttons in the notification:
Presumably all of these things will one day work, which will give you plenty of options to design a great user experience for your custom commands. Just be cautious when building on top of the preview feature of modern commanding.
Cloning parent + child records
The above example was a very simple case of record cloning, as we only needed to replicate data from one table. In real world scenarios we often run into a requirement where also the child records in related tables would need to be cloned together with the parent record. Can we achieve this with Power Fx?
Let’s use the same IT asset management data model but move one level higher and build a custom command button to clone a product record and its related asset records. Meaning, both A + B in this picture:
So, we’d like to first create a new product record, which is the exact same Power Fx formula pattern as before. After that’s done, we’d then need to have one or more record create events, depending on how many assets (if any) there are under the original product.
Let’s use the ForAll function to do a patch for each of the existing assets. To identify these records, we can reference them from under the current record with the familiar “dot notation” to travel down the Dataverse table relationships: Self.Selected.Item.Assets.
Then what we need to do is to ensure we link these newly patched assets to the new product record we created in the first step. To achieve this, I’ve added a ClonedProduct variable that is set to the result of the first patch. We can then use this ClonedProduct object when setting values for the N asset records we create inside the ForAll loop.
Our formula for the “Clone With Assets” button on the product main grid is as follows:
Set(ClonedProduct, Patch(Products, Defaults(Products),{Name: "Copy of " & Self.Selected.Item.Name, 'Product Category': Self.Selected.Item.'Product Category', Vendor: Self.Selected.Item.Vendor, Description: Self.Selected.Item.Description}));
ForAll(Self.Selected.Item.Assets, Patch(Assets, Defaults(Assets),{Name: "Copy of " & Name, Vendor:ClonedProduct.Vendor, Product:ClonedProduct, 'Purchase Date':Today(), 'Purchased From':'Purchased From', 'Purchase Cost':'Purchase Cost', 'Warranty End Date':'Warranty End Date', Description:Description}));
Notify("Product " & Self.Selected.Item.Name & " and its assets have been cloned. Please open the records and update the necessary fields.")
When selecting a product from the grid and clicking on the button, here’s what the end user will see:
This is already a much more powerful example of a low-code feature that can save time when users aren’t required to re-create similar sets of records over & over again. You will have the flexibility of easily adjusting the specific fields, field values and defaults used in your record cloning action.
Sure, you need to understand the concepts used in the Power Fx formula first. I’d still say the barrier for app makers with no software development background is still lower here compared to building the same thing with client-side JavaScript or server-side C# plugins.
There’s no such thing as 1:1 relationship in Dataverse, and hence your Power Apps Model-driven apps or Dynamics 365 Customer Engagement apps can’t directly have such a data model. Only 1:N (one-to-many), N:1 (many-to-one) and N:N (many-to-many) relationships are available between tables, be it standard or custom ones.
In practice, even the N:N relationship doesn’t actually exist in the database. While the Dataverse table configuration UI allows you to create this relationship type, it actually consists of a hidden intersect table and two 1:N / N:1 relationships that connect the actual tables together (see Dataverse table relationships documentation). Seasoned XRM professionals may even discourage the use of native N:N relationships, as you lose some control and visibility to the relationship due to its hidden nature.
Just because it’s not available in the platform, doesn’t mean there aren’t many real life business scenarios where a requirement to have exactly one record per a record in another table. (OK, “rows” in the latest Dataverse terminology, but I prefer the business process lingo where “record” still is more appropriate.) Also, like with N:N relationships, just because it’s not directly possible to create one, doesn’t mean we couldn’t build the required functionality by using the no-code tools in Power Platform.
In this blog post I’ll demonstrate not only how to create a 1:1 relationship but also how you can offer a pretty nice user experience for working with related records – thanks to the new Form Component Control feature. I’ve covered the feature details in an earlier blog post (“Relational data on Model-driven forms, part 2: Form Component Control”) so please refer to that for more info.
Why would we need 1:1 relationships?
From a theoretical data modelling perspective, you probably shouldn’t be splitting data into multiple tables if there is only a single match expected from either side. On a practical level there can be reasons why it makes sense to not cram everything into a single table, though.
A common source of such requirements are the restrictions of access rights to data. Let’s say that the contact information of a person needs to be widely available to users of the application for various purposes (billing, marketing etc.). However, this contact also happens to be a patient, with details about his or her medical profile being recorded into the same system. Only the doctors should have access to this data. A single contact will match a single patient record (or none, if it has been created for other purposes). If these are in two separate tables, granting access rights can be easily achieved via standard Dataverse security roles: everyone sees the contact table data, but only doctors see the patient details.
“Couldn’t we just use field level security to hide the confidential stuff?” We could, but you have to evaluate whether the approach will really scale to how the system will be used. You see, in addition to security we’ll also need to consider if we’re overloading a single table with too much data. There are hard limits of the maximum number of columns that SQL Server supports for a single table. Thanks to the value-add provided by Dataverse, adding one column into the data model can create many columns in SQL. This means you don’t have anywhere near the 1024 columns per table at your disposal. Also, if you’re working with a standard CDM entity like contact, there will already be close to 300 attributes taking up space before you extend the data model for your specific needs.
I was recently working with a customer that is planning to use Dynamics 365 Customer Service for managing all their service requests in every department they have. This will mean that tens of different types of services will be creating case records into the system. The amount of service specific information that must be available to be captured on case records is easily hundreds, if not thousands of fields. Adding all of these to the case (incident) table wouldn’t be feasible, so instead the solution architecture was designed to incorporate “service detail” tables specific to each service. Each case will have one (or zero) of these records, so it’s a 1:1 relationship between the standard case table and these custom service detail tables.
Establishing 1:1 in the data model
In the scope of our example, the data model will consist of these main tables:
Service 1, Service 2, …, Service N: parental record under which the cases will be created. Think of these as service contracts that a contact person can have for one or more services.
Case: the standard Dataverse / Dynamics 365 table, with lookups to all of the aforementioned Service tables. No other service specific data is stored here.
Service 1 Detail, Service 2 Detail, …, Service N Detail: service specific information that should be found from under each Case, depending on which service it applies to.
Just like the N:N relationships in Dataverse consist of two 1:N’s, the same applies to our manually created 1:1 relationship. Only this time we’re not going to need an intersect table, rather we’ll just link the two records together via the relationships like this:
The Case record will be parental to the Service Detail record, but at the same time the Service Detail will be the Case’s parent. These will appear just as two custom relationships under our table:
Next, we’ll want to ensure that there is always one and only one Service Detail record for a case – IF the case is related to the delivery of the specific Service. Furthermore, we’ll want to get the Service Detail created automatically immediately after case creation, so that users can start entering data on it.
The real-time requirement rules out Power Automate that is asynchronous by nature, so we’ll use the classic XRM workflow engine instead. There will be two levels in the automation:
When a Case record is created, check which of the many Services it is linked to and create a record in the corresponding Service Detail table (establish 1:N relationship).
When a Service Detail record is created, update its parent Case with a reference that sets the Service Detail to also be the parent of that Case (establish N:1 relationship).
Workflow 1 looks like this:
It will then in turn trigger workflow 2:
Notice that we have a check in place that stops the creation of a Service 1 Detail record if one already exists for the Case. If the lookup to Service 1 Detail is empty, we put the reference to our newly created record there and establish the 1:1 relationship.
Working with 1:1 data in the user interface level
This is where the Form Component Control comes in handy. In short, the control is meant to allow both the display and inline editing of a parental record’s form, embedded inside another form. An example of the standard data model use cases would be to show the fields of a the customer contact on a Case form and allow the service representatives to update them without having to open the actual Contact form.
It works in our 1:1 scenario, whereby we can edit the Service Details fields directly on Case form. The reason is that not only is the Service Detail a child record of the Case, it is also the parent – thanks to what we’ve just built above.
You’ll find the explanation of how to use Form Component Controls in my earlier blog post. For now you need to do the configuration in the legacy Solution Explorer side, by editing the form and setting one of the lookup fields to be rendered as Form Component Control:
Now when we create a new Case record and have the Service 1 lookup value populated, after the first save the user can immediately continue to fill the Service 1 Detail values right within the same Case form:
The beauty here is that for the user who’s working with a Case record, they won’t need to know there are two different Dataverse tables used for storing the data. Both the Case record details, Service 1 Details and even the Contact record details are all editable on the single screen. The world looks flat, regardless of our data model with several relationships configured behind the scenes.
Conclusions
Dataverse offers you plenty of configuration tools to get creative with both the data model and the UI in Model-driven Power Apps. While the standard hierarchical structure of parent-child records and table (entity) specific forms is the most common pattern, there are alternatives that may be useful when faced with more complex business requirements.
Dividing the business data into multiple tables with 1:1 relationship may sometimes be perfectly justified, to accomodate the security and data storage requirements. The user interace of Model-driven apps today offers great tools like the Main Form Dialog and Form Component Control to simplify working with proecsses that span across different tables in the underlying database.
If you’d like to see Microsoft implement a native one-to-one feature for Dataverse, please vote on this idea.
Our quest for improving the user experience of Power Apps Model-driven app forms and multi-table data models continues with this part 2 blog post. We will explore how the brand new Form Component Control enables us to essentially blend the forms from two different tables (entities) onto a single form for the user to easily interact with.
In part 1 I laid out the example scenario of a Rental Car app where a single rental event record will always have a single related car record associated with it. Please go and have a look at the details in the earlier post if you want to understand the details.
Our approach was to leverage the Quick View Form to bring in fields from the related parental table (Car) onto the child table (Rental) form. To make the data entry and editing easier we enabled the Main Form Dialog feature for the Car lookup field, which then opens the form in a modal window.
While this UX is a lot nicer than navigating between full screen forms and page loads, it’s still not all that seamless. The user will be very much aware of the fact that he/she is working on two different tables, while ultimately we’d want to show just a single page that abstracts away all this complexity of the underlying relational data model.
What is the Form Component Control?
First of all, it doesn’t have a very sexy name, that’s for sure. During the past few days of exploring the feature, I’ve had to repeatedly go back to the documentation to see what the name was. Even the product team’s announcement “editing related records on a main form in a model driven app” doesn’t sound very exciting. There’s a lot easier way to describe it:
Forms within forms.
It’s simple, and it’s very powerful. Unlike the CRM 2013 era feature of Quick View Forms, there’s no requirement to keep the forms as “view only” , nor particularly “quick” in terms of their contents. It’s just regular forms, and they can be used within other regular forms – full edit capabilities included.
Let’s add a Form Component Control onto our form and see how it works. Unlike with the Main Form Dialog feature discussed in part 1, this Form Component Control feature is unfortunately not yet available in the modern Power Apps form editor. So, we start with what we still need to do very often in the world of Model-driven apps, meaning hit the “Switch to classic” button to launch the classic Solution Explorer that dates back to CRM 2011.
On the form where we have a lookup field (in our case the Car lookup on the Rental form), let’s open its properties dialog, go to the Controls tab and click “Add control”. We can see the MS provided PCF control “Form Component Control” in there. Adding it and setting it to be the default control for our web client is easy, but the configuration requires some additional information that doesn’t have a graphical UI (maybe in the modern form editor then once this feature is supported there).
See the MS documentation page for the detailed steps to take. In short, you’ll need an XML entry that contains the table name (entityname) and the form ID of the main form you want to show for the related table. My configuration looks like this:
Let’s publish the changes and go test out the experience of editing an existing Rental record where the Car record’s fields have been partially populated. On the place where I previously had the Quick View Form with its locked fields, there are now fields coming from the Car table form. Text fields, lookups, choice fields – they all work exactly the way they would if I was editing data that’s natively stored on the Rental record, rather than the related Car record.
The save event happens as part of the hosting form, no additional tricks required. Field validation, notifications and error handling is also integrated, regardless of whether the business logic comes from the main form or the embedded form (details in the Docs).
All in all, this works incredibly well from a user experience perspective in my initial tests. Even if you’re a Dynamics 365 or Power Apps professional you might not realize that the form actually blends two different tables into a single form.
Main form rendering options via Form Component Control
With the old Quick View Form feature, there was a separate form type you had to create for the table for this specific purpose. It was far more limited in contents and layout than the full table forms, which kind of made sense for the purposes of bringing a few key fields in read-only mode onto a the actual main form of a different table. QVF allowed single column only + no other useful controls than the subgrid:
The Form Component Control knows no such boundaries. What you can use there are the existing or new main forms for any table. If you place them within a single narrow column on a multi-column form tab, then all of the form contents will be rendered within that column. Since the Unified Interface forms are inherently responsive by default (which is a big benefit compared to Canvas app screens), everything will just reflow into a layout that would resemble a phone screen – even if you’re viewing the form on a widescreen PC monitor.
What about if we give the Form Component Control a bit more space than a 1/3 of a typical Model-driven table form? The reflow also works the other way around, meaning all of the available screen space will be used. If the area given to FCC can accommodate more columns and the source form has them, they’ll be rendered just like on the “native” viewing experience of that form.
Below is an example of an alternative form design for the Rental table. Instead of having the related Car shown in the middle of the first form tab, I’ve added a second form tab “Car” and dedicated all the space available in it to a single lookup field that has the FCC control enabled. You’ll see from the static Business Process Flow and the form header that we’re firmly on the Rental form all the time, but the second Car tab shows things like the Timeline for that car record (with a note), further tabs for the car’s Dealer, even a Quick View Form referencing the dealer account related to the Car record – all within on FCC control.
This to me is just mind-blowing! We are reaching Inception level UX here, with the main forms embedded AND rendered as a full form tab within another form. I could be on the Rental record form, adding an activity via the Timeline control that’s actually linked to the parental Car record. Not the Rental record where the app navigation, form header, Command Bar and everything else visible on the screen is telling me I’m on. I’ve effectively built a form UI that defies the laws of nature I’ve come to expect from Model-driven apps.
Sure, embedded Canvas apps could do some magic like this already earlier. The big difference is that the user interface of those screens could never match exactly that of a Model-driven app. With FCC there are no visual clues distracting the UX, as everything looks and feels like it’s part of the native experience where Microsoft owns and manages the visual side.
What about record creation instead of edit?
The one gap that exists in the inline editing story for Microsoft’s controls like the Editable Grid or this new Form Component Control is that there’s no possibility to use them for adding new rows into a table. They offer the edit experience, but no create experience. Sure, we have the Quick Create Forms feature available for contextual data entry, but it’s not really optimal. The user shouldn’t have to think about if they are editing existing entries or creating new ones. Yes, the difference between these concepts matters to the platform on a technical level. Still, unless there’s a valid business process requirement for making the data entry experience different for create and update scenarios, it’s something I’d prefer to eliminate from the UI.
When there’s a scenario where we essentially have a one-to-one relationship between tables (no “real” 1:1 relationship exists in Dataverse, but there are ways to fake it), one option would be to automatically create the related parental record behind the scenes. With this approach, at the moment when the user will proceed to entering data via the Form Component Control, the lookup field will already be populated and the experience will look pretty seamless:
What I’ve done here is to create a classic XRM workflow that runs in real-time, triggered by the create event of the Rental record. (Power Automate can’t do real-time yet, so it’s a no go for flow in this case.) The workflow will create a Car record with a placeholder name “(Undefined)” and link it to the Rental record. By the time the first save event for the new Rental record takes place, the FCC can then render the fields from this placeholder Car record on the Rental form.
In the above example GIF animation you may also spot that the Car name changes transparently from “(Undefined)” to “BMW”, due to what has been selected in the Manufacturer field. This again is another real-time workflow that’s triggered by the update event of the Car record. The end user will not need to take any actions, it’s all just the native autosave feature of Model-driven apps that populates this name field while the user is still entering data into other fields further down the Car form.
Considerations
If the new Form Component Control gives us not just the read capabilities from Quick View Forms but also data edit support, then should we just stop using Quick View Forms altogether? Well, it certainly is a good question. Given that QVF dates back to the CRM 2013 era user interface technologies, FCC is much more in touch with how the modern Unified Interface client has been designed to work. It’s built using the Power Apps component framework (PCF) and should in theory be the most future proof choice for Model-driven app form design.
One downside is that the use of FCC for the pure view scenario is a bit more laborious. If we indeed would want to prevent the user from updating values from the parental record while on the child form, then these fields would need to be set as read-only on the main form itself. Which brings us to the challenge that you’ll need to keep more forms visible in the Model-driven app, whereas classic QVF’s are hidden behind the scenes and only applied as the definition when rendering the main form on which they are used.
The create scenario I talked about earlier is also a bit of challenge when analyzed deeper. If indeed the lookup from which the Form Component Control gets the related parental table record to show isn’t populated immediately, you’ll see a message saying “source record not selected”. In most cases that’s going to be quite a confusing message for the end user to encounter, given they are unlikely to have any idea about the forms magic and relational tables being used in to construct the app’s UI.
“Couldn’t we just hide that control until it the lookup has data?” Well, I can’t think of a no-code way to achieve this. You see, the problem is that the FCC essentially is the same field as the lookup field. Sure, you can have multiple instances of it on the same Model-driven app form. But you can’t use Business Rules to say “hide this field if this other field is empty”, because they are the one and the same. Quick View Forms handle this scenario much better, so let’s hope Microsoft will improve the functionality in FCC to accommodate this create/hide scenario better in future releases.
This first public preview release of the Form Component Control has a few limitations that you should be aware of. For instance, you can’t show more than a single tab from the form being rendered via FCC, which isn’t really a big issue unless you really are building an Inception app to confuse the hell out of the classic CRM users at least. Similarly, you can’t have FCC’s within FCC’s, which blocks some crazy recursion scenarios.