Tag: process

  • Playbooks for Dynamics 365 Activity Templates

    Playbooks for Dynamics 365 Activity Templates

    In my previous post I explored the current Dynamics 365 Customer Engagement solution update practices and used the Playbooks feature as an example. Here’s a quick overview of what the actual Playbooks offer.

    The official MS documentation, “enforce best practices with playbooks”, gives you a list of what the initial October ’18 release of Playbooks contains. The feature is essentially a way for a sales manager to determine a set of activities that sales users should perform when a real life event takes place that the playbook contents has been designed for. A checklist, if you will.

    To get started, you’ll need to have the Sales app upgraded to a recent enough version, so that the Sales Hub UCI app displays Playbook Templates under the App Settings:

    Notice that you won’t find these anywhere in the legacy web client (“classic UI”). One thing you might want to do first via that legacy client, though, is to ensure that the associated roles for Playbook Manager and Playbook User are assigned to the required user accounts.

    To kick things off, you could create examples of Playbook Categories for grouping your playbooks, since that’s a compulsory lookup on the Playbook Template form. The actual configuration work will all take place on the template, where you’ll first of all specify the record types that the playbook applies for. Right now it’s only lead, opportunity, quote, order, invoice, so don’t plan on using playbooks for any custom entities or other Dynamics 365 Apps than Sales.

    The template shows a subgrid of Playbook Activities, which look pretty much like your regular activities on the surface. They are a separate entity, however, as this is how you define the parameters for an activity (task, phone call or appointment). You have the usual subject, description, duration etc. fields you’d find on a normal activity, but instead of fixed dates you give them relative due dates, calculated from when the playbook is launched.

    (more…)
  • Microsoft Flow and Dynamics 365 – My Slides from CRM Saturday Oslo

    Microsoft Flow and Dynamics 365 – My Slides from CRM Saturday Oslo

    Watch out: the Citizen Developers are coming! They are armed with easy to approach GUI tools like Flow, PowerApps and PowerBI, and they aren’t afraid to connect to any of the 160+ cloud apps that you may or may not know your organization is using to solve everyday business problems that the traditional IT projects have failed to serve.

    This is the common story you hear when Microsoft talks about this new generation Business Platform and how it powers the hottest of the hot buzzwords: digital transformation. While it certainly represents a big shift in the capability to deliver new business apps, there is at least an equally significant impact these tools can have to the more centralized efforts of building organization wide solutions for managing business processes and data – meaning CRM system deployment and development. With this in mind, I set out to explore the current state of Microsoft Flow in regards to how it can be used together with Dynamics 365 Customer Engagement. The results of this study and some of my personal thoughts on how Flow changes the way we deliver CRM projects can be found in the following presentation:

    In these slides you’ll find information about topics such as:

    • How does Flow relate to other MS technologies like Common Data Service (CDS)
    • What traditional CRM process automation scenarios could Flow be leveraged in
    • Is the new Dynamics 365 V9 capability of embedded Flows the replacement to now deprecated Dialogs
    • Why Dynamics workflows are still easier to work with than Flows
    • What licensing and administration considerations do you need to keep in mind with Flow
    • Microsoft Flow vs. Azure Logic Apps, what should you use where

    The actual presentation took place last weekend in Oslo, Norway, where I was invited to speak at the CRM Saturday event. It was the first such event that I had the opportunity to participate in and found it to an awesome experience! I had a great time meeting both the local Dynamics 365 community members as well as spending time with the very knowledgeable speakers and fellow MVPs. A big thanks to Microsoft Norway for graciously hosting us and to the community hero Marius Agur Pedersen for making the event possible in the first place!

    If you aren’t yet familiar with the CRM Saturday concept, I suggest you go check it out and keep an eye for future events where Dynamics 365 community members can get together and exchange ideas on how to make the world a better place for CRM professionals and customers alike. Do also keep an eye on the #CRMSaturday hashtag on Twitter for the latest buzz around the events and information shared from the presentations. At least Mohamed Mostafa and Jonas Rapp have also made their sessions’ slide decks available and I’m sure there’s plenty of other blog posts out there that have been inspired by these events.

  • Tracking Pipeline Development Over Time in CRM 2015

    Tracking Pipeline Development Over Time in CRM 2015

    We’ve come to part 3/3 in the Smarter Sales Process article trilogy. In the earlier posts we talked about customizing the lead qualification process and using calculated fields for opportunity estimated revenue, to get more out of Dynamics CRM 2015 than what the standard sales related functionality offers. To close things off, let’s have a look at how we can gain more insight into the data in our sales opportunity pipeline and particularly how it has developed over a period of time.

    Capture the Sales Pipeline Trend

    With the data that Dynamics CRM collects about sales opportunities we can easily draw charts about how many deals were won or lost at any given time, presenting these as a monthly trend of both estimated and actual revenue. It’s also very simple to visualize the current contents of our sales pipeline by looking at the open opportunity records via standard visualizations like the… well, pipeline chart, obviously!

    What we can’t do quite so easily is to present how the sales pipeline has developed over time. For example, has the number of opportunities in a particular stage of the sales process gone up/down, or how the total estimated revenue from open opportunities is developing. An average CRM user may not understand why such a visualization wouldn’t be included in the application by default, but for a system customizer that knows the data model and behavior of Dynamics CRM this should be fairly obvious. The fundamental difference between closed opportunities and open opportunities is that for the former we have a permanent record of when they were closed and with what values, whereas the records that are currently in an open status represent transient data. It will change over time, based on the future actions that CRM users will take.

    So, what’s the problem with such data? The fact that an open opportunity may have been open last week or even ten weeks ago makes it impossible for us to draw a chart that would show a weekly number of records, since only a single record exists in the database, even though it might need to appear in the bar for each week in a chart showing the size of the pipeline on a weekly level. While technically we would have the information needed to project the number of opportunities that have been open at a given time by looking at their creation date, this would be a more complex exercise than what the ASP.NET charts in Dynamics CRM allow us to draw (although I wouldn’t be surprised if CRM Chart Guy would prove me wrong on this one).

    At the end of the day CRM is an operational system focused on managing individual records and transactions, which means it doesn’t bother archiving copies of records in their historical state. Sure, we have the audit log that will keep a record of the individual changes to tracked fields, but that’s data which isn’t accessible for reporting. But the question to ask is: if we wanted to capture such historical data for our analysis purposes, could we do that with Dynamics CRM? Sure we could! In fact, already back in 2008 when CRM didn’t yet have a built-in auditing capability, CRM MVP Guy Riddle showed us how the use of custom entities and workflows allowed us to build our very own audit log feature to capture changes for record field values.

    CRM_opportunity_count_by_week_and_stage

    Sure, our use case here is a bit different, since we’re not looking to only capture entries on when a record changes. To provide us visibility into how the sales pipeline has developed over time, we would need to capture a snapshot of the pipeline status at predetermined intervals.

    Scheduling Snapshots of CRM Data

    One of my favorite features in CRM 2015 version is Rollup Fields, which I’ve already covered in a number of earlier posts on this blog (including the gotchas you need to be aware of). This feature also comes in handy if we want to build a custom snapshot entity to store the count or sum of records related to it. In this scenario for monitoring sales pipeline development, which I presented in my MSDynamicsWorld.com webcast “A Non-Developer’s Guide to Smarter Sales Processes in Microsoft Dynamics CRM 2015”, what we’ll do is make a 1:N relationship between our custom Snapshot entity and the opportunity entity. This in turn will allow us to create Rollup Fields that will summarize the count and revenue of the related opportunities onto the Snapshot record. By having a snapshot per each stage of our sales process, we will get the attributes needed for drawing the kind of chart shown above, to visualize the trend of opportunity count and estimated revenue development per week.

    The detailed steps for the required customizations can be found from the following SlideShare presentation:

    The one missing ingredient that we still need to think about is how to automate the capture of these snapshots. What Dynamics CRM still doesn’t offer out-of-the-box is the ability to schedule recurring workflow processes in an easy way, to perform an automated task every X days. Luckily there are workarounds for scheduling such bulk data processing tasks with using nothing but the CRM platform, and one of the best solution’s I’ve come across is the Scheduling recurring Dynamics CRM workflows with FetchXML solution from Lucas Alexander. I’ve already shown you how to use this solution for monitoring Rollup Field Values with workflows and the same logic can be applied in this scenario, too. Only this time we don’t send a weekly email blast to CRM users, rather we’ll just create new snapshot records to store the opportunity count and total estimated revenue per sales stage.

    CRM_scheduled_process_opportunity_snapshot

    Alright, that concludes my Smarter Sales Process for CRM 2015 series, at least for now. As mentioned at the start, do check out part 1 and part 2, as well as the YouTube recording of the live demos if you’re interested for more details on the topic. Hopefully these examples have given you some new ideas on what kind of solutions you can build with the Dynamics CRM 2015 customization tools. If you’ve got any thoughts on what kind of no-code customization scenarios you’d be interested in seeing in the Surviving CRM blog in the future, please feel free to leave a comment!

  • Using CRM 2015 Calculated Fields for Opportunity Estimated Revenue

    Using CRM 2015 Calculated Fields for Opportunity Estimated Revenue

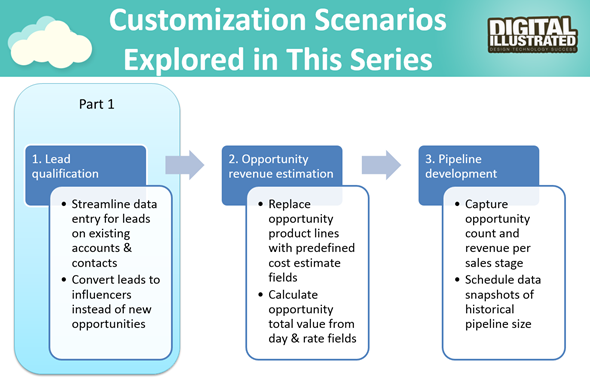
    It’s time for part 2 in the Smarter Sales Process article trilogy. As described in my previous blog post about lead qualification process customization, this content is taken from my MSDynamicsWorld.com webcast titled “A Non-Developer’s Guide to Smarter Sales Processes in Microsoft Dynamics CRM 2015“. After having adjusted the lead to opportunity process to better suit our needs, we’ll next have a look at how the data managed in the opportunity stage could be more easily entered and maintained by leveraging the no-code customization tools available in Dynamics CRM.

    Introduction to Calculated Fields

    As you should have noticed by now, the CRM 2015 release added the possibility for defining two new “complex” field types in addition to the traditional “simple” fields. Rollup fields is something I’ve covered in more detail in an earlier blog post, so this time we’ll be working with the other type, which is the calculated fields. Essentially these are the types of fields where you don’t directly insert a value in CRM, but rather the field value is calculated from one or more other fields in the system, based on the formula and conditions you specify in the calculated field definition editor found from the field’s properties in the CRM customization menus.

    How calculated fields differ from rollup fields is that with them we’re always working on the current record, whereas rollup fields retrieve data from related records. Well, actually that’s not entirely true, since a calculated field can also reference a value from a related parental record in its formula. A more accurate description could therefore be that calculated fields can access data from the “1” side of the 1:N one-to-many relationship, whereas rollup fields are the tool for retrieving data from the “N” side of the logical data model in our CRM organization.

    Another aspect that the system customizer must be aware of before starting to leverage these new tools for building CRM 2015 solutions is how and when the field values are calculated. As demonstrated in my post “CRM 2015 Rollup Fields: The Gotchas“, the data shown in rollup fields may be up to 30 minutes old, since these are updated based on an asynchronous job (unless you apply the workaround described in that blog post). Once they are updated, though, the values are persisted in the database. Calculated fields work in the exact opposite way, meaning they are calculated in real-time, but the data is not actually stored in the CRM database. While the latter part of that sentence might sound strange at first, it simply means that the CRM platform performs the calculation any time the specific calculated field is needed. This includes opening a form that contains the field, browsing a view with such columns, accessing a dashboard with charts referencing calculated fields, making SDK calls for retrieving this data and so on.

    To familiarize yourself with the details of these features, have a look at the TechNet article Define Calculated Fields. Or if you’re in a hurry, spend 5 minutes watching this YouTube video from the CRM product team, to see how what the new fields look like in the customization UI.

    Applying Calculated Fields on Revenue Estimation

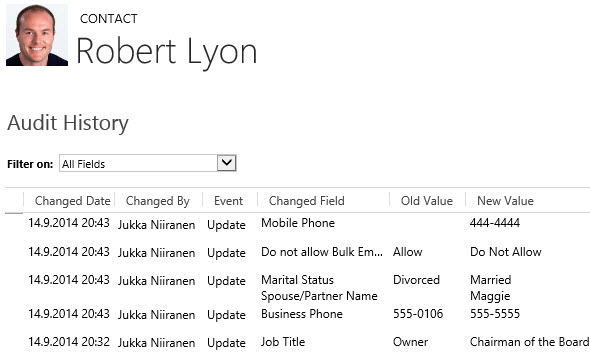
    The scenario that I chose for the Smarter Sales Process series deals with the way we determine an estimated value for an opportunity record in Dynamics CRM. By default, you have the option of either entering a lump sum into the Est. Revenue field of an opportunity record, or creating individual opportunity product records as line items that have a specific revenue value. This is what the bit field IsRevenueSystemCalculated is all about, with its options of “User Provided” or “System Calculated”. Since many organizations using Dynamics CRM don’t actually bother maintaining the detailed product catalog and price details in corresponding CRM records (at least not without a custom integration being built to sync the data from other systems), the “User Provided” option is quite often used for recording just the total estimated revenue value for the opportunity. What this means in practice is that the sales people end up using their own Excels to calculate the various components from which the revenue is generated and just entering the end result into CRM. If any parameter in the equation changes, it’s back to updating your Excels, then CRM again. Oh joy.

    Could there be some middle ground between taking just a single figure from an external Excel sheet and having a full blown product & price catalog maintenance process for CRM? If the products and services you’re selling consist of a limited set of key revenue components that are typically included in each quotation you make, then exploring the possibilities of creating custom fields for these components directly onto the opportunity record might well be in order. While these will not provide the high granularity data of having opportunity product line items with links to the related product record, the data entry and maintenance experience is probably going to be a lot easier for you to sell to the CRM end users. (After all, we’re talking about sales people here, who are the toughest crowd you’ll ever need to please with your CRM system functionality.)

    CRM_Opportunity_Estimated_Revenue_Calculated_Fields

    In this example scenario we’re selling CRM consulting projects that have three common revenue categories: consulting revenue, license revenue and “other” revenue. The total value of each area is calculated via a specific formula, after which each area specific revenue is summed up into the Total Amount field. As you’ve probably guessed by now, this is achieved by using the CRM 2015 calculated fields feature. Compared to adding the line items one by one, configuring unit prices and other variables, the data entry process is considerably faster, since all the user needs to do is tab through the relevant fields on a single form and enter values where necessary. You can catch a quick glimpse of the live opportunity form in this YouTube recording of the webcast.

    For a detailed explanation of how this type of functionality can be configured in Dynamics CRM, have a look at the following slides: Smarter Sales Process in Dynamics CRM 2015 – Part 2: Revenue Estimation.

    A Few “Gotchas” on Calculated Fields

    If you’ve implemented a similar custom opportunity form in the past by using Javascript to perform the calculations, then you should be aware that the native calculated fields in Dynamics CRM don’t offer exactly the same user experience as custom scripts do. The reason is that the calculation logic is executed whenever the fields referenced in the formula are retrieved from the CRM, meaning not before you’ve submitted the updated source field values into the database. So, the moment you change a field value (let’s say “consulting hours” in our example”) and click/tab to the next field, a client-side script would be able to recalculate the fields instantly, triggered by the onChange event of the field. A calculated field will just sit there waiting for the source data to be saved to CRM first, either via the auto-save feature every 30 seconds or the user explicitly clicking on the save icon in the bottom right corner of the form.

    Considering that with CRM 2013 we received the Business Rules feature that acts in practice the same way as a custom script (meaning it’s executed on the client side), this may seem like a slight setback in the level of application UI responsiveness for Dynamics CRM. Knowing that there are also some calculation capabilities available with Business Rules, you might be wondering if this feature could be used instead of calculated fields, to deliver an even better user experience. Well, based on my personal experience, if you try to build a very complex chain of calculations by using Business Rules, you’ll soon find yourself in a world of pain trying to figure out why the events don’t always trigger the way you want them to, how to handle resetting field values and so on. Although I haven’t yet used the calculated fields feature in as many real life scenarios as Business Rules, at least I haven’t run into similar problems in ensuring validity of the calculations performed with them, so my recommendation would be to always opt for calculated fields whenever you need to… calculate the value of a field (ever get the feeling that us consultants just state the obvious things?).

    Another thing to be aware of when it comes to calculated fields and Business Rules is that the two don’t mix. More specifically, a Business Rule cannot reference a calculated field, so you cannot grab the results of the calculation and use them in a subsequent business logic implemented via a Business Rule. Luckily, you can still access the calculated field values in a workflow process, which is the workaround that I’ve used in my aforementioned presentation.

    During the webcast, there was also a very good questions presented on whether there are some limitations on how many calculated fields you can use on a single entity. Based on the official documentation, there doesn’t seem to be any hard limit on the number of calculated fields you can create, but you cannot include more than 10 calculated fields into a single view (or chart), which could potentially be reached if creating a highly complex calculation scenario and a summary view to export the resulting data out of CRM.

    As always, the responsibility on system performance impact ultimately lies on the system customizer, even if the solution is created just via clicking the CRM configuration options instead of writing custom code. As the no-code customization tools get more advanced with every release of Dynamics CRM, it’s becoming increasingly important also for people in the business analyst role to have a basic understanding of how the underlying application platform operates. I want to highlight a couple of recent whitepapers that Microsoft has released around the solution design and performance topic, which should give you plenty of food for thought, whether you’re approaching Dynamics CRM from a developer point of view or if you’re an analyst that’s aspiring to design more complex CRM solutions:

  • Customizing Lead Qualification Process in CRM 2015

    Customizing Lead Qualification Process in CRM 2015

    This is the first part in an article series where I’ll be presenting a few customization tips & tricks that you can use in Microsoft Dynamics CRM 2015 to enhance the functionality used in a typical sales process. The content was first shown in my live webcast on MSDynamicsWorld.com on May 6th: “A Non-Developer’s Guide to Smarter Sales Processes in Microsoft Dynamics CRM 2015.” As promised during the webcast, I’ll be releasing all the slides here on my blog, but since there was a lot of details to go through in the 1h session, it will be split into three separate articles, to improve the accessibility to this information for those who didn’t attend the live webcast.

    The overarching theme of this series is to show you how the creative combination of the various customization tools available in Dynamics CRM 2015 can be used for building whole new functionality into the application – without having to write any custom code. The emphasis is on the word combination, since very often you’ll need to use several different pieces of the platform’s customization tools to achieve the end result. This isn’t something that you can easily learn just by reading the official product documentation that typically focuses on the introduction of a single feature at a time. With the examples in this article series I hope to demonstrate what these combinations could look like, in the context of customizing the standard application behavior in the sales process.

    MSDynamicsWorld_Smarter_Sales_Process_scenarios

    The techniques are by no means exclusive to the sales area of Dynamics CRM. Any process that you manage with our CRM/XRM application can surely benefit from the type of custom functionality that you can build via Business Process Flows, Real-time Workflows, Business Rules, Calculated Fields and Rollup Fields. The absolutely best way to gain an understanding of what you can achieve with the point & click customization tools in Dynamics CRM is to experiment with the tools in a sandbox environment, so I encourage you to go and try out these scenarios in an actual working CRM system. (Why not spin up a new CRM Online trial org and also get access to all the new CRM Online 2015 Update 1 goodies while at it?)

    What’s Wrong with CRM 2015 Lead Qualification?

    Those of you that have been working with Dynamics CRM for more than just a couple of years will probably remember how the things used to work before CRM 2013. When clicking on the Qualify button on a lead record, the user was presented with a dialog that allowed them to choose whether a new account, contact and opportunity record should be created from this lead. In the new world of Business Process Flows and no-popup UI of CRM 2013 (and CRM 2015), such options are no longer presented to the user. While this makes for a smooth user experience in general, it creates severe conflicts with many real life business processes of companies who either A) don’t use opportunities or B) don’t want to directly convert each lead into an opportunity. There are lots of suggestions on MS Connect (registration required, see here) to restore the ability for users to select not to create an opportunity from a qualified lead, but so far we haven’t seen any changes in the product to accommodate this.

    CRM_Lead_Qualification_Dialog

    So, if CRM wants to create opportunities but the user doesn’t, what could a mere system customizer do, without any knowledge of how to write plugins or scripts to develop new functionality by using the CRM SDK? Well, I’ve come up with a reasonably good workaround that uses the following solution components to establish a true user driven lead qualification process:

    • Branching Business Process Flow (BPF) to show stages that don’t take the user to the opportunity entity
    • Real-time Workflow to hand the lead status change and record creation instead of the built-in, non-configurable business logic of Dynamics CRM
    • Business Rules to conditionally show/hide fields for account/contact details on the form
    • Quick View Forms to present the records created from lead qualification process on the lead form after it’s closed

    You can find the detailed description of how I’ve configured each components from the below presentation:

    (For those of you who are not reading this article directly on survivingcrm.com and can’t see the embedded SlideShare presentation, click this link to access it.)

    I hope that this example has given you some ideas on how the lead management process and related Dynamics CRM functionality could be further developed in your own CRM organization. Stay tuned for part two of this Smarter Sales Process series, where we’ll be moving to the opportunity record and exploring how the estimated revenue information can more easily be managed by using the Calculated Fields feature introduced in Microsoft Dynamics CRM 2015 release. If you simply can’t wait for it or want to see the lead qualification process in action, then the webcast recording is available on YouTube already today.

  • Monitoring Rollup Field Values with Workflows

    Monitoring Rollup Field Values with Workflows

    In an earlier post I demonstrated how you could leverage the new Rollup Fields feature of Dynamics CRM 2015 to summarize the behavior of your customers and produce interesting metrics that could be used for targeting your sales activities towards the most active individuals who have reacted to your email and website content. The example included using data collected by ClickDimensions on the clicks on email marketing message links and page views on sites that contain the visitor tracking script. With the help of Rollup Fields and this marketing automation data stored directly into Dynamics CRM database under the contact records we were able to add the following custom fields onto our contact entity form:

    • Latest Email Link Click
    • Total Number of Link Clicks
    • Latest Page View
    • Total Number of Page Views

    While this allowed us to create a nice, sorted view of the contacts who’ve been interacting with our online content most recently, this information is still just data sitting in the CRM system, waiting for the users to go and discover it. Wouldn’t it be great if we could actually build an automated business process around it and make sure that the owners of these contacts who are clicking the links and visiting our website would be notified about these events? Sounds like something that a CRM workflow could help us with, right?

    CRM_2015_rollup_field_Clicks_5

    Unfortunately there are a few limitations when it comes to the new Rollup Fields in CRM 2015, as we discovered in my previous article. For example, if we would like to trigger a workflow process instance whenever the number of Link Clicks goes above a certain threshold, this isn’t something we can do directly by tapping onto the onChange event of the Total Number of Link Clicks field, because Rollup Fields cannot be used to trigger a workflow.

    Ok, what if we lower our expectations a bit and don’t even attempt to perform these actions in real-time for each event? It might be perfectly acceptable from a business perspective to have a process run once every night, inspect which contacts had clicked on the tracked links and then send out notifications to the record owners in one go. Surely that’s something Dynamics CRM can do, right? Well, let’s see if we could put together a solution like this.

    Batch Processing CRM Data with Workflows

    It’s quite a common requirement to perform checks or updates to CRM records based on a predetermined schedule. Although you can use workflow processes to be triggered on an event that takes place on CRM records (as long as it’s not on a special attribute like a Rollup Field), there isn’t actually any ready-made feature available in the CRM platform that would allow you to schedule the workflows to run every X hours, every night, once a week etc.

    The traditional approach for meeting such requirements for scheduled updates would have been to develop a small custom service to run on the CRM server machine. If you had access to other systems with interfaces to CRM like SQL Server Integration Services (SSIS) then these could naturally be also leveraged here. In the brave new cloud era where the number of Windows servers at your disposal for running these type of applications is rapidly decreasing it’s sometimes challenging to find a place where such schedulers could be deployed to, for performing small batch jobs that your CRM business processes would require. Wouldn’t it be convenient if you could build all of this by using just CRM Online and nothing more?

    Get ready for the good news: yes, you can schedule a recurring workflow to handle batch updates within Dynamics CRM, no external servers needed. The one thing you need, though, is a clever little custom workflow activity to extend the standard features of the CRM workflow engine. In this example we’ll use the Scheduling recurring Dynamics CRM workflows with FetchXML solution developed by Lucas Alexander. What this solution does is it gives us the possibility to:

    • Determine a query criteria for the bulk job
    • Schedule this job to be run hourly/daily/weekly
    • Run our own workflow process for all records returned by the query

    CRM_schedule_recurring_workflows_Lucas_Alexander

    The above diagram by Lucas outlines the logic behind the solution, but you really should go and read his blog post on the details of this approach, or check out the source code for the custom workflow activity on MSDN code gallery if you really want to dig deeper into the topic. For the purpose of today’s scenario, I’ll show you how I’ve used the solution in conjunction with the aforementioned Rollup Fields.

    Sending Out Notification Emails Based on Rollup Field Data

    In my example I’ve determined that it’s the Latest Page View datetime field on a contact that should be driving the business process. Once a week I would like to notify the owners of customer contact records if the contact has visited our website during the last 7 days. Turning this into a query criteria, it would mean that during the time of each batch processing I’d want to retrieve all contacts where the Rollup Field for Latest Page View contains a value greater than today minus 7 days.

    I will need to turn that query definition into a language that Dynamics CRM understands, and that is FetchXML. Sounds a bit tricky, eh? Lucky for us, CRM comes with a nifty lil’ FetchXML generator called Advanced Find, which I’m sure you’re already familiar with. All we need to do is find Advanced Find, specify the aforementioned query criteria for the contact entity and then click the “Download Fetch XML” button in the ribbon to grab the XML text into Notepad.

    CRM_AdvancedFind_FetchXML

    Next we should think about what action we want to perform on the contacts who match the query criteria. In this scenario it will be the sending of an email message to the owner of the contact. It only needs to be available as an on-demand process and there isn’t even a requirement to have any query criteria enforced here, but I added the 7 day rule here as well, just in case I end up using the same process in some other scenario.

    CRM_page_view_notification_workflow

    The final step is to create a record for the new Scheduled Process entity, which has been added to CRM in the solution packaged developed by Lucas. On this form I’ll first give a descriptive name to the Scheduled Process and then define it to be related to the contact entity. In the Workflow lookup field I’ll pick the workflow process you see above, and for the Query field I’ll paste in the FetchXML we grabbed from our Advanced Find.

    CRM_scheduled_process_page_view_small

    All that’s left for us to do is setting the actual schedule for this process. The weekly option in the dropdown menu suits our purpose best in this scenario. By adjusting the Next Run Date I can configure the email notifications to go out in the morning, so that they reach the inbox at an optimal time.

    CRM_notification_website_visit

    Alright, that concludes our scenario for using CRM 2015 Rollup Fields together with workflow processes to deliver actionable insights to our CRM users on how customers are responding to our marketing activities. What I personally find very interesting in this example is the ability to take a piece of existing data that’s sitting inside our CRM database and first turn it into a metric that’s easily viewable in the CRM UI, then further amplify its business impact by configuring conditional processes to deliver it as a notification to the user who should become aware of it.

    None of this required a huge technical development effort or investments into separate reporting systems. All we needed was to take a new feature that was added to the Dynamics CRM platform as a part of the 2015 version rollout (this being a CRM Online environment there wasn’t even an upgrade project to worry about), combine that with an excellent open source enhancement to the platform’s workflow functionality, then just design a solution that delivers new business value from existing data. If you look at your own Dynamics CRM system and the data that’s being collected into it as a part of your business processes, then I’m pretty sure you could also identify potential use cases for similar type of enhancements, built with CRM’s ever evolving process automation toolkit.

  • CRM 2015 Rollup Fields: The Gotchas

    CRM 2015 Rollup Fields: The Gotchas

    In an earlier blog post in December, I described one use case for the new Rollup Fields feature introduced in Microsoft Dynamics CRM 2015. This example involved rolling up data from email events tracked via ClickDimensions and summarizing this on the contact’s form, so you’ll want to check out the steps listed there if you don’t have any hands-on experience about this new feature yet. In this post I’m going to dig deeper into the details about how Rollup Fields actually work behind the scenes and what limitations you should be aware of when considering whether they are the right tool for the job in your own use cases.

    Rollup Schedules

    The first thing you need to understand about Rollup Fields is that they are not updated in real time. If you’re familiar with the difference between the real time workflows introduced in CRM 2013 and the asynchronous versions that were available in earlier versions, then this is something a bit like that, but not quite. As you might know, the traditional background workflows were triggered by an event that took place on a CRM record and the resulting workflow instance was scheduled to be executed by the asynchronous process running on the CRM server at the earliest possible date (depending on the overall workload on the server). Whereas this usually meant a delay of perhaps a minute or two at most, the new Rollup Fields are even further from real time than this.

    As we saw in my earlier post, when you create a new Rollup Field, a new mass calculation job will be created for the field in question. This will be scheduled 12 hours into the future, based on the assumption that this will most likely fall outside the office hours when actual CRM end users are working with the system. (Because us CRM customizers or system admins never work during the night, right? Yeah, what a funny assumption that is, but anyway…) The reason for such precaution is that the very first calculation job will have to populate each and every record that exists for that entity, which could be up into the millions, depending on what type of data you manage in your CRM.

    CRM_2015_rollup_system_job

    So, does this mean the Rollup Fields only get updated once per day, during that nocturnal schedule? No, actually they get updated once every hour. If you go to the Settings – System Jobs menu you’ll see that there are jobs of type “calculate rollup field” type running for each of your entities that have one or more Rollup Fields defined for them. They are not scheduled to start at exactly the same time, but they all run at one hour intervals. Another thing worth noting in the Rollup Field implementation architecture is that these calculation jobs are only applied to records that were created, updated or deleted after the last job finished. No point in processing a million records if only a handful of them could possibly have new values to be calculated, right? This is why the initial rollup and the recurring rollup requests are handled by different system jobs in the CRM platform.

    Rollups and Workflows

    Now that we know the Rollup Fields may not show a current values in the UI for quite some time, the next logical question to ask is: anything we can do to speed the calculations up? As an end user, you could go and look at any Rollup Fields that have been added onto an entity form which you have the necessary rights to view, then hover over the field and click the “recycle” icon to force the recalculation of the Rollup Field value. As a developer, you also have the option to force a Rollup Field to be recalculated on demand via a plugin, by using the CalculateRollupField message. As a system customizer… Well, there’s not much you can do, at least in the CRM 2015 version. (more…)

  • Who Is The Customer in Your CRM? (Podcast)

    Recently I was invited to make my second appearance on the CRM Rocks podcast series, hosted by Markus Erlandsson. The first episode we did back in fall last year was focused on “what’s new in Microsoft Dynamics CRM 2013”, which was certainly a timely topic back then. This time we decided to discuss on a theme that was less focused on the CRM application functionality or a specific version of it. On our agenda was the question “who is the customer”?

    It might seem like not such a complex question to answer at first. After all, if we are deploying or developing solutions for customer relationship management then surely there must be a clear understanding of what exactly we need to be managing with the system, right? Well, as with most things related to designing a CRM solution, there isn’t a single right answer, but there are many good questions instead! To help anyone who’s starting their journey towards implementing a CRM system for their company and wondering what questions should be asked from the business and process owners, I’ve listed some of these topics into the following presentation available on SlideShare:

    Our discussion in the podcast covers five major aspects of the CRM solution design fundamentals:

    • Who is your customer?
    • B2B customer modelling
    • Segmenting your customers
    • The role of non-customers in CRM
    • Why Social CRM is the new CRM

    While some of the podcast content is of course specific to the application platform that I have the most experience of working with (can you guess which one?), I hope and believe that much of the guidance would also apply to any modern CRM system you might be deploying. So, please have a look at the slides above, and if you feel like the contents is relevant to the business problems that you hope to solve with customer relationship management technology, proceed to listening to the full CRM Rocks podcast.

  • Dynamics CRM 2013 in Retrospect

    Dynamics CRM 2013 was released only a bit over year ago, on October 8th 2013 to be exact. With CRM 2015 already knocking at the door, this seems like ages ago already, even though the actual time between these two major releases is shorter than their marketing names imply.

    Since the discussions in the Dynamics CRM community will inevitably be moving towards the latest 2015 version as the year turns, it’s a good moment to reflect back a bit and recap what the previous release gave us. I took a look at some of the blog posts I’ve personally written regarding CRM 2013 specific functionality since the version came out. By analyzing the page view stats from my blog, the following articles came out on top as the five hottest topics that you, the readers, were interested in reading about.  If you missed any of the articles, now’s the time to do a quick catch up before CRM 2015 steals all the attention.

    Synchronization vs. Tracking: Understanding Activity Management Options

    (Article link)

    CRM_2013_Server-side_SyncCRM 2013 introduced a new feature called server-side synchronization, which allowed the CRM server to communicate directly with the Exchange server for the first time in the product’s history. Upon first look it might have appeared like the long dependency on Dynamics CRM Outlook client was about to be history. However, in our brave new “cloud first, mobile first” world there are many more aspects to managing activity data in relation to CRM records that you need to understand.

    While the synchronization options for activities and contacts were indeed expanded with CRM 2013, the tracking options were not. In addition, the combinations supported email client and server applications for each entity and action type were quite a maze to navigate in. Since this is not such an easy topic to grasp nor explain, I ended up building a support matrix of my own, so that I was able to clearly communicate the various synchronization and tracking options to our customers.

    Getting Your Head Around Dynamics CRM 2013 Processes

    (Article link)

    CRM_2013_Process_Automation_smallChanges in the application’s UI may have grabbed most of the attention when it came to the CRM 2013 release, but there were also notable enhancements made to platform capabilities behind the scenes. Business Rules and Real-time Workflows opened up a whole new world of possibilities for the system customizers to create custom business logic that had previously required JavaScript or plug-in development.

    The one process type that was highly visible to the users, Business Process Flow (BPF), was also perhaps the most demanding one when it came to applying it in real world scenarios. Since BPF’s themselves don’t provide any automation but rather rely on the other process types to work in conjunction with the BPF process stages and steps, understanding the role of each of these components will require a fair bit of experimentation. This is why I wrote a two-part article where I tried to lay out the big picture of process automation in CRM 2013.

    Connecting to CRM Online OData Feed with Excel 2013 Power Query

    (Article link)

    CRM_OData_feed_Excel_Power_Query_4While the CRM 2013 release itself didn’t provide any dedicated feature for the Power BI tools announced by Microsoft a bit earlier, there were updates made to the Power Query component in Excel 2013 that made it very interesting for CRM Online customers. More specifically, the December 2013 version of Power Query finally delivered the ability to connect to OData feeds what utilize Office 365 authentication – with CRM Online being such an application.

    There isn’t a whole lot of official documentation available on the topic of how to leverage CRM Online OData feeds to build reports utilizing the Power BI toolkit. The process isn’t necessarily very straightforward and requires a fair bit of experimentation with the various Excel components (Power Query, Power Pivot, Power View). In addition to the OData feed connection part, I also wrote a couple other posts on what to do once you have the CRM data flowing into Excel via Power Query.

    Setting Up a Microsoft Dynamics CRM 2013 Development Server on Azure

    (Article link)

    Azure_MSDN_benefitRunning Dynamics CRM in the cloud via CRM Online is a popular option these days, but for performing testing and development tasks it’s often more convenient to have your own sandbox where you can control each and every part of the system. Azure has evolved into quite an attractive option for running virtual machines, especially with MSDN subscription credits and discounts for development environments.

    I’m not an infrastructure specialist that enjoys configuring servers very much, but when new versions of Dynamics CRM become available as preview/beta versions, it’s a good exercise to set up your own sandbox server. To better remember what the minimum steps are to be able to install the Dynamics CRM server application, I decided to document the process via screenshots and make it available on SlideShare for anyone else wanting to complete the same task.

    Expanding Add Activity Options on CRM 2013 Forms

    (Article link)

    CRM2013_Activities_2In the course of the UI refresh performed in CRM 2013, the number of menu options visible to the end users were optimized to cover only a single way to perform many of the options that previously might have had alternative route options. While the intention was noble, this did create a few situations where the navigation path required to perform an action may have not been the optimal one.

    The great thing about Dynamics CRM is that it’s a customizable platform that allows you to adjust the data model, forms and also the menu options to the specific use cases required by the customer organization – as long as you know how. With awesome community contributed tools like the Ribbon Workbench these tasks can be completed with a few clicks of a mouse, which is what I illustrated in this post where I added a new flyout menu onto the CRM 2013 Command Bar to access standard as well as custom activity records, and even launching a dialog process directly from the menu.

  • Time Travel with Workflows: Accessing “Before” and “After” Values

    Time Travel with Workflows: Accessing “Before” and “After” Values

    Dynamics CRM has had a built-in auditing feature since the 2011 version, which provides a really handy tool for situations where someone needs to investigate the changes that have taken place on field values of a specific record. By default auditing is not enabled, but I recommend you to seriously consider enabling it for all business critical entities like accounts and contacts, since without it there’s not much to go by if you ever need to track down any intentional or unintentional updates made to your CRM data.

    CRM_workflow_audit_1

    Auditing is a great tool for capturing the “fire hose” of data updates that are taking place in CRM. However, since the audit data is not stored in actual CRM records but rather in a denormalized state inside the audit database tables, it’s not accessible for any type of reporting or business process logic. If you know what record to look for, the related Audit menu will give you the information. If you are an administrator and have access to the Audit Summary View, you can also use filters to narrow down the audit data stream and hunt down the events that are relevant to your investigation. Very useful for resolving issues in the data, but not so practical for simply staying informed about updates that are of interest to your role in the organization.

    Workflow processes can also be used for tracking specific changes made on the CRM records, just by setting the workflow to start when a particular field or a set of fields change. You can then perform any notification action you see appropriate, such as sending an email, creating an Activity Feed post, adding a note, appending a description field etc. Almost like auditing, but on a much more granular level, and also something that you can report on if necessary. One limitation compared to auditing, though, is that you can only see the new value of each field but not the previous one. So, you can’t produce a similar view that auditing provides, with the old and new values side by side.

    Or can you? With the launch of the CRM 2013 version we gained a whole new category of workflow processes, called real-time workflows. These behave much in the same way as custom plugins, as they are executed synchronously as part of the event pipeline of the CRM platform rather than via the asynchronous service that the traditional workflows use. The extra benefit we gain from this, aside from the fact that the workflow logic is executed immediately, is that we now also have the ability to choose whether the real-time workflow should be started before or after the event. This allows us to actually read the data that was in a field before the update took place. Sounds like a cool little feature? Well why don’t we take it our for a spin then and see what we can achieve with it.

    Tracking Account Name Changes

    Let’s consider a scenario where we would be interested in tracking the changes performed on the account name field. We have decided to leverage the Activity Feeds feature to post a message on the record wall every time an existing account has its name field updated. As a part of this post, we need to provide both the old name and the new name, so that the users can easily associate this particular account as a customer they’ve previously done business with under a different name.

    Since we need a place to store the old name of the account for the purposes of formulating the post’s content, first we’ll add a new custom text field for the account entity, called “Old Name”. Then we’ll open up the workflow editor and create a new real-time workflow process for the account entity, called “Account Name Change: Store Old Name”. The important part here is that we’ll set this workflow to be run when “Record fields change” with a box ticked for the “Account Name” field and change the “Start when” value to “Before”. The actual workflow actions only need to do one thing, which is to copy the value of the standard “Account Name” field to the new “Old Name” field. Nothing else.

    CRM_workflow_audit_2

    Next we’ll create a second workflow, called “Account Name Change: Post Old & New Name”. We’ll set it to run in real time for the account entity, just like the first one. We’ll even associate it with the very same event, meaning the change of the “Account Name” field. The difference will be that we’ll run this workflow “After” the event. Again, the actions that the workflow will perform are very simple, as we’ll only need it to create a new Activity Feed post record. Here’s how the message will be configured with the dynamic field values from the account record:

    CRM_workflow_audit_3

    So, we now have two real-time workflows running for the same entity, for the same field change event. Is this a smart thing to do? Will the universe by any chance collapse onto itself as a result of this reckless twin workflow configuration that we’ve built? Well, there’s only one way to find out! Let’s activate these two workflow processes, go to an account record and change it’s name.

    CRM_workflow_audit_4

    After the name is changed, we can click onto the Activity Feed’s auto posts column to refresh the post view. There we discover a post created by our second workflow process, containing both the “before” and “after” names for this account. Success! If we keep feeding further update events to this workflow duo, we can see that the post message is always updated to contain the last two names for this account in search of its true identity.

    CRM_workflow_audit_5

    If our second workflow process would have been an asynchronous process instead of real-time, the results might be different, though. As I’ve experimented in a previous post, “Auto-Numbering with CRM Workflows: Real-Time vs. Asynchronous”, the record data and execution order for traditional background workflow processes may not always be consistent, due to their asynchronous nature. By using a real-time workflow we are guaranteed to receive a ticket to the front row seats of CRM’s event execution pipeline. In practice this means the following:

    • “Account Name Change: Store Old Name” – this workflow is executed at the pre-operation stage, which means that it sees the record as it was before the update event took place. Therefore when it reads the account name field it still has the old value stored. Furthermore, because the workflow is completed before the actual platform event for the account update takes place, it can inject a new value into the “Old Name” field and have it committed to the database as a part of the original transaction.
    • “Account Name Change: Post Old & New Name” – this workflow is executed at the post-operation stage, meaning after the update has already taken place, but before the transaction is completely over. It receives an image of the account record where the standard “Account Name” field is populated with the new value the user has entered and the “Old Name” contains the value updated by the first workflow in the pre-operation stage.

    As this example scenario demonstrates, while a workflow can’t directly compare the “before” and “after” values of a record, there is actually a workaround available where you could pass the old value from the pre-operation workflow to the post-operation workflow. You could then perform a comparison of the values with the tools that the workflow editor offers (or extend it via custom workflow activities) and alter the outcome of the transaction based on the business logic. If needed, you could even cancel the operation and show an error message to the user if the old & new values are violating the rules of your business processes.

    To close things off, it’s important to keep in mind that just because you can do something with a workflow instead of custom code, it doesn’t mean it would always be the right tool for the job. Aside from the greater level of flexibility that a plugin will give you for comparing and manipulating the data during the update event, there are also performance considerations you should be aware of before pushing a ton of real-time workflows into your production CRM system. I recommend reading this post by CRM MVP Scott Durow: Real Time Workflow or Plugin?