Tag: Model-driven apps

  • Share links with access to records in Model-driven Power Apps

    Share links with access to records in Model-driven Power Apps

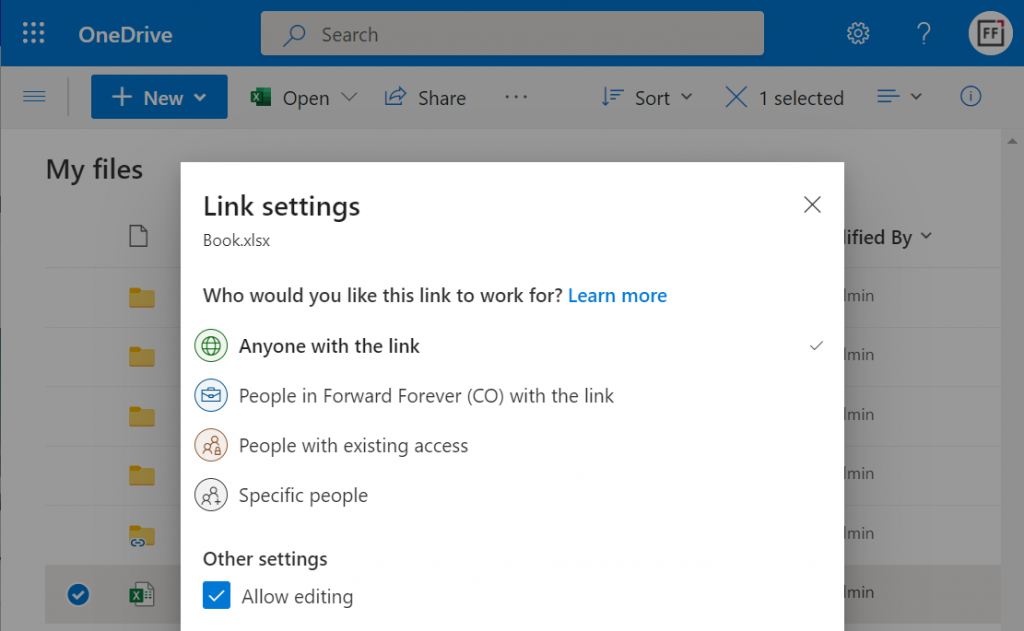
    Microsoft has been working towards a unified sharing experience across their cloud products. The dialogs that many are using today in Microsoft 365 services like SharePoint and OneDrive for sharing access to files is also finding its way to Power Platform.

    The visible UI in a sharing dialog is only one part of the experience. Knowing what the traditional sharing experience for Dataverse records has been in Dynamics 365 and what the underlying security model consists of, the new direction can present a few surprises for app makers and admins.

    For example: did you know that a user without any visible security role may be able to read the data of certain Dataverse records? Wow! That goes against everything we’ve learned about security modelling in the good ol’ XRM era. Sounds like something worth investigating a bit deeper then.

    Enabling the sharing links

    Since the new sharing functionality can have a big impact on the security model of your business apps, this capability needs to be consciously enabled by the administrator. I haven’t yet come across the official Docs materials for the feature. Presumably this page is where the details will eventually be published. For now, this blog post is based on my experiments of what you need to have in place (by minimum).

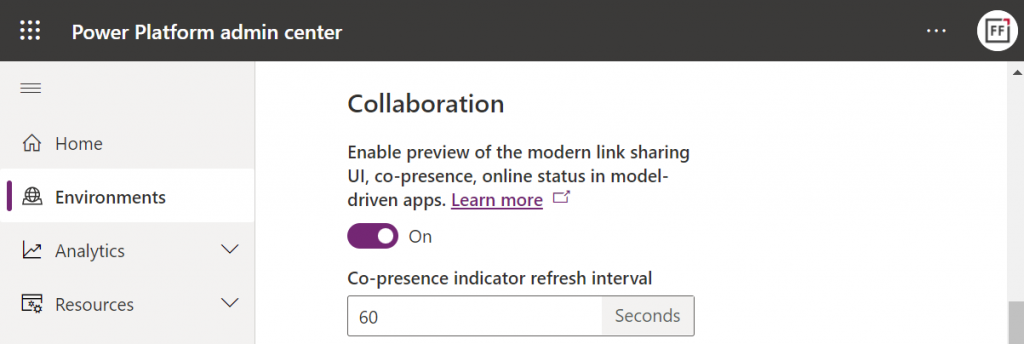
    First, you need to enable the collaboration feature in the environment settings via Power Platform Admin Center (PPAC):

    Next, you should go to the Privacy + Security page of the same environment and switch “enable sharing” to on:

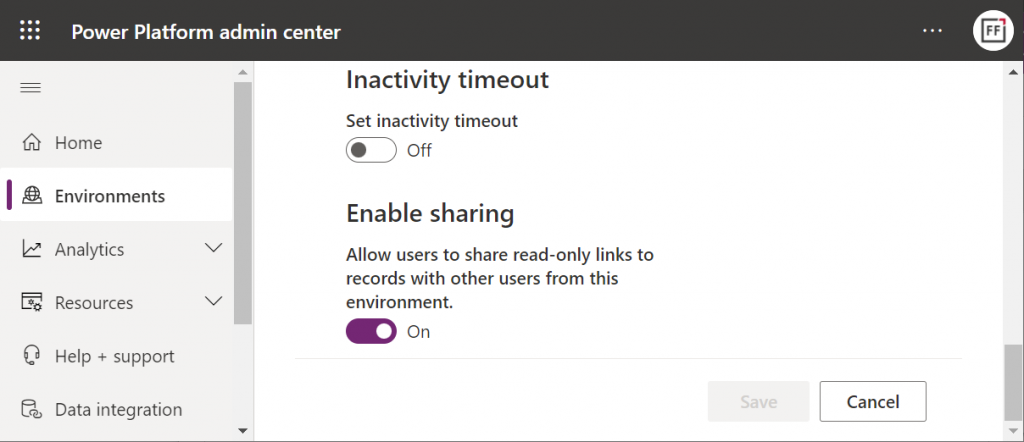
    As the message says, this should “allow users to share read-only links to records with other users from this environment.” I managed to get this working in a couple of different environments in our tenants, yet another demo tenant in the same European geo refused to co-operate. So, don’t be surprised if you see different results in your environments at this point.

    The link sharing experience

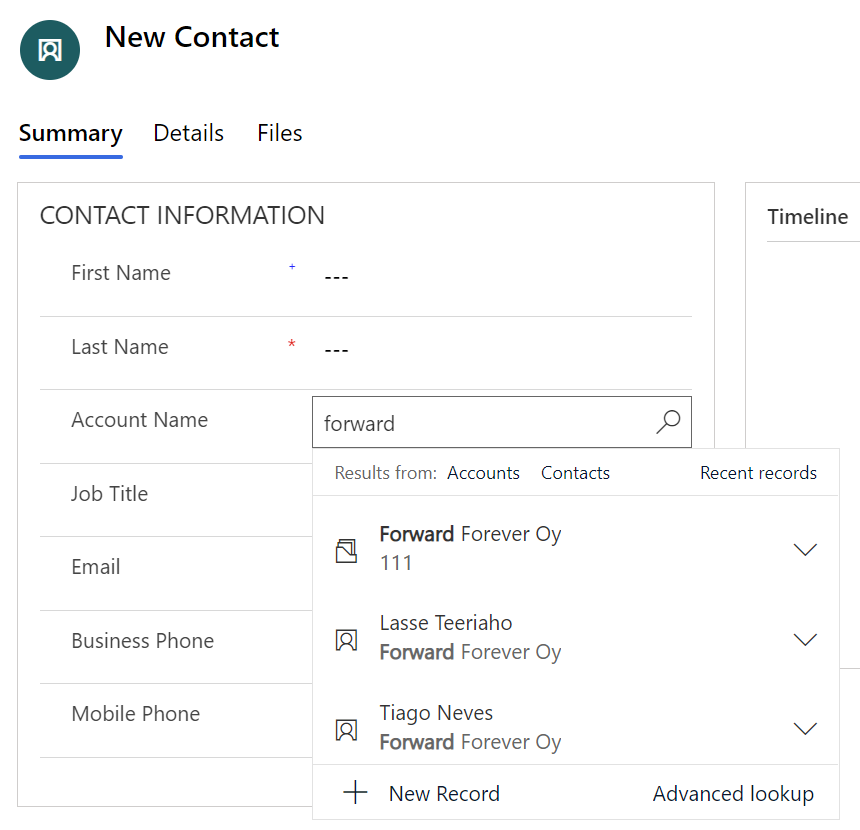
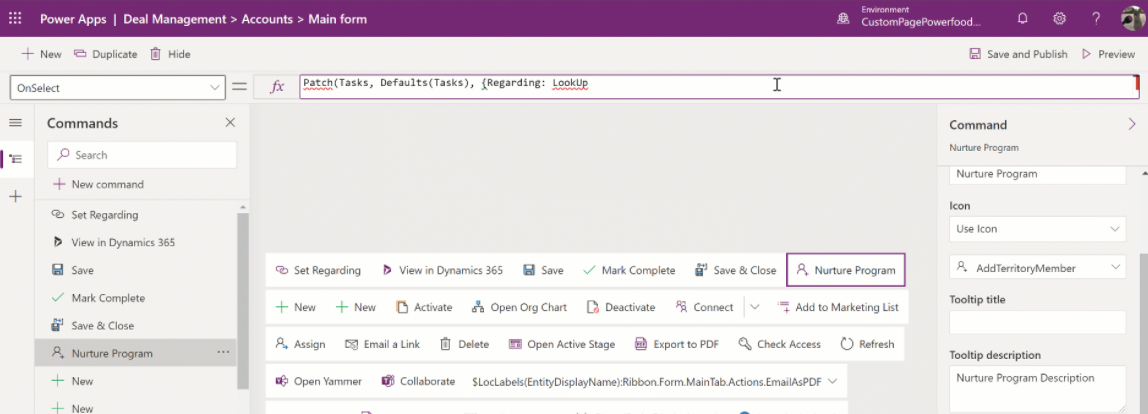
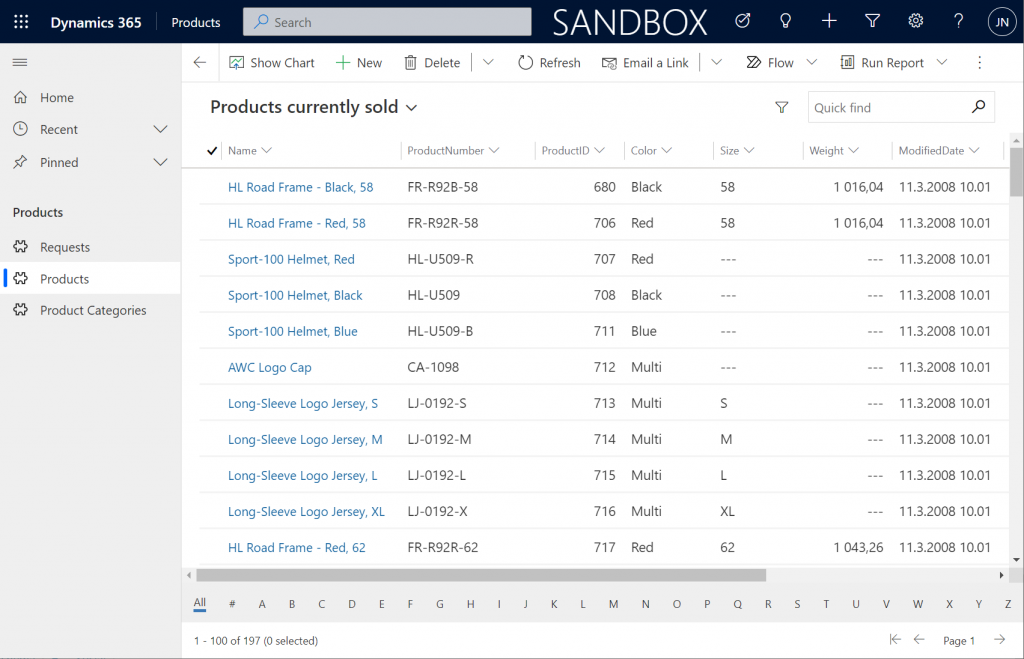
    Now that the features are turned on via PPAC, you should be able to go to a record like an account in a model-driven Power App and discover the new sharing menu in the top right corner of the form. Selecting “copy link” will give you a standard link that is the exact same URL as you’d get from the browser’s address bar. That’s because it’s meant for “people with existing access”.

    Once you click on the chevron and explore the link settings, there should be more options available (assuming the environment settings applied earlier have taken effect). Let’s select the “people in your organization with the link” option this time:

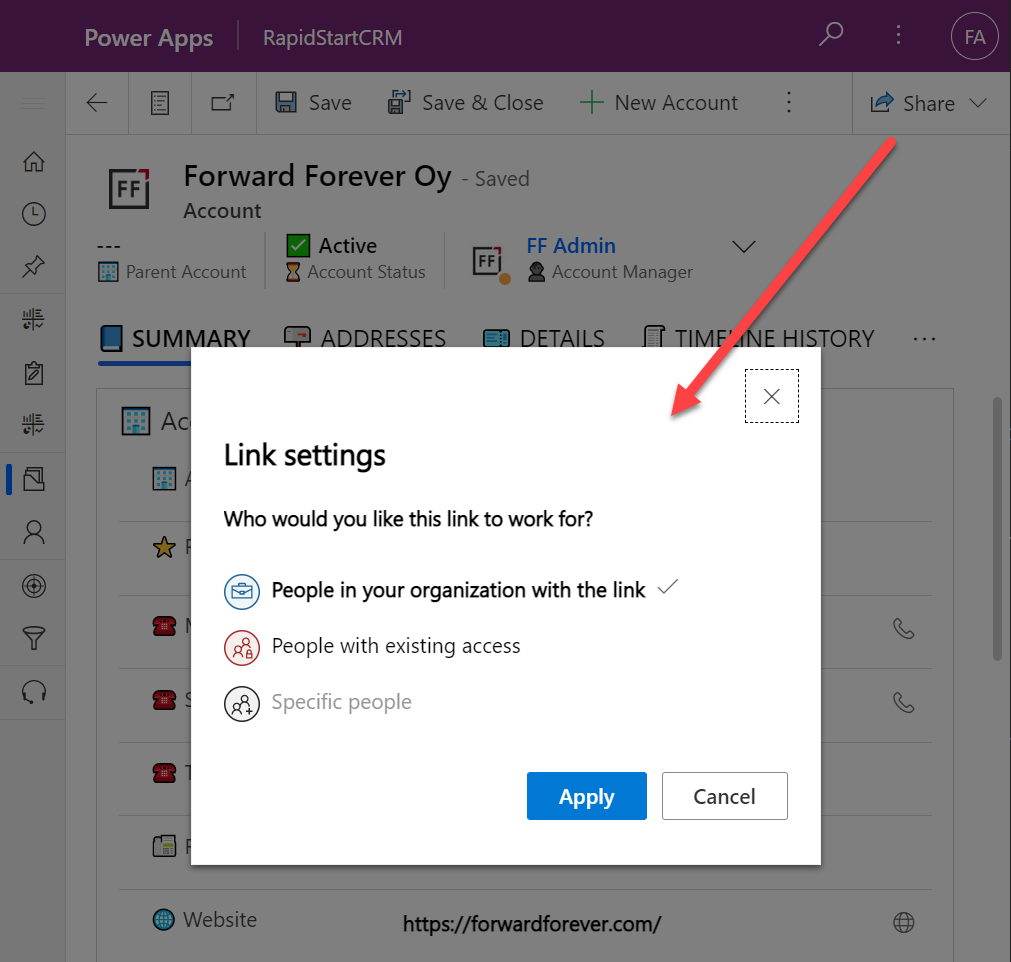
    Now we get a URL that is appended with parameters “shareLink” and “sig”. These are the magic keys to authorize someone who does NOT have existing access to the record in Dataverse.

    To validate how the feature actually works, I used our sandbox tenant’s user account FF App User as the guinea pig. First, as an administrator I went and removed any existing security roles for this user from the environment. Then I ran the diagnostics test from the user list in PPAC. A warning was displayed, saying “this user doesn’t have any security roles assigned directly to them”. Looks perfect for our testing purposes.

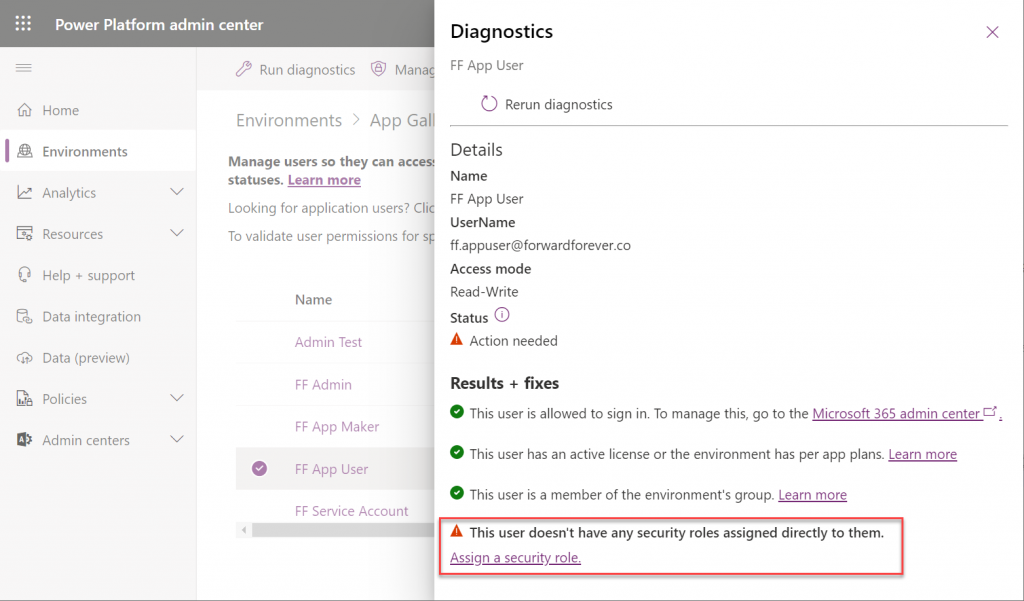
    (I actually also removed the license, yet that didn’t get flagged in the diagnostics test. Oh well, we all know how mysterious the license assignment and validation in Power Platform can be, so let’s ignore it this time.)

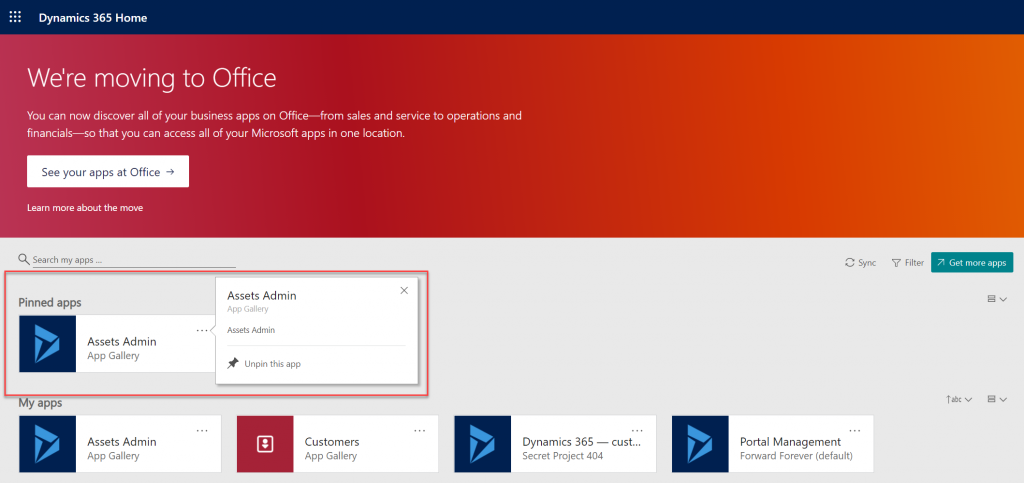
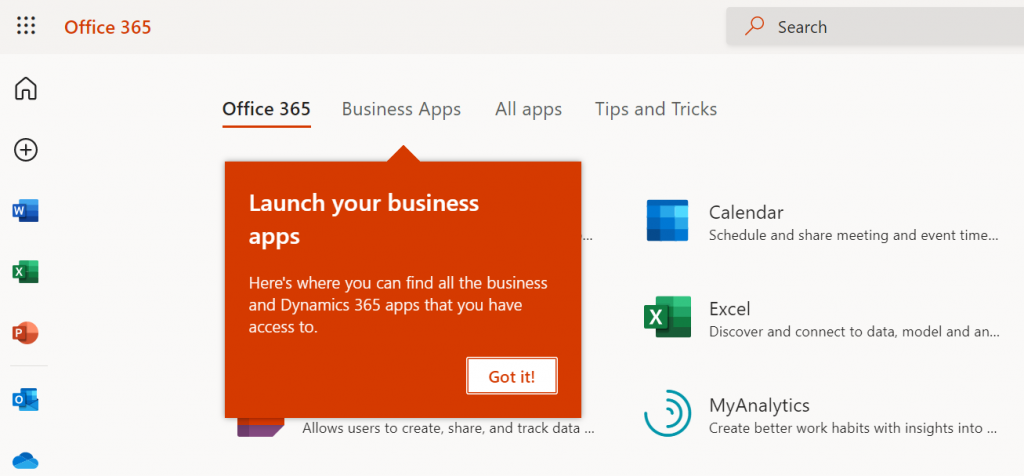
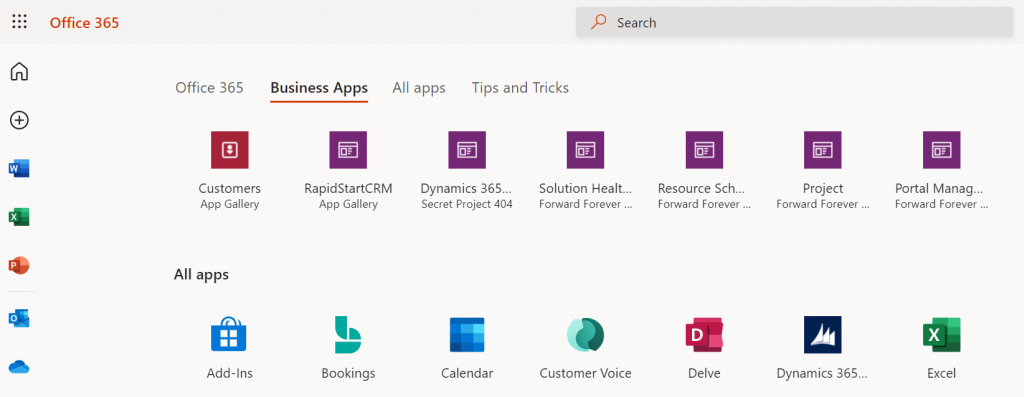
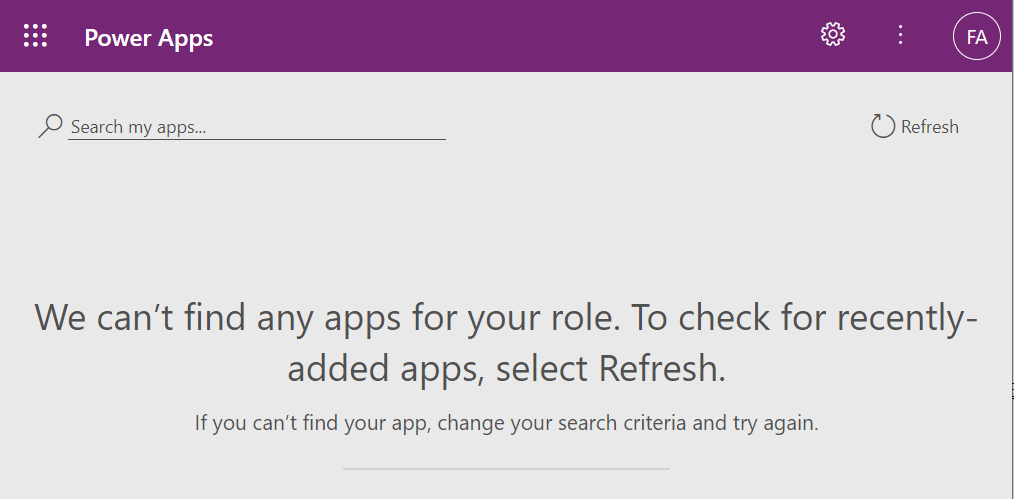
    Opening the naked URL of the Power Platform environment with this user account resulted in a screen saying “we can’t find any apps for your role”. Under normal circumstances, this would be the end of the road for a user.

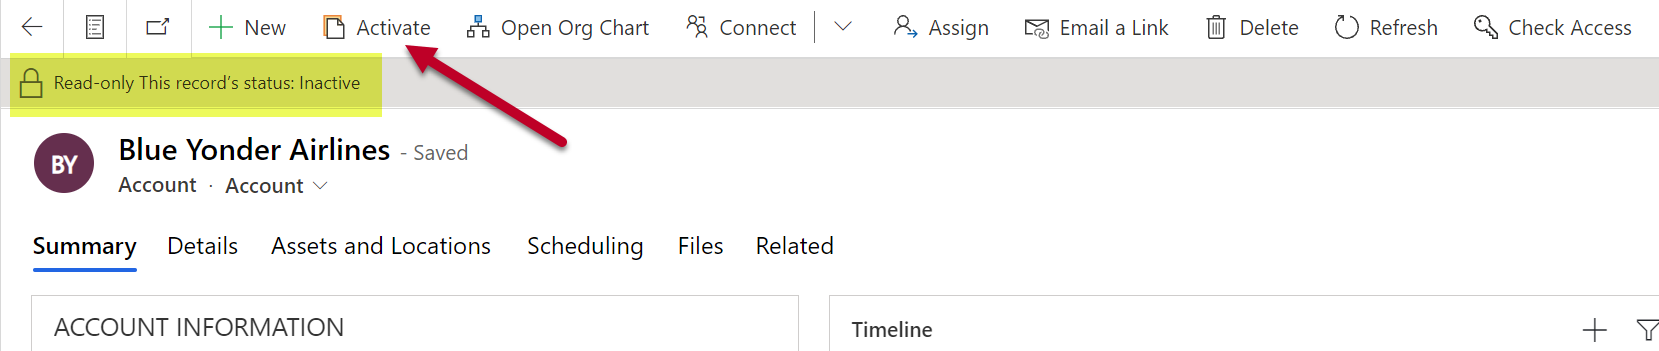
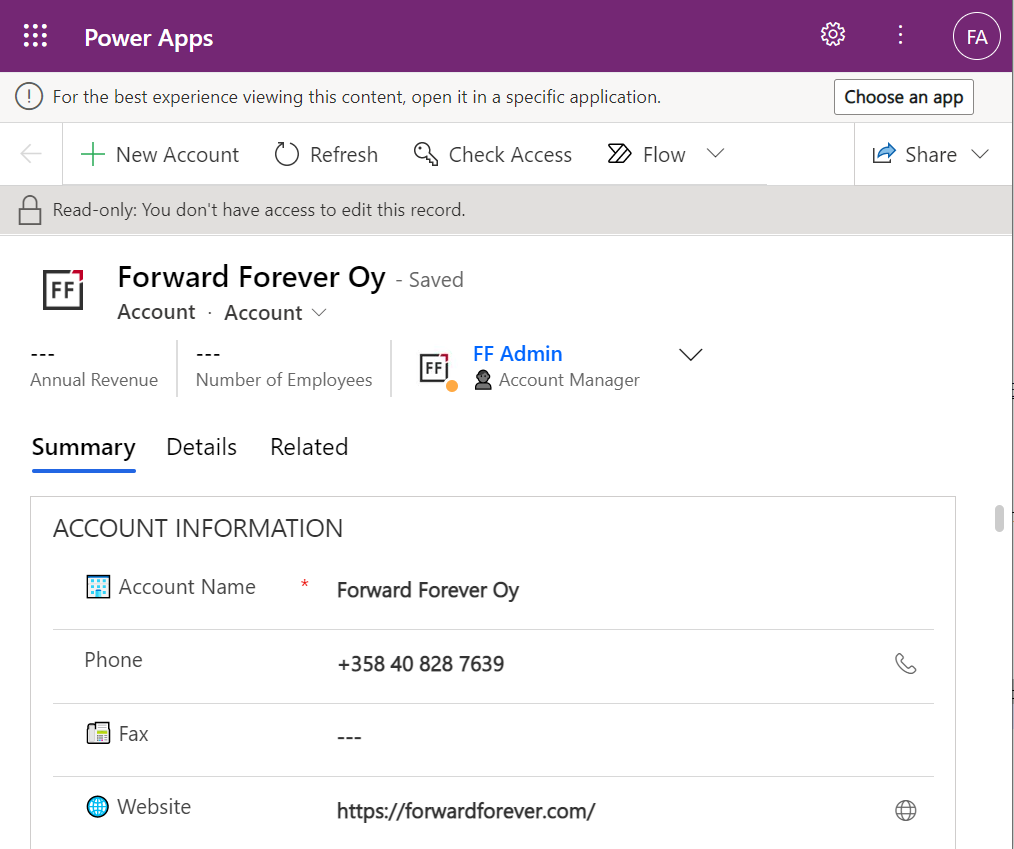
    This user has a special trick up his sleeve, though: the sharing link with the secret access code parameters. Using it allows us to open the account form outside any Model-driven app module. Yes, it’s read-only as the feature’s description text suggested, but from a viewing perspective this record form seems fully functional.

    How far do the sharing rights go?

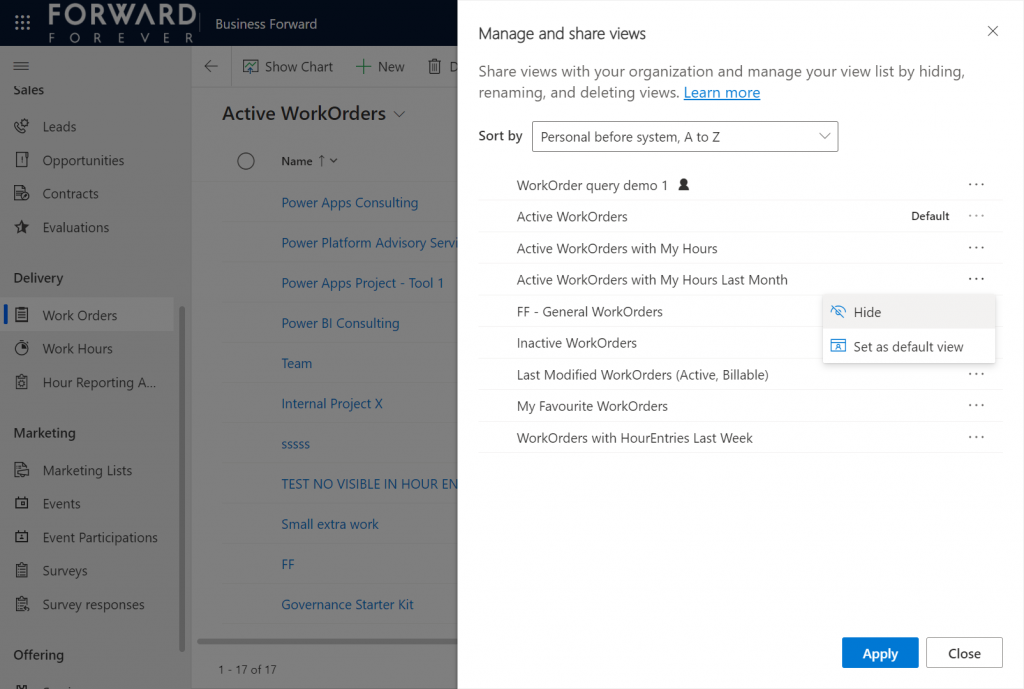
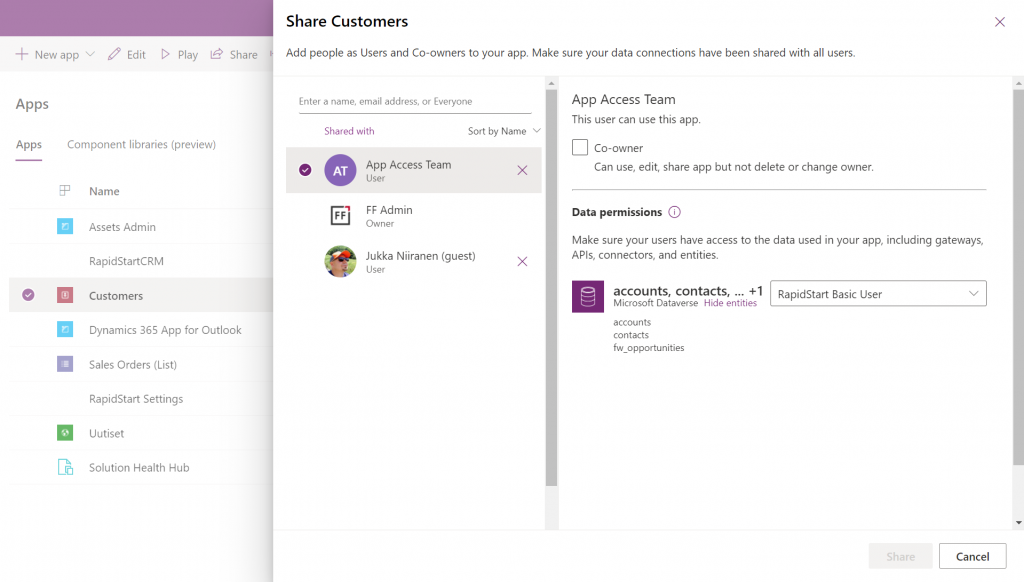
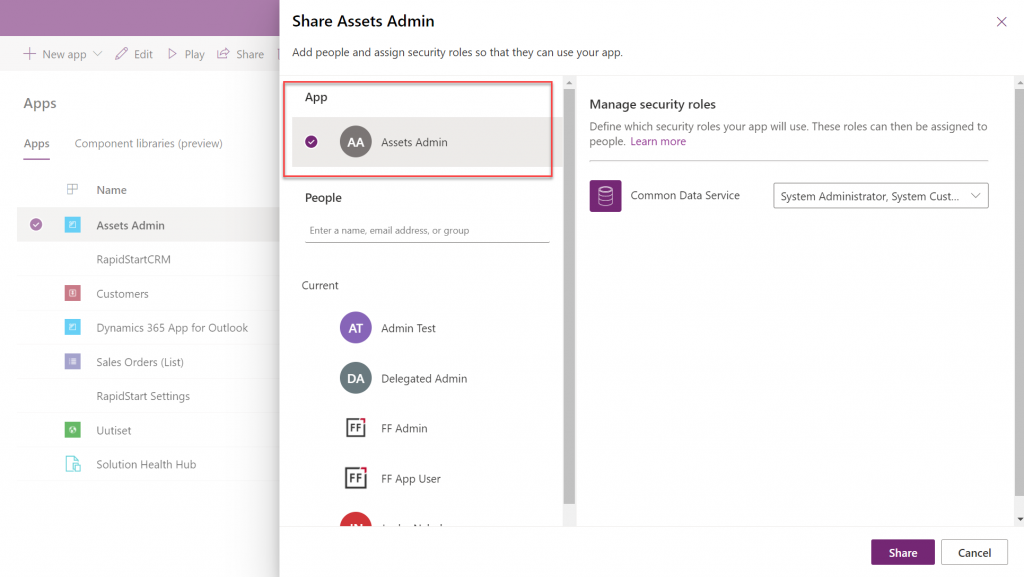
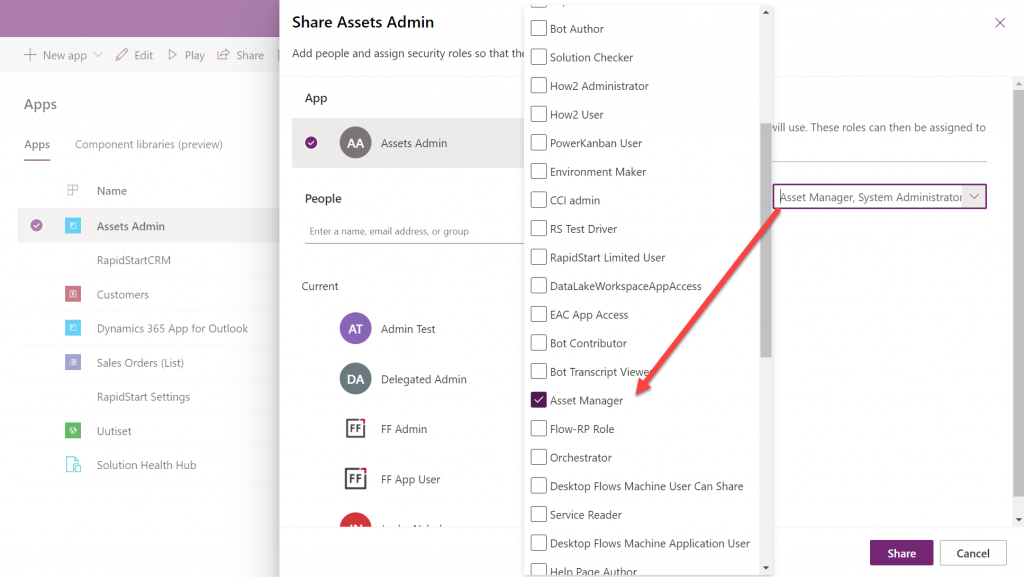
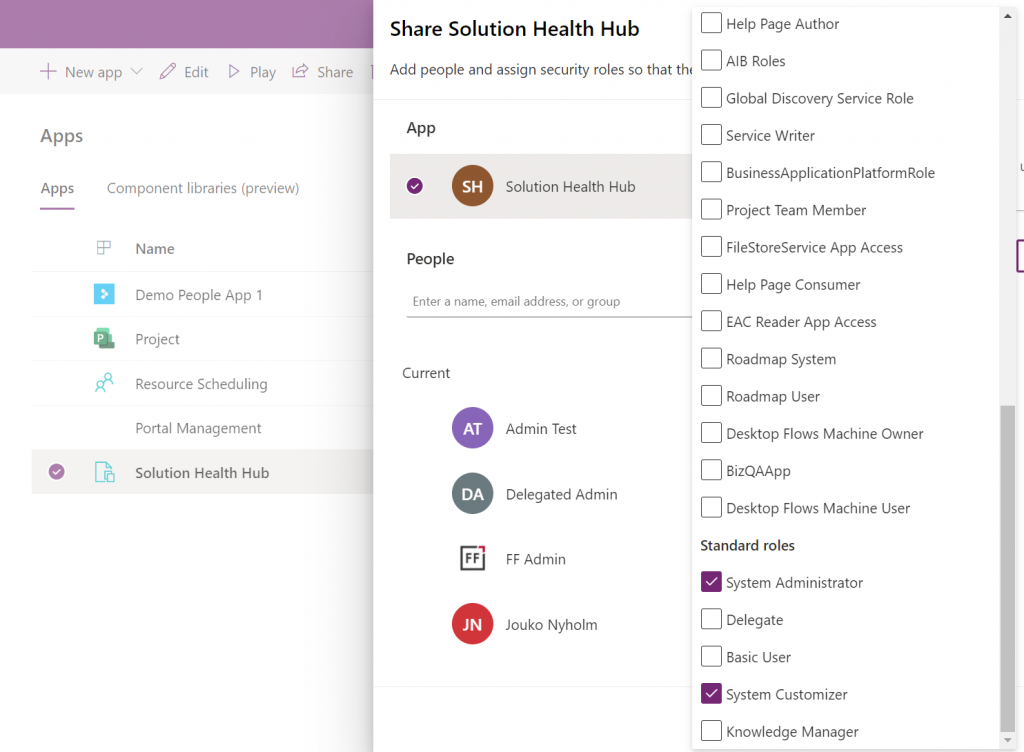
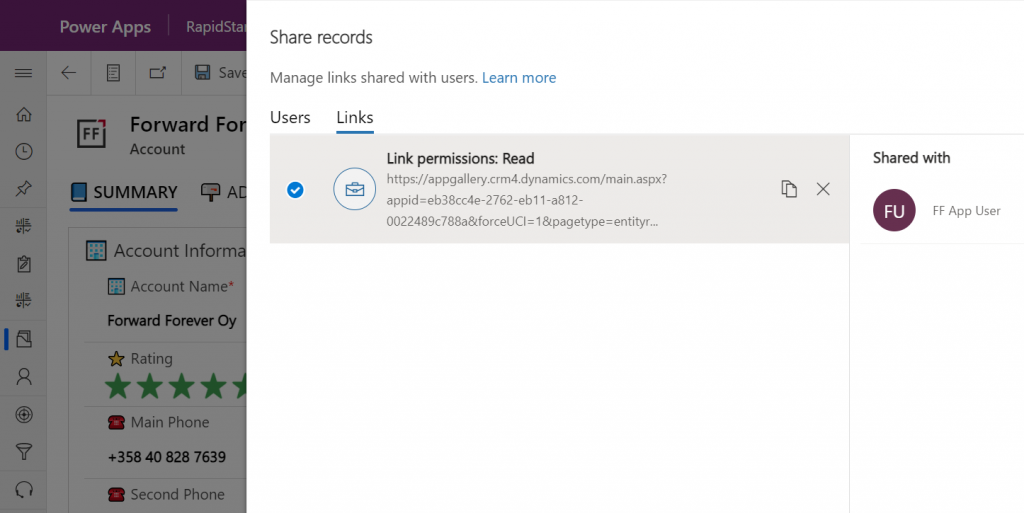
    If we’d go back to our admin user’s profile and re-run the user diagnostics in PPAC, we’d see that there still aren’t any security roles assigned for the FF App User. Let’s visit the sharing dialog of the single record instead and go to “manage access”.

    This screen shows us that we have one sharing link generated for the account in question, with read permissions. Also, since FF App User has accessed the record via the link, the user account is listed under “shared with”.

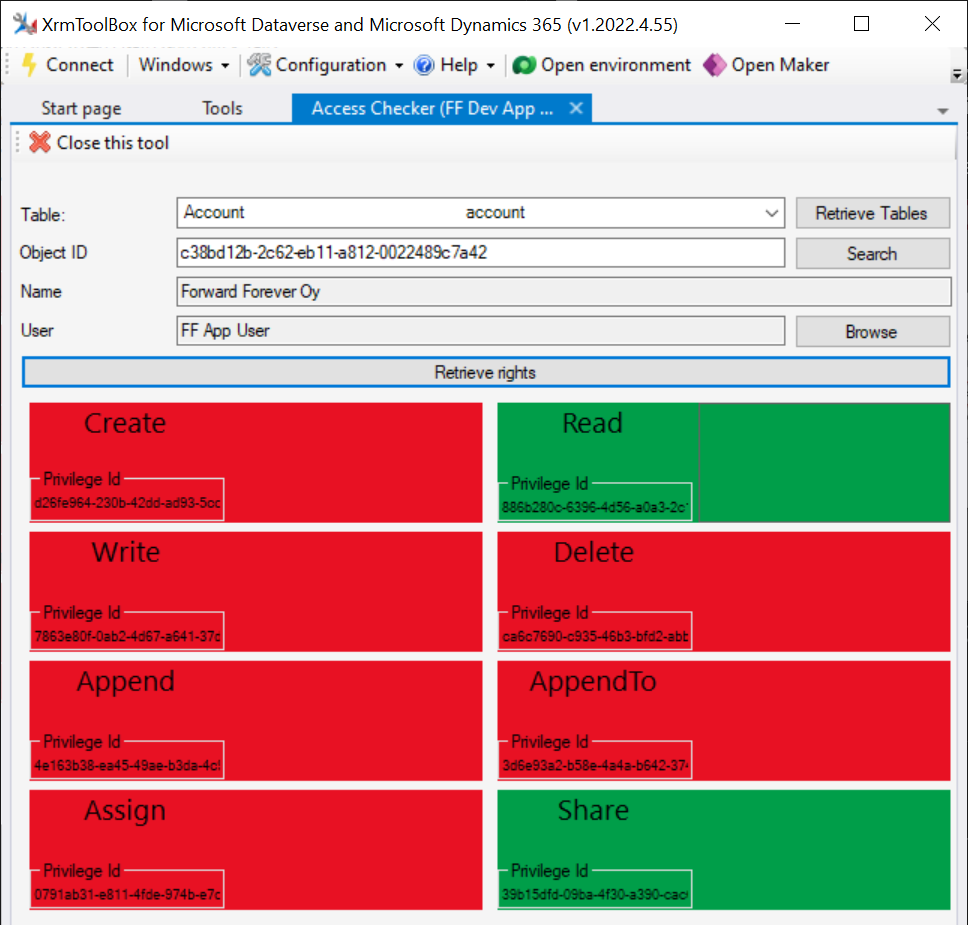
    Time to go deeper still, so let’s open XrmToolBox. Using the Access Checker plugin, we can run a test for the specific account record and the specific user account. We do indeed see that when called via the API, the user has both read and share privileges for this record:

    Could we find out even more about how the privileges are applied? Sure! Another plugin in XrmToolBox, “Your User Security – Magnified”, gives us a very interesting output for the FF App User account:

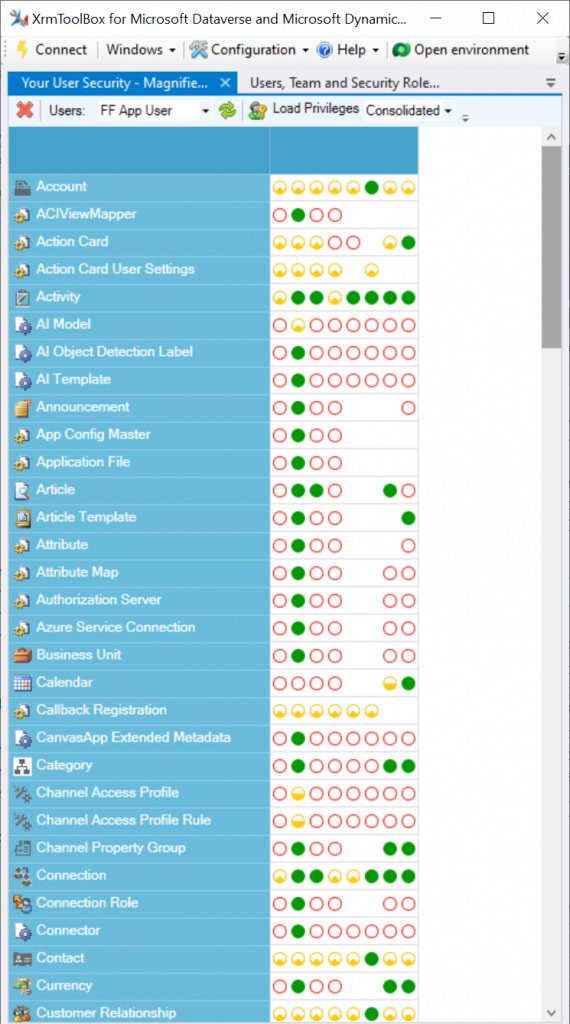
    As many of you know, there are plenty of system metadata tables (entities) that the user must be able to read for the application to function properly. Things like “attribute” or “user” are therefore understandably opened up for the FF App User account upon sharing the record.

    There are plenty of real business tables listed in that output, too. Contact and activity, for example. While the privileges are granted only in the user’s scope (meaning only records that the user is an owner of), this made me go back and think: what else did we see on the account form when we opened that one record?

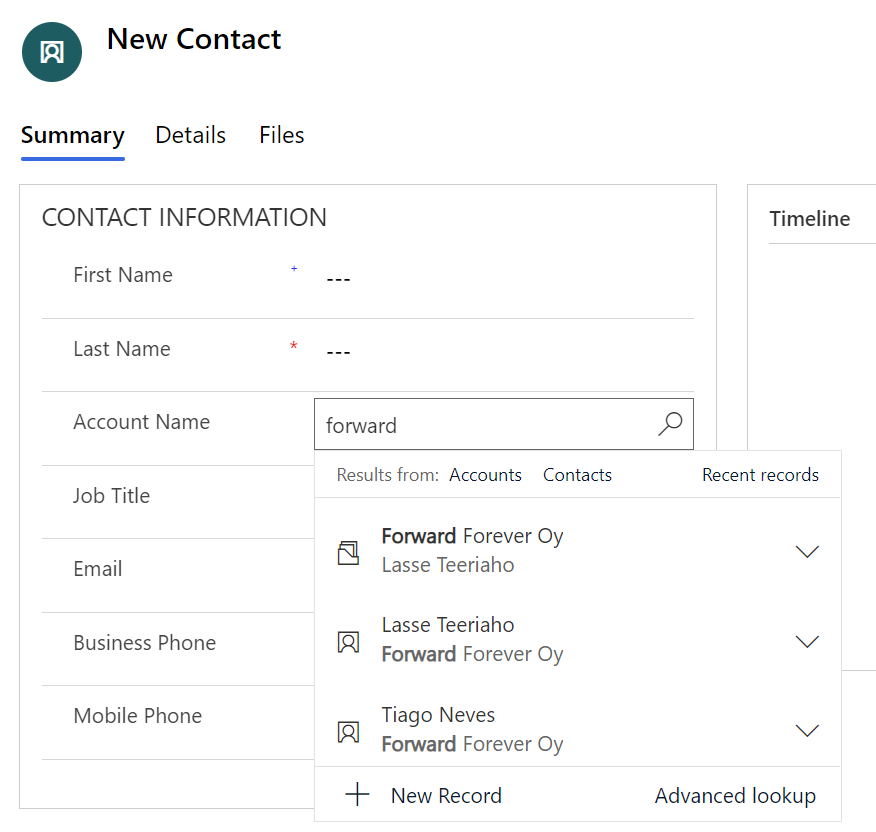
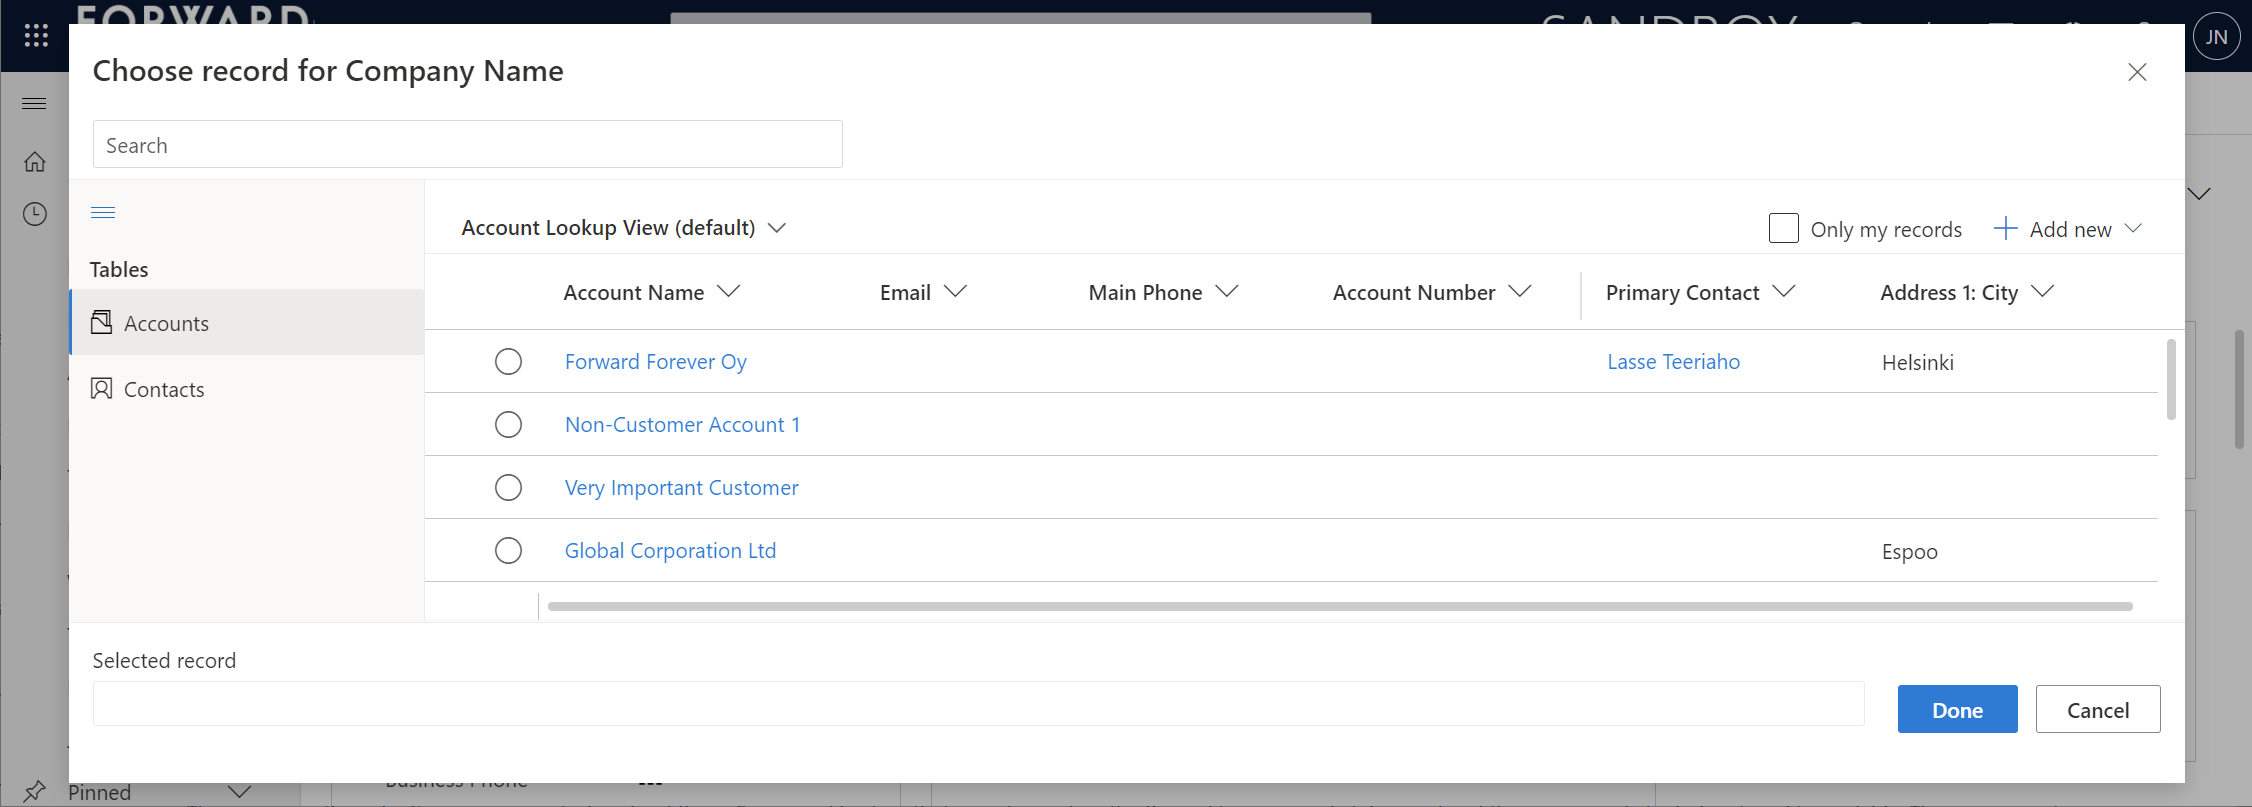
    Activities related to the account show up on the timeline. In addition, we’re able to navigate to their forms. We do also see the primary field values of anything that’s in a lookup, such as the regarding opportunity name.

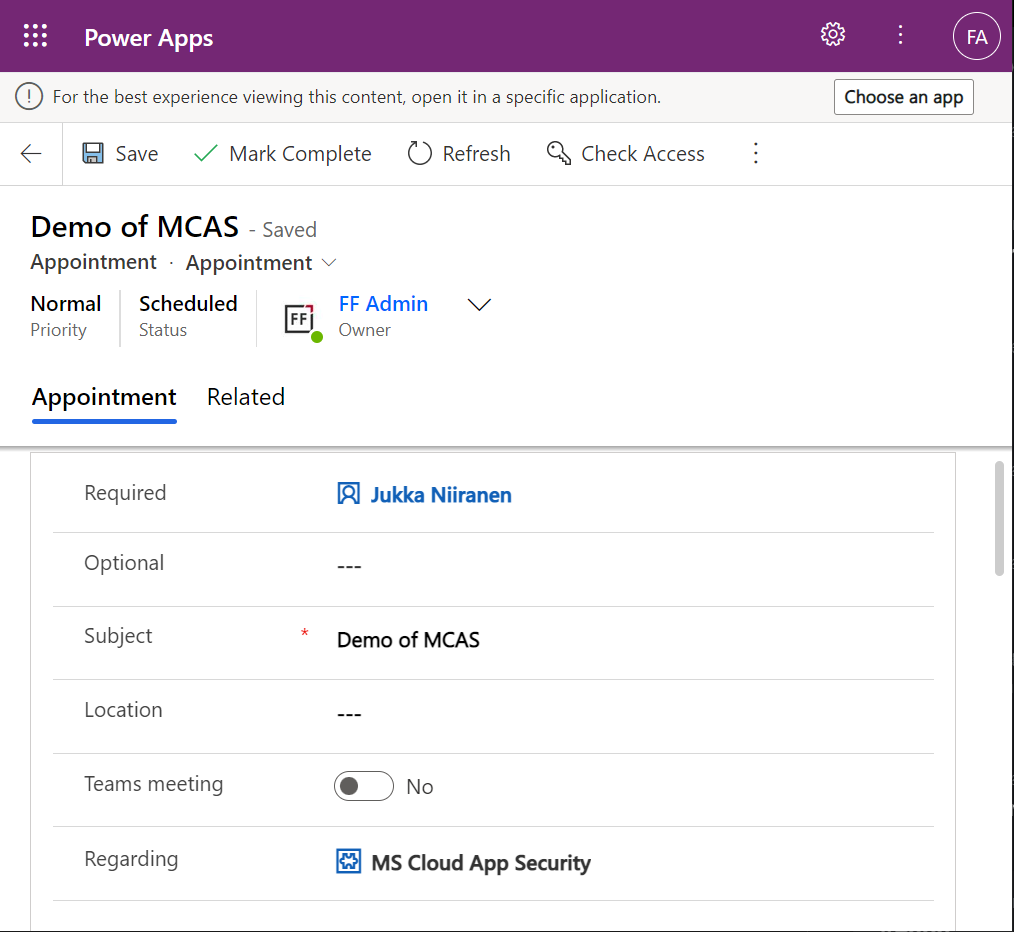
    Clicking on lookups, such as the contacts that are activity parties, will show an error message on missing read access rights. So, the security model is still enforced as expected, meaning we couldn’t just navigate via links to other records. It’s not just the lack of a surrounding app and its navigation that is missing from this user, there’s access checks also on the server side of course.

    It’s good to keep in mind that the modern collaboration features are currently enabled only for certain tables: account, contact, opportunity, case. There may be more configuration options ahead for how the sharing links work once the feature reaches general availability.

    Sharing within Microsoft Teams

    The primary scenario that these internal sharing links have surely been designed for is collaboration within Teams. Already back in July 2021 it was announced by Satya Nadella that “Teams customers will receive access to Dynamics 365 data within Teams at no extra cost.” We’ve been waiting for that possibility to arrive ever since.

    Given how the concept of sharing access to data has been radically different between a document world like SharePoint and a business record world like Dynamics 365, there has understandably been a lot of work needed to be done on the platform side. Now that the share links infrastructure appears to be in place, are we ready for the collaborative apps story to come to life?

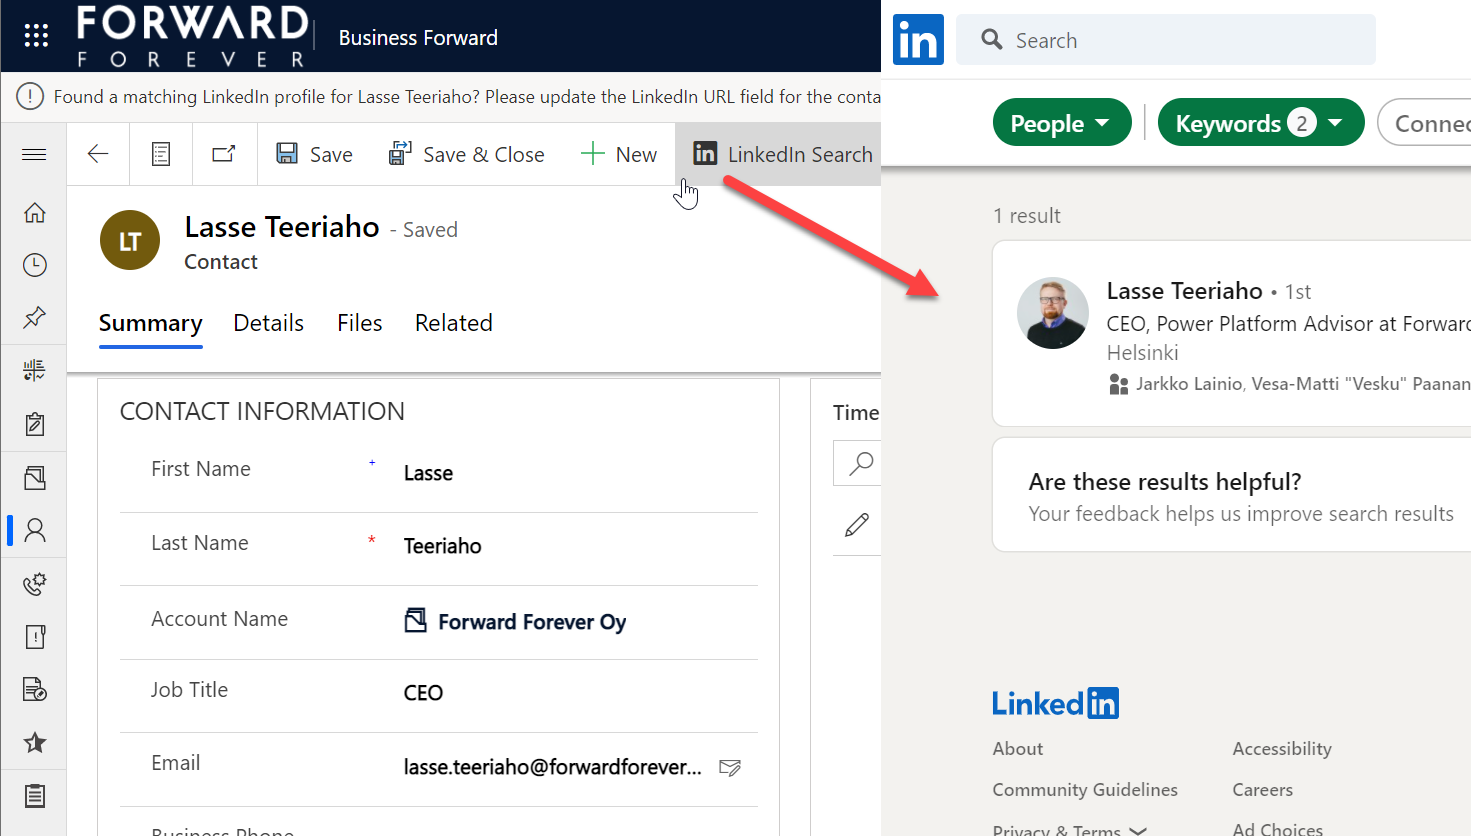
    Although the sharing capabilities are a Power Apps feature, there doesn’t yet appear to be the needed pieces in place on the Teams side for any low-code apps to take advantage of record sharing. However, if we test the sharing links in a Dynamics 365 enabled environment and with the Dynamics 365 Teams app deployed for the user, things start to light up:

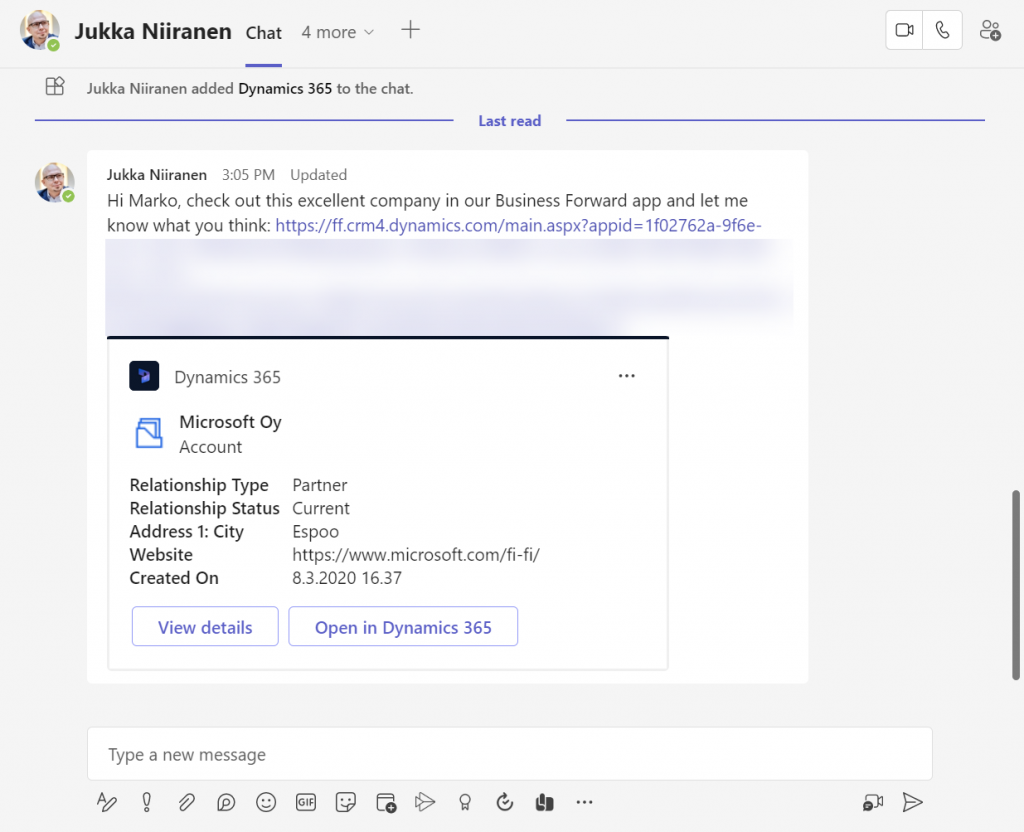
    Pasting the link into a Teams chat will now unfurl the contents and show an information card preview of the record. We also get the option to view the full record in the context of Teams, via the “view details” button. These are small yet important steps in allowing people to get work done within the platform that is Microsoft Teams, without needing to look for the details in another browser window.

    We’re still missing some of the elements showed by Microsoft as part of their collaborative apps story, like Context IQ for at-mentioning a Dataverse record or Loop components to embed live data into messages in Teams or Outlook. While we wait for a delivery timeline on those elements, at least this easy record sharing feature in Power Apps model-driven apps has a target GA date for September 2022.

  • Modern advanced find test drive

    Modern advanced find test drive

    The single most powerful end user feature of Dynamics CRM, XRM, CDS and Dataverse was always Advanced Find. Period.

    There, now that we’ve settled that argument, it’s time to move forward and see what life is going to look like when Dataverse no longer includes Advanced Find. Yes, there will still be the broad capabilities of advanced find, but I will refer to it without capitalization. This is in line with the fresh new documentation on a very important feature that aims to take the place of Advanced Find: modern advanced find.

    So modern you can barely see it

    Advanced Find was always its own UI in a separate popup window. This was perfectly in line with the Dynamics CRM 2011 UI – which was the last time there were any material changes to the visible features. Let’s have one last look at Advanced Find’s glorious Ribbon icon before we move on:

    OK, so this wasn’t actually the last time Microsoft touched the user experience for this feature. The CRM 2013 release did a complete overhaul of the application UI (I’d say a more visible change than Unified Interface even), which lead to the Advanced Find buttons getting either hidden or missing from parts of the app navigation. I had to write a blog post called “Finding Advanced Find in CRM 2013” to help out users who were worried that the feature had been removed from the product entirely.

    The modern advanced find that has been introduced as a preview feature in February 2022 takes the hiding game to a whole new level. You see, the entry point to modern advanced find is hidden within the global search bar. You have to 1) click the bar and then 2) click “search for rows in a table using advanced filters”.

    Be sure to not enter any search text into the bar, because that will hide this new option. Also, whatever you do, do not press enter after this text – otherwise you’ll be taken to the global search results page. There’s no way to “go advanced” from here, it’s a completely different search experience.

    Search “any” table

    A big new feature in the modern advanced find is what happens after you click on the new button within the search bar. (I already forgot the name of that button since it wasn’t anything as nearly catchy as “advanced find”, so I’ll refrain from scrolling up this post to see what it was and just move on instead.)

    You will see a sidebar saying “select a table to search”. Cool, just like in good ol’ Advanced Find! The difference you need to understand, though, is that it’s not a list of all the tables in the environment. Yes, it will likely be a longer list that what your Model-driven app’s sitemap navigation contains. This is because modern advanced find covers all the table’s that your app’s maker has chosen to include in the app module when working with the Model-driven app designer.

    There are pros and cons to this approach. The obvious upside is the ease of use for the casual data finder. He/she doesn’t need to confront the ever growing list of both standard and custom tables in a Dataverse environment (especially those with many Dynamics 365 apps installed in them). Things are quite different now compared to back when Advanced Find was originally designed for a simple CRM systems. Showing hundreds of cryptic tables isn’t a great UX to most users, so cutting down the noise of the underlying data model is understandable.

    How about those users who DO understand the data model, or even work in configuring and extending it? The advanced app makers, consultants and developers will most likely be frustrated by this limitation whenever they need to examine the detailed contents of an environment. Quite often I myself need to build new views and filters just to understand what data has been entered into the system (that has been designed by someone else).

    Sounds to me like there will be a growing demand for a “Super Advanced Find” type of a tool to be introduced in XrmToolBox. If you’ve already got a favorite tool for ad-hoc data exploration needs, be sure to leave a comment below.

    Query criteria remains the key criteria

    The one area where an advanced search feature in Dataverse simply has to perform well is the creation of complex query criteria across the relational data model of the environment. One of the most read articles on my blog has been Advanced Queries with Advanced Find, which illustrates both the possibilities of the tool as well as the demand for such advanced query criteria in real-life business scenarios.

    Luckily this is already included in the non-preview feature set of Model-driven Power Apps. The filter editor that you can find in any table view today is a very worthy replacement for what Advanced Find used to offer. Although I haven’t done a detailed comparison, I couldn’t easily spot any missing capability from the tools available for defining the view filters in modern advanced find vs. the classic pop-up query editor for Advanced Find.

    Just imagine if it was this easy to define the filter criteria for Dataverse tables on the modern automation side, too – not just views? Perhaps one day something similar will be made available for Power Automate cloud flows, based on what is being planned for SharePoint data sources in 2022 wave 1 (because priorities). Until then, luckily we have great articles and reference guides created by the community to copy-paste our “flow code” from while we wait for a GUI to arrive.

    Actually viewing the data

    Far too often I’ve seen people put all their effort in defining the correct query criteria and then being lazy when it comes to actually showing the results of that query. You could say I wrote the book on the importance of Dynamics CRM view design back in the 2013 era, so you can image how such user experience oversights have irritated me over the years.

    Smart choice of view columns and sort order are what defines the user experience outcome. Query filters are merely table stakes.

    Jukka Niiranen, in this blog post right here.

    As a data exploration tool, Advanced Find wasn’t always perfect, but us consultants learned to make the most of it. When needing to dig up data from columns that weren’t readily available in the system views, it was easy to just go and add all columns into an exploration view. Whereas when building more targeted we had two useful features in the “add columns” screen of Advanced Find: sort by name, sort by data type.

    Unfortunately this is where the modern advanced find is a little behind on the classic Advanced Find. Let’s look at what the column editor experience is like.

    First of all, the editor includes the very same modern stumbling block that you might have noticed when working in the Power Apps Maker portal and searching for table columns. When you open the “add columns” side pane, the list of available columns doesn’t cover everything that the table contains. Instead you are defaulted to a “Default” filter that’s easy to miss. Switch to “All” and you’ll finally see that field you wanted to include in your view.

    What exactly does “Default” mean in this context and how is it defined? No one can tell, not even Microsoft. It appears to be one of those good intentions in tidying up the menus of what should be a citizen developer friendly platform yet also serves huge enterprise CRM systems. A tough balance to get right, that’s for sure.

    One very nice improvement in the modern advanced find (as well as the Maker portal) is the ability to search for things while you are configuring those very things. Narrowing down the long list of available columns with a free text search term could be especially handy when you’re looking for information stored on a related parental ent… table.

    What could make such a feature even better? I’ve got one idea: extend the search index to include also the schema names. Believe it or not, the display names of f… columns can become quite misleading when you eventually need to adjust them for the places in the app UI where they can’t be customized (which just happens to mainly be: VIEWS!).

    Anyway, often the schema name may have a pattern that makes it easier to logically group columns, which in turn makes the app maker more productive as he/she finds them more easily when defining the views. Right now that’s something the modern advanced find doesn’t yet support. If you think it should, then go and vote for it.

    So, you’ve created a hundred and one views…

    If there was something that the classic Advanced Find feature really didn’t handle well at all, it was the process of managing the views created with it. The way how the Ribbon UI managed to both hide the feature and yet make it highly misleading at the same time was something… special.

    Compared to what we used to have in Advanced Find, the enanced personal view management now launched in preview is a thing of beauty. Changing the sort order and hiding unnecessary views are very welcome additions to how the power users will be able to take control of their business app UI details.

    The new view hiding feature is something to pay attention to:

    “Hiding a view is a way to personalize the view list and reduce clutter by making views not be visible in the view selector. A view may be needed for a specific purpose periodically or a view could be shared with you that you may not need it anymore. In such instances, hiding enables you to manage your view list by seeing only the views that are most important for you.”

    This probably won’t solve all the pain associated with view management as their number grows in “busy” tables used for different kinds of analysis, both via system and personal views. Yet it’s a simple, user-driven concept to offer personalization within Model-driven apps.

    Closing the Advanced Find popup

    We’ve known for quite some time that eventually the legacy web client popup with Advanced Find will not be supported anymore. This modern advanced find feature in 2022 release wave 1 aims to include the necessary features to allow deprecating a very central part of the product. It does a pretty good job and the general principles in modern advanced find are quite justified.

    Will I miss the good ol’ Advanced Find once the new feature is enabled and the icon to the classic experience is gone? Of course I will. Like with many of the modernization efforts around Power Apps as a business app platform, the new experiences always take away something that used to allow XRM veterans like myself to be productive. Often we get less information density in the screens, blocking the use of multiple tabs, slower loading times due to new API dependencies, more options hidden/missing due to simplification efforts…

    Enough with the complaining already! Things weren’t better before, they were just different. What used to be a single app in a single service is now a cloud where traditional boundaries are vanishing at an astonishing rate. Now everyone really can make apps, and there can be a thousand “XRMs” in an organization. Both the audience and the purpose of these tools is forever evolving – and so must their features.

    Update 2022-06-08: Microsoft has started to roll out an enhancement to the view filter editing screen. There will be a button to download the FetchXML definition of the view filters. Also, export to Excel will now honor the filter modifications done, without requiring the view to be saved. Just like in the good ol’ Advanced Find days then.😊

    Update 2022-08-02: As we get closer to 2022 Release Wave 2 when the classic Advanced Find button will be hidden from the UI for everyone (see Modern advanced find turned on by default), you should keep in mind that there is still a way to open the Advance Find page with the direct URL. You can (and should) install the LevelUp extension for Chrome/Edge/Firefox to have access to this dynamic URL. This will hopefully work for as long as Microsoft keeps the legacy web client page infrastructure alive.

  • How to control the lookup view columns for a customer field

    How to control the lookup view columns for a customer field

    It’s the little things in a user interface that can drive me nuts – at least when I keep running into them repeatedly.

    One such detail in Dynamics 365 CE apps / Model-driven Power Apps is the scenario where you’re creating a new contact record and linking it to a parent account. Filling in the lookup field gives a nice little preview of the matching records. Like this:

    Now, look at the first two results: aren’t they actually saying the same thing, but in different order?

    At least I have a hard time distinquishing which record I should pick when I want to link this new contact under the account Forward Forever Oy. So, why is row nr. 1 the right answer and row nr. 2 the absolutely wrong choice to pick here?

    The underlying dilemma is that this lookup field is a customer field (column). It can reference either an account or a contact record (row). It’s one of those non-simple types of lookups that Dataverse has contained since forever, thanks to it being originally designed for the purpose of being a CRM database.

    Now, in a B2B CRM scenario you would almost never want anyone to link child contacts under other contacts. Unfortunately, even after 2 decades of shipping a mighty fine CRM product, Microsoft still hasn’t considered it worthwhile to offer customer organizations a configuration option to force contacts to be linked only to parent accounts.

    Being an extensible enterprise business application platform, you can of course get a developer to write some JavaScript to change the default behaviour of the lookups that bother you. As for me personally, I always like to explore if there are no-code ways that would allow me to achieve a similar result without adding even a few lines of script into the environment for the future me / someone else to manage.

    In this case what I want to do is this: don’t show the Primary Contact field in the lookup view of an account. As we’ve seen, it can be highly confusing, since this very same contact itself can also show up in the list of results. For a contact, it’s very logical that the parent account should be shown in the lookup preview results. (and used as a search field). For accounts, the Primary Contact value would likely be irrelevant in 99% cases when looking up records.

    To give Microsoft some credit on the UX front, they have invested in developing a new Advanced Lookup feature that gives the end-users more filtering options to find the right record to link to. Opening up this modal dialog also gives us a way to examine why the previews behave the way they do.

    Initially this lead me to scratch my bald head even more. Based on what the documentation says about lookup field behavior, I shouldn’t see the Primary Contact field value in the dropdown preview of the lookup, as there are columns like Account Number before it in the view.

    “For system lookups that allow for multiple table types, the first two columns of the table lookup view are shown.”

    It turns out this is not true anymore. To demonsrate the real behavior, l added an Account Number “111” for Forward Forever Oy account record. This is what happens with the lookup preview:

    Ah. The current lookup in the modern Unified Interface is so darn clever that it shows the first non-empty column from the lookup view.

    The solution is simple then. You can just add columns at the beginning of the table’s lookup view that are always going to have data. These will then push further left the lookup fields that aren’t relevant in the dropdown preview. This means you can still keep the other fields visible by default when opening the Advanced Lookup dialog. Even that confusing Primary Contact field can be left there, just in case we need it.

  • Find contact’s LinkedIn profile with Power Fx & custom command bar button

    Find contact’s LinkedIn profile with Power Fx & custom command bar button

    So far in my experiments with Power Fx and the modern commanding preview in Model-driven Power Apps, I’ve worked with changing record status and cloning a set of existing records. This time I’ll create a custom button for another common CRM scenario: viewing the contact’s LinkedIn profile information.

    In our internal CRM application (Business Forward app) I’ve earlier added a custom field “LinkedIn URL” for contact records, which can be used for storing the reference to the contact’s profile. Not all contacts will of course have this field filled, which is why it’s a common need to go and search for the information on linkedin.com. Could we save a few clicks in this manual process with a simple button? We certainly can!

    This scenario is straightforward enough that you could well use it as your first custom command bar button in your Model-driven Power App or Dynamics 365 CE app.

    Button 1: LinkedIn Search

    Open up your Model-driven app in the preview editor that allows you to access the list of pages in the app. Then for the contact page select the three dots and click “edit command bar (preview)”:

    Select the contact’s main form as the target and the command designer will open. Pick a suitable spot in the existing list of commands and add a new button called “LinkedIn Search”. You can choose the out-of-the-box “LinkedInLogo” icon for it.

    We will want to have a visibility rule that will conditionally show/hide the button, based on whether the contact’s custom text field “LinkedIn URL” contains data or not. The IsBlank function will return a true value when the field is empty, so we can directly input that into the Visible property of our button:

    IsBlank(Self.Selected.Item.'LinkedIn URL')

    Next, let’s go over to LinkedIn website and study how their search actually works. There is of course the global search box in the top navigation bar, but when looking at the search results page we discover additional options for applying specific filters.

    This is the faceted search page, which allows us to specify that we are interested in finding people (1) rather than companies or content. Clicking on “all filters” (2) reveals an even more granular search experience, allowing us to enter keywords (3) for fields like “first name” and “last name”.

    If we were to search for Satya Nadella as an example, the result page URL would turn into this:

    https://www.linkedin.com/search/results/people/?firstName=satya&lastName=nadella

    This is a great scenario for using Power Fx to manipulate a text string for our app’s purposes and inject some dynamic values in there. We can now start designing our OnSelect formula needed for our LinkedIn Search button. It should do these things:

    • Open the LinkedIn search page in a new browser tab
    • Insert the contact’s name information into firstName and lastName query parameters
    • Ensure that any spaces in the name fields don’t mess up our URL validity

    The Launch function will take care of opening the browser tab. For joining the static and dynamic parts of the URL together, we use the string concatenation operator “&”. As for handling any non-URL friendly characters, we can use the EncodeURL function and pass the contact’s first & last name fields to it.

    Let’s save and publish these button configurations, which will generate a component library called “OurAppName_DefaultCommandLibrary” into our solution. Be sure to publish all customizations for your solution and also hit refresh a few times on the Power Apps application screen to make things come alive. (Note: you may also get an error the first time you click a custom command bar button, at least for me that happens every time, but then clears away.)

    Now when we open a contact record that doesn’t have a value in the “LinkedIn URL” field, the new button should be visible. Clicking on it will open up the LinkedIn people search page with results where the first & last name match the contact’s information:

    That was pretty easy!

    Button 2: LinkedIn Profile

    It would be nice if the next user of our CRM system wouldn’t have to browser through the people search results page to repeat the same query. Unfortunately there’s nothing we could grab with Power Fx from the first user’s new browser tab automatically, so we’ll need to ask the user to copy the URL and past it into our contact’s custom field.

    To remind them about the importance of updating CRM contact data, let’s show a notification bar that’s waiting for the user once they return back to the Power Apps tab:

    With this additional step, the OnSave event of our button 1 will therefore have two actions: launch and notify.

    Launch("https://www.linkedin.com/search/results/people/?firstName=" & EncodeUrl(Self.Selected.Item.'First Name') & "&lastName=" & EncodeUrl(Self.Selected.Item.'Last Name'));
    Notify("Found a matching LinkedIn profile for " & Self.Selected.Item.'First Name' & " " & Self.Selected.Item.'Last Name' & "? Please update the LinkedIn URL field for the contact. Thanks!")

    Now we can move on to button number 2. If the contact record already has a LinkedIn URL, we’d of course want to skip the unnecessary search part and open the profile page directly.

    Let’s add another command bar button called “LinkedIn Profile”. The OnSelect property will be very simple this time: we just pass the Launch function a parameter containing the value of the “LinkedIn URL” field.

    This second button should be visible only when the first button is not, to cover the two possible scenarios of the URL field having a value or not. While we could have conditional logic in our Power Fx to handle either scenario with a single formula, we don’t have the possibility to dynamically change the display names (or other properties) of the command bar buttons. So, two buttons with a similar feature is the approach we need to take.

    How do we reverse the visibility rule? For some reason adding a simple exclamation mark before the function doesn’t work as a negation operator in a custom button Power Fx formula like it would in a Canvas app formula, so I wrote the Visible formula of the new button in a less pretty format:

    If(IsBlank(Self.Selected.Item.'LinkedIn URL'), false, true)

    Save, publish, hit F5 a few times & wait. Now let’s open a contact record that already has the URL field filled. We see that instead of “LinkedIn Search” the command bar button now says “LinkedIn Profile”. Clicking on it takes us straight into the correct profile page:

    That’s all there’s to it!

    Closing thoughts

    I would have actually wanted to write a bit more complex formula than this, but there are a number of limitations in the current modern commanding preview feature that have blocked my other scenarios.

    For instance, there doesn’t seem to be any way currently to access the parent account information of a contact. Since under the hood it’s a customer lookup, meaning a polymorphic relationship that can reference either an account or contact record, we’d need to use the AsType function. That doesn’t appear to be supported for command bar buttons, so I couldn’t even grab the name of the company to be injected into the LinkedIn search URL to get better matches. Not a showstopper, but definitely something to add into the button once it becomes supported.

    Due to its preview status, some things in custom commands that used to work earlier aren’t working anymore. The record cloning example I built three weeks ago used the Set function, but today that has been removed from the modern commanding preview supported functions. Now that we can’t use any variables, the resulting Power Fx formulas would have to be constructed via the With function. In the custom button scenarios I had originally planned to build, I can’t easily see how to build them without variables and not causing a headache for myself, so they are currently on hold until the feature matures a bit.

    One question that comes to mind when building this example LinkedIn button is “why do we have to do it ourselves?” After all, Microsoft owns LinkedIn, so it would kinda make sense if there was some built-in integration at least between Dynamics 365 and LinkedIn to cover such simple profile matching scenarios. In fact, back in the April 2019 release wave an out-of-the-box integration for Dynamics 365 contacts was initially promised, but later cancelled:

    Sure, there is the Relationship Sales package available at $162/user/month for those who need a hardcore social selling tool with Dynamics 365 Sales and LinkedIn Sales Navigator. Alternatively, there’s the “$0” feature built into Outlook that will show the matching LinkedIn profile previews for the contacts stored in your address book.

    In between, there’s… nothing. It was interesting to reflect back on this topic by reading my own blog post from 2013 on LinkedIn, Dynamics CRM and Social Selling. The world has of course changed a lot from those days, with data privacy concerns as well as legislation affecting the ways in which this type of contact information can be exposed for commercial purposes. All the old iFrame options and LinkedIn APIs have been shut down, meaning pretty much all you can do without the paid LinkedIn plan is to create a low-code shortcut button like the one I showed in this article.

  • Clone records with Power Fx & custom command bar button

    Clone records with Power Fx & custom command bar button

    In my previous post I built my very first command bar button based on the modern commanding feature currently in preview. This time we’ll continue creating similar generic features often requested yet missing in the standard Model-driven Power Apps or Dynamics 365 Customer Engagement apps.

    Repeated entry of data that already exists in the system should always be a task we aim to minimize in the business applications we build, to increase the likelihood of A) the data being recorded in the first place and B) reducing errors resulting from manual data entry. Sometimes there may be a perfectly valid business need why several nearly identical records should exist in the Dataverse database. In such scenarios, it’s common that users will at some point request a “clone this record” feature to be added into the app when they get tired of typing in the same values over and over again.

    Such functionality has traditionally been implemented via a custom command bar button added with Ribbon Workbench, which then runs JavaScript & possibly a plugin. You could also perform the action with an on-demand XRM workflow. How about the modern command designer, could we do all this in Power Fx? Let’s find out!

    Power Fx for cloning asset records

    In our scenario we are working with a custom IT asset management app that has the following Dataverse tables and relationships:

    Let’s say that we often provide our employees the same phone model and we’d therefore want to make it faster to add these as asset records by being able to clone an existing asset as the starting point.

    First we’ll launch the preview version of the Model-driven app designer and choose to edit the command bar for the asset table. This time we’ll target the main grid:

    In the command designer, let’s add a new command bar button called “Clone” and start thinking about the required configuration for it.

    We’re going to want to do a similar limitation of scope as in the previous article, by supporting only a single record at a time. Multi-record selection is beyond what we can currently process, so a visibility rule is needed for us to ensure that the button is clickable only when a single record from the table main grid has been selected. The way to achieve this is:

    CountRows(Self.Selected.AllItems) = 1

    Then for the button’s action part. The end result of what we need to create looks like this:

    Unlike in the previous article, we are now not updating the currently selected record but rather creating a brand new one. We’re able to use the exact same kind of Patch formula that any Canvas app would leverage when adding Dataverse records and not using the built-in create forms.

    Our assets table has fields than can be directly copied from the earlier asset record. These include text fields like description and lookup fields like vendor and product. The syntax for the formula is very straightforward for all these: just use “Self.Selected.Item.[YourFieldNameHere]” to populate the field on the new record to be patched.

    We can of course manipulate the field values for our cloned record via simple tweaks in the Power Fx formula. Let’s set the asset’s purchased date value to Today() and add a “Copy of” prefix to the asset name field. This ease of modifying the field values based on evolving business requirements is one of the key benefits from having the logic defined with a low-code programming language that a citizen developer can use with confidence.

    After the patch, we can call up the notification bar in the Model-driven app to display a confirmation message from the clone operation. That’s pretty much all there’s to it, so here’s our formula:

    Patch(Assets, Defaults(Assets),{Name: "Copy of " & Self.Selected.Item.Name, Vendor:Self.Selected.Item.Vendor, Product:Self.Selected.Item.Product, 'Purchase Date':Today(), 'Purchased From':Self.Selected.Item.'Purchased From', 'Purchase Cost':Self.Selected.Item.'Purchase Cost', 'Warranty End Date':Self.Selected.Item.'Warranty End Date', Description:Self.Selected.Item.Description});
    Notify("A copy of the selected asset, " & Self.Selected.Item.Name & ", has been created. Please open the record and update the necessary fields.")

    Here’s the resulting end user experience for cloning a record from the main grid:

    Not too bad at all for a relatively simple formula, added as a command bar button via a visual editor available in the platform.

    Limitations of Power Fx commands today

    To be honest, the first cloning scenario that I actually set out to build was targeting the main form. Adding the custom button here is just as simple as the main grid. Actually, since you don’t even have to think about the visibility rules and multiple selection, it would be the logical place for any new Power Fx user to start customizing their Model-driven app command bar. However, I didn’t get exactly the result I hoped for there.

    The general cloning logic works on the form, too, but there is an unfortunate user experience issue. Can you spot it?

    In the above image, we have already clicked on the Clone button. We have a notification bar as a confirmation. However, we are still sitting on the original record form, not the cloned version of it. If a user would for a moment think that “ok here’s the new cloned record, let’s modify a few fields” the business data would be messed up.

    Could we take the user to the form of the newly created record instead? In theory, yes. In practice, nothing I’ve tried works as of today. The Navigate function that should be supported for custom command buttons doesn’t want to co-exist with any other function in the same action of a custom button. It doesn’t want to accept the newly patched record as the target to be navigated to. Even if we’d navigate to the view for all active assets after creating a new record, the UI will still return to the original record after everything in our button’s action formula has been run.

    With this current limitation in mind, I started to explore if we’d have any other method to take the user away from the original record form. Navigating to a dedicated “Cloned Assets” view was out of the question, due to the aforementioned feature/bug. Using the Model-driven app notification bar to display and action button with a link seems to not be an option since the documentation says the Notify function available in the command bar is actually that from the Canvas world. This doesn’t have the same action property as addGlobalNotification on the XRM side that can show a clickable link.

    One thing I really hoped would work is the new in-app notifications for Model-driven apps. This is such an excellent scenario for leveraging Power Fx to construct a rich message aimed at the specific user with targeted actions and helpful information. It could work the way shown below:

    But in the case of the command bar, it doesn’t work today. You see, the above examples of in-app notifications have been triggered from a dummy Canvas app I used for testing the notification feature in general. I took the Power Fx code from the awesome blog post by Diana Birkelbach that describes how to send in-app notifications from Custom Pages.

    The reason why you can’t make this work (at least to my knowledge) inside the command bar is the lack of support for collections. You see, in order to construct the JSON data needed for adding an action button into the notification, you would in practice need to feed a collection into the JSON function in your Power Fx. This will result in a “formula within canvas component manipulates collection” warning inside the command designer and this part of your formula will silently fail upon clicking the button.

    Update 2021-10-10: Scott Durow gave me a great tip over on LinkedIn, reminding that the in-app notification body text actually supports Markdown syntax. This way you could include a dynamic link that points to the newly created record clone, without having to insert the more complex strings needed for displaying proper action buttons in the notification:

    Presumably all of these things will one day work, which will give you plenty of options to design a great user experience for your custom commands. Just be cautious when building on top of the preview feature of modern commanding.

    Cloning parent + child records

    The above example was a very simple case of record cloning, as we only needed to replicate data from one table. In real world scenarios we often run into a requirement where also the child records in related tables would need to be cloned together with the parent record. Can we achieve this with Power Fx?

    Let’s use the same IT asset management data model but move one level higher and build a custom command button to clone a product record and its related asset records. Meaning, both A + B in this picture:

    So, we’d like to first create a new product record, which is the exact same Power Fx formula pattern as before. After that’s done, we’d then need to have one or more record create events, depending on how many assets (if any) there are under the original product.

    Let’s use the ForAll function to do a patch for each of the existing assets. To identify these records, we can reference them from under the current record with the familiar “dot notation” to travel down the Dataverse table relationships: Self.Selected.Item.Assets.

    Then what we need to do is to ensure we link these newly patched assets to the new product record we created in the first step. To achieve this, I’ve added a ClonedProduct variable that is set to the result of the first patch. We can then use this ClonedProduct object when setting values for the N asset records we create inside the ForAll loop.

    Our formula for the “Clone With Assets” button on the product main grid is as follows:

    Set(ClonedProduct, Patch(Products, Defaults(Products),{Name: "Copy of " & Self.Selected.Item.Name, 'Product Category': Self.Selected.Item.'Product Category', Vendor: Self.Selected.Item.Vendor, Description: Self.Selected.Item.Description}));
    ForAll(Self.Selected.Item.Assets, Patch(Assets, Defaults(Assets),{Name: "Copy of " & Name, Vendor:ClonedProduct.Vendor, Product:ClonedProduct, 'Purchase Date':Today(), 'Purchased From':'Purchased From', 'Purchase Cost':'Purchase Cost', 'Warranty End Date':'Warranty End Date', Description:Description}));
    Notify("Product " & Self.Selected.Item.Name & " and its assets have been cloned. Please open the records and update the necessary fields.")

    When selecting a product from the grid and clicking on the button, here’s what the end user will see:

    This is already a much more powerful example of a low-code feature that can save time when users aren’t required to re-create similar sets of records over & over again. You will have the flexibility of easily adjusting the specific fields, field values and defaults used in your record cloning action.

    Sure, you need to understand the concepts used in the Power Fx formula first. I’d still say the barrier for app makers with no software development background is still lower here compared to building the same thing with client-side JavaScript or server-side C# plugins.

  • Reopen tasks with Power Fx & custom command bar button

    Reopen tasks with Power Fx & custom command bar button

    The preview feature for customizing command bars in Model-driven Power Apps is one of the most exciting examples of how the converging app types allow doing more with less code. Instead of having to learn how to write JavaScript, the low-code app maker can now leverage the Power Fx language familiar from Canvas apps development (and of course Excel formulas) to add custom business logic for command bar buttons.

    This preview was launched late July, but up until now I hadn’t come across a need to use it in an actual Power App. Today I encountered a familiar platform limitation that I though would be a great opportunity to try the new Power Fx based commanding in practice.

    The missing feature in Power Apps activity management

    The scenario is this: for any “normal” table in Dataverse, there’s usually the possibility for the user to change the status not just from active to inactive but also from inactive back to active. For example, re-activating an inactive account is a feature available natively in the command bar:

    The story is different when working with activity tables. Let’s say we have a task record that we’ve closed as completed but would want to append with further information. Hmm, where’s the “activate” button on this form’s command bar…?

    It’s not there. Activities like tasks, phone calls, appointments aren’t something you can easily reopen. This has been the situation for as long as we’ve had Dataverse / Common Data Service / XRM / Dynamics 365 / Dynamics CRM. It’s not that the user wouldn’t technically be allowed to perform the reactivation. There just isn’t a feature that would allow you to click on a button and start editing an activity that has already been closed.

    The traditional no-code way for making this available to the user would have been to create an on-demand XRM workflow for them to run. A more advanced option would have been to create a JavaScript web resource and use the Ribbon Workbench to add a custom button for the user to click on.

    Yeah, the Ribbon was cool in 2011, but let’s see if we would have a better way to achieve this with Power Apps functionality now in the year 2021.

    Adding a command

    The first thing we need to do is to locate the new command designer. Currently this lives inside another preview feature, the modern app designer. We can launch this designer when looking at the options for editing a Model-driven app module inside a solution:

    In this new world the command bar is a component found from under a page in the app module. So, let’s look at the page for the task table and choose “edit command bar”:

    We need to keep in mind that we’ve got 4 different command bar locations to choose from. All of them are potentially relevant for such a generic feature, but to keep things simple we’ll focus on the main form command bar. This means that when we open a task record into a full window (or Main Form Dialog modal window), we want to see our new custom button there. It’s better to start from a command specific to a single record rather than any of the views where a command might need to apply to a number of different records from the same table at once.

    In the command designer window we can add a new custom button. The simple no-code parts are the visual editing experience of giving the button a label, icon, tooltip and dragging it into the suitable relative position in the existing command bar for the task table. Once we get to the low-code part of writing the Power Fx formula to perform an action for this button, it’s a good idea to pause for a moment and think about what elements we need to work with.

    First of all, what we want to do is to update the current record (rather than creating a new one). We need to use the Power Fx Patch function to accomplish this. The documentation gives us an idea of how to set the target object (Self.Selected.Items), but when it comes to the actual fields to be updated, we’re going to need to do some research on how activity tables in Dataverse behave.

    An important detail to understand is that the record status isn’t something that you just set with a single field value. It’s a combination of the Activity Status (statecode) and Status Reason (statuscode) that need to be aligned in order for the status change to go through succesfully on Dataverse side. A combination of Power Apps Community posts and the Dynamics 365 Customer Engagement developer docs for the task EntityType is needed here to figure out what values your Power Fx formula should use. The end result is:

    Patch(Tasks, Self.Selected.Item, {statuscode:'Status Reason (Tasks)'.'In Progress',statecode:'Activity Status (Tasks)'.Open,percentcomplete:0})

    Due to the funny data types for choice columns in Dataverse (formerly option sets in CDS / XRM), we need to reference the available values for a specific choice, as seen above. Now, this gets us to the question of “how do I make sure my command bar formula is correct?”

    Unlike with the traditional Canvas app Maker studio, you can’t easily run the formula on a test record and see whether you get an error or success. Which is why I very quickly proceeded to creating a dummy Canvas app to validate my Power Fx formula against a real record in Dataverse to see the results in action. I’d recommend you do the same for any custom command formula that you’re not 100% sure to work when added as an action onto a button.

    OK, looks like we’ve got the status change part nailed down. But what’s with that “percentcomplete” value in the formula? It has to do with how we control the button visibility later on.

    Setting command visibility

    While we can get the job done by just adding a button that will perform the action missing from default Power Apps / Dynamics 365 activity forms, we should also pay a little more attention to the user experience. In this scenario, the action for reopening a task isn’t going to be relevant for any task record that has not yet been closed. To make sure we don’t create unnecessary clutter in the UI, let’s hide our custom command from records that are not valid targets for its action.

    In theory we should be able to accomplish this by adding a visibility formula for our custom command that reads:

    Self.Selected.Item.'Activity Status' = 'Activity Status (Tasks)'.Completed

    This should be true only when the task record we’re looking at has been closed as completed. Yet it doesn’t work. Even though Mr. Ribbon Workbench himself, Scott Durow, uses this structure in his example of a “set visibility” expression, it didn’t produce the desired results in my app.

    How about the Microsoft docs then? Well, they claim that the formula to control visibility based on record data should be something like this:

    //Button will be visible for accounts with Account Rating > 20
    Self.ThisContext.SelectedItem.'Account Rating'>20

    Unfortunately “Self.ThisContext” isn’t something that the intellisense feature in the command designer editor recognizes at all, so we’re kinda stuck here. Unless we can figure out a way to identify the closed status of an activity record without referencing those pesky choice fields.

    Let’s do what an experienced XRM customizer would try and launch Advanced Find to explore all the column values in our task table rows to look for clues. A-ha! There we have it! The system apparently populates the Percent Complete (percentcomplete) integer field with the value 100 whenever the task status is changed to completed:

    Let’s use this information to design an alternative formula for our custom command’s visible property:

    Self.Selected.Item.'Percent Complete' = 100

    Now we only see the “Re-open” button on task forms where the record is in completed status. We should make sure that upon reopening the task we also set his value back to less than 100, which is what we’ve already got in our action formula.

    Notification to end user

    We now have functionality in place for both the action we want to perform and when we want it to be visible in the command bar. To add more polish into the user experience, we could take advantage of the confirm function and show the user an “OK / Cancel” confirmation dialog box before the action to reopen the task is performed.

    The only problem is: it doesn’t work. Once again, the intellisense feature for the Power Fx formula refuses to acknowledge that “Confirm” would be a valid function. Saving it into our action formula will not produce any visible results. OK, we need to keep in mind that modern commanding is still in preview, so let’s give Microsoft some time to fix these issues before using them in our production apps.

    Thankfully the notify function does work with custom commands already today. We can add this line into the action property of our button:

    Notify("Task status has been set to Open - In Progress.")

    When the user then goes and clicks on the button for a completed task, the experience will be the following:

    Showing the custom notification bar in the same location as where the default system message “Read-only – This record’s status: Completed” would normally be is actually a pretty nice experience. The user probably can’t distinguish this from a native command behaviour.

    Custom commands in grids

    With similar steps we are able to also make commands available outside the single record form. Now, the big difference here will be that instead of always being sure we have exactly one record to work with when on a form, grids provide users the opportunity for multi-select. Which can be a bit of a problem, since at least based on the current preview documentation for modern commanding in Model-driven Power Apps, I don’t know how the Power Fx formulas should be structured to loop through a record set.

    Let’s therefore build something that we know will work, based on the above example. On our custom table “inspection” we have a subgrid of tasks related to that parent record. To streamline the process of marking the tasks completed, we can add a button on the subgrid command bar that allows us to change the status without leaving the main inspection form. Here’s what it will look like:

    I’ve added a “Complete” button to the subgrid view commands for the task table. The action part is pretty much the same as before, only we’re setting the status & status reason to “Completed” this time:

    Patch(Tasks,Self.Selected.Item, {statuscode:'Status Reason (Tasks)'.Completed,statecode:'Activity Status (Tasks)'.Completed})

    As for the command visibility, I want to check that A) there is only a single record selected and B) the status is not “Completed”. We’ll use the same workaround with “Percent Complete” field as before and include a CountRows function:

    If(CountRows(Self.Selected.AllItems) = 1 && Self.Selected.Item.'Percent Complete' < 100, true, false)

    Now the command is ready for use in the subgrid. The visibility rule does work, although there seems to be a bit of a caching delay in determining the status of the chosen task. If immediately after closing a task as completed we go and select the same row again, the “Complete” button will still show there.

    Although the clicking on a command will perform AutoSave, it is run before the command itself is initiated. After we perform a manual refresh of the form, the button is correctly hidden for the recently completed task. Just a minor detail you should be aware of when testing your custom commands.

    Conclusion

    The modern commanding feature looks very promising. If you have been using Power Fx in Canvas apps, building the action and visibility rules in the command designer isn’t that big of a leap. Sure, it is low-code rather than no-code, meaning we’ll need a larger number of documentation samples to understand how the properties and functions can be used in the context of an app command bar specifically. However, it’s a much safer sandbox for app makers to work in than full blown JavaScript, which one of the reasons it makes sense for Microsoft to invest in developing their programming language for low-code.

    Ever since The Ribbon was introduced in 2011 (and later evolved into a Command Bar), I’ve always felt like it has been a missed opportunity for optimizing the user experience of business applications built on Power Platform / XRM. The barrier for modifying and extending it, even with awesome community tools like the Ribbon Workbench, has simply been too high for getting many of these nice-to-have features implemented in real life customer projects. The native command designer tool and common Power Fx logic can definitely help in lowering this barrier.

    At the same time, we need to keep in mind that the modern commands don’t yet replace the classic commands from the RibbonXML era. Common requirements for usability improvement like hiding irrelevant default buttons isn’t yet supported. Check out Scott’s article on Ribbon Workbench vs. Power Fx Command Buttons to understand what is & isn’t available in Power Apps modern commanding.

  • Virtual Dataverse tables with no code, via Connectors

    Virtual Dataverse tables with no code, via Connectors

    The concept of a virtual table (previously: virtual entity) has existed in the Dataverse platform for quite some time already. The feature was originally introduced before XRM and Power Apps merged. This in turn means that the Connector feature used by Canvas apps and Power Automate flows is an alternative approach for the same core need: how to work with data that’s not physically stored within Dataverse?

    Since there are still three different flavours of Power Apps , let’s quickly recap what each of them think about data location:

    • Model-driven apps: “I’ll let you work with any business data, as long as it’s stored within Dataverse.”
    • Power Apps portals: “I’m essentially an external facing version of Model-driven apps, so I follow the same principle.”
    • Canvas apps: “Your data may be in whatever system you want! Just point me to the right API and wrap a Connector around it & we’re sorted.”

    The term “Model-driven” refers to the existence of a clearly defined data model, on top of which the visible app UI and background features (security, search etc.) are then generated by the Dataverse platform. You get all those features because a specific set of rules exists on how different types of data are related to one another.

    Canvas apps enjoy the freedom of taking some data from source A, another piece of data from source B, mashing them together in a common gallery, stitched together with a few lines of Power Fx code. The downside is that the app maker needs to build many of the generic features that in the Model-driven world would just magically appear within the app module.

    The best possible outcome would of course be if Power Apps were able to offer both the freedom of a Connector based Canvas app and the strong relational data management capabilities of Model-driven apps. While we are not quite there yet, some elements of the unified app / platform story are starting to emerge.

    Connectors in Model-driven apps

    Ultimately Microsoft wants to bring the Canvas and Model-driven app types as close together as possible. This means expanding the capabilities for working with external data sources in Dataverse to cover also the Connector technology. At Build 2021 the session “Dataverse for Developers” introduced the latest updates on what the sources for virtual tables can be:

    Previously the options for adding virtual tables to Dataverse was pretty much a pro-dev targeted story. The requirements for OData feeds were such that I don’t think I ever managed to find a sample feed to try out the feature. Same for the custom connectors, which are created via writing your own plugins. Technically they can be built, but if the requirements are similar to that of a traditional data integration approach, then it doesn’t exactly revolutionize the low-code data story of Dataverse.

    The new preview for Virtual Connector Provider looks more interesting, though. Supporting out-of-the-box connectivity to SQL Server databases is definitely a scenario that’s closer to the no-code level where I personally prefer to operate on. So, I decided to go and see how far this track can take me in building a Model-driven app that actually works with data not physically stored inside Dataverse.

    Even though the documents still say “private preview”, anyone can install the Virtual connectors in Dataverse solution from AppSource today:

    There’s a Power CAT Live video on YouTube that introduces the solution. If you’re like me and you prefer consuming written information instead of video walkthroughs, this PDF document will be the place to go for understanding the feature. Inside it you will find this diagram that explains the architecture of how concepts like connectors, data sources, connection references etc. relate to this new Virtual Connector Provider.

    Setting up SQL Server tables to expand your Dataverse

    I have a demo AdventureWorksLT database deployed in SQL Azure, just like the one used in Microsoft’s feature documentation for virtual connectors. I had already earlier used this demo SQL database as a data source for Power Apps Canvas apps, which meant I had an existing connection available in Power Apps Maker portal. Authentication is done with SQL username/password combo in my connection, but Azure AD authentication would also be an option if you’d rather not have stored credentials within the connection.

    After following the step-by-step instructions, including setting up an application user / service principal for the virtual connector provider, I had a brand new table visible in my Dataverse environment: “Entity Catalog for AdventureWorksLT”.

    Cool, we have a “table of tables”! I can see all the SQL Server database tables available via this connection. By opening up one of these records, I can specify that I want to create the corresponding SQL table as a Dataverse virtual table.

    I picked the Product and Product Category tables from there. (Note: modifying the table properties in the Power Apps UI doesn’t seem to work, so use the legacy web client and Solution Explorer to change things like table name.) After this, the virtual connection provider nicely maps all of the available columns in SQL into a matching Dataverse column, with the correct data type.

    I can then do the standard configuration tasks I’d perform for a native Dataverse table, such as adding views and modifying form layouts. Of course there are a number of considerations for virtual tables when it comes to the Power Apps features they support. Still, whatever works here is exactly the same experience from an app maker perspective, whether the table is “real” or virtual.

    Building a Model-driven app with virtual tables

    I created a small demo app module for testing how the different table types can co-exist and work together. I added a custom table called “Requests” and added it as the child table for both Product and Product Category virtual tables coming from SQL.

    Let’s first go and browser the external data from a view. Opening up the Products table, the experience is in practice the same as if I was browsing native Dataverse records. I can create a personal view “products currently sold” that filters out all products with a value in SellEndDate field. I can sort based on the SellStartDate. I can filter to see only products with Color value Black.

    This is already pretty darn impressive for someone coming from a Model-driven background. Sure, in the Canvas world I’ve been able to easily point a gallery to a SQL table and view the data, but having all of it available within the pre-generated Model-driven UI is a major step beyond that.

    Let’s try out how the native Dataverse table + external SQL Server tables work together on a form. Upon adding a new Request, I’m able to reference the related Product Category and Product tables via the standard lookup, just like everything would be stored in a single system. Behind the scenes, the native Request record will get references stored to the external Product Category and Product tables from SQL.

    But wait, there’s more! Did you notice that my Request form actually used the Form Component Control to show an embedded form of the Product table on the right side? Immediately upon populating the lookup field on the left side I see all the details of the selected product, just as if they were regular fields of the current record.

    In the above example I’m actually editing the Color field of the chose product with the value “White” before creating my request record. What this means is that within the same save event not only am I creating a new row in the Request table in my Dataverse, I’m also directly updating the data in my SQL Server’s Product table.

    That is powerful! No custom code was needed in creating an app UI that talks with multiple different line of business systems in real-time, on the very same form.

    From databases to Dataverses

    This simple example of simultaneously performing CRUD operations on data stored in different systems via a Power Apps form illustrates the reason why Dataverse needs to be seen as much more than just a database. It’s purpose is to be a value-add layer on top of different data storage systems, making them easy to leverage in your business apps. We already see today with the Dataverse file & image data getting stored in Azure Blob Storage and audit log entries in CosmosDB, alongside the core relational data in Azure SQL.

    The Virtual Connector Provider and virtual tables take things one step further. Especially in scenarios where you’d need to reference master data from an external system, there may not be a need to physically replicate it into Dataverse (perhaps you also want to reduce the storage costs). Specifying the virtual presence of such data will however make it appear as if it was part of the platform, thus brining it into both Model-driven apps and Canvas apps in a unified way. Even adding support for Dataverse business events to cover Power Automate is technically possible for virtual tables, although these understandably will require pro-developer involvement to get the external systems in sync with the API.

    Behind the scenes, these same concepts for virtual entities / tables are already being used by Microsoft in their first-party app features. By browsing the Data Sources within an environment we can see features like case/contact/activity suggestions listed here, as well as platform capabilities like component layers or non-relational data provider.

    Two years ago I wrote a blog post called “The Real Common Data Service Emerges” where I explored the direction where Dataverse (then CDS) was going. Since then we have seen Microsoft make the export of relational business data to a data lake a straightforward process with the built-in Azure Synapse Link for Dataverse. Similarly the import capabilities into Dataverse have expanded as the Dataflows / Power Query support keeps improving. Combine these physical data import/export pipelines with the virtual layers that the connector technology may soon offer for several tabular data sources and we’ve got a highly capable low-code toolkit for business data management needs in the Power Platform.

    You need to keep in mind that there are many considerations (read: limitations) for using virtual tables to review before deciding if they are a good fit for your business requirements. Even in building the above demo app there were things that don’t quite work the same way as with real Dataverse tables. For instance, I can’t specify a 1:N relationship between the two virtual tables for Product Categories and Products. Quick Find on the SQL data doesn’t seem to produce any meaningful results. Referencing virtual tables via lookups in a Canvas app seems to not retrieve related data at all times. Not to mention the fact that in two different environments the whole Virtual Connector Provider configuration process got stuck before any SQL tables ever materialized in the Entity Catalog.

    So, keep in mind that this is a preview of things to come, rather than production ready functionality to use today.

    Update 2021-08-20: the feature has now been officially released in public preview format, with new documentation available. Check out the Docs page “Create virtual tables using the virtual connector provider (preview)” that contains the information previously only available in the aforementioned PDF.

  • One-to-one relationships and forms within forms

    One-to-one relationships and forms within forms

    There’s no such thing as 1:1 relationship in Dataverse, and hence your Power Apps Model-driven apps or Dynamics 365 Customer Engagement apps can’t directly have such a data model. Only 1:N (one-to-many), N:1 (many-to-one) and N:N (many-to-many) relationships are available between tables, be it standard or custom ones.

    In practice, even the N:N relationship doesn’t actually exist in the database. While the Dataverse table configuration UI allows you to create this relationship type, it actually consists of a hidden intersect table and two 1:N / N:1 relationships that connect the actual tables together (see Dataverse table relationships documentation). Seasoned XRM professionals may even discourage the use of native N:N relationships, as you lose some control and visibility to the relationship due to its hidden nature.

    Just because it’s not available in the platform, doesn’t mean there aren’t many real life business scenarios where a requirement to have exactly one record per a record in another table. (OK, “rows” in the latest Dataverse terminology, but I prefer the business process lingo where “record” still is more appropriate.) Also, like with N:N relationships, just because it’s not directly possible to create one, doesn’t mean we couldn’t build the required functionality by using the no-code tools in Power Platform.

    In this blog post I’ll demonstrate not only how to create a 1:1 relationship but also how you can offer a pretty nice user experience for working with related records – thanks to the new Form Component Control feature. I’ve covered the feature details in an earlier blog post (“Relational data on Model-driven forms, part 2: Form Component Control”) so please refer to that for more info.

    Why would we need 1:1 relationships?

    From a theoretical data modelling perspective, you probably shouldn’t be splitting data into multiple tables if there is only a single match expected from either side. On a practical level there can be reasons why it makes sense to not cram everything into a single table, though.

    A common source of such requirements are the restrictions of access rights to data. Let’s say that the contact information of a person needs to be widely available to users of the application for various purposes (billing, marketing etc.). However, this contact also happens to be a patient, with details about his or her medical profile being recorded into the same system. Only the doctors should have access to this data. A single contact will match a single patient record (or none, if it has been created for other purposes). If these are in two separate tables, granting access rights can be easily achieved via standard Dataverse security roles: everyone sees the contact table data, but only doctors see the patient details.

    “Couldn’t we just use field level security to hide the confidential stuff?” We could, but you have to evaluate whether the approach will really scale to how the system will be used. You see, in addition to security we’ll also need to consider if we’re overloading a single table with too much data. There are hard limits of the maximum number of columns that SQL Server supports for a single table. Thanks to the value-add provided by Dataverse, adding one column into the data model can create many columns in SQL. This means you don’t have anywhere near the 1024 columns per table at your disposal. Also, if you’re working with a standard CDM entity like contact, there will already be close to 300 attributes taking up space before you extend the data model for your specific needs.

    I was recently working with a customer that is planning to use Dynamics 365 Customer Service for managing all their service requests in every department they have. This will mean that tens of different types of services will be creating case records into the system. The amount of service specific information that must be available to be captured on case records is easily hundreds, if not thousands of fields. Adding all of these to the case (incident) table wouldn’t be feasible, so instead the solution architecture was designed to incorporate “service detail” tables specific to each service. Each case will have one (or zero) of these records, so it’s a 1:1 relationship between the standard case table and these custom service detail tables.

    Establishing 1:1 in the data model

    In the scope of our example, the data model will consist of these main tables:

    • Service 1, Service 2, …, Service N: parental record under which the cases will be created. Think of these as service contracts that a contact person can have for one or more services.
    • Case: the standard Dataverse / Dynamics 365 table, with lookups to all of the aforementioned Service tables. No other service specific data is stored here.
    • Service 1 Detail, Service 2 Detail, …, Service N Detail: service specific information that should be found from under each Case, depending on which service it applies to.

    Just like the N:N relationships in Dataverse consist of two 1:N’s, the same applies to our manually created 1:1 relationship. Only this time we’re not going to need an intersect table, rather we’ll just link the two records together via the relationships like this:

    The Case record will be parental to the Service Detail record, but at the same time the Service Detail will be the Case’s parent. These will appear just as two custom relationships under our table:

    Next, we’ll want to ensure that there is always one and only one Service Detail record for a case – IF the case is related to the delivery of the specific Service. Furthermore, we’ll want to get the Service Detail created automatically immediately after case creation, so that users can start entering data on it.

    The real-time requirement rules out Power Automate that is asynchronous by nature, so we’ll use the classic XRM workflow engine instead. There will be two levels in the automation:

    1. When a Case record is created, check which of the many Services it is linked to and create a record in the corresponding Service Detail table (establish 1:N relationship).
    2. When a Service Detail record is created, update its parent Case with a reference that sets the Service Detail to also be the parent of that Case (establish N:1 relationship).

    Workflow 1 looks like this:

    It will then in turn trigger workflow 2:

    Notice that we have a check in place that stops the creation of a Service 1 Detail record if one already exists for the Case. If the lookup to Service 1 Detail is empty, we put the reference to our newly created record there and establish the 1:1 relationship.

    Working with 1:1 data in the user interface level

    This is where the Form Component Control comes in handy. In short, the control is meant to allow both the display and inline editing of a parental record’s form, embedded inside another form. An example of the standard data model use cases would be to show the fields of a the customer contact on a Case form and allow the service representatives to update them without having to open the actual Contact form.

    It works in our 1:1 scenario, whereby we can edit the Service Details fields directly on Case form. The reason is that not only is the Service Detail a child record of the Case, it is also the parent – thanks to what we’ve just built above.

    You’ll find the explanation of how to use Form Component Controls in my earlier blog post. For now you need to do the configuration in the legacy Solution Explorer side, by editing the form and setting one of the lookup fields to be rendered as Form Component Control:

    Now when we create a new Case record and have the Service 1 lookup value populated, after the first save the user can immediately continue to fill the Service 1 Detail values right within the same Case form:

    The beauty here is that for the user who’s working with a Case record, they won’t need to know there are two different Dataverse tables used for storing the data. Both the Case record details, Service 1 Details and even the Contact record details are all editable on the single screen. The world looks flat, regardless of our data model with several relationships configured behind the scenes.

    Conclusions

    Dataverse offers you plenty of configuration tools to get creative with both the data model and the UI in Model-driven Power Apps. While the standard hierarchical structure of parent-child records and table (entity) specific forms is the most common pattern, there are alternatives that may be useful when faced with more complex business requirements.

    Dividing the business data into multiple tables with 1:1 relationship may sometimes be perfectly justified, to accomodate the security and data storage requirements. The user interace of Model-driven apps today offers great tools like the Main Form Dialog and Form Component Control to simplify working with proecsses that span across different tables in the underlying database.

    If you’d like to see Microsoft implement a native one-to-one feature for Dataverse, please vote on this idea.

  • Making Model-driven Power Apps visible (and hidden)

    Making Model-driven Power Apps visible (and hidden)

    I’ve got a confession to make: even though I’ve been building Model-driven apps long before they even were Power Apps (back in the XRM era), I’ve struggled to understand how I can make them visible to the end users in the modern experiences Microsoft offers.

    In this post I’ll address two different challenges. First, how to enable end users to have access to your Model-driven app. Second, how to protect them from seeing irrelevant apps.

    “Why isn’t the app sharing menu working?”

    Once you’ve built your Model-driven app are ready to release it, you need to make it visible not just to the app makers and system admins but also regular users. This involves using the Share menu from the list of apps available in the environment.

    Working in the Power Apps Maker portal, it’s pretty obvious the things we see here have been built with Canvas apps in mind. When it comes to sharing a Canvas app, the steps are fairly logical. You click the 3 dots next to the app, select “Share” and are shown this dialog:

    You add users or groups, set their data permissions via the many available security roles within Dataverse, click Share, after which the users get an (optional) email message. All good!

    Try the same steps with a Model-driven app and your users will see… nothing. It’s not just that there isn’t an email message with the app URL sent to them. They actually don’t have access to the app at all, even if you provide them the URL directly. Why isn’t the share action working from here?

    If you’ve worked with the Dynamics 365 App Modules before, you might remember that you needed to specify which security roles have access to which app. Just like with role-based forms, too. Now, that particular role assignment UI existed in the legacy web client that has been deprecated and there doesn’t seem to be an equivalent in the Maker portal anymore. Does this mean we don’t have to perform this step, rather the sharing of the app to the users takes care of this automatically?

    At some point I assumed so, but this isn’t actually the case. After a long hard look at the documentation, I finally realized that the MS product team had squeezed this functionality into the Canvas sharing dialog in quite an unintuitive way. You see, you’re not only using it to share the app to the users, but also for “sharing” the app to a security role:

    So, rather than sharing the app to the users, stay on the higlighted App section that’s at the top of the list. Pick the correct security role from the list and then click “Share”:

    Now all users with the specified security role will have access to the app when trying the URL shared with them. Yes, you didn’t actually need to explicitly share the app to them via this menu at all! Sure, you can use it for adding the required security roles for these users, if they haven’t already acquired through other means, like group membership. But the whole concept of “app sharing” is still completely irrelevant to Model-driven apps, from what I can see. It’s only this misleading UI that may give you the impression that you can achieve visibility to Model-driven apps via a sharing action when in fact it’s still security role based like it was back in XRM.

    This leads us to the next question around Model-driven app visibility that has been puzzling me:

    “Where can I find the apps I have access to?”

    If the app user is not a maker in the particular environment, they logically won’t have access to the Power Apps Maker portal to view the list of apps in it. So, from where exactly should they be viewing the list of all the apps shared to them?

    If we have past experience from the world of XRM then we’d probably navigate to the Dynamics 365 Home page at home.dynamics.com. This page should be showing all the apps that the user has access to, which it currently does. We can pin our newly shared Model-driven app to the top of the list for easy access:

    Oh, right. “We’re moving to Office” says the banner, since this Dynamics 365 Home page has been deprecated a while ago. In fact, based on the original deprecation message this page should have started to automatically redirect you to office.com/apps already. Today we still have the option to visit the legacy page, but let’s move over to the modern Office experience. We’re greeted with the “launch your business apps” onboarding dialog that points us to the Business Apps tab at the Office 365 home page:

    Looking at the list of apps, though, we probably won’t see our brand new app here right away. There’s a pretty significant delay in the list of business apps getting updated here. Unlike the old Dynamics 365 Home, which suffered from a similar delay, we don’t have a “Sync” button to make this process any quicker.

    While we’re waiting for our new Model-driven app to show up on the Office 365 home page, we may start to wonder what apsp actually are listed here. For instance, why is Solution Health Hub showing up there for a normal user with no admin nor maker roles?

    Perhaps the Model-driven apps visibility isn’t entirely security role based after all. Whatever the reason why these Microsoft built apps like Solution Health Hub or Resource Scheduling from the default environment show up for a non-admin user, it’s not exactly a pleasant user experience. The Office 365 home page doesn’t offer us any pinning or filtering features like the old Dynamics 365 home page did, so there’s not much an end user could do to clean up the mess.

    As a system administrator, though, we actually do have a way to trim the list of apps – even when they are first-party MS apps. Thanks to fellow MVP Alex Shlega, I recently learned that Model-driven apps can now be deactivated and activated. So, let’s go to the Maker portal in the default environment, pick the apps we want to hide from office.com/apps and select “Deactivate”:

    Much better! Not only have the unwanted apps disappeared from the Business Apps list, but also our newly configured Model-driven app has appeared there during our small exercise.

    There still remains one item on that app list that I can’t figure out a way to remove from the user. That “Dynamics 365 – custom” app from the Secret Project 404 environment is actually the result of a Dataverse for Teams environment provisioned by this end user. Now, since we have no way to directly navigate to the full Maker portal of such an environment and they shouldn’t support any Model-driven apps to begin with, these apps are something only MS can clear away in a future update hopefully

    Thankfully there’s another place where the end user has more control over the app list than the Office 365 home page. Whenever you’re using some other Microsoft 365 service and need to open up a Power App, it’s a lot more convenient to use the waffle menu from the top left corner rather than the full home page.

    Thanks to Thomas Sandsør for reminding me about the customizability of this app launcher. This is of course the place where a user should be instructed to pin their new Model-driven app for easy access:

    One final point to make about Model-driven apps visibility is around Microsoft Teams. You should definitely consider pinning the apps into relevant Teams channels as tabs, to maximize the likelihood of the end users remembering to use them. As for a complete list of Power Apps available to the user, currently no such place exists within Teams, so you should pay attention to the Office menus as the portal to display your Power Apps app catalog for desktop users.

    Update 2021-12-07: Office App Launcher new visibility criteria defined

    Microsoft has recently changed the behavior of their app lists, with an update communicated via Microsoft 365 Message center message MC290818. Since many people will not have access to MC content and it will probably disappear at some point, I’ll post the contents here in full:

    To help improve the app exploration and discovery experience for users, beginning mid-November 2021, the Office App Launcher, All Apps (https://office.com/apps), and app search experiences will be updated to only list relevant Dynamics 365 apps, Power Apps apps, and Azure Active Directory integrated apps.

    Following this update, the Office App Launcher, All Apps, and app search experiences will only list Dynamics 365 apps, Power Apps apps, and Azure AD integrated apps that meet one of the following criteria:

    Dynamics 365 apps and Power Apps apps:

    • Apps a user has launched in the last 7 days
    • Apps created by a user
    • Apps an admin has marked as ‘featured’ in the tenant
    • User accessible Microsoft published Dynamics 365 apps

    Dynamics 365 apps or Power Apps apps that meet the above criteria will be shown in the App Launcher, the Business Apps section of the All Apps experience, and in app search results. Note that the time between when an app is shared with a user and when it appears in an Office experience is expected to be 24 hours.

    Azure AD Integrated Apps:

    • Apps an admin or user has added to an Azure AD collection

    Azure AD integrated apps meeting the criteria above will be shown grouped by collection name in the All Apps experiences, as well as individually listed in the App Launcher and in app search results. A link to the My Apps portal where users can create Azure AD collections will be added to the All Apps experiences as part of this update.

    How does this affect me?
    Dynamics 365 apps, Power Apps apps, and Azure AD integrated apps that don’t meet the above criteria will no longer be listed in the Office App Launcher, All Apps, and app search experience. Users can take the following steps to access these apps and have them listed again in their experiences.

    For Dynamics 365 apps and Power Apps apps, if a user cannot find an app they are looking for will need to first launch it in the browser via its Uniform Resource Identifier (URI). Note that admins and makers can get an app’s URI by selecting an app in the Power Platform admin center or via https://make.powerapps.com by selecting details, then selecting web link. Once the app is launched, it will be listed in the Office App Launcher, All Apps, and app search experiences.

    For Azure AD integrated apps, a user can locate the full list in the “Apps” collection of the My Apps portal. Users can create collections for quick access to their favorite or most often used Azure AD integrated apps. Once the Azure AD integrated app is added to a collection, it will be listed in the Office App Launcher, All Apps, and app search experiences.

    What action do I need to take?
    This message is to inform you of an upcoming change, no action is required. However, if you want to guarantee specific Dynamics 365 apps, Power Apps apps, and Azure AD integrated apps are available to users following this update, please perform either of the following:

  • What will Power Fx mean for Model-driven Power Apps?

    What will Power Fx mean for Model-driven Power Apps?

    By now many of you will have read about the announcement Microsoft made at Ignite 2021 on their “low-code programming language for everyone”. I’ve written about the wider role of Power Fx in the high level Power Platform story in the Forward Forever team blog, which will give you all the basic information on what/why/how/when:

    Recently I also recorded a quick 10 minute video discussion I had with Julie Yack from 365.training where I had a chance to verbally express some of my thoughts on Power Fx:

    I’ve personally started my low-code journey with Microsoft Business Applications back when the concept of XRM was first promoted, which is why most of my hands-on experience with Power Apps lies firmly on the Model-driven side. Power Fx as a formula language originates from a time when the two app types (Canvas & Model-driven) were still completely separate product offerings. If you’ve always built Canvas apps, there’s essentially nothing new for you in Power Fx. If you’ve only worked with the Model-driven business apps (Dynamics 365), there will be plenty of changes ahead.

    In this blog post I’ll share some initial thoughts on how I see the arrival of Power Fx potentially affecting the way Model-driven Power Apps are built.

    Why Model-driven needs Power Fx

    There has traditionally been a clear divide between no-code and pro-code tasks when building apps the XRM way – meaning customizing and extending Dynamics 365 Customer Engagement apps in most cases. You’ve had a GUI for clicking your way through a variety of configuration options the application platform offers, to perform tasks like:

    • Define entities, fields and relationships
    • Determine the layouts of your forms, sitemaps and views
    • Design business logic via workflows, business rules, BPF

    Our reliance on the almighty mouse pointer as the sword with which we fight our way through a battle field full of fierce business problems might be considered a weakness. Sure, we’ve often managed to emerge as the no-code hero who’s been able to tackle a business requirement most bystanders would have expected to require custom code. Yet there’s frequent frustration to be experienced when the particular configuration option we would have needed was not present in the graphical user interface (GUI).

    Such problems don’t need to be very complex to become unsolvable. All it takes is for the specific function to have fallen outside of the scope of features that the Microsoft product team has managed to squeeze into the platform’s built-in toolkit. Sometimes you might find a community tool that generates the required JavaScript for you, or a custom workflow activity comes and extends the built-in actions to let you implement that specific calculation your customer needs.

    Yet it remains mostly a black box for the non-pro developers: the next time you run into a similar limitation, you’re likely to again need help from the pro-devs to move forward. Venturing beyond the GUI tends to always push us into uncharted territory.

    What the announcement of Power Fx promises is far more empowering. “Formula based Power Apps Model-driven customizations” sounds like you could actually get a peek of the underlying logic layer in text format rather than a finite list of picklist options to choose from. At the same time you probably would not need to assume responsibility of any software code implementation details. The lower level of how the conditions defined by your formula are actually met by the big computer running in the cloud would not be your concern.

    This aligns with the promise of declarative programming:

    The maker describes what they want their logic to do, not exactly how or when to do it. This allows the compiler to optimize by performing operations in parallel, deferring work until needed, and pre-fetching and reusing cached data.

    Power Fx documentation on the language’s design principles

    For me, the big reason to steer clear from copy-pasting JavaScript snippets from websites and tweaking them to be used in business applications built for customers is that I’m all too aware of what I don’t know. While I can often read what the specific scripts are doing, I don’t fully understand why they work vs. why they would not work under different circumstances. It would be far too easy for me to accidentally create something that breaks in the near future – not because of a bug in Microsoft’s code but a bug in my code.

    Formulas that are written in Power Fx (today only in Canvas apps) are very different. Sure, they can be very complex as well, but there’s no knowledge required from outside the domain of Power Apps. If I pick a tutorial video from Shane Young’s YouTube catalog that explains the usage of a particular function in Canvas apps, most of the time I get it. I can immediately adapt it for my own scenarios, and get helpful Intellisense error messages from Power Apps Maker Studio when there’s something missing from my function (well, not always helpful messages, but at least an indicator of “keep trying”).

    Taking the step to writing your Power Fx formulas instead of just clicking around the GUI helps in unleashing your creativity in app design and significantly expanding the realm of what’s possible. There’s also big potential in improving the efficiency of the app building process when you can copy-paste text based formuals instead of having to repeat a series of clicks in the MS admin portals that seem to only get slower and slower as years go by…

    Why Power Fx may be scary for Model-driven app makers

    Canvas apps have been promoted as the way to create “pixel perfect experiences” tailored to the end users’ specific requirements and needs. This is a completely different starting point for low-code app creation than the traditional business apps in CRM style projects where you are mostly customizing an existing application. On a high level, everything will look & behave pretty much the same way every time.

    I’d argue that many of the limitations in Model-driven apps are in reality a safety net for the no-code app makers. Back in 2019 I did a presentation on the topic “Canvas apps for the Model-driven mind”, which describes the kind of leap that is needed both on mental and practical level for an XRM pro to turn into a modern Power Apps app maker. Power Fx will now play a big role in this transformation.

    The relational Dataverse data model that sits behind every Model-driven Power App largely dictates how the app UI will function. As a result, there’s not too much creativity required nor allowed in creating the visual side of your business application. Navigation and Command Bar buttons will be generated for you, and you can rely on them being constantly presented to the user. Everything’s responsive out of the box, too.

    The other side of Power Apps that’s not built on relational data structures and predefined UI grids is the world where everything runs on Power Fx. In Canvas apps the buttons don’t exist until you drop them on the screens and they do absolutely nothing until you add a piece of Power Fx text into the OnSelect property. Any dynamic behavior that’s desired for the app’s controls (visibility, size) must be expressed in Power Fx for their respective properties.

    Building Canvas apps doesn’t require you to have programming skills, but it does quickly push you much closer to the experience of custom app development. You’re no longer merely a system customizer like in Dynamics 365 scenarios, now you’re an app maker. The whole purpose of the low-code tooling is that it blurs the lines between traditional developer roles, thus powering the new “fusion teams” that may share many of their tools – and now also the programming language.

    As a result, it becomes less obvious what you can & can’t do without custom code extensions when building Power Apps. Configuration expressed as text based formulas can be vastly more powerful than GUI based options, allowing the most creative makers to achieve functionality that others might assume to be impossible with the available tools.

    Journey towards “just Power Apps”

    Back in Summer 2019 Microsoft revealed their long term roadmap on how the two types of Power Apps would eventually converge into one. We haven’t yet seen much concrete changes on how Model-driven and Canvas could coexist within a single app, apart from the embedding feature. The original plans for launching custom pages as a “canvas” within Model-driven apps were removed from 2o20 release wave 2 and no new target dates have been announced for it.

    There is likely a wealth of moving parts in this puzzle that have dependencies between each other, so it’s no wonder this merging of Model and Canvas apps is taking time. Power Fx is a clear step towards making the new app building story consistent. Plenty of new functionality is likely to be needed, though, as you’re not simply replacing one programming language with another. Rather it’s the case of expanding bespoke GUI tools with a low-code programming language that can also be used to express the same logic.

    Exactly what the new Power Fx based “form and commanding customization in Power Apps” promised at Ignite will consist of remains to be seen. Calculated columns defined with Power Fx are much easier to grasp. The same goes for the conversion of Business Rules into Power Fx formulas, since already today the Text View in the editor looks a bit like these.

    Making that If-Then-Else box editable would be a simple step. However, turning the actions in Business Rules into something that you could define with Power Fx and apply on a Model-driven form will surely require some more platform unification work. Show/hide fields, set required, prompt for errors… They all sound straightforward from a logic perspective, but how will such concepts be extended to cover not just Canvas sceen controls but Model form controls is going to be interesting to watch.

    This is probably why Business Rules are in the same “future roadmap” bucket as the Power Automate flows for receiving Power Fx coverage. It’s not yet easy to envision how the declarative logic of Excel that Power Fx tries to follow wherever possible is going to be applicable to these more imperative scenarios. What would a flow written in Power Fx look like and is it really going to be easier for app makers to grasp than the current GUI?