Tag: development

  • Auto-Numbering with CRM Workflows: Real-Time vs. Asynchronous

    One of the missing features that is often requested for Dynamics CRM is the ability to automatically assign numeric identifiers to records (see the feature suggestion on MS Connect). Sure, we’ve had the Auto-Numering feature for a limited set of default entities (contracts, cases, articles, quotes, orders, invoices, campaigns) since the early days of CRM 3.0, but generating numbers on a standard entity like account or any custom entity has not been possible out of the box.

    As if often the case, workflows offer a way for the creative user to overcome such limitations and enhance the CRM functionality with some custom business logic. The usage of workflows to generate automatic numbers for records has been described in several blog posts, of which I’d like to point out the ones written by Karel Iuel and Leon Tribe. The high level concept of this process is as follows:

    • Create a custom entity to hold the current counter value of the number
    • Link your business entity to this custom counter entity through a N:1 relationship (meaning the single counter record will be the parent for all the intended child business records)
    • Trigger a workflow rule from the business entity record creation that performs the following actions:
      • Links the new business entity record to the existing counter entity record
      • Increments the counter value
      • Assigns this value as the number for the child business entity record

    With the recent enhancements to workflows in the CRM 2013 release I thought I’d take this scenario and use it to compare the different outcomes with the new real-time workflows and a traditional asynchronous workflow process.

    Number assignment with a Real-Time Workflow

    Let’s first see how the aforementioned methods work in a CRM 2013 environment. I’ve created a new custom entity called Record Number Counter and added a 1:N relationship to the account entity, with the intention of assigning an automatic number to any new account record that gets added into the CRM database. To actually make this happen, we need to have a workflow process in place that performs the three steps outlined above. Note that the box for “run this workflow in the background (recommended)” is unchecked, meaning this will be a synchronous, real-time workflow process that starts immediately after the specified event, which in this case is “record is created”.

    CRM_2013_auto_numbering_real-time_workflow

    Let’s do some account data importing next to test the results of this workflow. I’ve created an Account Number record of the Record Number Counter entity with its Number value set to 100 500, which means the next account record to get created should be numbered 100 501. With a set of 500 test records to import in my csv file, I’m expecting the counter to hit 101 000 by the time the job is done.

    So, off we go with the import job and then we start to anxiously click on the Refresh icon on the account entity view to see which values get assigned in the Account Number column.

    CRM_2013_auto_numbering_test_1

    Looks like everything is as we wanted it to be! All the 500 account records have been assigned a unique number and the counter value is incremented by one after each assignment. Sure, we’re getting the local number formatting setting from our integer field applied into the target text field on the account (in my case it’s the empty space as the thousands separator), but that’s not a huge issue for our home grown auto-numbering solution. The concept itself appears to be working, which is the main outcome we were after.

    Why this won’t work in CRM 2011

    If you’ve been reading any discussions on the workflow driven method of auto-numbering, you may have come across issues with the numbers not always being unique. If you create a single record, then wait for the workflow process to complete and check the results before the next record, everything will most likely look ok. But when there’s a bigger volume of database inserts taking place in a bulk operation, the results may not be as expected. (more…)

  • Enforcing Business Process Flow Fields with Real-time Workflows

    Enforcing Business Process Flow Fields with Real-time Workflows

    Earlier I demonstrated the new capabilities that Microsoft Dynamics CRM 2013 has introduced for workflow processes: showing error messages with real-time workflows. I covered examples of record assignment, merging duplicate accounts and stopping unwanted updates in the Mobile Express client. This time I’ll take a look at how the error message feature can be leveraged in managing the sales process on opportunity records.

    The new Business Process Flows in CRM 2013 provide the possibility of setting fields in a stage as required. This is a nice advancement over the previous platform functionality that only allowed you to set fields as business required per entity, since now we can dynamically control the stage at which we will require the user to input the information onto a form. It’s very typical that a user wouldn’t yet have much details available about a sales opportunity when first entering the information into the CRM system, so it makes total sense to not ask too many questions initially. After all, you can make a field required, but if the user simply doesn’t possess the information asked in it, he or she may just enter dummy data into the field to meet the technical minimum requirements.

    CRM_2013_business_process_flow_editor

    Looking at the default opportunity sales process that comes with Dynamics CRM, we have a number of bit fields in the Close stage that indicate tasks the opportunity owner should complete before closing the opportunity. In the Business Process Flow editor we can tick a box and set these fields to be required. What does a required field in the Business Process Flow then mean exactly? It simply means that you can’t move the record forward from that stage until a value is entered in the field. In the case of bit fields (two options) the value should be set to Yes (ID 1) to meet the criteria.

    OK, sounds logical, but what about if we’re already in the last stage of the process? How is the requirement level enforced if there are no more stages to move to? The answer is: it’s not. Since the actual closure of an opportunity as Won or Lost is not a stage in the process but rather a change of the record status, Business Process Flow has nothing to do with it. We can observe this behavior by setting a field required in a process stage and then navigating to a test opportunity and attempting to close it as Won. In our example, the File Debrief field has been set as required in the Opportunity Sales Process, but the system still allows the user to close the opportunity without entering data into this field.

    CRM_2013_business_process_flow_opportunity_close

    “That sounds like an unfortunate gap in the business logic, I guess we’ll need to get a developer to write a plug-in for us to stop the status change operation if required data is missing.” Hold it right there, mister! We’re dealing with Dynamics CRM 2013 here, which means we can build the equivalent feature with a real-time workflow process! No custom code needed for such a simple task, as long as you know how to leverage the new interactive nature of synchronous workflows.

    Let’s create a new workflow on the opportunity record and set it to start when the record status changes. We’ll configure it to be run as “after” the event, since we’re interested in capturing the new status value of the record. In the workflow criteria we’ll define that we want our business logic to apply if the opportunity is being set as Won but the File Debrief field has not bee set to Completed. Since this is a real-time workflow, we can add a step where we set the process to be stopped as Cancelled and then define an error message in that step’s properties. This will then be presented to the end user who is triggering the status change event if the workflow criteria is met.

    CRM_2013_workflow_opportunity_close

    Now, let’s go to our test opportunity, re-open it and attempt to close it without marking the File Debrief field as Completed. When clicking the Close as Won button on the opportunity form command bar we’re presented with the standard, non-customizable Close Opportunity dialog window asking us about the Actual Revenue, Close Date and so on. Since we’re so excited about having won the opportunity we’ve completely forgotten that there were still tasks we needed to complete before we’re allowed to close it off from the sales pipeline.

    CRM_2013_business_process_flow_opportunity_close_2

    Once we click OK, a new dialog window is presented: the Business Process Error prompt, along with the error message that we defined in the Stop stage of our workflow process. The opportunity close event is rolled back and we can return to the opportunity form to see what steps of the process we had neglected.

    CRM_2013_business_process_flow_opportunity_close_3

    As I mentioned in my previous article about the new business process automation capabilities of CRM 2013, Business Process Flows are essentially a process map that is meant to guide the user through the stages. It cannot actually perform any automated tasks by itself, nor enforce any rules apart from the changing of the stage through the visual business process control at the top of the form. To implement this type of functionality you should look into Business Rules and Real-Time Workflows instead.

  • Using Real-Time Workflows to Show Error Messages

    Using Real-Time Workflows to Show Error Messages

    In CRM 2013 we now have the option of setting a workflow to be run synchronously, also known as a real-time workflow. This opens up great new possibilities to leverage workflows in designing automated processes and providing immediate feedback to the end user when CRM data is created or updated. Having the workflow process executed in real-time also provides one additional capability that traditional, asynchronous workflows can’t handle: stopping the transaction from taking place.

    Configuring Custom Error Messages

    Similar to synchronous plug-ins, real-time workflows can present a Business Process Error dialog to the user when the operation being performed is breaking the rules of the configured business logic. As the real-time workflows execute in the current transaction, they have the power to roll back the changes that the user is trying to perform, whereas an asynchronous workflow could only observe what had already taken place.

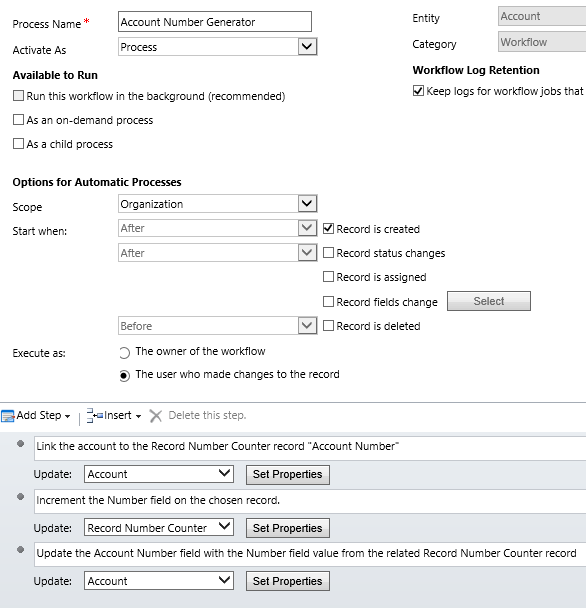
    How does this work in practice? Let’s explore the feature by setting up a very simple workflow rule to verify the owner of a record, in this case the Project Manager (owner) of a custom Project entity. When creating the workflow we’ve unchecked the “run this workflow in the background (recommended)” checkbox and thus defined it to run in real time. (If you forgot to do this, just reach for the “Convert to a real-time workflow” button on the toolbar, as the form checkbox can’t be edited directly). We’ll attach the workflow to the assign event of the entity.

    Real-Time_Workflow_rule

    In the workflow rule criteria we’ll perform a check that the Project Manager has the necessary qualifications for the job. If not, we will  stop the workflow and set its status to be Canceled. What’s new compared to CRM 2011 workflows is that we can set a Status Message for the workflow cancellation. Rather than just being a behind the scenes log entry, this text field’s contents will actually be presented to the user if the real-time workflow process is cancelled. This is therefore the place where you should provide instructions on why the cancellation took place and how the user can avoid it.

    Let’s activate our workflow, go to an existing project record and attempt to assign it to a less competent CRM project manager, like Teppo:

    Real-Time_Workflow_error_1

    After we click OK on the assign dialog, a Business Process Error dialog is presented, along with our status message text that explains why the operation cannot be allowed.

    Real-Time_Workflow_error_2

    The transaction is rolled back, which means the assignment never takes place and our project remains in the hands of a certified professional. CRM workflows save the day!

    Here’s a couple of considerations to keep in mind with the above example:

    • If I had set the workflow to run Before the assign event, I wouldn’t have received an error. That’s because we would have had a pre-image of the record to work with, in which the change of ownership would not yet have taken place. Having these options available in the workflow editor UI gives more flexibility for defining the business logic, but you should know at least a bit about the underlying Dynamics CRM event execution pipeline to make the most of them.
    • If I had simply clicked on the Project Manager (owner) lookup and changed the value, I wouldn’t have received an error in either case. That’s because from the platform’s perspective the assign event is different from the event of updating the owner lookup field. Also note that creating a new record for another user is not an assign event either, so you’ll want to expand the criteria of when the workflow rule is triggered to catch these.

    Stopping Unwanted Data Updates

    What kind of real life scenarios would then require the system to throw a Business Process Error at the user? Let’s think about a typical CRM implementation where the customer data is integrated with an ERP system. As long as you’re working with prospects that haven’t placed an order yet, there shouldn’t be too many limitations in place in CRM on how you can update the data. Once the account information is transferred to the ERP system for the purpose of order and invoice processing, the need for restricting certain operations on the account records will likely arise.

    Let’s assume that we’re identifying the ERP integrated accounts through the Account Number field on the CRM account entity. If the field contains data, then this is a record where updates need to be restricted. By leveraging the new CRM 2013 Business Rules we can configure the fields on the form to be disabled if an account number exist. But what about updates that are not performed as changes of form field values? This is an area the Business Rules can’t touch, but with real-time workflows we may be able to add custom business logic into CRM that would have traditionally required a .NET developer to write plug-ins for us.

    As an example, we’d like to ensure that no account records can be deactivated in CRM if they exist in the ERP system. The deactivation might take place through a data management operation like merging duplicate records, in which the master record is left in active status and the child record gets deactivated. We can’t directly trigger the workflow process from the clicking of the Merge button on the account view Command Bar, but we can set our business logic to be run on the status change event. Let us therefore build a new “Stop account merge” real-time workflow rule with the following criteria:

    CRM_2013_workflow_stop_account_merge

    We’re actually performing this after the deactivation has already taken place, but that doesn’t matter, because we’ll still be able to cancel the whole operation. We’ll look for any accounts that have gone through a status change event and are now in an Inactive state. If the account record has an account number, we’ll stop the workflow with status of Canceled and provide a message to the user explaining what are the proper steps to take in getting everything updated correctly both in the CRM and ERP systems.

    Let’s try this first on a single account record. When we click on the Deactivate button on the account form’s Command Bar, the Business Process Error dialog is presented to us, along with the message we defined in the workflow. No deactivation can take place, so the account is returned back to active status. More precisely, the account record status never changes, as can be verified from the audit history log (if enabled).

    CRM_2013_account_deactivate

    Great, now let’s move on to the Merge scenario and try to combine two active accounts with account numbers into a single account. We’ll select the accounts, click Merge, go through the Merge Records dialog, defy all the instructions given to us by the CRM key user of our organization and attempt to merge two separate ERP accounts in CRM. Once we hit the OK button for the merge to be performed, the Business Process Error dialog jumps to the rescue and stops the operation.

    CRM_2013_account_merge

    Hey, wait a second, why’s the text in the Business Process Error window different now? “ISV code aborted the operation”, what does that mean? Well, it seems that because we’re not actually performing the status change action directly on the record but rather leverage the built-in Merge Records dialog and its associated business logic for record deactivation, our status message text doesn’t  reach that screen. The event itself does “bubble up”, though, so stopping the status change also rolls back the entire transaction and none of the fields on the records being the targets of the merge operation change. That’s the important part, after all.

    Complementing Business Rules

    Let’s have a look at one more use case for the real-time workflow error messages before I let you get on with your browsing. The previous example covered an event that Business Rules weren’t able to control, due to the fact that they execute only on the entity form. In a CRM & ERP integration scenario you may however need to have the account record fields locked on more places than just the form. Remember that any updates the user would perform through other means, such as Excel export/re-import or a custom client app would not trigger the Business Rules that are essentially just client side scripts on the form. If you build this logic onto the server side as plug-ins or workflows, though, no one can perform an operation that would violate the rules (just ensure there’s always some supported way for performing the necessary updates & don’t block you integrations while creating these gatekeeper workflows).

    One built-in form where the Business Rules don’t run is the mobile form. Utilized in both the Mobile Express browser version as well as the mobile apps for Windows Phone, iPhone and Android, these forms offer a limited set of capabilities for reading, creating and updating records. While you can set a field on the mobile forms to be read-only, you can’t build any conditional logic to determine when the field should be locked.

    CRM_2013_account_name_edit

    CRM_2013_Mobile_Express_acount_editLet’s assume you want to allow people to quickly create and edit accounts through their mobile device, but you also want to lock down the account names on records that have been synchronized to the ERP system. To meet the first requirement you’ll need to leave the field on the form in an editable mode. To stop someone from accidentally overwriting the name of your biggest customer account with “Aasd,abhoignldfiiiiii” or other gibberish when fumbling around with CRM on their tiny little iPhone screens, you could create a real-time workflow to guard these fields from unwanted input. Have it run on the field change events, check whether it’s an ERP account with an account number and then cancel the event if necessary.

    Opening up the Mobile Express UI (just append the CRM organization URL with /m/ to access this version) and trying to edit the account name field now gives the same kind of notification as the full browser client. The Business Process Error dialog window doesn’t seem to have any mobile optimized version, but again it gets the basic job done by stopping the update. I didn’t test this on the Dynamics CRM mobile apps, but seeing how at least on Android the app is almost identical to the Mobile Express browser version I’d imagine the experience is similar there as well.

    OK, that’s the end of my experiments with real-time workflow process error messages for now. I’m sure that there will continue to be a need for more advanced solutions for controlling user data input that will involve hiding UI components through scripts or enforcing business logic through plug-ins, especially if the transaction volumes are expected to be high. The new workflow capabilities do however provide a quick way to configure custom error prompts and stop unwanted events when experimenting with the design options of your solutions and iterating your way towards the final production system.

  • Getting Your Head Around Dynamics CRM 2013 Processes – Part 2

    In the first part of this series we looked at the two new process categories introduced in Dynamics CRM 2013: Business Process Flows and Actions. Now it’s time to dig deeper into new CRM 2013 functionality that will allow you to achieve process automation results in areas where custom code was previously required.

    Business Rules: Processes In Disguise

    You may have already heard about the new feature in CRM 2013 that promises to free us from writing Javascript to manipulate form fields, called Business Rules. If you’re looking to find them from under the Process Center, though, you’re in the wrong place. Business Rules are a property of the entity and you’ll see them alongside other such components like Charts and Views in the Solution explorer. From this we can already gather that it won’t be possible to move Business Rules across different CRM organizations as individual components like you can do with processes, instead they always travel with their parent entity in the solution files.

    CRM_2013_Business_Rule

    Business Rules have the nickname of Portable Business Logic (PBL), so there must be something else that makes them particularly easy to carry around then? The portability actually refers to the way in which the rules can be applied to all the different forms of the entity and also to how they will be carried over to the mobile client application (MoCA) on Windows 8 and iOS tablets. They are however form specific in the sense that you must define what the scope of the Business Rule is: either tied to a particular form of the entity or simply set to run on “all forms”.

    What can you use Business Rules for from a process automation perspective? Similar to the Business Process Flow (BPF) process type, Business Rules can be used for guiding the data entry and update tasks by dynamically changing the UI presented to the user, based on the values of other fields on the form. Typically CRM entities end up having far more fields available than what a user is really expected to fill or even view in a particular stage of a business process. Whereas the Business Process Flow can only touch the Process Control shown on the top of the entity form, Business Rules can manipulate any field on the form, setting it either as visible/not visible, required/not required and disabled/enabled. They also have the ability of presenting field specific error messages if a user tries to deviate from the intended process.

    Business Rules have a similar type of conditional statement setting as workflow processes do (if/then), but it is quite a lot more limited currently than the workflow editor options. For instance, you can only reference fields from the same entity you’re working on, so setting the requirement level of a contact form field based on the parent account record’s values won’t work. You are also limited to only specifying a single set of conditions that must all be true for the action to run. In order to build an “or” rule to cover multiple alternative conditions you’ll need to save your first Business Rule, then create a copy of it with Save As and have as many concurrent rules as there are options in your “or” statement.

    Unlike the Business Process Flow processes that are only able to present fields from the entity, Business Rules can actually update the record as well. The “Set field value” action allows you to input either a static value, copy the value of another field (on the same record) or perform a simple +/-/* calculation with two fields. For an in-depth list of Business Rule capabilities and considerations, look no further than this excellent article by Jesper Osgaard on Understanding Portable Business Logic.

    This first release of Business Rules for Dynamics CRM 2013 addresses many of the common scenarios where Javascript has previously been applied on entity forms to make them dynamically adapt to the business logic of an organization. However, there remain some frequently requested features that will still require form scripts to be developed, such as:

    • Create dependent optionset fields (filtering available values based on another field)
    • Set dynamic default values (“task deadline today+3 days”)
    • Show/hide form components other than fields (tabs, sections, subgrids, iFrames, Quick View Forms etc.)

    Based on the fact that Business Process Flows are categorized as a process record in CRM 2o13 whereas Business Rules are “only” a component of an entity, should you spend more time designing the Business Process Flow and resort to Business Rules only when you need to tweak some details on the forms? I personally don’t think that the BPF Process Control is necessarily the only right way for implementing guided processes in CRM 2013. For a transactional record with a linear process consisting of several stages with clear boundaries (the sales opportunity scenario) it is surely a natural fit, but in many situations the flexibility provided by the field level configuration of Business Rules can prove to be a more practical approach. At least ask yourself these question before committing to a BPF based design: 1) does it offer some required functionality that Business Rules could not replicate, and 2) can the process data naturally fit into the stages that the Process Control will display?

    Real-Time Workflows: Plug-ins For The Analysts

    For the past 10 years the Dynamics CRM workflows have been tirelessly performed their tasks behind the scenes, driven by the time slots that the asynchronous service on the CRM server has kindly allocated for them. Originally designed for executing workloads that didn’t have a need to present the results immediately to the same end user who triggered the event, they’ve since been frequently leveraged also in process automation tasks that would have performed much more smoothly with a synchronous execution (also known as “poor man’s plug-ins”). The powerful process automation capabilities presented in the workflow editor would have often been enough to meet the business logic customization requirements, had it not been for that delay in the logic’s execution that demanded the same logic to be replicated in custom code instead.

    In CRM 2013 workflows have now been promoted to a 1st class citizen status by adding one tiny switch: “Run this workflow in the background [yes/no]”.

    CRM_2013_Real-Time_Workflow

    Why is this option of running workflows synchronously so important then? Well, if you’re just using your workflow to send an email notification to someone, there’s precious little difference in whether the action takes place immediately or after one minute. However, if you are updating the current record that the user is currently viewing through the entity form, the fact that you can present the changes right away opens up a whole new world of opportunities for leveraging workflows to guide the business process.

    Nowadays when the new CRM 2013 entity form design leans towards a dashboard style of summary views presenting a number of subgrids of child entities, activities or activity feed posts, the need for immediate feedback on the UI applies also to the creation of related records through workflows. If your business process relies on the assignment of tasks to users rather than the “mark completed” checkbox driven style introduced by the new Business Process Flows, the fact that the user will see the process automation in action as he updates the records in CRM will surely help to build confidence in the system’s ability to manage the business process and distribute information to all relevant parties, without the need for manual emails or phone calls to coordinate the work.

    From a development perspective, Real-Time Workflows have a similar but likely far more significant impact on the division of labor between the business analyst and the .NET developer than the new CRM 2013 Action processes that we covered in part 1. Synchronous workflow processes can cover many of the common CRM customization scenarios that would have previously required developing a plug-in. While a custom plug-in will naturally still remain far more flexible in terms of its ability to query and manipulate data, the Real-Time Workflows will drive more and more custom code to be developed as Custom Workflow Activities rather than plug-ins.

    This is because of the fact that if you can isolate your code into a component that the business analyst can call from a standard workflow process, the configurability of the business process automation functionality will be greatly enhanced as future adjustments to the process can be performed through the CRM UI without touching any code. The development of re-usable components that extend the default capabilities of workflows also lowers the barrier of applying the same custom logic into new processes as the needs of the customer organization evolve.

    The less people it takes to solve a business problem through CRM and the shorter the lead time from identifying the problem to deploying the solution is, the more likely it is for the problem to get solved. This is the main reason why increasing the share of configuration tasks over development tasks is so critical for any business information system that needs to adapt to changing business processes and not just fulfill a static set of requirements. If you’ve worked with CRM systems beyond their initial implementation projects, you’ll surely know into which category these systems fall into.

    The Growing Business Process Automation Toolkit

    If we compare the old and the new world of process automation in Dynamics CRM, we can see that the tools available for no-code configuration of business process management functionality have grown considerably over the past few years:

    • CRM 4.0: workflows
    • CRM 2011: workflows, dialogs
    • CRM 2013: asynchronous workflows, real-time workflows, dialogs, business process flows, business rules, actions

    What this means from a system administrator, customizer or business analyst perspective is that if you haven’t yet started to take advantage of the process automation capabilities of Dynamics CRM, you’re really missing out on a significant share of the platform’s potential value to your business. At the same time the growing number of options in CRM can make it seem like an increasingly difficult topic to approach. How do you know which one of the six tools to pick for building a solution to a business problem you’ve identified?

    As discussed in part 1 of this article, Business Process Flows are essentially just a map of the process that you present to the end user, but they don’t perform any actions on the data on their own. Since the Action processes are currently only valid for scenarios that involve a developer resource, we can also leave those our when exploring the right tools of how to get started with CRM process automation. That leaves us with four tools to evaluate for their fit to get the job done. I’ve compiled some of the main characteristics of each of them into the following table to help you in the selection process:

    CRM_2013_Process_Automation_small

    You should pay attention to the following constraints of each tool when analyzing their fit for the task at hand:

    • Business Rules are the only way to perform actions right after the user updates a field. Workflows will not fire until the save event (which can be 30 seconds away in the new auto-save CRM 2013 organizations).
    • Workflows will run even when the records are created or updated through other means than the form (data import, integrated systems). Business Rules are only executed on the form.
    • Due to the aforementioned limitation, Business Rules also only ever apply to a single record at a time.
    • Workflows can reference data from related entities for read/update. Business Rules can only work with data available directly on the form.
    • The special capability of Business Rules includes manipulating the UI (hide/show fields, set requirement level, show alerts). Workflows only deal with the data.
    • Dialogs are a manually initiated subset of workflow functionality with a specific Wizard style UI. They also have one special skill: querying data from any entity, not just the directly related ones.

    I hope that this article has managed to highlight the new features in Microsoft Dynamics CRM 2013 that can help you build solutions for guiding the user through a business process and automate the related tasks. There is a lot to explore in the latest CRM release in this area and I’m sure we’ll discover many creative ways for applying these new tools in practice as more and more customers move onto the CRM 2013 / Fall ’13 platform.

  • CRM Rocks Podcast: Discussing the New CRM 2013 Features and User Experience

    CRM_rocks_podcastThere’s a large number of great CRM blogs out there, but how many Dynamics CRM podcasts do you know of? Well, here’s one website you should definitely take a look at: CRM Rocks! Markus Erlandsson has started a new podcast series that focuses purely on Microsoft Dynamics CRM topics.

    In the first episode Markus interviewed CRM MVP Gustaf Westerlund on the available tools and best  practices that any Dynamics CRM developer should be aware of. I had the honor of being guest nr. 2 on CRM Rocks and got to share my thoughts and observations on the latest and so far the greatest release, CRM 2013. Click here to access the podcast recording in MP3 format.

    Some of the topics that Markus and me discuss during the podcast include:

    • The new UI: how will the new form design impact the user experience and what requirements does it impose on system customizers.
    • Business Process Flows: how are they different from the other process types and what do they mean in practice for the management of tasks related to business processes such as sales opportunity management.
    • Business Rules and Actions: what are the new options for code-free CRM configuration and where do we still need .NET developer resources.
    • No more ribbon: are we missing out on past functionality or are we actually better off in the end.
    • A world without popup windows: why is CRM now easier to learn for new users.
    • One CRM platform, many CRM applications: what the extended client support for mobile devices means for CRM usage scenarios.
    • Auto save = no more “post buttons”: why you need to be careful when upgrading your custom business logic stored in scripts and plugins.

    I personally enjoyed the discussion a lot and if anyone has 55 minutes to spare on listening to my ramblings on CRM 2013 then I hope you manage to get something out of it, too!

  • Setting up a Microsoft Dynamics CRM 2013 development server on Windows Azure

    Setting up a Microsoft Dynamics CRM 2013 development server on Windows Azure

    First the great news: Microsoft Dynamics CRM 2013 has been officially released today, on October 8th 2013! Not only can you sign up for a brand new Fall ’13 trial environment in CRM Online but you can also download the on-premises bits for the RTM release (build number 06.00.0000.0809). Here are the download links:

    Microsoft Dynamics CRM Server 2013
    http://www.microsoft.com/en-us/download/details.aspx?id=40341

    Microsoft Dynamics CRM 2013 Language Packs
    http://www.microsoft.com/en-us/download/details.aspx?id=40340

    Microsoft Dynamics CRM 2013 Email Router
    http://www.microsoft.com/en-us/download/details.aspx?id=40342

    Microsoft Dynamics CRM 2013 Report Authoring Extension (with SQL Server Data Tools support)
    http://www.microsoft.com/en-us/download/details.aspx?id=40343

    Microsoft Dynamics CRM 2013 for Microsoft Office Outlook (Outlook Client)
    http://www.microsoft.com/en-us/download/details.aspx?id=40344

    Microsoft Dynamics CRM 2013 List Component for Microsoft SharePoint Server 2010 and Microsoft SharePoint Server 2013 (for multiple browsers)
    http://www.microsoft.com/en-us/download/details.aspx?id=40345

    Servers in the cloud

    Now then, what should we do with these shiny new CRM 2013 bits? If you haven’t got any spare hardware lying around but you do have an active MSDN subscription, then why not leverage the subscriber benefits and set up a development/test server in Windows Azure? It’s easy, it’s fast, and if you have the MSDN credits, it’s also FREE!

    Azure_MSDN_benefit

    The discounted rates for MSDN subscribers make it up to 97% cheaper to run a virtual machine on Azure compared to the standard rates, leaving the cost at only $0.06 per hour for a VM (small instance). Combine this with the fact that Azure VM’s are nowadays charged by the minute and they incur no charges when the VM is stopped, you can stretch a few $ worth of Azure credits for quite a long period of testing. If you haven’t yet looked into the MSDN benefits, go and read this article on Scott Guthrie’s blog for all the details.

    Not only does MSDN provide you with free credits to spend on your favorite Azure service, you can also leverage the MSDN usage rights for software running on a Windows Azure virtual machine. For a great review of the licensing options for setting up Dynamics CRM development and test environments by using MSDN, look no further than this recent blog post by Leon Tribe.

    Preparing a development server for CRM 2013

    While you can’t just directly provision an Azure VM image pre-configured with CRM 2013 (at least not yet), you can skip a few steps by starting with an image from the Azure VM Gallery that comes with SQL Server 2012. You will need to setup Active Directory and IIS before starting the CRM 2013 server installation, which requires a set of clicks and a couple of reboots.

    To make this process faster, I decided to take notes of the steps needed in installing the required components for CRM 2013 and share them with anyone who’s interested in doing the same. So, here’s a 50 slide presentation with screenshots of the configuration tasks and options to install a working CRM 2013 dev/test/demo server on a Windows Azure VM:

    Do take note of this fact before proceeding any further: this is NOT the “how to” of deploying a live CRM 2013 server. These are the minimum steps needed to get the Dynamics CRM server installation process to complete without errors – nothing more. When considering setting up a proper test and production environment, the first thing you need to do is read the Microsoft Dynamics CRM 2013 Implementation Guide.

    For taking CRM 2013 on a casual test drive and seeing what your current CRM 2011 organization looks like when imported into the latest server version, the steps outlined in the presentation are all you need to get started. I’ve timed the process and the last time it took around 1.5 hours from provisioning a new VM from the Azure Gallery to having a fully working test instance of CRM 2013 in the cloud. Not quite the couple of minutes that spinning up a new CRM Online organization takes, but short enough to set up an ad-hoc test environment for development and configuration tasks that are more easily accomplished with full CRM server and SQL database access.

  • No-code Customizations with North52 Formula Manager, Part 3: Case Resolutions

    In the previous articles (part 1 and part 2) we’ve explored how the North52 Formula Manager can be utilized in automating steps related to the sales process. This time we’ll be looking at a scenario related to service management, in an effort to make it easier to share knowledge and report on the resolutions of cases recorded in the Microsoft Dynamics CRM database.

    Cases vs. Case Resolutions

    Case_resolve_cancelIn theory it should be pretty straightforward how you work with a case record: they are support tickets that are initially open (active) when you create them and eventually they end up getting closed as either resolved (service was provided) or cancelled (duplicate ticket, customer never replied etc.).

    The point where complexity raises its ugly head is how the resolution process works: instead of entering the case resolution details onto the case record itself, the user is presented with a window that creates a Case Resolution activity underneath the parent case. While this is a perfectly valid design in terms of the nature of the interactions, as there could be situations where the case gets re-opened and resolved again (thus being a 1:N relationship with the case), it does make it more complicated to work with the resolution data later on.

    Resolve_case_dialog

    For example, say you’d want to study the resolved cases by using a view of the case records. In that view you can see the case subject, owner, status and other standard fields, but there’s no information visible on what the actual resolution to the case was. “Ok, so I’ll need to customize the view and show columns from a related record. That’s not too difficult, now is it?” Unfortunately that’s not going to work, because the information we’re interested in resides on the N side of the relationship. Since there can be several case resolutions for a single case, no columns from this entity can be displayed in a case view. So, we can’t construct a nice Q&A list that the service reps could leverage in scanning for similar cases on a new question from a customer. We can only see the problem, not the resolution.

    Resolved_cases_view

    You could build a view of case resolutions, the child entity in this relationship, but that’s not very convenient either. Although case resolution is an entity of its own, it’s not actually available in Advanced Find to directly build queries on. It is possible to access a list of case resolutions by crafting a view of activities with that specific type, but you’ll still be limited to only the generic activity fields. As an example, the field Billable Time (Time Spent) cannot be accessed in a view, which makes it rather difficult to report on this data entered as a part of the service process.

    Activities_Advanced_Find_case_resolution

    Using a Formula to Replicate the Case Resolution Fields on the Case Form

    Luckily Dynamics CRM is a flexible platform that allows you to develop new business logic to fulfill the requirements for your service process. In this situation, if we could simply have the Resolve Case dialog fields copied over to the parent case, this would solve the aforementioned problems. So, how to proceed then?

    If we want to alter the default behavior or the service entities, we should first have a look at the workflow process capabilities of Dynamics CRM to see if can  configure a workflow rule that is triggered when the case resolution is created. This time we won’t get very far with that idea, though, as neither the case resolution nor the activity entity can be used as a workflow trigger. Fair enough, we’ll then need to come up with a lower level solution to meet this requirement. Assuming we have access to a .NET developer who knows the Dynamics CRM SDK, creating a custom plug-in to copy the fields to the case record would be a worthy option to consider. Since the title of this post promised “no-code customizations”, let’s instead look at how we could achieve the same functionality with the Formula Manager.

    First we need a place to host the case resolution data of course, so let’s add three custom fields on the case entity: Resolution (text field), Resolution Description (multiple lines) and Time Spent (whole number with duration format). On the case form they can be put into a section of their own and set as disabled, since the user shouldn’t directly update them.  Then we’ll create the three formulas that will populate these fields with corresponding values from the case resolution entity.

    Case_custom_fields

    We’ll be using a formula of the type “Save – To Parent” and attach it to the create event of the case resolution entity. As our target (parent) entity we can select case, but notice that you’ll actually need to specify the relationship field value first before you’re able switch the value in the target entity field. Let’s take the Resolution Description field we just created as the target property. The formula itself in this case will be very simple, since all we need is a value directly from the source entity. We can use the source entity tree visible in the bottom left corner of the screen to browse through the available fields or just type in directly the value [incidentresolution.description].

    Formula_case_description

    The other two fields will get an identical treatment, which means we can click on the Clone Formula button on the ribbon and create two copies of the original formula. Just update the target property field and select a new source field value into the formula description window accordingly. After we’re done, we can publish the formulas and try them out by resolving an existing case.

    Resolve_case_formula_1

    After we’ve entered the details into the Resolve Case dialog fields and clicked OK, our formula will update the underlying case form in real time to reflect the same values presented directly on the resolved case record. Unlike asynchronous workflow processes, the formulas can perform their tasks right in front of the user, which makes the user experience more consistent.

    Resolve_case_formula_2

    Making Use of the Resolution Data

    Now that the fields are available on the case entity, we still need to ensure that the user actually has access to them through all the necessary routes. First we should of course include them into the Resolved Cases view we talked about earlier.

    Resolved_cases_view_updated

    Seeing the resolution field contents directly in the view is a great improvement, but an even more important feature is to enable the users to search for this information. You see, one of the peculiar default settings of Dynamics CRM is that the Quick Find view for case entities only covers active (open) cases. (more…)

  • No-code Customizations with North52 Formula Manager, Part 2: Line Items

    In a previous post I wrote about how the North52 Formula Manager solution can help you build some common customizations that would otherwise require writing Javascript for Dynamics CRM entity forms. The scenarios included:

    • Setting default values for lookup fields
    • Dynamically changing the field requirement level
    • Displaying popup warnings
    • Launching dialog process windows

    This time I will show a few examples of the Formula Manager capabilities that would typically fall into the domain of writing C# plugin code to enhance the business logic of Dynamics CRM. Being a functional CRM consultant that doesn’t normally deliver a single line of code (at least for production environments), these scenarios would traditionally require me to hand over the task to a CRM developer. What we’re about to see is an alternative method of creating just formulas with the graphical tools available in the solution package to get the same job done.

    Updating Opportunity, Quote, Order or Invoice Products

    In Microsoft Dynamics CRM 2011 you can trigger workflow processes on the line items of Opportunities, Quotes, Orders or Invoices. This allows you to execute custom logic when, for example, new Quote Product rows are added for a Quote record. Unfortunately what you cannot do with standard workflows is to actually update the line item record itself.

    Workflow_update_quote_product

    Well, this surely looks like a dead-end for most of the use cases you could think of for triggering the workflow process in the first place. If I wanted to, for example, pull information from the selected Product record and save it on the Quote Product’s fields, such as product description, vendor details or a line item number to sort the quote rows, this apparently cannot be achieved with CRM’s workflow functionality.

    Let’s look at how we can solve the problem with Formula Manager instead. In our scenario we would like the description field of the Quote Product record to be updated with the description field contents of the selected Product record. What we therefore need is a “Save – To Current Record” type of formula that is triggered on the Create & Update events of the Quote Product entity. We can limit the update events only to the Existing Product field by setting the Source Property value. The Target Property of our formula should be the Description field.

    Finally, we need the actual formula that will feed the values from the related Product record into the Quote Product’s description field. To retrieve the description field contents we’ll use the FindValue function and tell it to search for a Product record that has the same productid as the existing product selected on the Quote Product record. While we’re at it, let’s also ensure that the Quote Product actually has an existing product instead of a write-in product by verifying the productid field contents with the ContainsData function. The end result will look like this:

    if(ContainsData([quotedetail.productid]), FindValue(‘product’, ‘productid’, [quotedetail.productid], ‘description’),’NoOp’)

    FormulaManager_update_quote_product_description

    Now when we navigate onto a Quote and add a new Quote Product record underneath it, the description field will inherit the value from the related Product and display it directly on the Quote Product form (assuming you’ve made this default field visible on the form in the first place).

    Quote_product_description

    Not that much more complicated than building a workflow rule, just as long as you familiarize yourself with how the formulas work and how to format the parameters required by the functions.

    Creating Line Items

    Let’s proceed with exploring the world of line item records in the sales process. Updating existing records automatically is a nice capability to have for sure, but what about automating the complete process of creating the line items for an Opportunity, Quote, Order or Invoice? For example, if we wanted to ensure that there is always a standard Delivery Fee or other persistent item included whenever we’re creating an Order of a specific type (or for a specific customer group), then this is another area where the out-of-the-box functionality of Dynamics CRM workflows can’t be used, since new Order Product records cannot be created through a workflow rule.

    With Formula Manager we have no such limitations in place, rather we are free to create any type of records we want with the CreateRecord function. The example formula below was actually provided to me by North52’s John Grace to demonstrate the solution’s functionality. The Save – Perform Action formula is attached to the Create event of an Order record, which in turn triggers the creation of a new Order Product record. The contents of this auto-created line item can be defined either directly in the formula or alternatively queried with the FindValue function familiar to us from the previous example.

    CreateRecord(‘salesorderdetail’,
    1,
    ‘salesorderid.salesorder.’ + [salesorder.salesorderid],
    ‘productid.product.’ + FindValue(‘product’, ‘name’, ‘Bike’, ‘productid’),
    ‘uomid.uom.’ + FindValue(‘uom’, ‘name’, ‘Primary Unit’, ‘uomid’),
    ‘quantity.10’
    )

    FormulaManager_create_order_product

    Now, as a limited time special offer, any new Order that we create (or a Quote that we convert) will get 10 Bike products added onto it with their unit price dynamically retrieved from the Price List selected on the Order. What a sweet deal!

    Order_Products

    Cloning Records

    For a Dynamics CRM administrator these type of automated steps can be really handy in enforcing business rules and ensuring correct entry of data onto sales records. If we’d show them to your typical salesman, though, he might not be so impressed with this type of detailed process automation functionality.

    “Sure, it looks like we could save a few clicks with these formulas. But here’s the deal: many of the quotations I make are practically identical. They contain the same line items every time, with only some variations in quantity and discounts given. What I’d really want to do is simply select a quote I’ve created for another customer and create a copy of it. You know, the “Save As” button that’s found in all the other Office applications. Why couldn’t CRM also have that? It would be a huge time saver for me.”

    Ever had this kind of a discussion with your CRM users? If you have, then you’ll surely appreciate the fact that Formula Manager provides a Clone function that allows you to create a new copy of any existing record. Not only that, but the function also clones all the related 1:N & N:N records, which means you can create a copy of both the Quote and Quote Product line items with a single function!

    To get an understanding of how the function could be leveraged in delivering the “Save As” functionality your sales users have been asking for so long, watch this video that demonstrates not only the formula in action but also how you can use the Ribbon Workbench to build a custom Clone button for the required entities.

    Clone_Quote

    Think these type of features would be useful to have in your Dynamics CRM organization? Then go ahead and grab the fully functional Standard Edition of Formula Manager that allows you to have 10 active formulas at a time, for test or production use.

  • No-code Customizations with North52 Formula Manager

    North52North52 Formula Manager is a very interesting solution that promises to simplify the process of customizing and extending Dynamics CRM by offering a graphical toolkit to implement custom business logic that would otherwise require developing plug-ins in C# or adding Javascripts on the forms. Instead of writing custom code, the business logic can be configured through the N52 entities inside CRM, with the help of a Silverlight based editor to write formulas that check conditions, perform validations, update fields etc.

    In this article I’ll show you a few simple examples of how a person with no coding skills can perform some customizations that go beyond the GUI tools that Dynamics CRM offers. I’ll use the opportunity entity to add some client side actions to make the sales process a more guided experience for the end user. You can grab the free Standard edition of Formula Manager and use it’s 10 available formulas to try out these examples in your own CRM environment, or watch some of the training videos from North52 that cover several other scenarios.

    Default values

    The sales records in Dynamics CRM contain a few fields that sometimes don’t deliver any added value to the user, but they still need to be filled for each record. One common example is the usage of the price list. If your organization only has a single valid price list at any given time, the CRM users would surely appreciate it if the system could automatically populate the lookup field with the default price list when creating a new opportunity.

    Opportunity_default_price_list

    This is a very simple formula where all we basically need to do is populate a lookup field with a static value. To get the GUID of the price list, open it’s form in a new IE window by pressing Ctrl+N and find the string like “3F2504E0-4F89-11D3-9A0C-0305E82C3301” from it. Then create a new N52 Formula record and define the formula type as Save – To Current Record. We’ll set the mode as Client Side Classic and set it to run on the Create event, as we want the price list field to be populated with the default value only once – when the user creates a new opportunity record. The source and target entities should both be set to opportunity, as we’re updating the current record. The source property in this case is the event that triggers the formula, so let’s select OnLoad to fill the field immediately when the form is opened. Finally, the target property should be the field that will be updated with the results of the formula, in this case Price List.

    Different field types on the CRM form require different kinds of update procedures. Since we’re dealing with a lookup field and populating it as a client side event, let’s pick the SetClientSideLookup function from the N52 Formula menu and give it the required parameters of the entity name, record GUID and record display name:

    SetClientSideLookup(‘pricelevel’, ‘5EF541AA-67B6-E211-93F7-08002719F2F4’, ‘Default List’)

    FormulaManager_opportunity_default_pricelist

    Now we’ll just need to publish the formula and go test it out by creating a new opportunity record and verifying that the price list gets set to the record we wanted. In case you get an error prompt from N52 Formula Manager while opening the form, please revisit the formula record and verify that you’ve selected the correct options.

    Required fields

    Changing the requirement level of a field based on another field on the form is another common requirement. Let’s assume we have a simple sales process with three stages (picked up from the default CRM sample opportunity data): 1) Prospect, 2) Qualify, 3) Closing. We’ll use the Status Reason field’s (customized) values to drive the process and we want to enforce the following business rules:

    • If stage = 2) Qualify then make Estimated Close Date field required
    • If stage = 3) Closing then make Estimated Close Date and Estimated Revenue fields required

    In the UI the user would see the requirement level change dynamically when he or she changes the Status Reason field value and clicks elsewhere or tabs out of it.

    Opportunity_required_fields

    To achieve this feature with Formula Manager, we would build a formula that references the statuscode ID values and the schema names of the fields we want to set as required. Something like the following if-statements:

    if(([opportunity.statuscode]=’2′), SetRequiredFields(‘estimatedvalue’), if(([opportunity.statuscode]=’3′), SetRequiredFields(‘estimatedvalue’, ‘estimatedclosedate’), SetNotRequiredFields(‘estimatedvalue’, ‘estimatedclosedate’)))

    Basically what we do in the formula is first check for the stage 2, then stage 3 and finally use a default action for stage 1 to return the fields into not required status (so we also support moving backward in the stages). We’ll set the formula to run on the opportunity entity as a Client Side – Perform Action formula, tied to the source property of the Status Reason field, which effectively means it’s triggered with the OnChange event of that field as the user manipulates the form values. (more…)

  • Dynamics CRM 2011 on Windows Server 2012

    In addition to the shared development and test CRM servers at the office, I like to run my own personal CRM sandbox that allows me to test any applications, configurations and updates without having to worry about affecting any of my colleagues’ work. I’ve been running a VirtualBox server image on my desktop PC and standard hard drives, but even in a single user test environment, you can never have too much performance for your own needs.

    SanDisk_ExtremeAfter reading this blog post from Jeff Atwood, I couldn’t help but to shop around for an “SSD in your pocket”, meaning a super fast USB flash drive that would have sufficient storage space for hosting a CRM 2011 development server image. I decided to grab the SanDisk SDCZ80-064G-X46 64GB Extreme USB 3.0 Flash Drive from Amazon.co.uk for €60 and test it out as a portable CRM sandbox. 190 MB/s read and 170 MB/s write should provide a nice performance boost compared to my old spinning HDD’s.

    Since shrinking my existing VirtualBox image down to the 60Gb available on the flash drive would have meant giving up on a lot of things I had installed there, I decided this was a good moment for building a brand new virtual server. During the fall I had already attempted a few times to deploy CRM 2011 on Windows Server 2012, even though it has been unsupported. Unfortunately none of the workarounds published by Daniel Cai had done the trick for me, so I decided to wait for the official support.

    With Update Rollup 13 Microsoft Dynamics CRM 2011 Server finally became officially supported to be run on Windows Server 2012. However, there was one catch: you could only upgrade an existing Windows Server 2008 deployment with CRM 2011 onto Windows Server 2012. For a brand new deployment there was a disclaimer included with UR13 release notes:

    The Self-Healing Setup (SHS) that is required to install Update Rollup 13 for Microsoft Dynamics CRM 2011 on Windows Server 2012 will be published on Microsoft Update alongside the update rollup in mid-to-late April, 2013.

    Ok, it’s 1st of May now, so where are these SHS files? Well, they are available, but not quite in the kind of format you would expect. You can’t simply download an updated version of the Dynamics CRM Server installer, as the one available on Microsoft Download is still the old version with Update Rollup 6 that was released in January 2012.

    There’s a thread over at Dynamics Community CRM Forum that discusses the Windows Server 2012 installation procedure, but I’ll summarize how I managed to get CRM installed on such an environment. There were a few puzzling gotchas that no one else should spend their time on pondering.

    Get the update files

    The KB article 2434455, “How to obtain the setup updates for Microsoft Dynamics CRM 2011”, gives you the steps you need to follow. Instead of heading to Microsoft Download, you’ll need to visit the Microsoft Update catalog website (which only supports IE, by the way, so don’t click the link on Chrome or anything). From there you’ll be able to obtain a file called Setup Update for Microsoft Dynamics CRM Server 2011. The fun part about this is that the size of the file is 1.5 GB.

    Setup_update_for_CRM_2011_server

    Why is the file so huge, with the actual CRM 2011 Server installer being only 120 MB? The reason is that this file contains all 25 language versions for the update file. If you’re installing the English version, you’ll only need the en-server_kb2434455_amd64_1033 cab file. Oh well, the Internet is fast nowadays and hard drives are infinite, so let’s get on with it.

    Prepare for installation

    The cab file won’t be the installer itself, rather it’s a collection of updates that needs to be references while running the actual server installer. How do you do that then? By creating a config.xml file following the example given in the KB article above and dropping it into the same folder as installer and the cab file.

    Then we can proceed with starting the installation. Only there’s one more catch which isn’t included in the KB article: you’ll need to start the installation process from the command line in order to be able to tell that there’s a config file pointing to a cab file that contains the updates necessary for CRM 2011 to run on Windows Server 2012. You can read through the TechNet article “Use the Command Prompt to Install Microsoft Dynamics CRM 2011” if you’re interested in the finer details of parameterizing your CRM server deployments, but if you’re like me, you’ll just want to copy-paste the required bits onto the prompt to move on with the process.

    1. Put the cab and config.xml in C:\Temp
    2. Download the UR6 version of CRM 2011 Server installer and put the CRM2011-Server-ENU-amd64.exe file in the same folder
    3. Run the file, point it to extract the files onto the very same C:\Temp directory
    4. Cancel any further setup screens that may be launched, as you’ll still need to provide the pointer to the cab file
    5. Open the command prompt, go to C:\Temp directory and type: setupserver.exe /config C:\Temp\config.xml

    This process will make the installer skip the question of “do you want to download updates from Microsoft Update” and use the SHS cab file directly. This is the whole point of our exercise, as Microsoft Update for one reason or another cannot provide the necessary updates for Windows Server 2012 compatibility for the CRM 2011 Server installer.

    After this part, you can follow the standard steps for installing CRM. You may get an error screen saying “Action Microsoft.Crm.Setup.Common.InstallWindowsSearchAction failed. Class not registered (Exception from HRESULT: 0x80040154 (REGDB_E_CLASSNOTREG))”, but just click Ignore on it as that issue is most likely just about the indexing service for the CRM help files.

    Validate and update once more

    Once you’re done and have rebooted the server, you’ll be able to launch CRM. From those oldskool icons in the Wunderbar area you’ll quickly notice that this deployment is still running a pre-cross-browser era version of Dynamics CRM. The build numbers 5.0.9690.2015 and 5.0.9690.1992 indicate that it is in fact a UR6 organization still. (Hmm, was there ever any need for UR13 to support installation on Windows Server 2012 then?) Before you start working on your environment, download and install Update Rollup 13 to make CRM support the IE10 running on your Windows Server 2012, unless you enjoy using the IE7 Compatibility View.

    Windows_Server_2012_CRM_2011_small

    There we have it. A nice and fast CRM 2011 sandbox image running Windows Server 2012 and SQL Server 2012 in a 36 GB image stored on a very fast thumb drive. I’m sure I’ll be struggling with keeping the image small enough with all the updates, service packs, Office, Visual Studio and other bloat that’s bound to end up there. On the plus side I’ll be able to carry the sandbox on my keychain and plug it into any PC with sufficient memory to run the environment (3.5 GB & 2 CPU reserved for it currently) and enjoy SSD level disk I/O performance. We’ll see if it was worth all the trouble at the end, but hey – don’t we all just enjoy fiddling with the latest software and fastest hardware?

    Edit 2013-05-04: For anyone looking to move completely towards developing for Dynamics CRM on top of Windows Server 2012, please note that the Dynamics CRM Outlook client does not support Windows Server 2012 yet. If you try to run the setup, all you will get is the following message: “Cannot install Microsoft Dynamics CRM for Outlook. Install Windows Server 2008 Service Pack 2, and then try again.”

    Edit 2013-05-04, Part 2: If you’re interested in the detailed steps for building a Dynamics CRM sandbox, please refer to articles like Creating a MS CRM 2011 VM by Mark Kovalcson or Setting up a CRM demo environment in Windows Azure Virtual Machines by Shan McArthur (unfortunately the images on this post no longer work). It doesn’t really matter on which virtualization platform you’re building your sandbox on. I’m using VirtualBox simply because I have other existing virtual machines on it, but with Windows 8 built-in Hyper-V support you don’t necessarily need any additional software. Also, as you can see from Shan’s post, running these environments in Azure is also a perfectly viable option.