Tag: CRM 2011

  • Modern advanced find test drive

    Modern advanced find test drive

    The single most powerful end user feature of Dynamics CRM, XRM, CDS and Dataverse was always Advanced Find. Period.

    There, now that we’ve settled that argument, it’s time to move forward and see what life is going to look like when Dataverse no longer includes Advanced Find. Yes, there will still be the broad capabilities of advanced find, but I will refer to it without capitalization. This is in line with the fresh new documentation on a very important feature that aims to take the place of Advanced Find: modern advanced find.

    So modern you can barely see it

    Advanced Find was always its own UI in a separate popup window. This was perfectly in line with the Dynamics CRM 2011 UI – which was the last time there were any material changes to the visible features. Let’s have one last look at Advanced Find’s glorious Ribbon icon before we move on:

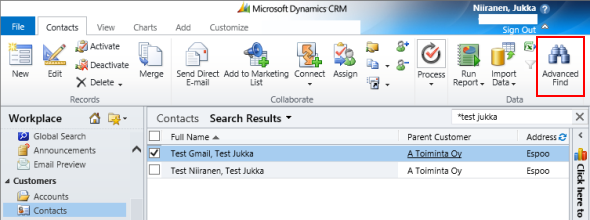
    OK, so this wasn’t actually the last time Microsoft touched the user experience for this feature. The CRM 2013 release did a complete overhaul of the application UI (I’d say a more visible change than Unified Interface even), which lead to the Advanced Find buttons getting either hidden or missing from parts of the app navigation. I had to write a blog post called “Finding Advanced Find in CRM 2013” to help out users who were worried that the feature had been removed from the product entirely.

    The modern advanced find that has been introduced as a preview feature in February 2022 takes the hiding game to a whole new level. You see, the entry point to modern advanced find is hidden within the global search bar. You have to 1) click the bar and then 2) click “search for rows in a table using advanced filters”.

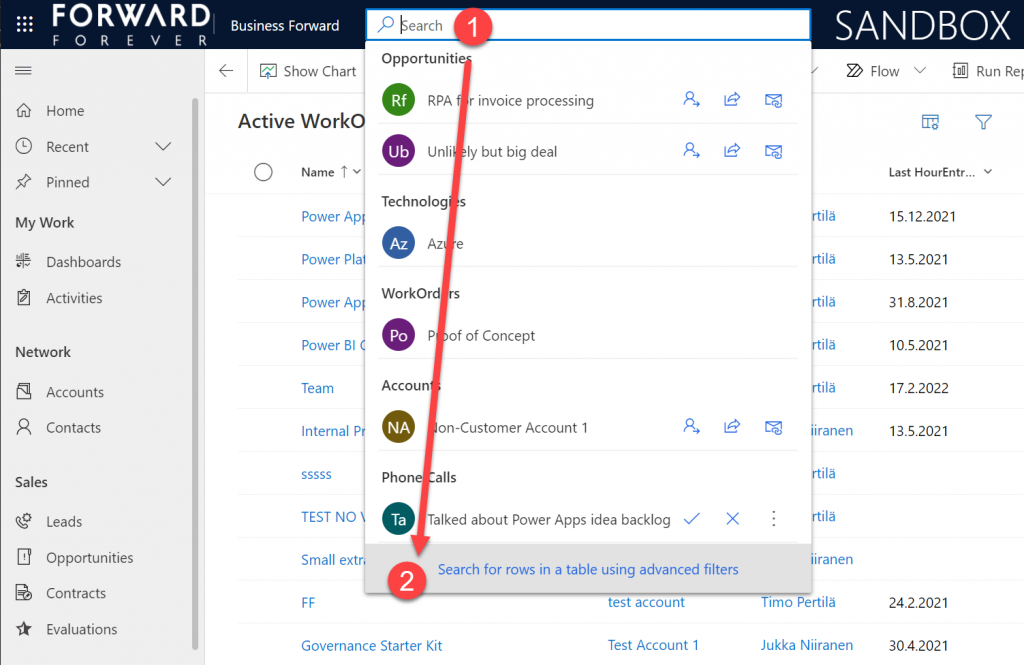
    Be sure to not enter any search text into the bar, because that will hide this new option. Also, whatever you do, do not press enter after this text – otherwise you’ll be taken to the global search results page. There’s no way to “go advanced” from here, it’s a completely different search experience.
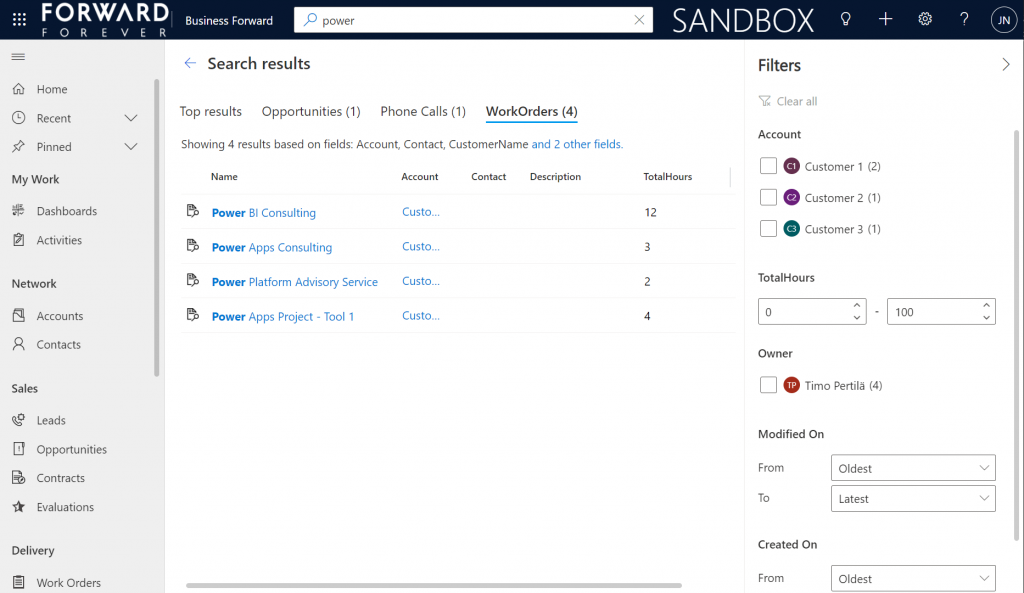
    Search “any” table

    A big new feature in the modern advanced find is what happens after you click on the new button within the search bar. (I already forgot the name of that button since it wasn’t anything as nearly catchy as “advanced find”, so I’ll refrain from scrolling up this post to see what it was and just move on instead.)

    You will see a sidebar saying “select a table to search”. Cool, just like in good ol’ Advanced Find! The difference you need to understand, though, is that it’s not a list of all the tables in the environment. Yes, it will likely be a longer list that what your Model-driven app’s sitemap navigation contains. This is because modern advanced find covers all the table’s that your app’s maker has chosen to include in the app module when working with the Model-driven app designer.

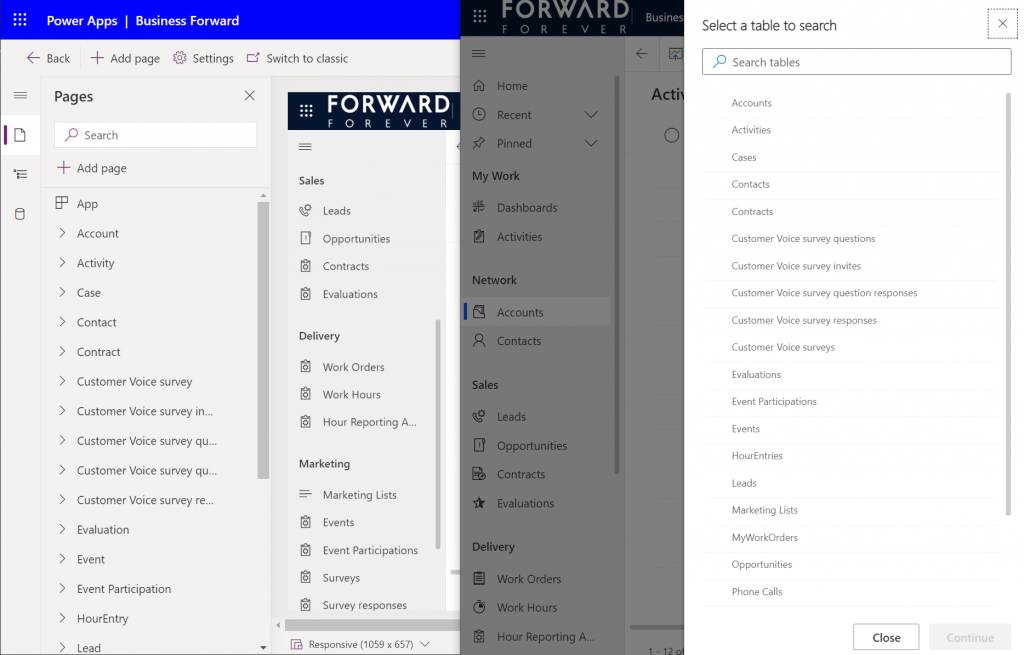
    There are pros and cons to this approach. The obvious upside is the ease of use for the casual data finder. He/she doesn’t need to confront the ever growing list of both standard and custom tables in a Dataverse environment (especially those with many Dynamics 365 apps installed in them). Things are quite different now compared to back when Advanced Find was originally designed for a simple CRM systems. Showing hundreds of cryptic tables isn’t a great UX to most users, so cutting down the noise of the underlying data model is understandable.

    How about those users who DO understand the data model, or even work in configuring and extending it? The advanced app makers, consultants and developers will most likely be frustrated by this limitation whenever they need to examine the detailed contents of an environment. Quite often I myself need to build new views and filters just to understand what data has been entered into the system (that has been designed by someone else).

    Sounds to me like there will be a growing demand for a “Super Advanced Find” type of a tool to be introduced in XrmToolBox. If you’ve already got a favorite tool for ad-hoc data exploration needs, be sure to leave a comment below.

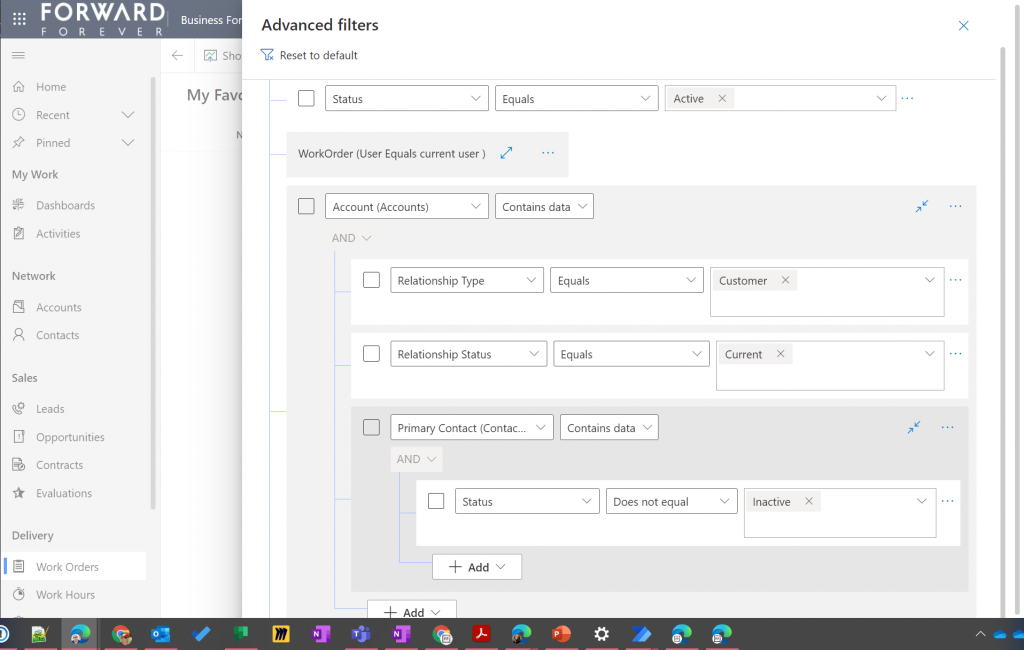
    Query criteria remains the key criteria

    The one area where an advanced search feature in Dataverse simply has to perform well is the creation of complex query criteria across the relational data model of the environment. One of the most read articles on my blog has been Advanced Queries with Advanced Find, which illustrates both the possibilities of the tool as well as the demand for such advanced query criteria in real-life business scenarios.

    Luckily this is already included in the non-preview feature set of Model-driven Power Apps. The filter editor that you can find in any table view today is a very worthy replacement for what Advanced Find used to offer. Although I haven’t done a detailed comparison, I couldn’t easily spot any missing capability from the tools available for defining the view filters in modern advanced find vs. the classic pop-up query editor for Advanced Find.

    Just imagine if it was this easy to define the filter criteria for Dataverse tables on the modern automation side, too – not just views? Perhaps one day something similar will be made available for Power Automate cloud flows, based on what is being planned for SharePoint data sources in 2022 wave 1 (because priorities). Until then, luckily we have great articles and reference guides created by the community to copy-paste our “flow code” from while we wait for a GUI to arrive.

    Actually viewing the data

    Far too often I’ve seen people put all their effort in defining the correct query criteria and then being lazy when it comes to actually showing the results of that query. You could say I wrote the book on the importance of Dynamics CRM view design back in the 2013 era, so you can image how such user experience oversights have irritated me over the years.

    Smart choice of view columns and sort order are what defines the user experience outcome. Query filters are merely table stakes.

    Jukka Niiranen, in this blog post right here.

    As a data exploration tool, Advanced Find wasn’t always perfect, but us consultants learned to make the most of it. When needing to dig up data from columns that weren’t readily available in the system views, it was easy to just go and add all columns into an exploration view. Whereas when building more targeted we had two useful features in the “add columns” screen of Advanced Find: sort by name, sort by data type.

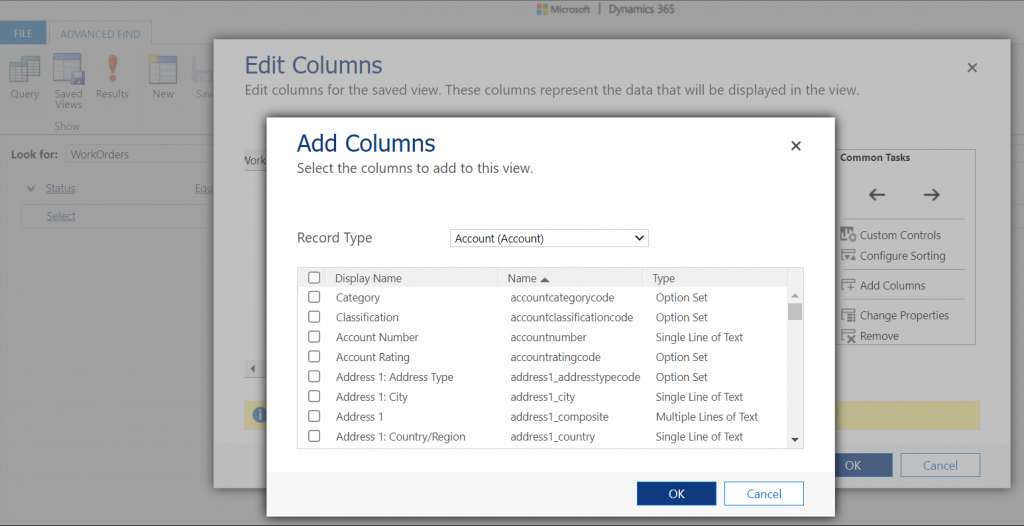
    Unfortunately this is where the modern advanced find is a little behind on the classic Advanced Find. Let’s look at what the column editor experience is like.

    First of all, the editor includes the very same modern stumbling block that you might have noticed when working in the Power Apps Maker portal and searching for table columns. When you open the “add columns” side pane, the list of available columns doesn’t cover everything that the table contains. Instead you are defaulted to a “Default” filter that’s easy to miss. Switch to “All” and you’ll finally see that field you wanted to include in your view.

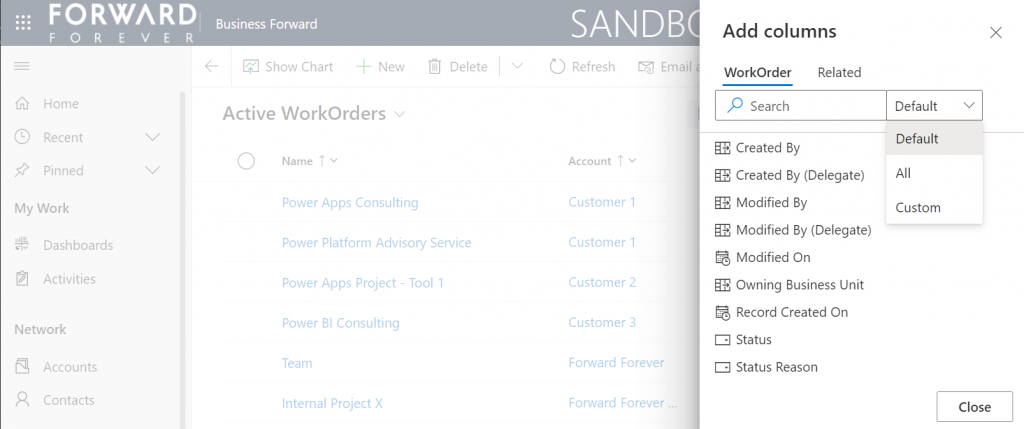
    What exactly does “Default” mean in this context and how is it defined? No one can tell, not even Microsoft. It appears to be one of those good intentions in tidying up the menus of what should be a citizen developer friendly platform yet also serves huge enterprise CRM systems. A tough balance to get right, that’s for sure.

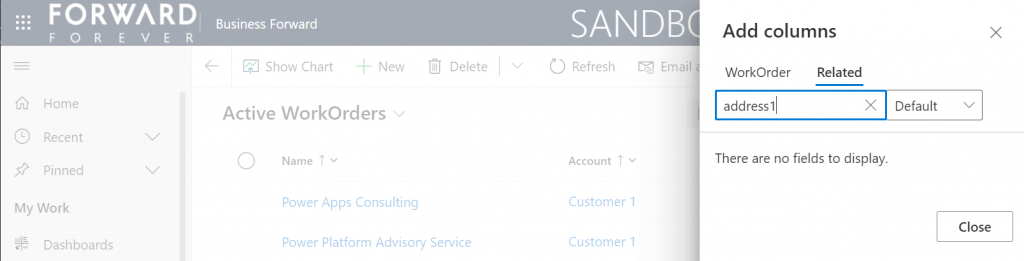
    One very nice improvement in the modern advanced find (as well as the Maker portal) is the ability to search for things while you are configuring those very things. Narrowing down the long list of available columns with a free text search term could be especially handy when you’re looking for information stored on a related parental ent… table.

    What could make such a feature even better? I’ve got one idea: extend the search index to include also the schema names. Believe it or not, the display names of f… columns can become quite misleading when you eventually need to adjust them for the places in the app UI where they can’t be customized (which just happens to mainly be: VIEWS!).

    Anyway, often the schema name may have a pattern that makes it easier to logically group columns, which in turn makes the app maker more productive as he/she finds them more easily when defining the views. Right now that’s something the modern advanced find doesn’t yet support. If you think it should, then go and vote for it.

    So, you’ve created a hundred and one views…

    If there was something that the classic Advanced Find feature really didn’t handle well at all, it was the process of managing the views created with it. The way how the Ribbon UI managed to both hide the feature and yet make it highly misleading at the same time was something… special.

    Compared to what we used to have in Advanced Find, the enanced personal view management now launched in preview is a thing of beauty. Changing the sort order and hiding unnecessary views are very welcome additions to how the power users will be able to take control of their business app UI details.

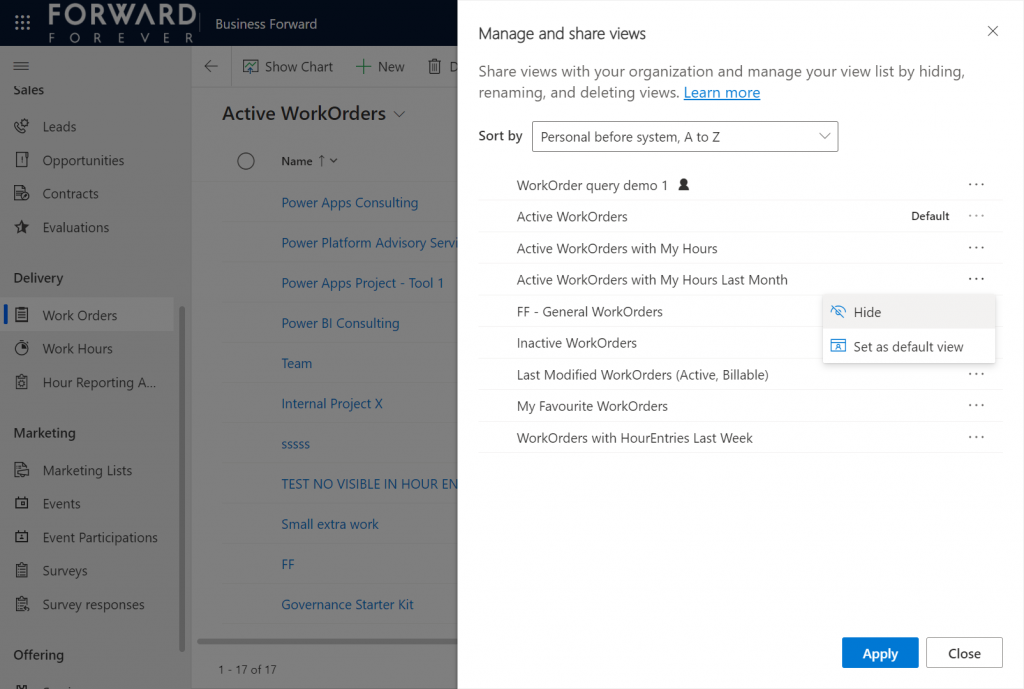
    The new view hiding feature is something to pay attention to:

    “Hiding a view is a way to personalize the view list and reduce clutter by making views not be visible in the view selector. A view may be needed for a specific purpose periodically or a view could be shared with you that you may not need it anymore. In such instances, hiding enables you to manage your view list by seeing only the views that are most important for you.”

    This probably won’t solve all the pain associated with view management as their number grows in “busy” tables used for different kinds of analysis, both via system and personal views. Yet it’s a simple, user-driven concept to offer personalization within Model-driven apps.

    Closing the Advanced Find popup

    We’ve known for quite some time that eventually the legacy web client popup with Advanced Find will not be supported anymore. This modern advanced find feature in 2022 release wave 1 aims to include the necessary features to allow deprecating a very central part of the product. It does a pretty good job and the general principles in modern advanced find are quite justified.

    Will I miss the good ol’ Advanced Find once the new feature is enabled and the icon to the classic experience is gone? Of course I will. Like with many of the modernization efforts around Power Apps as a business app platform, the new experiences always take away something that used to allow XRM veterans like myself to be productive. Often we get less information density in the screens, blocking the use of multiple tabs, slower loading times due to new API dependencies, more options hidden/missing due to simplification efforts…

    Enough with the complaining already! Things weren’t better before, they were just different. What used to be a single app in a single service is now a cloud where traditional boundaries are vanishing at an astonishing rate. Now everyone really can make apps, and there can be a thousand “XRMs” in an organization. Both the audience and the purpose of these tools is forever evolving – and so must their features.

    Update 2022-06-08: Microsoft has started to roll out an enhancement to the view filter editing screen. There will be a button to download the FetchXML definition of the view filters. Also, export to Excel will now honor the filter modifications done, without requiring the view to be saved. Just like in the good ol’ Advanced Find days then.😊

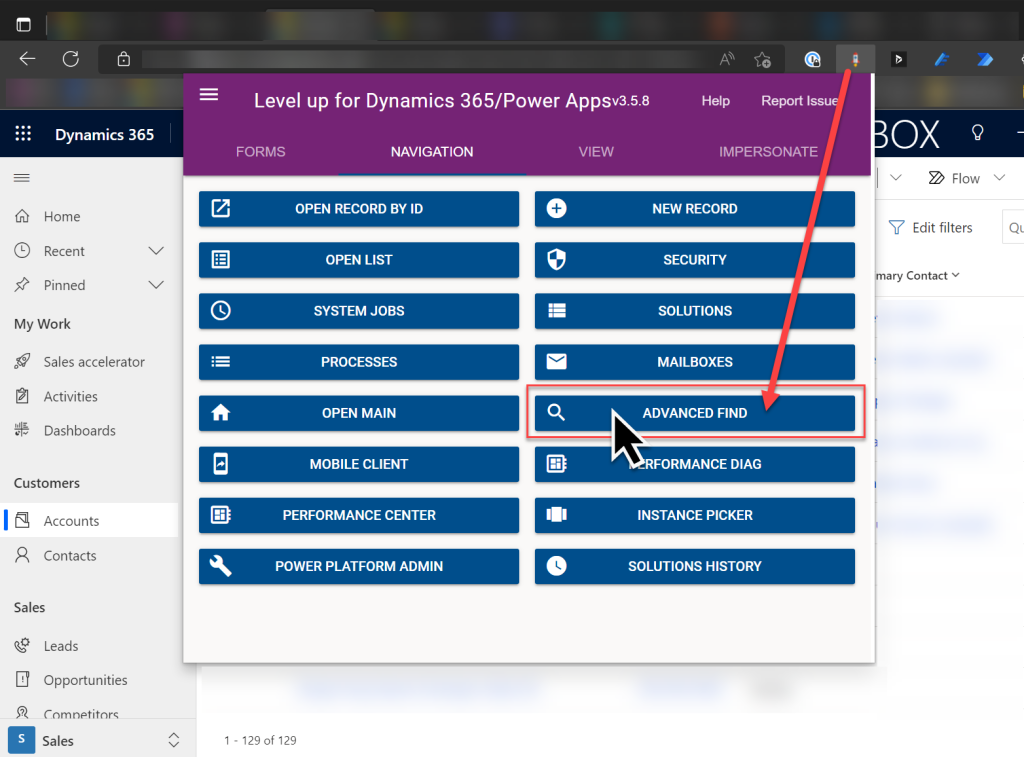
    Update 2022-08-02: As we get closer to 2022 Release Wave 2 when the classic Advanced Find button will be hidden from the UI for everyone (see Modern advanced find turned on by default), you should keep in mind that there is still a way to open the Advance Find page with the direct URL. You can (and should) install the LevelUp extension for Chrome/Edge/Firefox to have access to this dynamic URL. This will hopefully work for as long as Microsoft keeps the legacy web client page infrastructure alive.

  • Don’t Merge Your Forms in CRM 2013

    If you have been using Dynamics CRM before the 2013 version was released, you may have something in your system called “information forms”. This is not a very descriptive term for them, since of course all the entity forms are about presenting “information” to the end user. These forms actually date back to a time in the Dynamics CRM platform history when there was only a single form available per entity. Times have changed quite a lot since then, as entities can now have role based forms, mobile forms, quick create forms and quick view forms.

    Although not a specific form type in itself, CRM 2013 introduced a whole new layout for the default entity forms as a part of the UI refresh. Instead of the traditional & boring two column layout, the new CRM 2013 forms are made up of three columns that can consist of not just entity fields but also related entity subgrids, the social pane, Bing Maps component and other exciting new features. Whereas the old default forms were called “Information”, the names of these new forms follow the entity names. So, the account entity will have a new form labelled “Account”, as an example. (By the way: check this tip for optimizing your form naming convention.)

    Merge Forms Feature

    Since the new forms are designed to make better use of the new navigation paradigm of CRM 2013 as well as present the data in a much richer way than the old “ERP style” forms of past CRM versions, customers who are upgrading their Dynamics CRM deployment to the latest version are advised to migrate into using these new forms. In fact, Microsoft has stated that the next major version (CRM 2015) would no longer support the use of the old “information forms”.

    To make this transition easier, Microsoft has provided a feature called “Merge Forms”. This new button available on the form editor in the CRM customization UI (which still utilizes the old CRM 2011 style layout even in CRM 2015, by the way) is intended to be used for bringing the tabs, sections and fields from your old forms onto the new forms with as little clicks as possible.

    CRM_merge_forms

    The process is described in the article “Update your forms to Microsoft Dynamics CRM 2013 or Microsoft Dynamics CRM Online Fall ’13”. Even more detailed steps can be found from the PDF document “How to Prepare for the CRM Online Fall ’13 Service Update”. Basically what the feature does is bring in the contents of the old form to the end of the currently open form, with the intention of making it faster to rearrange your customized fields and sections to align with the new default form’s content and layout.

    Sounds like a handy feature, right? There’s only one slight problem with it: it doesn’t work.

    Conflicting ID Values

    “What do you mean it doesn’t work? I have used the button to bring in my custom fields and it did just what I expected.” Well, maybe I should rather say that it works partially. If you never export your CRM customizations into a solution file and move it to a different environment, you may not notice that anything is wrong with your forms. However, if you do want to move the customizations between development, test and production organizations, you might run into the below error message during the solution import process.

    CRM_import_solution_error_after_form_merge

    After the error, if you download the log file and open it, you’ll see a message like this:

    Error code 0x8004F658. The label ‘E-mail 2′, id: ’87dc7c9c-94c1-3953-e490-11413b31d0ad’ already exists. Supply unique labelid values.

    What the system is telling us is that we’re trying to insert an item into the customization metadata that has a non-unique ID. Depending on the scenario, the item could be a field or section label. But how did the ID end up being a duplicate? After all, we don’t assign these GUID values in the customization UI, rather the CRM platform generates them. What could have caused the system to violate its own rules?

    The answer can be found from this thread on the MSDN forums: CRM 2013 Solution Import. A Microsoft support engineer has confirmed that the error is caused by a design mistake in the Merge Forms feature. Apparently in the process of merging form content from the old form onto the new one there is more data carried over than is needed. Not only do you get the form components exactly the way they are configured in the original form, but you also get the same ID’s. Now, since the old form also exists in the system, this will cause an error message when you try to import your solution file from the source system to the target environment, like from development to test environment, for example.

    The Workaround

    The system where I ran into this problem was running Dynamics CRM 2013 Service Pack 1 (6.1.0.581) with no Update Rollups (see this earlier blog post for help on understanding the different updates and version numbering). The forum thread above does not indicate that a hotfix for the form merge bug would have been included in one of the released updates so far, so I’m assuming that all CRM 2013 environments are affected by it during the time of writing.

    The suggested workaround in the forum discussion was basically “start all over”, meaning removing the merged content from the form and re-adding the components back there one by one. In the environment I was working on this would have required many hours of work with using the form editor on a number of entities , which I wasn’t too keen on spending there. I had just migrated a copy of the CRM 2011 production organization database onto a CRM 2013 test server and was in the process of testing the upgrade steps before the final go-live, so re-doing the customizations at this stage just sounded like both a schedule challenge as well as a potential source for new issues.

    I extracted the CRM solution zip file and poked around the customization.xml file for a while, trying to think of a way out of this situation. After I realized that trying to edit the XML manually would only land me into a deeper hole, it occurred to me that there was another feature in CRM that performed something similar than the broken Merge Forms: the “Save As” button. Copying entity forms to create new variations was something that I had used many times with no issues, so perhaps I could rely on it here as well?

    I proceeded with creating a copy of each of the entity forms where I had used the Merge Forms feature. Since the new form versions created via “Save As” are able to co-exist with the original forms without causing any conflicts, this must mean that the CRM platform assigns the required new ID’s to the form components. Based on this reasoning, I therefore assumed that once I deleted the original merged form and renamed the new copy (as well as configured the form order and security roles), I would have a clean solution file with unique ID values. After testing the solution import I was extremely glad to see that this was in fact the case, as no more error messages appeared during the import. Saved by the “Save As”!

    Don’t Just Merge – Design

    So, with the above workaround and a potential upcoming hotfix, is there any reason not to use the Merge Forms feature? In my humble opinion, the merge process is not a best practice but rather just a quick’n dirty way of getting the custom fields to appear on the entity forms. If you don’t in practice know how to customize your Dynamics CRM environment but need to cope with the updated UI of the new version, then the merge will technically make it possible to keep using your CRM data. What it will not do is produce a system that your end users will enjoy.

    The merge will bring over a lot of duplicate content (all the default fields) that you may forget to clean away from the new form. It will also create very confusing components for the system administrators, such as the old “What’s New” section vs. the new Social Pane, which require a deeper understanding of the Dynamics CRM platform evolution to really figure out. The biggest risk is that the form content designed for the old version UI will end up living alongside the content that is specifically made for the post CRM 2013 world, creating a disconnected and illogical application that works differently depending on the area where the user navigates to.

    Instead of taking the shortcut and doing a quick content merge, I recommend investing a bit more time and effort in planning what’s the best way to present the data and how to make it as easy as possible for the users to interact with it through the UI. If you need some ideas for improving the user experience of your Microsoft Dynamics CRM environment, take a look at my previous post that listed 10 tips for designing a great user experience in Dynamics CRM.

  • Auto-Numbering with CRM Workflows: Real-Time vs. Asynchronous

    One of the missing features that is often requested for Dynamics CRM is the ability to automatically assign numeric identifiers to records (see the feature suggestion on MS Connect). Sure, we’ve had the Auto-Numering feature for a limited set of default entities (contracts, cases, articles, quotes, orders, invoices, campaigns) since the early days of CRM 3.0, but generating numbers on a standard entity like account or any custom entity has not been possible out of the box.

    As if often the case, workflows offer a way for the creative user to overcome such limitations and enhance the CRM functionality with some custom business logic. The usage of workflows to generate automatic numbers for records has been described in several blog posts, of which I’d like to point out the ones written by Karel Iuel and Leon Tribe. The high level concept of this process is as follows:

    • Create a custom entity to hold the current counter value of the number
    • Link your business entity to this custom counter entity through a N:1 relationship (meaning the single counter record will be the parent for all the intended child business records)
    • Trigger a workflow rule from the business entity record creation that performs the following actions:
      • Links the new business entity record to the existing counter entity record
      • Increments the counter value
      • Assigns this value as the number for the child business entity record

    With the recent enhancements to workflows in the CRM 2013 release I thought I’d take this scenario and use it to compare the different outcomes with the new real-time workflows and a traditional asynchronous workflow process.

    Number assignment with a Real-Time Workflow

    Let’s first see how the aforementioned methods work in a CRM 2013 environment. I’ve created a new custom entity called Record Number Counter and added a 1:N relationship to the account entity, with the intention of assigning an automatic number to any new account record that gets added into the CRM database. To actually make this happen, we need to have a workflow process in place that performs the three steps outlined above. Note that the box for “run this workflow in the background (recommended)” is unchecked, meaning this will be a synchronous, real-time workflow process that starts immediately after the specified event, which in this case is “record is created”.

    CRM_2013_auto_numbering_real-time_workflow

    Let’s do some account data importing next to test the results of this workflow. I’ve created an Account Number record of the Record Number Counter entity with its Number value set to 100 500, which means the next account record to get created should be numbered 100 501. With a set of 500 test records to import in my csv file, I’m expecting the counter to hit 101 000 by the time the job is done.

    So, off we go with the import job and then we start to anxiously click on the Refresh icon on the account entity view to see which values get assigned in the Account Number column.

    CRM_2013_auto_numbering_test_1

    Looks like everything is as we wanted it to be! All the 500 account records have been assigned a unique number and the counter value is incremented by one after each assignment. Sure, we’re getting the local number formatting setting from our integer field applied into the target text field on the account (in my case it’s the empty space as the thousands separator), but that’s not a huge issue for our home grown auto-numbering solution. The concept itself appears to be working, which is the main outcome we were after.

    Why this won’t work in CRM 2011

    If you’ve been reading any discussions on the workflow driven method of auto-numbering, you may have come across issues with the numbers not always being unique. If you create a single record, then wait for the workflow process to complete and check the results before the next record, everything will most likely look ok. But when there’s a bigger volume of database inserts taking place in a bulk operation, the results may not be as expected. (more…)

  • Connecting to CRM Online OData feed with Excel 2013 Power Query

    The latest version of Excel contains a Get External Data menu option for linking the workbook to an OData data feed. Knowing that Dynamics CRM 2011 and 2013 both provide an OData endpoint, this would seem like a great option for retrieving data from a CRM Online based system for reporting purposes, since direct database connections aren’t available in the cloud. Unfortunately, if you try to enter the CRM Online OData URL as a feed link, you’ll get this error message:

    CRM_OData_feed_Excel_error

    “We can’t use the data from this feed.” Bummer. The reason behind the error messages is that Excel and PowerPivot have not been able to support the authentication mechanism required for accessing the CRM Online OData feed. There is a workaround that you could apply if you’ve got the CRM Outlook client installed on the same machine, as described in this video by Ed Martinez, but in general using PowerPivot for CRM Online reporting has been quite restricted.

    Power BI December 2013 Update

    Last summer Microsoft announced the preview program for Power BI, their cloud based business intelligence suite, containing tools for publishing reports in Office 365. The Power BI umbrella also covers client side components, including Power Pivot (now spelled as two separate words apparently) and Power Query, that bring new capabilities to Excel. To get an understanding of the features included or under development, I encourage you to watch this Power BI demo from WPC 2013, which definitely deserves the Coolest Tech Demo of 2013 trophy if you ask me.

    PowerBI

    The latest December 2013 Update for Power BI announcement mentions the following enhancements:

    “Power Query can now connect to more data sources:

    • Sybase IQ
    • Exchange
    • Dynamics CRM Online

    Hey, that last part sounds great! So, what does it mean in practice for us CRM people? Well, the Power BI Preview subscription still doesn’t provide the option to provision a CRM Online instance for the same Office 365 instance, so there’s not that much new things visible on the cloud side yet if you spin up a preview org. On the client side, however, there is now an updated version of Power Query Preview for Excel 2013 that gives us the possibility to finally connect to a CRM Online OData feed directly. Let’s explore that in more detail. (more…)

  • Your Essential Toolkit for Microsoft Dynamics CRM

    You can do a lot with the configuration and customization toolkit that Microsoft Dynamics CRM offers. With the SDK and some lines of custom code, you can do almost anything. There in between lies the territory where the Dynamics CRM community is helping its members manage some of the commonly required tasks without the need for .NET developer resources. This is done through a wealth of wonderful, free tools that make it easier for anyone working with Dynamics CRM to access the power of the platform without getting their hands dirty in tweaking XML files or learning the right SDK calls.

    Many of the tools listed here are a permanent fixture I take along with me to any consulting gig, while some are new entrants to the list. If you’ve been actively reading up the posts on various popular CRM blogs, you may well recognize most of them. However, while I personally spend far too much time on social media channels, I realize that not everyone in the industry has the luxury for such a lifestyle and may have therefore missed out on some tools that could have saved them hours worth of work. Therefore, I decided to compile a “Best Of” post to highlight the 10 tools no CRM consultant should be without. (For anyone wanting to stay on top of the latest tools and solutions I come across, you can either subscribe to my Dynamics CRM Links RSS feed or follow the Surviving CRM page on Google+.)

    CRM 2011 User Settings Utility

    Download from CodePlex.

    When setting up new user accounts in your Dynamics CRM organization, wouldn’t it be nice if the system administrator could set their personal settings to match the policies of the organization as well as the likely preferences of the user in question? Things like Time Zone, Records per Page, Advanced Find mode, default home page etc. can be easily configured for users in bulk with the CRM 2011 User Settings Utility by Amreek Singh.

    CRM2011_User_Settings_Utility

    One particular pet peeve of mine related to the default configuration of Dynamics CRM is that new contact records are automatically created from tracked email sender or recipient addresses not found in the database. Well, with this tool you can stop the users from unintentionally populating your database with partially filled contact records not associated to their proper parent accounts by simply configuring the setting to “No” for all users. Beats having to send everyone instructions by email on how to check their CRM profile settings, doesn’t it?

    Universal Settings

    Download from Sonoma Partners website.

    It’s not only the user settings that may require you to pop the hood open on your CRM instance. There is a number of Organization Settings as well as Deployment Settings that can be used to either overcome limitations or alter the default behavior of Dynamics CRM. For example, if you’d like to be able to export all of your contacts records from CRM to Excel and not just the first 10,000 then you’ll be happy to know that changing the MaxRecordsForExportToExcel parameter is a breeze with Universal Settings, no matter if you have an on-premises or CRM Online environment.

    UniversalSettings

    Another handy limit you can adjust with the tool is AggregateQueryRecordLimit, which will allow your charts to summarize more than 50,000 records at a time, instead of seeing “the maximum record limit is exceeded” errors. Also very handy if you wish to work with more than 50,000 marketing list members in your campaign target group. Unfortunately this tweak is not available for CRM Online, though, as the setting resides in the deployment table rather than the organization table, which is the only one you can update in the cloud.

    XrmToolbox

    Download from CodePlex.

    We’re now stepping into the world of “Mr. CRM Tools” himself, a.k.a. Tanguy Touzard. His awesome Toolbox for Dynamics CRM 2011 is a collection of the various tools developed over the years to help make Dynamics CRM administration and customization more efficient and enjoyable. By downloading the Toolbox you’ll get a number of great tools, but just to ensure you understand why you need them, let me give a quick intro to my favorite ones.

    Sitemap editor

    Adjusting the CRM main page navigation (a.k.a. sitemap) is something that you should always perform after you’ve determined what are the entities your different user groups (sales, marketing, etc.) will need to access and what is the logical arrangement of them in the navigation. Trust me, the right answer is not “the order in which the entities were created” nor “alphabetical”. There’s a number of free sitemap editor tools out there, but since XrmToolbox is such a powerhouse, it makes a lot of sense to use the the same tool that you’ll be using for other tasks in the same organization, as you’ll only need to configure the connection parameters once.

    Sitemap_editor

    Re-arrange, add, hide, group, rename, do basically whatever you want with the CRM menus with this editor without ever seeing a trace of the solution XML file contents.

    Easy Translator

    Easy_translatorThe latest addition to XrmToolbox is something every CRM admin from a non-English speaking country can surely appreciate. Since most of us still prefer to use the English base language setting in Dynamics CRM due to the awkward terminology of our native language translations in the customization UI (and any potential technical compatibility quirks that come with it), working with the “export/import labels for translation” process is all too familiar to us. Hunting down those strings in the unstructured output file isn’t very pleasant, which is where Easy Translator comes in handy. You’ll get a nicely arranged Excel with just the types of labels you’ve selected for export, which reduces the amount of trial & error in translating fields, values and form labels to the language of your choice. (more…)

  • How to Import Primary Contacts

    The Import Wizard in Dynamics CRM can do a lot more than what may initially seem possible. I’ve covered some of these features in a previous article called CRM 2011 Data Import Wizard in Practice. Among these capabilities is the possibility of importing records to different entities that have multiple relationships connecting them in both directions, not just the simple parent-child relationship pointing from one entity to the other.

    A typical example of such a relationship would be the Primary Contact of an account. The account is a parental record to all the child contacts, but one of these contacts may however have a 1:N relationship back to the account and be presented in the Primary Contact lookup field on an account form. If you are importing both the account and contact columns in a single file (such as an Outlook contacts export) then mapping these relationships should only be a matter of mapping the right fields. If you have two separate files, then simply zipping them up into a single file will allow you to map both entities in the same import process.

    Primary_contacts_account_formOne of the problems that you may encounter during such an import process is that there are multiple matching records for the mapping fields. If you have more than one account record called “Litware, Inc”, to for example represent different regional offices of the company, mapping the primary contact by account name won’t work. Similar problems will arise if several people have the same first and last names. Therefore it’s a good practice to always generate a unique ID for each record before importing it. You can construct the identifier field in Excel with the Concatenate function and combine several fields into a single Import ID string (account name + address 1 city, for example) which you then map into a temporary field in CRM. You can use this field as the lookup reference to the related entity instead of the standard primary field when importing data.

    Appending Existing Records

    In a recent import task I was once again faced with the Primary Contact issue. Only this time the account data that I needed to map the contacts into was already in the CRM database. As these were new contact records being imported, my first thought was to create a workflow rule to be triggered from the create event of a contact record. Using some temporary contact field to store the primary contact flag into, like “governmentid = PrimaryContact”, and then searching for this value in the workflow rule would have allowed me to start a record update step for the parent account of the newly imported contact. In the update step I could just state that the account’s primary contact would be the contact that the workflow process instance has been initiated on.

    Fortunately I looked through the source data once again before proceeding any further, as that revealed a flaw in the assumptions behind the above workflow rule logic. A single contact was sometimes the primary contact for more than one account. Also, there were occurrences where the contact wasn’t the primary contact of its own parent account. The relationships were therefore more complex than what a single workflow rule could cover.

    This doesn’t mean that leveraging workflows was out of the question, though. To enable the creation of multiple relationships from a single imported contact record I just needed to have an intermediate stage in my process, to store the data in CRM. What this requires in practice is that you first import the data into a different entity, then trigger the update step from that record into the actual record you want to append with new information.

    One option would have been to create a new temporary entity just for the sake of getting the data imported correctly. However, since these were account and contact records for which we wanted to link the imported data, there was already a logical place available in the default data model of Dynamics CRM: connections. It’s in fact the perfect entity for importing any relationship data into, as the two parties of the connection can be references to any entity type that has connections enabled for it, meaning several default entities and any custom entity you’ve created. Therefore we could cover several different import scenarios with connections and not have to go into system customizations to add relationships to other entities.

    The Import Process

    First I had to add a new connection role for “Primary Contact” (step 1) to identify the connection records that I want to run my workflow process on. As this role will be used exclusively between account and contact records, I specified them as the available record types for the role (step 2). Also, I always tend to put the same role value on the “other side” of the relationship to keep the data consistent and simple to view/search for, so I set this new role to be its own matching connection role (step 3).

    Primary_contacts_connection_role

    Then I proceeded to creating a new workflow process that would be triggered on the create event of a new connection record. In the workflow rule I specified it to run only on connections that have the Primary Contact connection role. I also wanted to validate that the Connected From and Connected To entities are mapped the right way around in the connection record, so I simply check that the account and contact records behind each relationship contain data. Without these conditions being met, the update step wouldn’t produce any meaningful results anyway.

    Primary_contacts_workflow_rule

    In the update step I mapped the Connected To contact record into the Primary Contact field of the Connected From account record.

    Primary_contacts_workflow_update

    Now we were ready to start the actual import work. Since the primary contact relationship data was handled with a separate entity, I first imported the contact records through the normal process. (more…)

  • No-code Customizations with North52 Formula Manager, Part 3: Case Resolutions

    In the previous articles (part 1 and part 2) we’ve explored how the North52 Formula Manager can be utilized in automating steps related to the sales process. This time we’ll be looking at a scenario related to service management, in an effort to make it easier to share knowledge and report on the resolutions of cases recorded in the Microsoft Dynamics CRM database.

    Cases vs. Case Resolutions

    Case_resolve_cancelIn theory it should be pretty straightforward how you work with a case record: they are support tickets that are initially open (active) when you create them and eventually they end up getting closed as either resolved (service was provided) or cancelled (duplicate ticket, customer never replied etc.).

    The point where complexity raises its ugly head is how the resolution process works: instead of entering the case resolution details onto the case record itself, the user is presented with a window that creates a Case Resolution activity underneath the parent case. While this is a perfectly valid design in terms of the nature of the interactions, as there could be situations where the case gets re-opened and resolved again (thus being a 1:N relationship with the case), it does make it more complicated to work with the resolution data later on.

    Resolve_case_dialog

    For example, say you’d want to study the resolved cases by using a view of the case records. In that view you can see the case subject, owner, status and other standard fields, but there’s no information visible on what the actual resolution to the case was. “Ok, so I’ll need to customize the view and show columns from a related record. That’s not too difficult, now is it?” Unfortunately that’s not going to work, because the information we’re interested in resides on the N side of the relationship. Since there can be several case resolutions for a single case, no columns from this entity can be displayed in a case view. So, we can’t construct a nice Q&A list that the service reps could leverage in scanning for similar cases on a new question from a customer. We can only see the problem, not the resolution.

    Resolved_cases_view

    You could build a view of case resolutions, the child entity in this relationship, but that’s not very convenient either. Although case resolution is an entity of its own, it’s not actually available in Advanced Find to directly build queries on. It is possible to access a list of case resolutions by crafting a view of activities with that specific type, but you’ll still be limited to only the generic activity fields. As an example, the field Billable Time (Time Spent) cannot be accessed in a view, which makes it rather difficult to report on this data entered as a part of the service process.

    Activities_Advanced_Find_case_resolution

    Using a Formula to Replicate the Case Resolution Fields on the Case Form

    Luckily Dynamics CRM is a flexible platform that allows you to develop new business logic to fulfill the requirements for your service process. In this situation, if we could simply have the Resolve Case dialog fields copied over to the parent case, this would solve the aforementioned problems. So, how to proceed then?

    If we want to alter the default behavior or the service entities, we should first have a look at the workflow process capabilities of Dynamics CRM to see if can  configure a workflow rule that is triggered when the case resolution is created. This time we won’t get very far with that idea, though, as neither the case resolution nor the activity entity can be used as a workflow trigger. Fair enough, we’ll then need to come up with a lower level solution to meet this requirement. Assuming we have access to a .NET developer who knows the Dynamics CRM SDK, creating a custom plug-in to copy the fields to the case record would be a worthy option to consider. Since the title of this post promised “no-code customizations”, let’s instead look at how we could achieve the same functionality with the Formula Manager.

    First we need a place to host the case resolution data of course, so let’s add three custom fields on the case entity: Resolution (text field), Resolution Description (multiple lines) and Time Spent (whole number with duration format). On the case form they can be put into a section of their own and set as disabled, since the user shouldn’t directly update them.  Then we’ll create the three formulas that will populate these fields with corresponding values from the case resolution entity.

    Case_custom_fields

    We’ll be using a formula of the type “Save – To Parent” and attach it to the create event of the case resolution entity. As our target (parent) entity we can select case, but notice that you’ll actually need to specify the relationship field value first before you’re able switch the value in the target entity field. Let’s take the Resolution Description field we just created as the target property. The formula itself in this case will be very simple, since all we need is a value directly from the source entity. We can use the source entity tree visible in the bottom left corner of the screen to browse through the available fields or just type in directly the value [incidentresolution.description].

    Formula_case_description

    The other two fields will get an identical treatment, which means we can click on the Clone Formula button on the ribbon and create two copies of the original formula. Just update the target property field and select a new source field value into the formula description window accordingly. After we’re done, we can publish the formulas and try them out by resolving an existing case.

    Resolve_case_formula_1

    After we’ve entered the details into the Resolve Case dialog fields and clicked OK, our formula will update the underlying case form in real time to reflect the same values presented directly on the resolved case record. Unlike asynchronous workflow processes, the formulas can perform their tasks right in front of the user, which makes the user experience more consistent.

    Resolve_case_formula_2

    Making Use of the Resolution Data

    Now that the fields are available on the case entity, we still need to ensure that the user actually has access to them through all the necessary routes. First we should of course include them into the Resolved Cases view we talked about earlier.

    Resolved_cases_view_updated

    Seeing the resolution field contents directly in the view is a great improvement, but an even more important feature is to enable the users to search for this information. You see, one of the peculiar default settings of Dynamics CRM is that the Quick Find view for case entities only covers active (open) cases. (more…)

  • No-code Customizations with North52 Formula Manager, Part 2: Line Items

    In a previous post I wrote about how the North52 Formula Manager solution can help you build some common customizations that would otherwise require writing Javascript for Dynamics CRM entity forms. The scenarios included:

    • Setting default values for lookup fields
    • Dynamically changing the field requirement level
    • Displaying popup warnings
    • Launching dialog process windows

    This time I will show a few examples of the Formula Manager capabilities that would typically fall into the domain of writing C# plugin code to enhance the business logic of Dynamics CRM. Being a functional CRM consultant that doesn’t normally deliver a single line of code (at least for production environments), these scenarios would traditionally require me to hand over the task to a CRM developer. What we’re about to see is an alternative method of creating just formulas with the graphical tools available in the solution package to get the same job done.

    Updating Opportunity, Quote, Order or Invoice Products

    In Microsoft Dynamics CRM 2011 you can trigger workflow processes on the line items of Opportunities, Quotes, Orders or Invoices. This allows you to execute custom logic when, for example, new Quote Product rows are added for a Quote record. Unfortunately what you cannot do with standard workflows is to actually update the line item record itself.

    Workflow_update_quote_product

    Well, this surely looks like a dead-end for most of the use cases you could think of for triggering the workflow process in the first place. If I wanted to, for example, pull information from the selected Product record and save it on the Quote Product’s fields, such as product description, vendor details or a line item number to sort the quote rows, this apparently cannot be achieved with CRM’s workflow functionality.

    Let’s look at how we can solve the problem with Formula Manager instead. In our scenario we would like the description field of the Quote Product record to be updated with the description field contents of the selected Product record. What we therefore need is a “Save – To Current Record” type of formula that is triggered on the Create & Update events of the Quote Product entity. We can limit the update events only to the Existing Product field by setting the Source Property value. The Target Property of our formula should be the Description field.

    Finally, we need the actual formula that will feed the values from the related Product record into the Quote Product’s description field. To retrieve the description field contents we’ll use the FindValue function and tell it to search for a Product record that has the same productid as the existing product selected on the Quote Product record. While we’re at it, let’s also ensure that the Quote Product actually has an existing product instead of a write-in product by verifying the productid field contents with the ContainsData function. The end result will look like this:

    if(ContainsData([quotedetail.productid]), FindValue(‘product’, ‘productid’, [quotedetail.productid], ‘description’),’NoOp’)

    FormulaManager_update_quote_product_description

    Now when we navigate onto a Quote and add a new Quote Product record underneath it, the description field will inherit the value from the related Product and display it directly on the Quote Product form (assuming you’ve made this default field visible on the form in the first place).

    Quote_product_description

    Not that much more complicated than building a workflow rule, just as long as you familiarize yourself with how the formulas work and how to format the parameters required by the functions.

    Creating Line Items

    Let’s proceed with exploring the world of line item records in the sales process. Updating existing records automatically is a nice capability to have for sure, but what about automating the complete process of creating the line items for an Opportunity, Quote, Order or Invoice? For example, if we wanted to ensure that there is always a standard Delivery Fee or other persistent item included whenever we’re creating an Order of a specific type (or for a specific customer group), then this is another area where the out-of-the-box functionality of Dynamics CRM workflows can’t be used, since new Order Product records cannot be created through a workflow rule.

    With Formula Manager we have no such limitations in place, rather we are free to create any type of records we want with the CreateRecord function. The example formula below was actually provided to me by North52’s John Grace to demonstrate the solution’s functionality. The Save – Perform Action formula is attached to the Create event of an Order record, which in turn triggers the creation of a new Order Product record. The contents of this auto-created line item can be defined either directly in the formula or alternatively queried with the FindValue function familiar to us from the previous example.

    CreateRecord(‘salesorderdetail’,
    1,
    ‘salesorderid.salesorder.’ + [salesorder.salesorderid],
    ‘productid.product.’ + FindValue(‘product’, ‘name’, ‘Bike’, ‘productid’),
    ‘uomid.uom.’ + FindValue(‘uom’, ‘name’, ‘Primary Unit’, ‘uomid’),
    ‘quantity.10’
    )

    FormulaManager_create_order_product

    Now, as a limited time special offer, any new Order that we create (or a Quote that we convert) will get 10 Bike products added onto it with their unit price dynamically retrieved from the Price List selected on the Order. What a sweet deal!

    Order_Products

    Cloning Records

    For a Dynamics CRM administrator these type of automated steps can be really handy in enforcing business rules and ensuring correct entry of data onto sales records. If we’d show them to your typical salesman, though, he might not be so impressed with this type of detailed process automation functionality.

    “Sure, it looks like we could save a few clicks with these formulas. But here’s the deal: many of the quotations I make are practically identical. They contain the same line items every time, with only some variations in quantity and discounts given. What I’d really want to do is simply select a quote I’ve created for another customer and create a copy of it. You know, the “Save As” button that’s found in all the other Office applications. Why couldn’t CRM also have that? It would be a huge time saver for me.”

    Ever had this kind of a discussion with your CRM users? If you have, then you’ll surely appreciate the fact that Formula Manager provides a Clone function that allows you to create a new copy of any existing record. Not only that, but the function also clones all the related 1:N & N:N records, which means you can create a copy of both the Quote and Quote Product line items with a single function!

    To get an understanding of how the function could be leveraged in delivering the “Save As” functionality your sales users have been asking for so long, watch this video that demonstrates not only the formula in action but also how you can use the Ribbon Workbench to build a custom Clone button for the required entities.

    Clone_Quote

    Think these type of features would be useful to have in your Dynamics CRM organization? Then go ahead and grab the fully functional Standard Edition of Formula Manager that allows you to have 10 active formulas at a time, for test or production use.

  • Dynamics CRM Data Visualization with Excel 2013 GeoFlow

    Excel_2013There are some great new features available in Excel 2013 that can take your Dynamics CRM data visualization onto a whole new level without the need to invest in new server infrastructure or build traditional OLAP cubes on your SQL Server. With the recent announcement of the GeoFlow Preview for Excel 2013, I decided to see what I could make of this tool when combined with some data pulled from CRM.

    Working with Cloud Data

    Although the feature parity of CRM Online and Dynamics CRM on-premises is on quite a high level these days in terms of the application platform capabilities, one unfortunate limitation has been that you can’t easily tap into the CRM Online data with analytical applications like Excel PowerPivot. Naturally the direct SQL database table connection is unavailable, but also the OData feeds that would be such a neat way for performing some pivot magic have been off limits, as PowerPivot doesn’t support the claims based authentication of CRM Online. Oh, and as far as I know, this also applies to an IFD configured on-premises server  (if anyone knows how to connect to the OData feed with AD authentication while using an IFD CRM, do leave a comment below).

    With the new capabilities of Excel 2013, there is now a workaround available that allows you to access OData feeds from CRM that require Windows Live ID / Microsoft Account / Office 365 authentication. You’ll also need the CRM Outlook client on your workstation to facilitate the initial connection, although with another workaround for the sign-in prompt on the Excel sheet you might be able to do without one.

    Here’s a great video from former Dynamics CRM Team member Ed Martinez that walks you through the steps needed in order to connect your Excel 2013 (note: Excel 2010 is not supported AFAIK) to a Dynamics CRM Online OData feed:

    (For all the Finnish speaking CRM folks out there, you can also check out this video clip by Sulava’s Markku Suominen.)

    As a summary, what you need to do is:

    • Copy the OData feed address from the developer resources menu of your CRM
    • Export any set of data from CRM to a dynamic Excel sheet
    • Open the file and refresh the data (thus establishing the authenticated connection), the save it in .xlsx format
    • Add a new data source by clicking on “Get External Data, From OData Data Feed”
    • Paste in the address you previously copied from CRM

    That’s it. Now you can connect an Excel sheet to a CRM Online (or IFD) data source through OData and refresh the content to reflect the live data as your CRM source system gets updated.

    Power View in Action

    For my own lil’ “Big Data” scenario I decided to point my OData enabled Excel 2013 towards a Dynamics CRM instance where ClickDimensions is storing the website visitor data from this blog (sorry, you’re being tracked, but it’s all for a noble cause, trust me). I proceeded by following the instructions above, adding a new OData data source into a dynamic Excel sheet, selecting the entities (“sets”) that I wanted to use in my analysis. Then I waited… and waited… and waited some more.

    OData_data_feed_connection_wizard_CRM

    A word of warning: OData data feeds can be slow. It’s nothing like using a direct database connection, and not even the type of performance you get with a dynamic Excel in an IFD environment that uses an Excel Web Query to “screen scrape” the data over http. My data set was retrieving around 100,000 records and I saw the counter ticking on the bottom right corner of the Excel sheet at a rate of roughly 200 rows per second, which translates into some 10 minutes of waiting before the download from CRM is complete. Oh well, it’s not like we’re in a rush to create a real life report for the boss who wants to have it in his inbox within 15 minutes. Let’s be grateful that we can at least retrieve more rows in one go than the default MaxRecordsForExportToExcel setting for this CRM organization would otherwise allow (which is 10,000). (more…)

  • No-code Customizations with North52 Formula Manager

    North52North52 Formula Manager is a very interesting solution that promises to simplify the process of customizing and extending Dynamics CRM by offering a graphical toolkit to implement custom business logic that would otherwise require developing plug-ins in C# or adding Javascripts on the forms. Instead of writing custom code, the business logic can be configured through the N52 entities inside CRM, with the help of a Silverlight based editor to write formulas that check conditions, perform validations, update fields etc.

    In this article I’ll show you a few simple examples of how a person with no coding skills can perform some customizations that go beyond the GUI tools that Dynamics CRM offers. I’ll use the opportunity entity to add some client side actions to make the sales process a more guided experience for the end user. You can grab the free Standard edition of Formula Manager and use it’s 10 available formulas to try out these examples in your own CRM environment, or watch some of the training videos from North52 that cover several other scenarios.

    Default values

    The sales records in Dynamics CRM contain a few fields that sometimes don’t deliver any added value to the user, but they still need to be filled for each record. One common example is the usage of the price list. If your organization only has a single valid price list at any given time, the CRM users would surely appreciate it if the system could automatically populate the lookup field with the default price list when creating a new opportunity.

    Opportunity_default_price_list

    This is a very simple formula where all we basically need to do is populate a lookup field with a static value. To get the GUID of the price list, open it’s form in a new IE window by pressing Ctrl+N and find the string like “3F2504E0-4F89-11D3-9A0C-0305E82C3301” from it. Then create a new N52 Formula record and define the formula type as Save – To Current Record. We’ll set the mode as Client Side Classic and set it to run on the Create event, as we want the price list field to be populated with the default value only once – when the user creates a new opportunity record. The source and target entities should both be set to opportunity, as we’re updating the current record. The source property in this case is the event that triggers the formula, so let’s select OnLoad to fill the field immediately when the form is opened. Finally, the target property should be the field that will be updated with the results of the formula, in this case Price List.

    Different field types on the CRM form require different kinds of update procedures. Since we’re dealing with a lookup field and populating it as a client side event, let’s pick the SetClientSideLookup function from the N52 Formula menu and give it the required parameters of the entity name, record GUID and record display name:

    SetClientSideLookup(‘pricelevel’, ‘5EF541AA-67B6-E211-93F7-08002719F2F4’, ‘Default List’)

    FormulaManager_opportunity_default_pricelist

    Now we’ll just need to publish the formula and go test it out by creating a new opportunity record and verifying that the price list gets set to the record we wanted. In case you get an error prompt from N52 Formula Manager while opening the form, please revisit the formula record and verify that you’ve selected the correct options.

    Required fields

    Changing the requirement level of a field based on another field on the form is another common requirement. Let’s assume we have a simple sales process with three stages (picked up from the default CRM sample opportunity data): 1) Prospect, 2) Qualify, 3) Closing. We’ll use the Status Reason field’s (customized) values to drive the process and we want to enforce the following business rules:

    • If stage = 2) Qualify then make Estimated Close Date field required
    • If stage = 3) Closing then make Estimated Close Date and Estimated Revenue fields required

    In the UI the user would see the requirement level change dynamically when he or she changes the Status Reason field value and clicks elsewhere or tabs out of it.

    Opportunity_required_fields

    To achieve this feature with Formula Manager, we would build a formula that references the statuscode ID values and the schema names of the fields we want to set as required. Something like the following if-statements:

    if(([opportunity.statuscode]=’2′), SetRequiredFields(‘estimatedvalue’), if(([opportunity.statuscode]=’3′), SetRequiredFields(‘estimatedvalue’, ‘estimatedclosedate’), SetNotRequiredFields(‘estimatedvalue’, ‘estimatedclosedate’)))

    Basically what we do in the formula is first check for the stage 2, then stage 3 and finally use a default action for stage 1 to return the fields into not required status (so we also support moving backward in the stages). We’ll set the formula to run on the opportunity entity as a Client Side – Perform Action formula, tied to the source property of the Status Reason field, which effectively means it’s triggered with the OnChange event of that field as the user manipulates the form values. (more…)