Tag: workflow

  • Microsoft Flow and Dynamics 365 – My Slides from CRM Saturday Oslo

    Microsoft Flow and Dynamics 365 – My Slides from CRM Saturday Oslo

    Watch out: the Citizen Developers are coming! They are armed with easy to approach GUI tools like Flow, PowerApps and PowerBI, and they aren’t afraid to connect to any of the 160+ cloud apps that you may or may not know your organization is using to solve everyday business problems that the traditional IT projects have failed to serve.

    This is the common story you hear when Microsoft talks about this new generation Business Platform and how it powers the hottest of the hot buzzwords: digital transformation. While it certainly represents a big shift in the capability to deliver new business apps, there is at least an equally significant impact these tools can have to the more centralized efforts of building organization wide solutions for managing business processes and data – meaning CRM system deployment and development. With this in mind, I set out to explore the current state of Microsoft Flow in regards to how it can be used together with Dynamics 365 Customer Engagement. The results of this study and some of my personal thoughts on how Flow changes the way we deliver CRM projects can be found in the following presentation:

    In these slides you’ll find information about topics such as:

    • How does Flow relate to other MS technologies like Common Data Service (CDS)
    • What traditional CRM process automation scenarios could Flow be leveraged in
    • Is the new Dynamics 365 V9 capability of embedded Flows the replacement to now deprecated Dialogs
    • Why Dynamics workflows are still easier to work with than Flows
    • What licensing and administration considerations do you need to keep in mind with Flow
    • Microsoft Flow vs. Azure Logic Apps, what should you use where

    The actual presentation took place last weekend in Oslo, Norway, where I was invited to speak at the CRM Saturday event. It was the first such event that I had the opportunity to participate in and found it to an awesome experience! I had a great time meeting both the local Dynamics 365 community members as well as spending time with the very knowledgeable speakers and fellow MVPs. A big thanks to Microsoft Norway for graciously hosting us and to the community hero Marius Agur Pedersen for making the event possible in the first place!

    If you aren’t yet familiar with the CRM Saturday concept, I suggest you go check it out and keep an eye for future events where Dynamics 365 community members can get together and exchange ideas on how to make the world a better place for CRM professionals and customers alike. Do also keep an eye on the #CRMSaturday hashtag on Twitter for the latest buzz around the events and information shared from the presentations. At least Mohamed Mostafa and Jonas Rapp have also made their sessions’ slide decks available and I’m sure there’s plenty of other blog posts out there that have been inspired by these events.

  • Tracking Pipeline Development Over Time in CRM 2015

    Tracking Pipeline Development Over Time in CRM 2015

    We’ve come to part 3/3 in the Smarter Sales Process article trilogy. In the earlier posts we talked about customizing the lead qualification process and using calculated fields for opportunity estimated revenue, to get more out of Dynamics CRM 2015 than what the standard sales related functionality offers. To close things off, let’s have a look at how we can gain more insight into the data in our sales opportunity pipeline and particularly how it has developed over a period of time.

    Capture the Sales Pipeline Trend

    With the data that Dynamics CRM collects about sales opportunities we can easily draw charts about how many deals were won or lost at any given time, presenting these as a monthly trend of both estimated and actual revenue. It’s also very simple to visualize the current contents of our sales pipeline by looking at the open opportunity records via standard visualizations like the… well, pipeline chart, obviously!

    What we can’t do quite so easily is to present how the sales pipeline has developed over time. For example, has the number of opportunities in a particular stage of the sales process gone up/down, or how the total estimated revenue from open opportunities is developing. An average CRM user may not understand why such a visualization wouldn’t be included in the application by default, but for a system customizer that knows the data model and behavior of Dynamics CRM this should be fairly obvious. The fundamental difference between closed opportunities and open opportunities is that for the former we have a permanent record of when they were closed and with what values, whereas the records that are currently in an open status represent transient data. It will change over time, based on the future actions that CRM users will take.

    So, what’s the problem with such data? The fact that an open opportunity may have been open last week or even ten weeks ago makes it impossible for us to draw a chart that would show a weekly number of records, since only a single record exists in the database, even though it might need to appear in the bar for each week in a chart showing the size of the pipeline on a weekly level. While technically we would have the information needed to project the number of opportunities that have been open at a given time by looking at their creation date, this would be a more complex exercise than what the ASP.NET charts in Dynamics CRM allow us to draw (although I wouldn’t be surprised if CRM Chart Guy would prove me wrong on this one).

    At the end of the day CRM is an operational system focused on managing individual records and transactions, which means it doesn’t bother archiving copies of records in their historical state. Sure, we have the audit log that will keep a record of the individual changes to tracked fields, but that’s data which isn’t accessible for reporting. But the question to ask is: if we wanted to capture such historical data for our analysis purposes, could we do that with Dynamics CRM? Sure we could! In fact, already back in 2008 when CRM didn’t yet have a built-in auditing capability, CRM MVP Guy Riddle showed us how the use of custom entities and workflows allowed us to build our very own audit log feature to capture changes for record field values.

    CRM_opportunity_count_by_week_and_stage

    Sure, our use case here is a bit different, since we’re not looking to only capture entries on when a record changes. To provide us visibility into how the sales pipeline has developed over time, we would need to capture a snapshot of the pipeline status at predetermined intervals.

    Scheduling Snapshots of CRM Data

    One of my favorite features in CRM 2015 version is Rollup Fields, which I’ve already covered in a number of earlier posts on this blog (including the gotchas you need to be aware of). This feature also comes in handy if we want to build a custom snapshot entity to store the count or sum of records related to it. In this scenario for monitoring sales pipeline development, which I presented in my MSDynamicsWorld.com webcast “A Non-Developer’s Guide to Smarter Sales Processes in Microsoft Dynamics CRM 2015”, what we’ll do is make a 1:N relationship between our custom Snapshot entity and the opportunity entity. This in turn will allow us to create Rollup Fields that will summarize the count and revenue of the related opportunities onto the Snapshot record. By having a snapshot per each stage of our sales process, we will get the attributes needed for drawing the kind of chart shown above, to visualize the trend of opportunity count and estimated revenue development per week.

    The detailed steps for the required customizations can be found from the following SlideShare presentation:

    The one missing ingredient that we still need to think about is how to automate the capture of these snapshots. What Dynamics CRM still doesn’t offer out-of-the-box is the ability to schedule recurring workflow processes in an easy way, to perform an automated task every X days. Luckily there are workarounds for scheduling such bulk data processing tasks with using nothing but the CRM platform, and one of the best solution’s I’ve come across is the Scheduling recurring Dynamics CRM workflows with FetchXML solution from Lucas Alexander. I’ve already shown you how to use this solution for monitoring Rollup Field Values with workflows and the same logic can be applied in this scenario, too. Only this time we don’t send a weekly email blast to CRM users, rather we’ll just create new snapshot records to store the opportunity count and total estimated revenue per sales stage.

    CRM_scheduled_process_opportunity_snapshot

    Alright, that concludes my Smarter Sales Process for CRM 2015 series, at least for now. As mentioned at the start, do check out part 1 and part 2, as well as the YouTube recording of the live demos if you’re interested for more details on the topic. Hopefully these examples have given you some new ideas on what kind of solutions you can build with the Dynamics CRM 2015 customization tools. If you’ve got any thoughts on what kind of no-code customization scenarios you’d be interested in seeing in the Surviving CRM blog in the future, please feel free to leave a comment!

  • Customizing Lead Qualification Process in CRM 2015

    Customizing Lead Qualification Process in CRM 2015

    This is the first part in an article series where I’ll be presenting a few customization tips & tricks that you can use in Microsoft Dynamics CRM 2015 to enhance the functionality used in a typical sales process. The content was first shown in my live webcast on MSDynamicsWorld.com on May 6th: “A Non-Developer’s Guide to Smarter Sales Processes in Microsoft Dynamics CRM 2015.” As promised during the webcast, I’ll be releasing all the slides here on my blog, but since there was a lot of details to go through in the 1h session, it will be split into three separate articles, to improve the accessibility to this information for those who didn’t attend the live webcast.

    The overarching theme of this series is to show you how the creative combination of the various customization tools available in Dynamics CRM 2015 can be used for building whole new functionality into the application – without having to write any custom code. The emphasis is on the word combination, since very often you’ll need to use several different pieces of the platform’s customization tools to achieve the end result. This isn’t something that you can easily learn just by reading the official product documentation that typically focuses on the introduction of a single feature at a time. With the examples in this article series I hope to demonstrate what these combinations could look like, in the context of customizing the standard application behavior in the sales process.

    MSDynamicsWorld_Smarter_Sales_Process_scenarios

    The techniques are by no means exclusive to the sales area of Dynamics CRM. Any process that you manage with our CRM/XRM application can surely benefit from the type of custom functionality that you can build via Business Process Flows, Real-time Workflows, Business Rules, Calculated Fields and Rollup Fields. The absolutely best way to gain an understanding of what you can achieve with the point & click customization tools in Dynamics CRM is to experiment with the tools in a sandbox environment, so I encourage you to go and try out these scenarios in an actual working CRM system. (Why not spin up a new CRM Online trial org and also get access to all the new CRM Online 2015 Update 1 goodies while at it?)

    What’s Wrong with CRM 2015 Lead Qualification?

    Those of you that have been working with Dynamics CRM for more than just a couple of years will probably remember how the things used to work before CRM 2013. When clicking on the Qualify button on a lead record, the user was presented with a dialog that allowed them to choose whether a new account, contact and opportunity record should be created from this lead. In the new world of Business Process Flows and no-popup UI of CRM 2013 (and CRM 2015), such options are no longer presented to the user. While this makes for a smooth user experience in general, it creates severe conflicts with many real life business processes of companies who either A) don’t use opportunities or B) don’t want to directly convert each lead into an opportunity. There are lots of suggestions on MS Connect (registration required, see here) to restore the ability for users to select not to create an opportunity from a qualified lead, but so far we haven’t seen any changes in the product to accommodate this.

    CRM_Lead_Qualification_Dialog

    So, if CRM wants to create opportunities but the user doesn’t, what could a mere system customizer do, without any knowledge of how to write plugins or scripts to develop new functionality by using the CRM SDK? Well, I’ve come up with a reasonably good workaround that uses the following solution components to establish a true user driven lead qualification process:

    • Branching Business Process Flow (BPF) to show stages that don’t take the user to the opportunity entity
    • Real-time Workflow to hand the lead status change and record creation instead of the built-in, non-configurable business logic of Dynamics CRM
    • Business Rules to conditionally show/hide fields for account/contact details on the form
    • Quick View Forms to present the records created from lead qualification process on the lead form after it’s closed

    You can find the detailed description of how I’ve configured each components from the below presentation:

    (For those of you who are not reading this article directly on survivingcrm.com and can’t see the embedded SlideShare presentation, click this link to access it.)

    I hope that this example has given you some ideas on how the lead management process and related Dynamics CRM functionality could be further developed in your own CRM organization. Stay tuned for part two of this Smarter Sales Process series, where we’ll be moving to the opportunity record and exploring how the estimated revenue information can more easily be managed by using the Calculated Fields feature introduced in Microsoft Dynamics CRM 2015 release. If you simply can’t wait for it or want to see the lead qualification process in action, then the webcast recording is available on YouTube already today.

  • Monitoring Rollup Field Values with Workflows

    Monitoring Rollup Field Values with Workflows

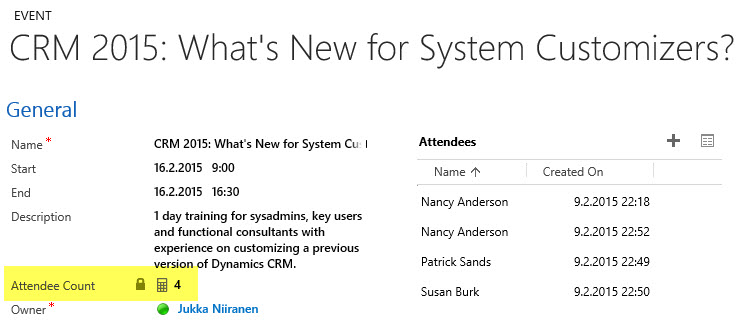
    In an earlier post I demonstrated how you could leverage the new Rollup Fields feature of Dynamics CRM 2015 to summarize the behavior of your customers and produce interesting metrics that could be used for targeting your sales activities towards the most active individuals who have reacted to your email and website content. The example included using data collected by ClickDimensions on the clicks on email marketing message links and page views on sites that contain the visitor tracking script. With the help of Rollup Fields and this marketing automation data stored directly into Dynamics CRM database under the contact records we were able to add the following custom fields onto our contact entity form:

    • Latest Email Link Click
    • Total Number of Link Clicks
    • Latest Page View
    • Total Number of Page Views

    While this allowed us to create a nice, sorted view of the contacts who’ve been interacting with our online content most recently, this information is still just data sitting in the CRM system, waiting for the users to go and discover it. Wouldn’t it be great if we could actually build an automated business process around it and make sure that the owners of these contacts who are clicking the links and visiting our website would be notified about these events? Sounds like something that a CRM workflow could help us with, right?

    CRM_2015_rollup_field_Clicks_5

    Unfortunately there are a few limitations when it comes to the new Rollup Fields in CRM 2015, as we discovered in my previous article. For example, if we would like to trigger a workflow process instance whenever the number of Link Clicks goes above a certain threshold, this isn’t something we can do directly by tapping onto the onChange event of the Total Number of Link Clicks field, because Rollup Fields cannot be used to trigger a workflow.

    Ok, what if we lower our expectations a bit and don’t even attempt to perform these actions in real-time for each event? It might be perfectly acceptable from a business perspective to have a process run once every night, inspect which contacts had clicked on the tracked links and then send out notifications to the record owners in one go. Surely that’s something Dynamics CRM can do, right? Well, let’s see if we could put together a solution like this.

    Batch Processing CRM Data with Workflows

    It’s quite a common requirement to perform checks or updates to CRM records based on a predetermined schedule. Although you can use workflow processes to be triggered on an event that takes place on CRM records (as long as it’s not on a special attribute like a Rollup Field), there isn’t actually any ready-made feature available in the CRM platform that would allow you to schedule the workflows to run every X hours, every night, once a week etc.

    The traditional approach for meeting such requirements for scheduled updates would have been to develop a small custom service to run on the CRM server machine. If you had access to other systems with interfaces to CRM like SQL Server Integration Services (SSIS) then these could naturally be also leveraged here. In the brave new cloud era where the number of Windows servers at your disposal for running these type of applications is rapidly decreasing it’s sometimes challenging to find a place where such schedulers could be deployed to, for performing small batch jobs that your CRM business processes would require. Wouldn’t it be convenient if you could build all of this by using just CRM Online and nothing more?

    Get ready for the good news: yes, you can schedule a recurring workflow to handle batch updates within Dynamics CRM, no external servers needed. The one thing you need, though, is a clever little custom workflow activity to extend the standard features of the CRM workflow engine. In this example we’ll use the Scheduling recurring Dynamics CRM workflows with FetchXML solution developed by Lucas Alexander. What this solution does is it gives us the possibility to:

    • Determine a query criteria for the bulk job
    • Schedule this job to be run hourly/daily/weekly
    • Run our own workflow process for all records returned by the query

    CRM_schedule_recurring_workflows_Lucas_Alexander

    The above diagram by Lucas outlines the logic behind the solution, but you really should go and read his blog post on the details of this approach, or check out the source code for the custom workflow activity on MSDN code gallery if you really want to dig deeper into the topic. For the purpose of today’s scenario, I’ll show you how I’ve used the solution in conjunction with the aforementioned Rollup Fields.

    Sending Out Notification Emails Based on Rollup Field Data

    In my example I’ve determined that it’s the Latest Page View datetime field on a contact that should be driving the business process. Once a week I would like to notify the owners of customer contact records if the contact has visited our website during the last 7 days. Turning this into a query criteria, it would mean that during the time of each batch processing I’d want to retrieve all contacts where the Rollup Field for Latest Page View contains a value greater than today minus 7 days.

    I will need to turn that query definition into a language that Dynamics CRM understands, and that is FetchXML. Sounds a bit tricky, eh? Lucky for us, CRM comes with a nifty lil’ FetchXML generator called Advanced Find, which I’m sure you’re already familiar with. All we need to do is find Advanced Find, specify the aforementioned query criteria for the contact entity and then click the “Download Fetch XML” button in the ribbon to grab the XML text into Notepad.

    CRM_AdvancedFind_FetchXML

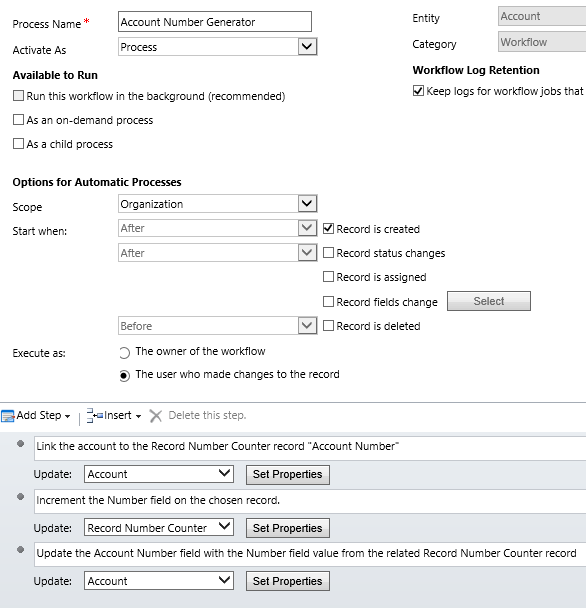
    Next we should think about what action we want to perform on the contacts who match the query criteria. In this scenario it will be the sending of an email message to the owner of the contact. It only needs to be available as an on-demand process and there isn’t even a requirement to have any query criteria enforced here, but I added the 7 day rule here as well, just in case I end up using the same process in some other scenario.

    CRM_page_view_notification_workflow

    The final step is to create a record for the new Scheduled Process entity, which has been added to CRM in the solution packaged developed by Lucas. On this form I’ll first give a descriptive name to the Scheduled Process and then define it to be related to the contact entity. In the Workflow lookup field I’ll pick the workflow process you see above, and for the Query field I’ll paste in the FetchXML we grabbed from our Advanced Find.

    CRM_scheduled_process_page_view_small

    All that’s left for us to do is setting the actual schedule for this process. The weekly option in the dropdown menu suits our purpose best in this scenario. By adjusting the Next Run Date I can configure the email notifications to go out in the morning, so that they reach the inbox at an optimal time.

    CRM_notification_website_visit

    Alright, that concludes our scenario for using CRM 2015 Rollup Fields together with workflow processes to deliver actionable insights to our CRM users on how customers are responding to our marketing activities. What I personally find very interesting in this example is the ability to take a piece of existing data that’s sitting inside our CRM database and first turn it into a metric that’s easily viewable in the CRM UI, then further amplify its business impact by configuring conditional processes to deliver it as a notification to the user who should become aware of it.

    None of this required a huge technical development effort or investments into separate reporting systems. All we needed was to take a new feature that was added to the Dynamics CRM platform as a part of the 2015 version rollout (this being a CRM Online environment there wasn’t even an upgrade project to worry about), combine that with an excellent open source enhancement to the platform’s workflow functionality, then just design a solution that delivers new business value from existing data. If you look at your own Dynamics CRM system and the data that’s being collected into it as a part of your business processes, then I’m pretty sure you could also identify potential use cases for similar type of enhancements, built with CRM’s ever evolving process automation toolkit.

  • CRM 2015 Rollup Fields: The Gotchas

    CRM 2015 Rollup Fields: The Gotchas

    In an earlier blog post in December, I described one use case for the new Rollup Fields feature introduced in Microsoft Dynamics CRM 2015. This example involved rolling up data from email events tracked via ClickDimensions and summarizing this on the contact’s form, so you’ll want to check out the steps listed there if you don’t have any hands-on experience about this new feature yet. In this post I’m going to dig deeper into the details about how Rollup Fields actually work behind the scenes and what limitations you should be aware of when considering whether they are the right tool for the job in your own use cases.

    Rollup Schedules

    The first thing you need to understand about Rollup Fields is that they are not updated in real time. If you’re familiar with the difference between the real time workflows introduced in CRM 2013 and the asynchronous versions that were available in earlier versions, then this is something a bit like that, but not quite. As you might know, the traditional background workflows were triggered by an event that took place on a CRM record and the resulting workflow instance was scheduled to be executed by the asynchronous process running on the CRM server at the earliest possible date (depending on the overall workload on the server). Whereas this usually meant a delay of perhaps a minute or two at most, the new Rollup Fields are even further from real time than this.

    As we saw in my earlier post, when you create a new Rollup Field, a new mass calculation job will be created for the field in question. This will be scheduled 12 hours into the future, based on the assumption that this will most likely fall outside the office hours when actual CRM end users are working with the system. (Because us CRM customizers or system admins never work during the night, right? Yeah, what a funny assumption that is, but anyway…) The reason for such precaution is that the very first calculation job will have to populate each and every record that exists for that entity, which could be up into the millions, depending on what type of data you manage in your CRM.

    CRM_2015_rollup_system_job

    So, does this mean the Rollup Fields only get updated once per day, during that nocturnal schedule? No, actually they get updated once every hour. If you go to the Settings – System Jobs menu you’ll see that there are jobs of type “calculate rollup field” type running for each of your entities that have one or more Rollup Fields defined for them. They are not scheduled to start at exactly the same time, but they all run at one hour intervals. Another thing worth noting in the Rollup Field implementation architecture is that these calculation jobs are only applied to records that were created, updated or deleted after the last job finished. No point in processing a million records if only a handful of them could possibly have new values to be calculated, right? This is why the initial rollup and the recurring rollup requests are handled by different system jobs in the CRM platform.

    Rollups and Workflows

    Now that we know the Rollup Fields may not show a current values in the UI for quite some time, the next logical question to ask is: anything we can do to speed the calculations up? As an end user, you could go and look at any Rollup Fields that have been added onto an entity form which you have the necessary rights to view, then hover over the field and click the “recycle” icon to force the recalculation of the Rollup Field value. As a developer, you also have the option to force a Rollup Field to be recalculated on demand via a plugin, by using the CalculateRollupField message. As a system customizer… Well, there’s not much you can do, at least in the CRM 2015 version. (more…)

  • Time Travel with Workflows: Accessing “Before” and “After” Values

    Time Travel with Workflows: Accessing “Before” and “After” Values

    Dynamics CRM has had a built-in auditing feature since the 2011 version, which provides a really handy tool for situations where someone needs to investigate the changes that have taken place on field values of a specific record. By default auditing is not enabled, but I recommend you to seriously consider enabling it for all business critical entities like accounts and contacts, since without it there’s not much to go by if you ever need to track down any intentional or unintentional updates made to your CRM data.

    CRM_workflow_audit_1

    Auditing is a great tool for capturing the “fire hose” of data updates that are taking place in CRM. However, since the audit data is not stored in actual CRM records but rather in a denormalized state inside the audit database tables, it’s not accessible for any type of reporting or business process logic. If you know what record to look for, the related Audit menu will give you the information. If you are an administrator and have access to the Audit Summary View, you can also use filters to narrow down the audit data stream and hunt down the events that are relevant to your investigation. Very useful for resolving issues in the data, but not so practical for simply staying informed about updates that are of interest to your role in the organization.

    Workflow processes can also be used for tracking specific changes made on the CRM records, just by setting the workflow to start when a particular field or a set of fields change. You can then perform any notification action you see appropriate, such as sending an email, creating an Activity Feed post, adding a note, appending a description field etc. Almost like auditing, but on a much more granular level, and also something that you can report on if necessary. One limitation compared to auditing, though, is that you can only see the new value of each field but not the previous one. So, you can’t produce a similar view that auditing provides, with the old and new values side by side.

    Or can you? With the launch of the CRM 2013 version we gained a whole new category of workflow processes, called real-time workflows. These behave much in the same way as custom plugins, as they are executed synchronously as part of the event pipeline of the CRM platform rather than via the asynchronous service that the traditional workflows use. The extra benefit we gain from this, aside from the fact that the workflow logic is executed immediately, is that we now also have the ability to choose whether the real-time workflow should be started before or after the event. This allows us to actually read the data that was in a field before the update took place. Sounds like a cool little feature? Well why don’t we take it our for a spin then and see what we can achieve with it.

    Tracking Account Name Changes

    Let’s consider a scenario where we would be interested in tracking the changes performed on the account name field. We have decided to leverage the Activity Feeds feature to post a message on the record wall every time an existing account has its name field updated. As a part of this post, we need to provide both the old name and the new name, so that the users can easily associate this particular account as a customer they’ve previously done business with under a different name.

    Since we need a place to store the old name of the account for the purposes of formulating the post’s content, first we’ll add a new custom text field for the account entity, called “Old Name”. Then we’ll open up the workflow editor and create a new real-time workflow process for the account entity, called “Account Name Change: Store Old Name”. The important part here is that we’ll set this workflow to be run when “Record fields change” with a box ticked for the “Account Name” field and change the “Start when” value to “Before”. The actual workflow actions only need to do one thing, which is to copy the value of the standard “Account Name” field to the new “Old Name” field. Nothing else.

    CRM_workflow_audit_2

    Next we’ll create a second workflow, called “Account Name Change: Post Old & New Name”. We’ll set it to run in real time for the account entity, just like the first one. We’ll even associate it with the very same event, meaning the change of the “Account Name” field. The difference will be that we’ll run this workflow “After” the event. Again, the actions that the workflow will perform are very simple, as we’ll only need it to create a new Activity Feed post record. Here’s how the message will be configured with the dynamic field values from the account record:

    CRM_workflow_audit_3

    So, we now have two real-time workflows running for the same entity, for the same field change event. Is this a smart thing to do? Will the universe by any chance collapse onto itself as a result of this reckless twin workflow configuration that we’ve built? Well, there’s only one way to find out! Let’s activate these two workflow processes, go to an account record and change it’s name.

    CRM_workflow_audit_4

    After the name is changed, we can click onto the Activity Feed’s auto posts column to refresh the post view. There we discover a post created by our second workflow process, containing both the “before” and “after” names for this account. Success! If we keep feeding further update events to this workflow duo, we can see that the post message is always updated to contain the last two names for this account in search of its true identity.

    CRM_workflow_audit_5

    If our second workflow process would have been an asynchronous process instead of real-time, the results might be different, though. As I’ve experimented in a previous post, “Auto-Numbering with CRM Workflows: Real-Time vs. Asynchronous”, the record data and execution order for traditional background workflow processes may not always be consistent, due to their asynchronous nature. By using a real-time workflow we are guaranteed to receive a ticket to the front row seats of CRM’s event execution pipeline. In practice this means the following:

    • “Account Name Change: Store Old Name” – this workflow is executed at the pre-operation stage, which means that it sees the record as it was before the update event took place. Therefore when it reads the account name field it still has the old value stored. Furthermore, because the workflow is completed before the actual platform event for the account update takes place, it can inject a new value into the “Old Name” field and have it committed to the database as a part of the original transaction.
    • “Account Name Change: Post Old & New Name” – this workflow is executed at the post-operation stage, meaning after the update has already taken place, but before the transaction is completely over. It receives an image of the account record where the standard “Account Name” field is populated with the new value the user has entered and the “Old Name” contains the value updated by the first workflow in the pre-operation stage.

    As this example scenario demonstrates, while a workflow can’t directly compare the “before” and “after” values of a record, there is actually a workaround available where you could pass the old value from the pre-operation workflow to the post-operation workflow. You could then perform a comparison of the values with the tools that the workflow editor offers (or extend it via custom workflow activities) and alter the outcome of the transaction based on the business logic. If needed, you could even cancel the operation and show an error message to the user if the old & new values are violating the rules of your business processes.

    To close things off, it’s important to keep in mind that just because you can do something with a workflow instead of custom code, it doesn’t mean it would always be the right tool for the job. Aside from the greater level of flexibility that a plugin will give you for comparing and manipulating the data during the update event, there are also performance considerations you should be aware of before pushing a ton of real-time workflows into your production CRM system. I recommend reading this post by CRM MVP Scott Durow: Real Time Workflow or Plugin?

  • Dynamics CRM Reminder Workflows Done Right

    A very frequent requirement that customers present for their CRM system functionality is that they will get automatic reminders from it when an item recorded into the database requires their attention after a specific date is reached. This might be a hard, physical date like a contract expiring or a softer variable such as a follow-up date on an open opportunity. Since receiving email notifications from various online services is such a ubiquitous pattern for process reminders these days, it’s only natural that the CRM system is expected to behave the same way.

    What sounds like a straightforward thing to implement with the help of the Dynamics CRM workflow processes isn’t necessarily such an easy task – at least if you want the reminder workflow to operate correctly under all the possible circumstances. In a scenario where the reminder is set by the user via a value entered into a date field there’s a number of other variables that you should take into consideration besides that single data entry. For a developer who is used to dealing with user inputs and exceptions this may be just another routine task of figuring out the logic surrounding the reminder date variable, but for a functional consultant who typically works more directly with the end users and mainly just points & clicks in the CRM customization menus for building out the required functionality this may not be such familiar territory. I’ll be the first to admit that I struggle with workflow logic a lot.

    Dynamics_CRM_reminder_workflows_8Given how much time I’ve spent wondering “how should I do this” when it comes to CRM workflows, the wording of this blog post’s title is pretty bold. Is there really a single right way to build reminder workflows and do I know nearly enough about them to claim the privilege of defining the proper design pattern for them? This is actually just more of a provocation through which I’m hoping to gather feedback on the inevitable shortcomings of this post via the comments section. Another reason behind this choice of the title is that I stand on the shoulders of giants when it comes to my knowledge about CRM workflows, meaning everything I know about them I’ve read from blogs elsewhere and I’ll try my best to highlight the articles deserving most attention via linking to them as we move forward.

    In this post I’ll use a scenario where the opportunity record has been extended with a custom follow-up date field. Entering a date into the field is done by any user who has access to update the opportunity. When the follow-up date is reached, a reminder should be sent to the owner of the opportunity, but only if the record is still in an open status, since won or lost opportunities don’t require reminders anymore. Sounds logical? Good, then let’s start working on implementing all the required business logic onto the Dynamics CRM workflow editor canvas.

    Start conditions

    The first thing we need to decide on when designing workflows is defining the criteria on when should we be performing any actions to begin with. In our scenario, any moment a user could enter a value into our reminder date field is a potential trigger for our workflow logic, so we should have the process started both on the create event of the record as well as the change event of the field in question.

    Since we’re dealing with an optional field that doesn’t necessarily contain any value, we should check this right away. It’s not enough that there is a value in the field, but it also needs to be something we can act upon. There are two general things that interest us: 1) is the record sill active (meaning does it require any reminders) and 2) is the reminder date in the future. There’s no point in us sending an email to a user right away if he or she mistakenly enters a date that’s passed last month already, so better to just ignore any such input values and do nothing in this case.

    Dynamics_CRM_reminder_workflows_1

    Wait conditions and stopping the workflow

    If we’ve determined that there is a valid reason for our workflow to take note of the event to which it has been attached to, the next step is to… just wait. No, I didn’t mean you can just start slacking away with your workflow design! Waiting in itself is a topic deserving your full attention as a CRM customizer, since there are more than just one type of waits in the platform we’re working with. Read this great article by Paul Nieuwelaar for an in-depth discussion on the different options available.

    There are multiple possible outcomes that should cause our workflow process to wake up. It’s not only the events when a follow-up action should be performed but also any path that leads to a state where the workflow is no longer required. After all, you really don’t want to have an ever increasing number of workflow instances left forever waiting in your CRM system, hogging up resources unnecessarily. So, in our scenario, whenever the status of an opportunity changes to something else than “open” before the reminder date is reached, we’ll want to stop our workflow.

    Dynamics_CRM_reminder_workflows_2

    This brings up another best practice regarding Dynamics CRM workflows. We have the option of stopping a workflow with the status values of “Succeeded” or “Cancelled”. As a general rule of thumb, you should always choose to stop your workflow as “Succeeded” unless you have a good reason to do otherwise. This is because a “Cancelled” value is considered an exception in the workflow process job execution and it will leave a permanent record into the system for debugging purposes. If the stopping is just business as usual for your workflow logic, let the system job be deleted by choosing the “Succeeded” option. Only use the “Cancelled” value if you intend to go through and review all the cancelled process instances when testing or debugging your workflows.

    Change of date

    Since our trigger field is just a normal date field on the opportunity form, we need to take into consideration the fact that a user may at any stage go and update the date value. For example, when the opportunity in question gets delayed due to lack of actions from the customer’s decision makers, the opportunity follow-up reminder would naturally also get postponed to a later date. Whether a reminder has already been sent for the record or not doesn’t actually matter to us, since what we’re dealing with in this scenario is a reusable reminder field that should always work reliably and deliver a notification at the time specified by the user.

    Since our start conditions were tied to not just the creation of a new record but also any changes made to the follow-up date field, this will create a new instance of the workflow process whenever the field value is updated. We don’t want to have multiple concurrent waiting workflows for the same record and we most certainly don’t want to send more than one reminder at the follow-up date, so we need a logic to get rid of the old process instance when a new one is created. But how do we tell the existing workflow that a new version has been created? (more…)

  • Making Better Use of Business Process Flow Data

    CRM 2013 Business Process Flows (BPF) have been designed to support a scenario where the same transactional records (opportunities, cases, custom entities like projects) can follow alternative process steps depending on the business logic required. For example, you can use the same opportunity entity to support the sales processes of two departments that are operating in very different markets and thus have different process stages as well as information content gathered within those stages.

    You can either limit the availability of BPF’s by CRM security role, so that a salesman in department A will always get the sales process A for the opportunity records he creates, or you can enable the users to see a number of different processes and let them choose the correct one via the Switch Process button on the Command Bar. In the latter scenario the Select Business Process Flow dialog window will present the available processes, like this:

    BPF_CRM2013_multiple_processes_1

    More processes will naturally mean more variety in the type of data your opportunity records will hold. Instead of a fixed number of stages in a specific order you’ll have opportunities that are following different sales processes with unique stages, which could easily lead to a situation where the CRM user may be comparing apples and oranges in the same entity view. How can we avoid such confusion in a multi-process environment? Hopefully this post will give you some ideas on the best strategy to manage your Business Process Flow data.

    Working with the Stage Category

    The officially recommended tool for making Business Process Flow stages visible in views and charts is the Stage Category option set. This is a field available on the Process Stage entity and you can select a value for it while editing the Business Process Flow process record.

    BPF_CRM2013_multiple_processes_2

    Basically what this field allows you to do is to standardize the stage values across different BPF processes. You can enter a different name for the actual stage in the BPF editor but still link it to a Stage Category value that is used in some of your other processes, too. Depending on your business, there may be different sales processes that would each contain a conceptual Propose stage but apply different terminology for it. That’s one problem that the Stage Category can solve.

    If you want to customize the list of values available for the Stage Category, just find the global option set under the Default Solution (Settings – Customizations – Customize the System) and update it like any other field. The new values will appear in he Business Process Flow editor after publishing the changes.

    BPF_CRM2013_multiple_processes_7

    When building a view to display the opportunities by stage, you’ll need to add a column from the related Process Stage entity to leverage this information. In the Add Columns dialog of Advanced Find, choose the aforementioned entity and select the Stage Category field from the list that appears.

    BPF_CRM2013_multiple_processes_3

    One limitation related to the view columns is that we can’t apply any sorting to the Process Stage field. That’s because it’s from a related entity and as a result it doesn’t appear as a possible field in the Configure Sort Order dialog. This means that our opportunity view can’t have the records nicely aligned per stage value, to simulate a pipeline, but instead we’ll need to rank them based on some field that’s directly available on the opportunity record itself.

    BPF_CRM2013_multiple_processes_6

    Grouping or Filtering by Business Process Flow

    So, we have the capability to merge stage values across different BPF’s into a single view. Pretty cool. Now, since different sales processes are often related to different types of product categories or business lines, what are the steps needed for creating an opportunity view that also displays the name of the BPF process chosen for the record? For example, if we want to group the revenue per process instead of process stage, which field do we need to add into the view?

    Sorry, there is no such field. Thank you, have a nice day.

    Excuse me, what?! Didn’t you just show how to harmonize the stage values across different processes? Surely there’s a way to un-harmonize things and break it down based on individual processes and stages?

    Well, stages yes, but processes, no. You see, there isn’t a direct relationship to the actual Business Process Flow process entity from the opportunity entity (or any other BPF enabled entity). While the system does store a GUID reference to the process and process stage records in the StageId and ProcessId fields, these are “unique identifier” type of fields that you can’t reference in Advanced Find query criteria. We could add them as a view column, but they’d just be gibberish like “3e8ebee6-a2bc-4451-9c5f-b146b085413a”.

    BPF_CRM2013_multiple_processes_4

    The Process Stage entity that we examined earlier is a parent entity of the opportunity and it can be accessed in Advanced Find, but it doesn’t contain any field that would specify the name of the process to which the stage belongs to. When selecting view columns in Advanced Find we can only go one level up, but luckily when building a filter criteria for the view we can query entities further away. This means we can reach the Process entity related to the Process Stage entity and find our Alternative Sales Process from there, as illustrated below. (Note that you’ll need to change the default lookup view to display the BPF processes, as otherwise you’ll only see workflow processes to choose from.)

    BPF_CRM2013_multiple_processes_5

    By adding this criteria we are able to build a view containing only opportunities from a specific Business Process Flow. To see the total pipeline revenue per each process we’d just need to switch between the views, or build a dashboard that contains one list/chart per process. Not quite as elegant as having a single chart grouping the revenue per process, but it’s still better than a mixed bucket of opportunities from all over the place.

    What if I told you there was a better way to do this than the out-of-the-box data model provides? Would you be interested in seeing its possibilities? Then you’re in luck, because that’s what I was going to write about next. (more…)

  • Auto-Numbering with CRM Workflows: Real-Time vs. Asynchronous

    One of the missing features that is often requested for Dynamics CRM is the ability to automatically assign numeric identifiers to records (see the feature suggestion on MS Connect). Sure, we’ve had the Auto-Numering feature for a limited set of default entities (contracts, cases, articles, quotes, orders, invoices, campaigns) since the early days of CRM 3.0, but generating numbers on a standard entity like account or any custom entity has not been possible out of the box.

    As if often the case, workflows offer a way for the creative user to overcome such limitations and enhance the CRM functionality with some custom business logic. The usage of workflows to generate automatic numbers for records has been described in several blog posts, of which I’d like to point out the ones written by Karel Iuel and Leon Tribe. The high level concept of this process is as follows:

    • Create a custom entity to hold the current counter value of the number
    • Link your business entity to this custom counter entity through a N:1 relationship (meaning the single counter record will be the parent for all the intended child business records)
    • Trigger a workflow rule from the business entity record creation that performs the following actions:
      • Links the new business entity record to the existing counter entity record
      • Increments the counter value
      • Assigns this value as the number for the child business entity record

    With the recent enhancements to workflows in the CRM 2013 release I thought I’d take this scenario and use it to compare the different outcomes with the new real-time workflows and a traditional asynchronous workflow process.

    Number assignment with a Real-Time Workflow

    Let’s first see how the aforementioned methods work in a CRM 2013 environment. I’ve created a new custom entity called Record Number Counter and added a 1:N relationship to the account entity, with the intention of assigning an automatic number to any new account record that gets added into the CRM database. To actually make this happen, we need to have a workflow process in place that performs the three steps outlined above. Note that the box for “run this workflow in the background (recommended)” is unchecked, meaning this will be a synchronous, real-time workflow process that starts immediately after the specified event, which in this case is “record is created”.

    CRM_2013_auto_numbering_real-time_workflow

    Let’s do some account data importing next to test the results of this workflow. I’ve created an Account Number record of the Record Number Counter entity with its Number value set to 100 500, which means the next account record to get created should be numbered 100 501. With a set of 500 test records to import in my csv file, I’m expecting the counter to hit 101 000 by the time the job is done.

    So, off we go with the import job and then we start to anxiously click on the Refresh icon on the account entity view to see which values get assigned in the Account Number column.

    CRM_2013_auto_numbering_test_1

    Looks like everything is as we wanted it to be! All the 500 account records have been assigned a unique number and the counter value is incremented by one after each assignment. Sure, we’re getting the local number formatting setting from our integer field applied into the target text field on the account (in my case it’s the empty space as the thousands separator), but that’s not a huge issue for our home grown auto-numbering solution. The concept itself appears to be working, which is the main outcome we were after.

    Why this won’t work in CRM 2011

    If you’ve been reading any discussions on the workflow driven method of auto-numbering, you may have come across issues with the numbers not always being unique. If you create a single record, then wait for the workflow process to complete and check the results before the next record, everything will most likely look ok. But when there’s a bigger volume of database inserts taking place in a bulk operation, the results may not be as expected. (more…)

  • Address Copy Button with CRM 2013 Business Rules and Workflows

    Address Copy Button with CRM 2013 Business Rules and Workflows

    The default forms in Dynamics CRM only contain one set of address fields, but most organizations will need to surface at least the Address 2 fields for accounts and contacts to manage the different information for visiting address, mailing address, delivery address, invoicing address or whatever the business scenario.

    Sometimes it may be justified to have a bit of redundant information in your CRM database for practical purposes. For example, if you use the Address 2 fields for managing the mailing addresses for accounts where this is separate from the visiting address, it may be easier to have the mailing address fields populated also in scenarios where the values are identical to the visiting address. Otherwise the marketing assistant who is building target groups for mailing campaigns will need to perform some Excel sorcery to pick different address fields for different customers when extracting the data from CRM.

    If you’ve bought anything from online stores during the past 10 years, you’ve probably ran into a nice little feature on the checkout or registration forms where the system asks if you’d like to use the address information you entered into your customer profile also as the shipping address for the order. Often times this is presented as a checkbox field that you simply need to tick once, to save you the trouble of re-entering the same data the system already knows.

    Wouldn’t this be a nice feature to have also on the CRM account form? Let’s take a look at a form where both Address 1 and Address 2 fields are presented side-by-side. If we would have a “Copy to Address 2?” checkbox that the user could tick after having tabbed through the Address 1 fields and entering data into them, that would be quite an intuitive feature that the users would surely feel right at home with. On the account form it could look like this:

    CRM_2013_address_copy_account_1

    Now that we have our new custom field below the Address 1 fields, next we need to build the functionality for duplicating the field values from Address 1 to Address 2. So, please open you “Javascript for Dummies” textbook from page 47 and… Hey, wait a minute! We’re working with CRM 2013 now that has the great new Business Rules feature for situations like these! Forget what I said about scripts, instead go ahead to the account entity customization menus and add a new Business Rule for this form.

    On the “Copy Address 1 to Address 2” Business Rule we’ll set a single condition to monitor the value of our custom chechbox field. If the box is ticked, meaning the field value equals “Yes”, we’ll set the values of each visible Address 2 field on the form to be the same as what’s been entered into the corresponding Address 1 field.

    CRM_2013_address_copy_business_rule

    Once we publish our customizations and activate the Business Rule, we can try out the feature in practice. Let’s create a brand new account record to simulate the typical data entry process (although an existing account would work just as well). After we’ve entered the Address 1 information on the left column, the moment we tick on the “Copy to Address 2?” box we’ll see the address fields on the right side get populated with the same values in real time.

    CRM_2013_address_copy_account_2

    Great, we’re all set to move this into production now! Or are we actually? What happens when the user wants to go and edit the field values for Address 2? If we leave the “Copy to Address 2” box ticked, then our Business Rule will keep copying the values over to the Address 2 fields the next time the rule is evaluated. As we’d like to allow the user to leverage this copy feature to initially replicate the fields to Address 2 but perform the necessary changes to those values that are in fact different, such as editing the Street 2 field, we should somehow restrict when our field copy operation is triggered. (more…)