Tag: UX

  • A few notes on the Timeline: model-driven Power Apps form tweaks

    A few notes on the Timeline: model-driven Power Apps form tweaks

    In the default form components arrangement for tables in model-driven Power Apps or Dynamics 365 CE apps, the Timeline is usually front and center. This makes perfecet sense. Scenarios that revolve around accounts and contacts typically include the need to show activities and notes related to these records.

    Compared to how things used to be just a few years ago, meaning mostly hard coded, we now have an amazing amount of configuration options for the Timeline control. This is reflected in the MS Learn article “set up the Timeline control” which has an estimated reading time of 32 minutes! And that’s just the “how” part of official documentation, not the “why” that you’ll learn as the settings are applied in real world business application context.

    This blog post is my attempt to highlight the recent, most useful features that the modern Timeline form component enables for improving the user experience of your model-driven apps.

    Rolling up the notes

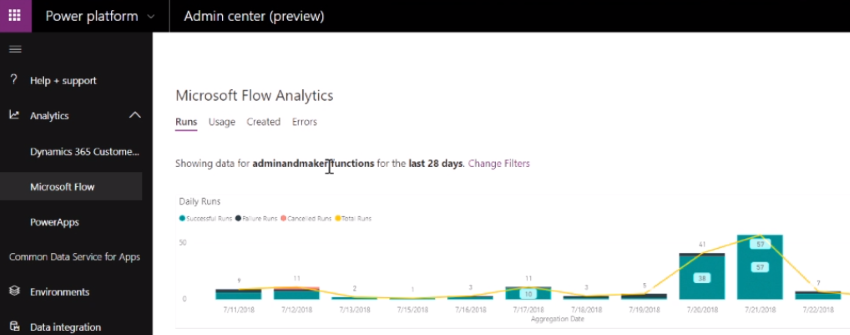
    The one huge feature that 2022 Release Wave 2 has delivered for model-driven Power Apps has been buried deep into the release plan. It seems almost like an intentional “let’s hope no one notices this” move since the feature is listed under Dynamics 365 Customer Service and called “Improve agent productivity with timeline enhancements”:

    Notes that work like other activities and roll up on contact, account, and opportunity form timelines.

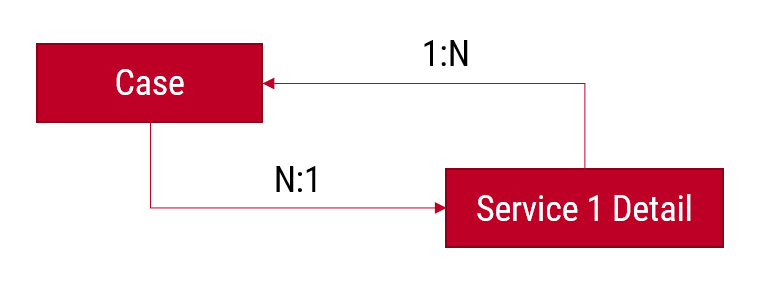
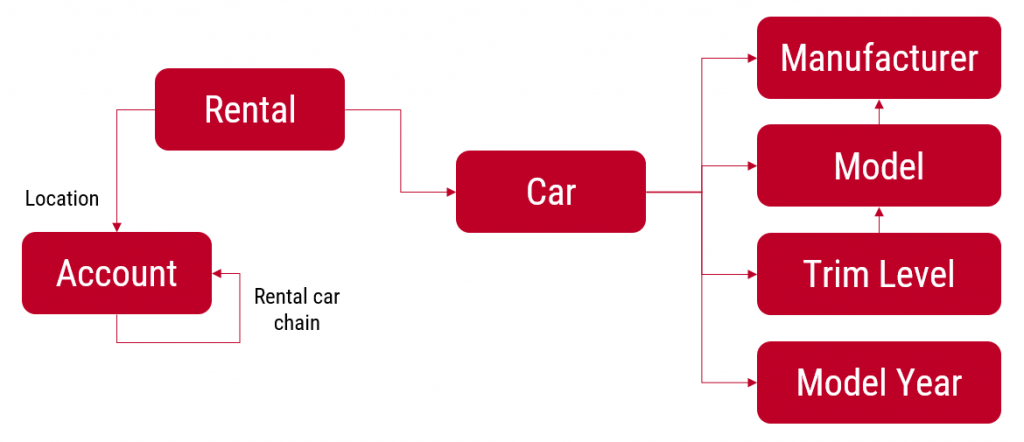
    Woohoo! We’ve been waiting for this feature close to 2 decades already! If you haven’t experienced the Dynamics CRM era, then the significance of the rollup capability in the platform may not be immediately obvious. I won’t go deep into it now, instead I’ll dig up an illustration that I created 11 years ago for a blog post I wrote about the native activities associated views vs. form subgrids:

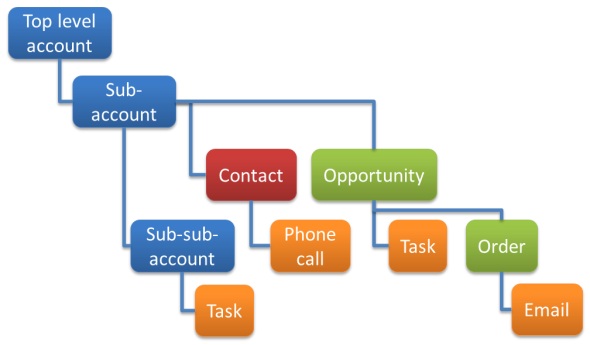
    Unlike other standard or custom tables in Dataverse, activities have one superpower: they can be shown not just from the directly related child records but also rolled up from deeper in the hierarchy across many different record types (tables, entities, you pick the terminology). This means that in the account Timeline you’re able to see tasks, phone calls, emails, appointments that are set regarding a child record, like an opportunity where that account is the potential customer.

    While the same form component has been used to display both activities and notes (and activity feed posts, in case someone’s still using them), the rollup functionality has been exclusive to activity data. This has lead to a classic CRM functional gap where a note record added onto a lead will not be carried over once the lead is qualified and becomes an account/contact/opportunity. Notes have been “sticky” in the sense that you slap them on a specific record and that’s where they’ll forever stay.

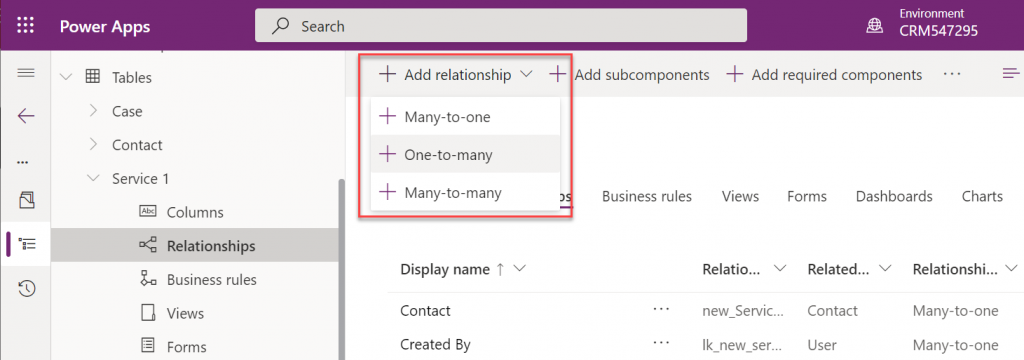
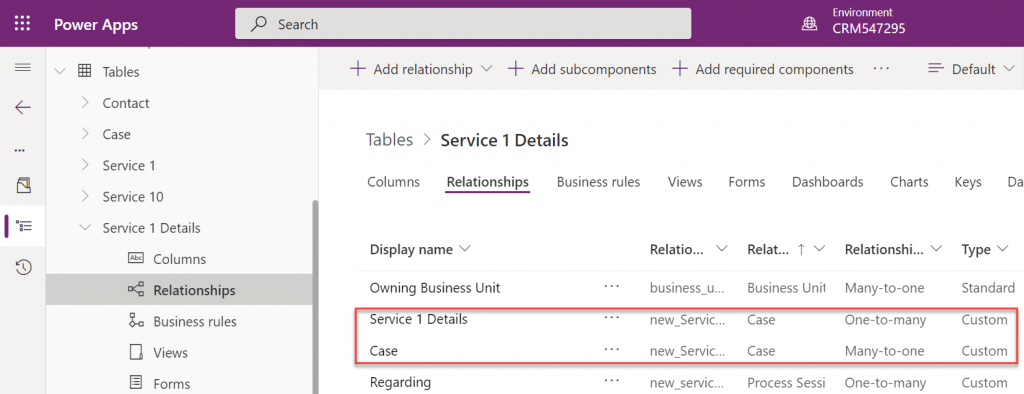
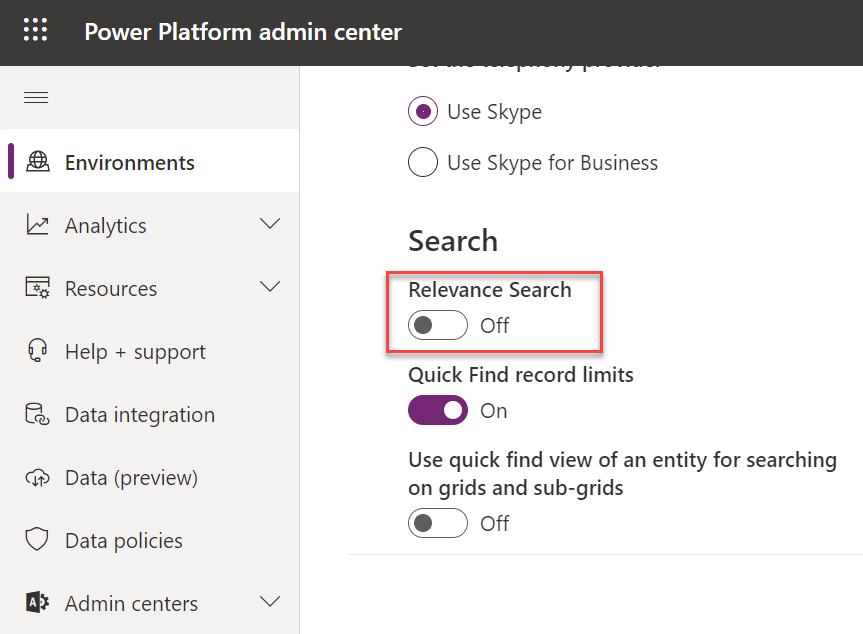
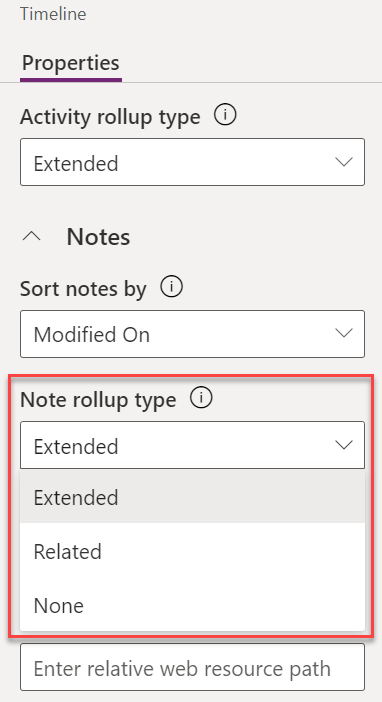
    Well not anymore! While the official docs on Learn are still pending to be updated to describe the feature in more detail, the “Notes rollup type” setting already appears on the Timeline component properties:

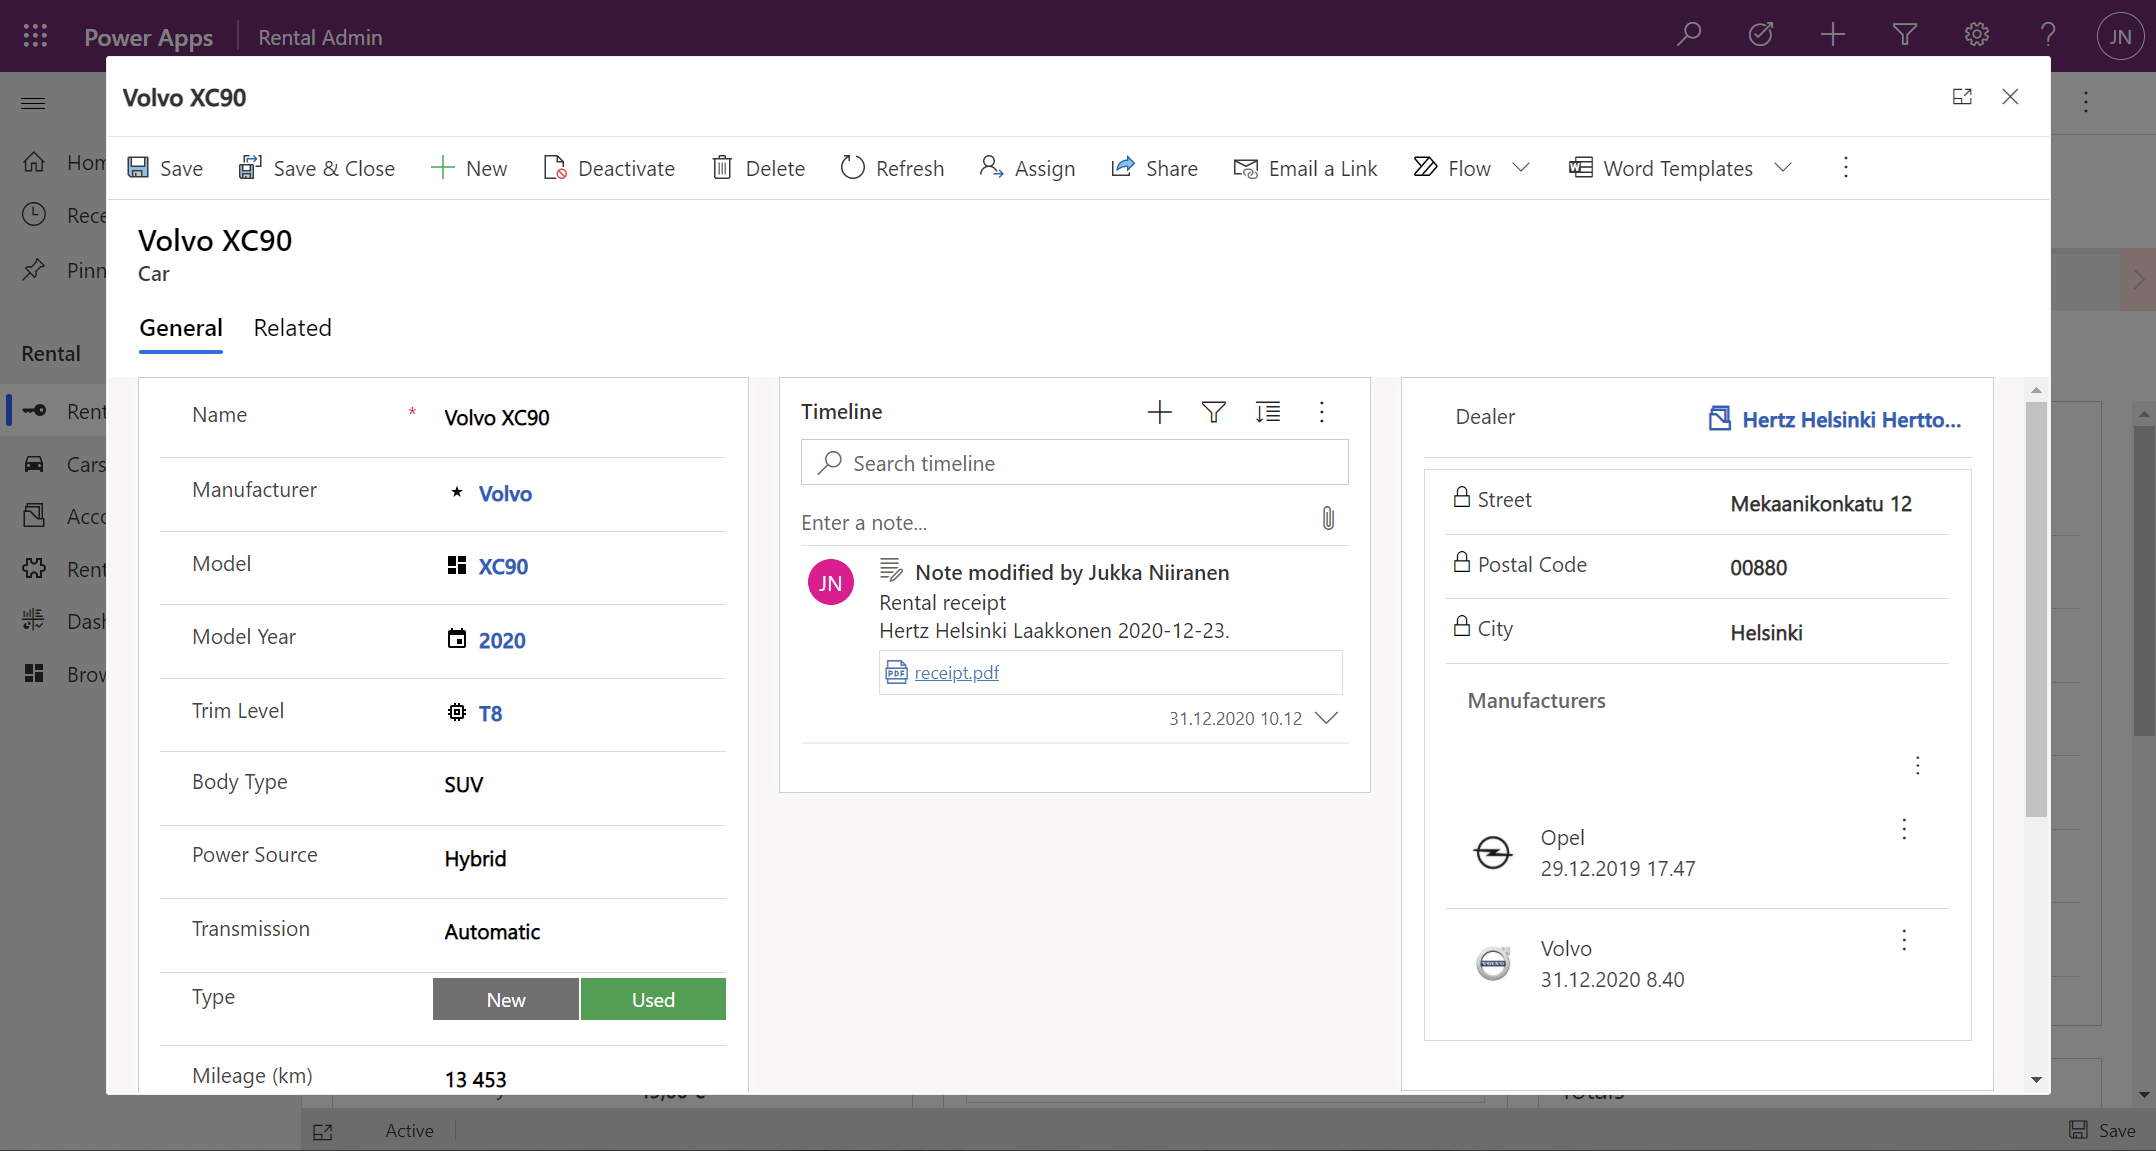
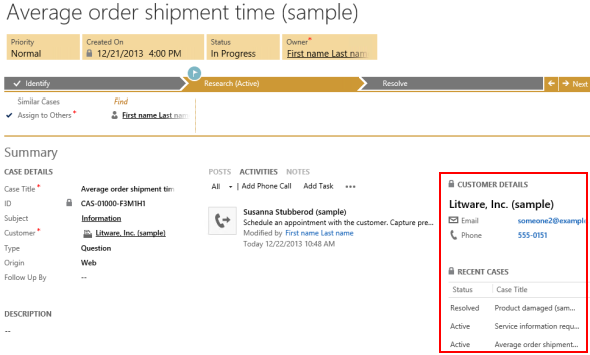
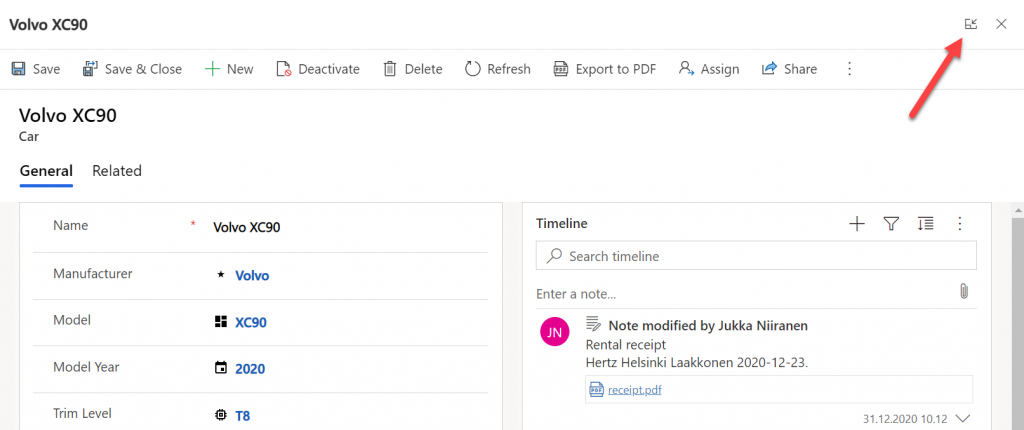
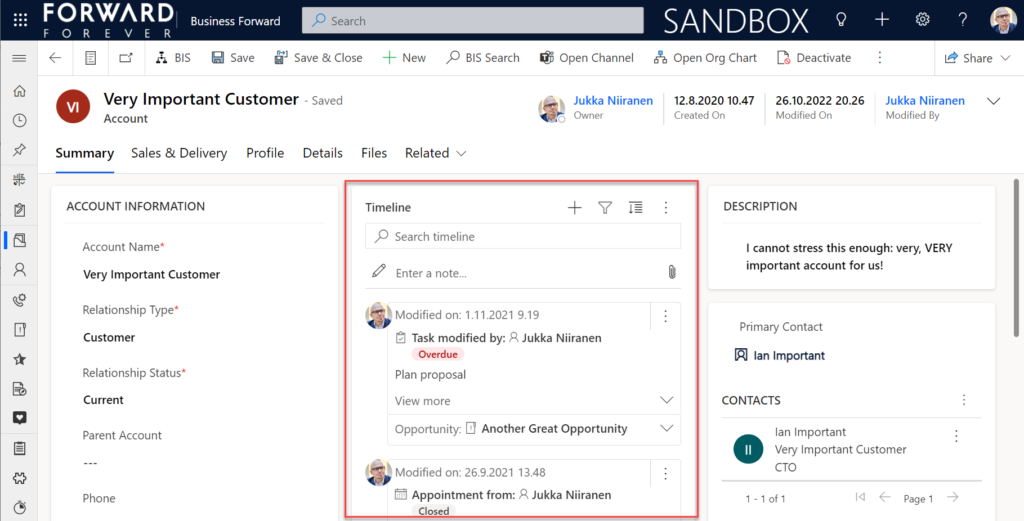
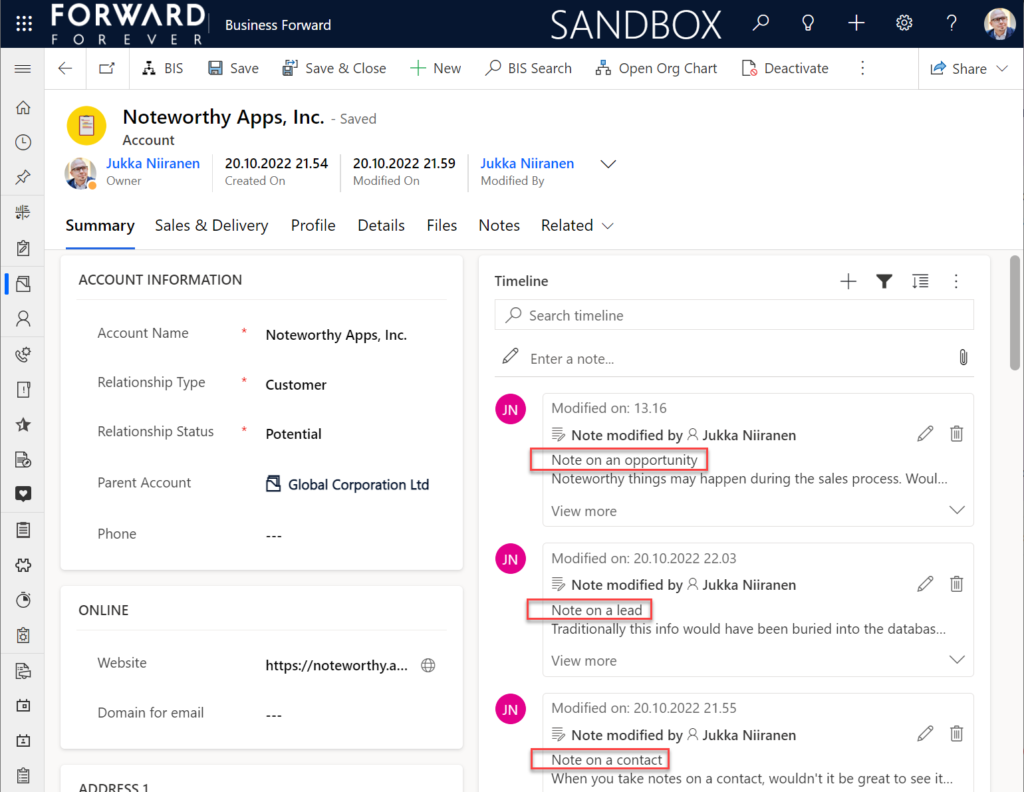
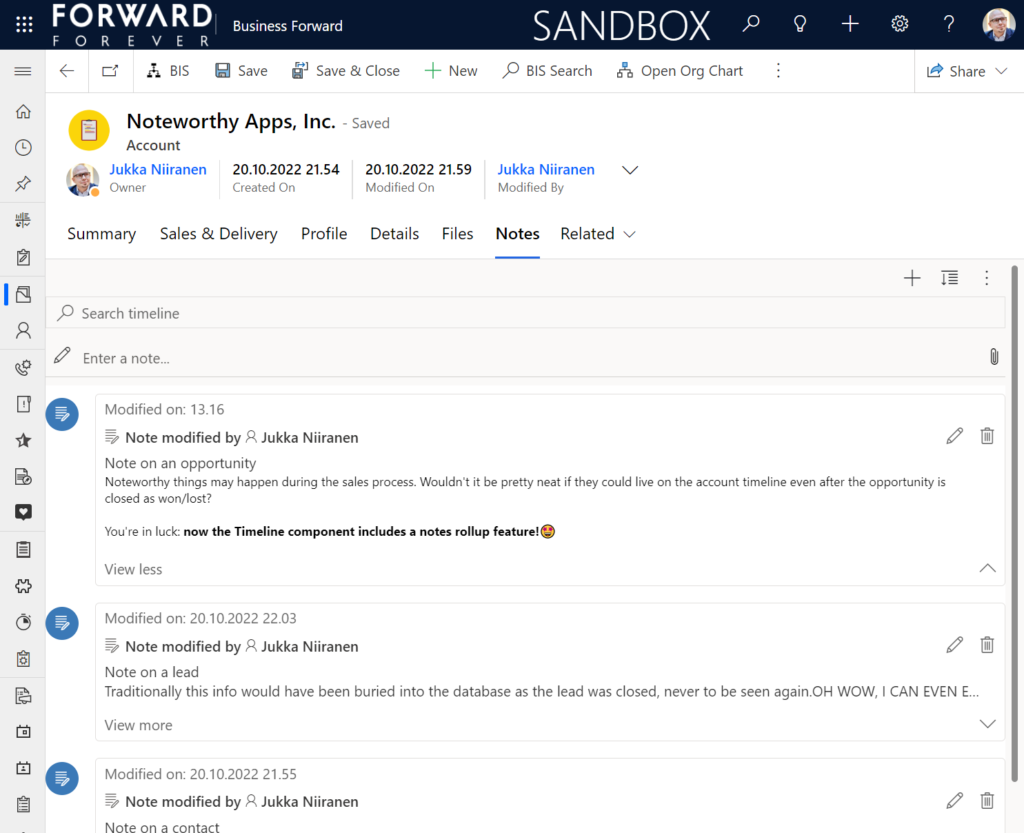
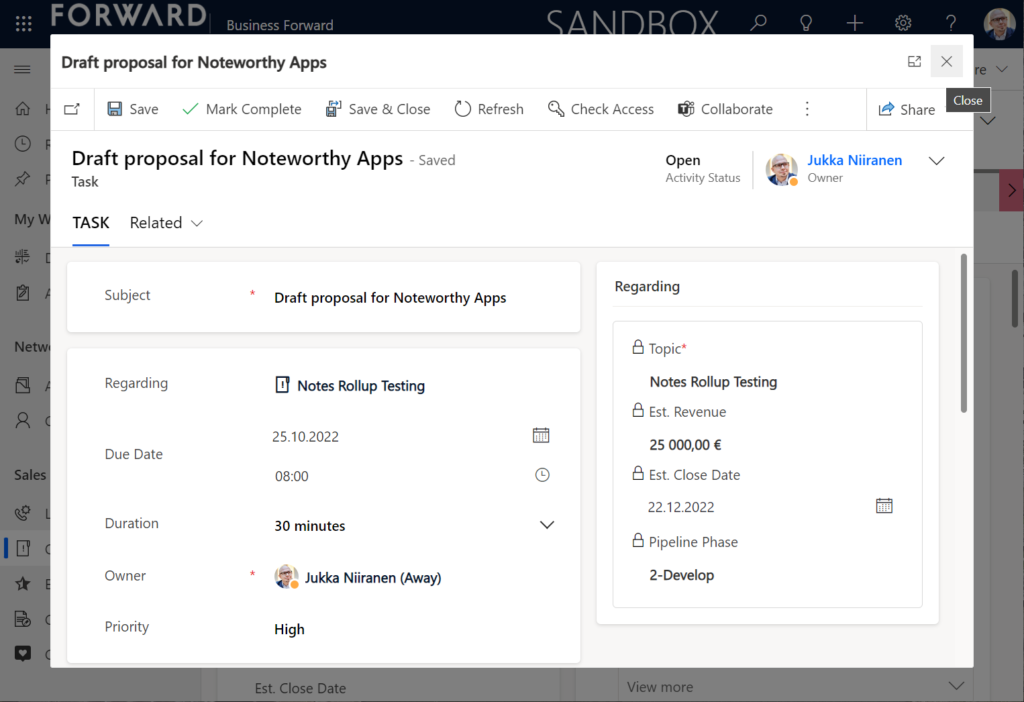
    Setting this to “Extended” for the Timeline control on the account means that we’ll now see notes that have been added to the originating lead, any of the account’s contacts or opportunities. Here’s an example where there are zero notes on the account itself, yet we can see 3 notes on the Timeline:

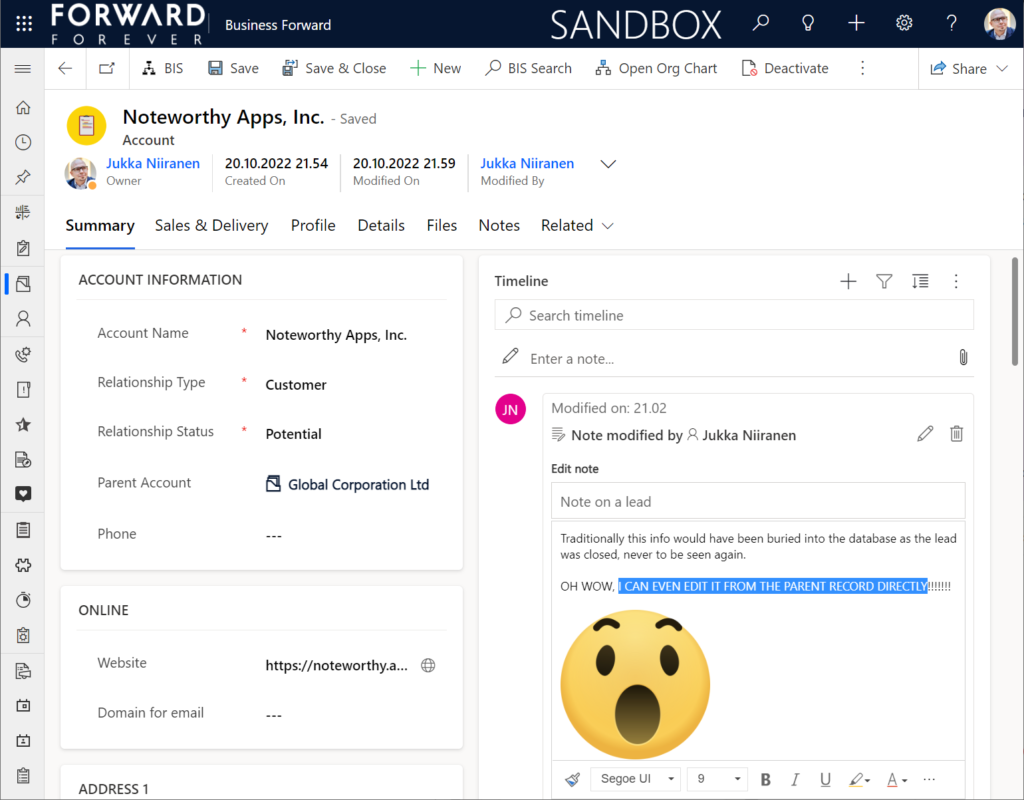
    All the notes from these child records appear just as like they were the traditional notes on the account record itself. In fact, you can simply click the pen icon to start editing a note on the account form Timeline, even if it has originally been added via a different record:

    This can be a bit confusing for the user, since there’s no visual indication on the Timeline card on which exactly is the original hosting record of that note. Which probably is due to the Dataverse data model that doesn’t treat the notes (annotation) table as something where the users could freely set the Regarding record information. With such a non-standard implementation it might be tricky even for the team developing the Timeline to surface this information in the UI.

    You need to keep in mind that this notes rollup isn’t applicable to custom tables, nor across all system tables either. Just like the activity rollup, this is feature of showing relational data from beyond a single relationship “hop” is not a generic platform capability in Dataverse. It works in these basic CRM style scenarios using predefined record types. And when it does, it can be hugely beneficial to end users.

    Alternative Timelines

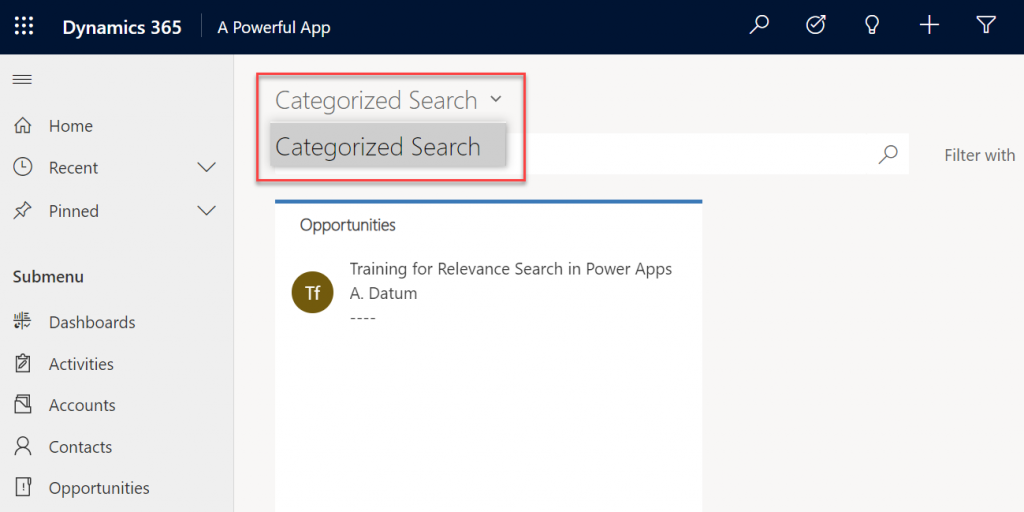
    There are more goodies in 2022 Release Wave 2 under the release item “Try enhancements to timeline maker experience”. One of them is the support for having multiple Timelines on a single form. This means you could add a dedicated “Notes” tab on the account form and configure it to include only notes data, not activities or posts. The benefit from this would be to tailor the display settings in the main Timeline differently than in the Timeline dedicated for notes only.

    In the example above I’ve ticked the box “expand first component to full tab” in the tab settings. This removes all the whitespace and labels around the Timeline, giving it maximum space. Yeah, it’s not the prettiest tab in the world when applying this technique to the Timeline. Yet from a purely functional perspective it’s an option worth trying out.

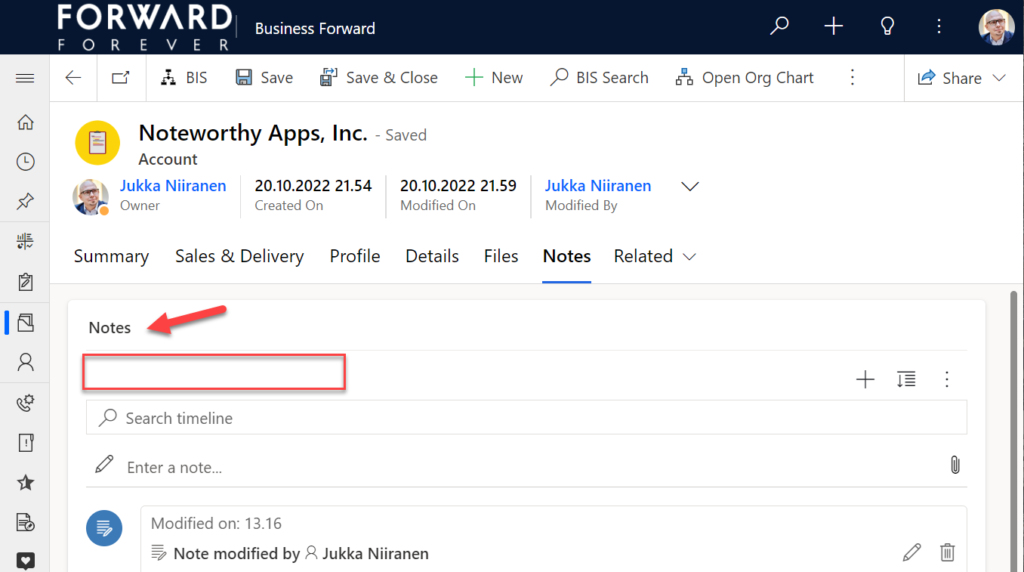
    One common question from customers who want to customize their CRM system’s terminology has been “can we rename the Timeline to something else”? The answer is still: no. However, now that you can have multiple Timelines on a form, the workaround you can apply is this: 1) under Timeline – Properties – Advanced – Additional Settings, check the box “Hide Timeline label”, 2) set your form column label to show the string you want.

    Now the custom text will appear and the place where it used to read “Timeline” is blank:

    Native controls like search or options menu will still use the timeline terminology, though. It’s always worth asking a few times whether it’s absolutely necessary to try and change such native features of a SaaS product like Dynamics 365. (The argument “because we had it like that in our previous system” is always the wrong answer.)

    Timeline forms and actions

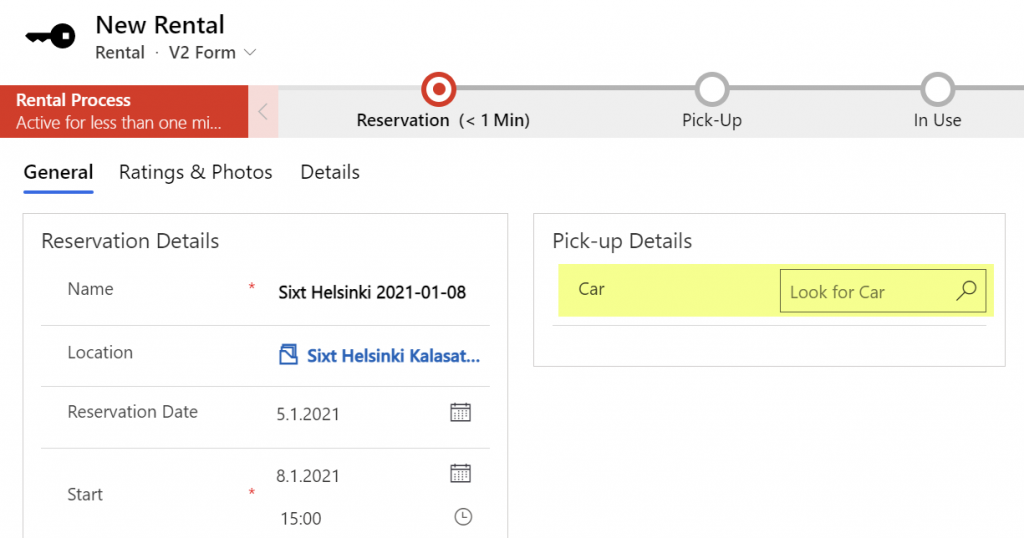
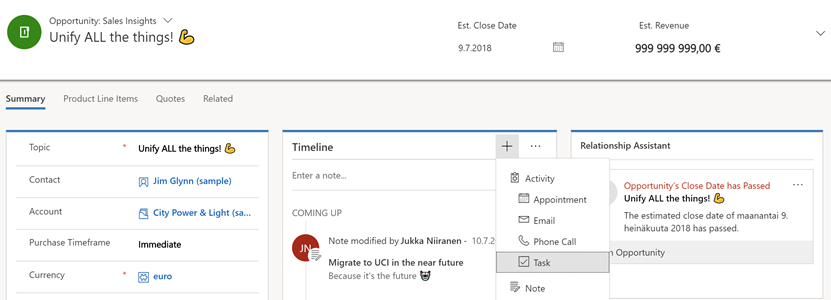
    An area of the Timeline that has really exploded in terms of configuration options is the forms used for interacting with records shown on or created from the Timeline. Let’s look at one example of how the default functionality for tasks could be optimized on the opportunity form Timeline. Without any customizations, it looks like this:

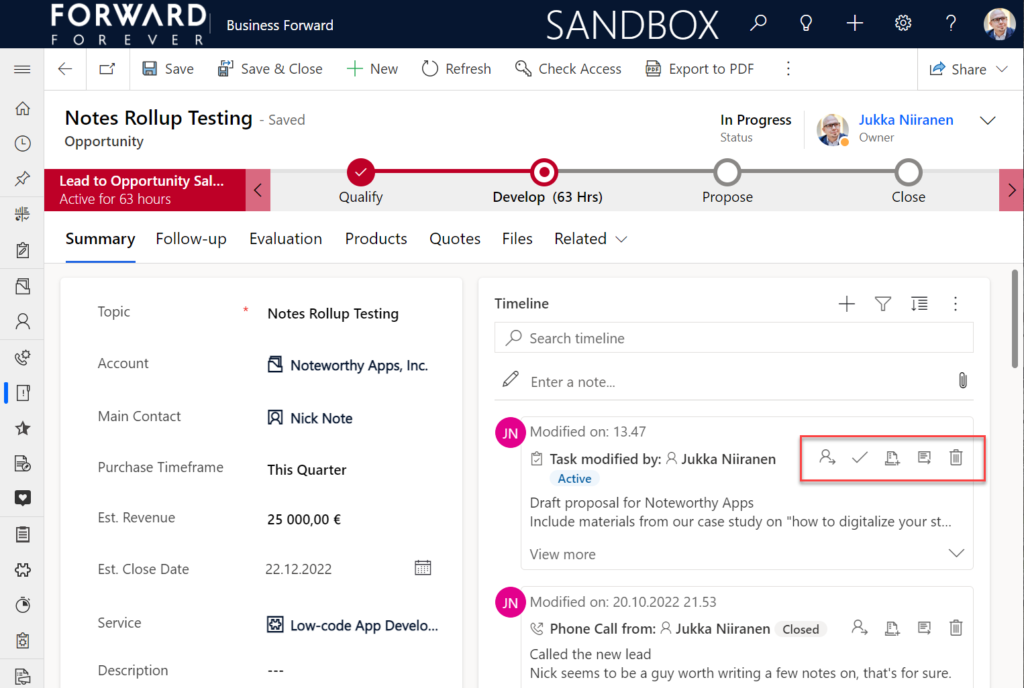
    Looking at the standard Timeline, there’s a bunch of command buttons available for every activity. Problem 1 is: it’s not easy to spot which icon opens the task’s detail form (at least I’ve never learned to immediately pick the right one). Problem 2: when we open the task, it takes us to a whole different web page, thus we lose the context of the original business record (opportunity).

    The Timeline allows us to fix both these problems by changing the settings just a bit. By going to Record settings – Activities and clicking on Task, we get a flyout pane with options specific to that activity type in this specific Timeline instance. Problem 1 can be fixed by disabling rarely needed actions like “Assign”, “Add to queue” (who uses queues anyway?) and “Delete” (deletion of data in CRM does not need to be easy!).

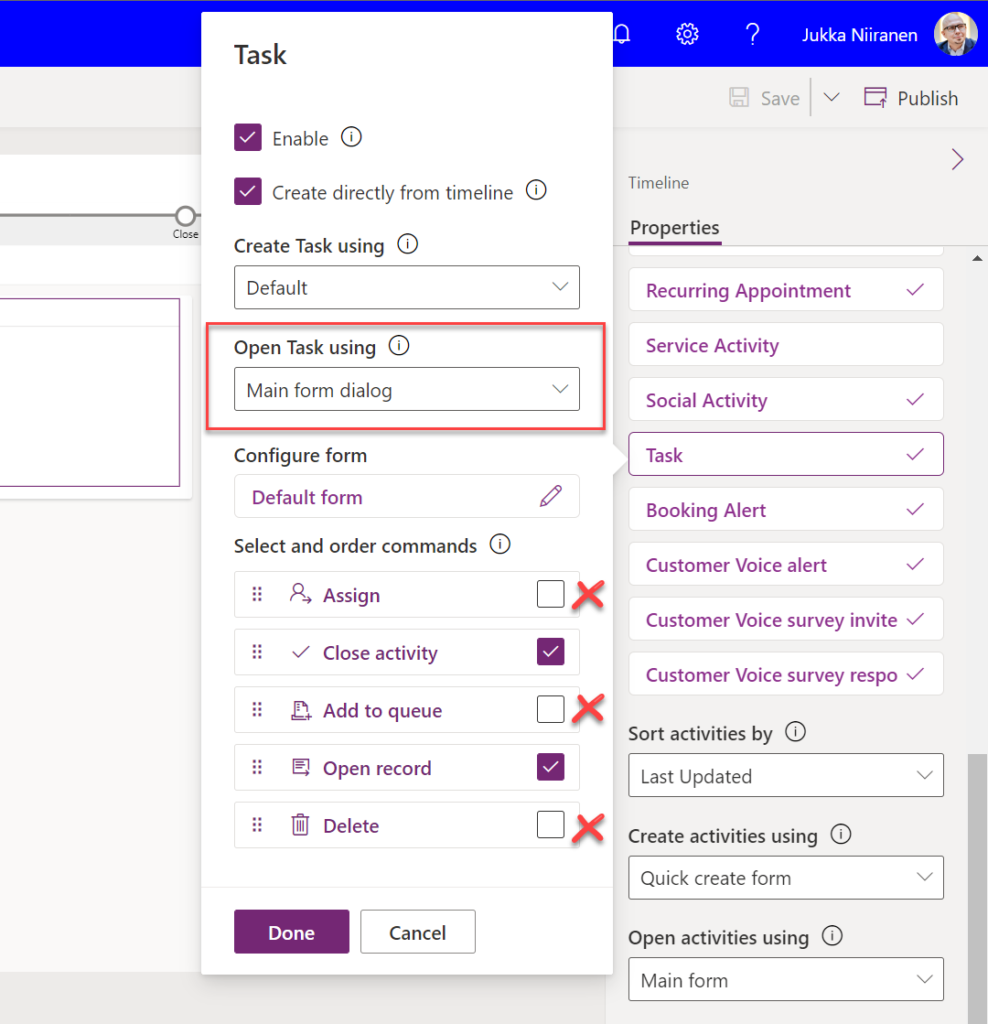
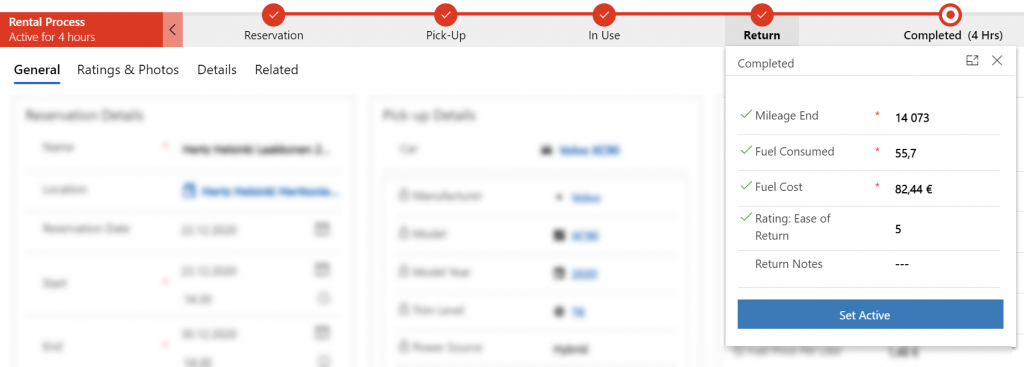
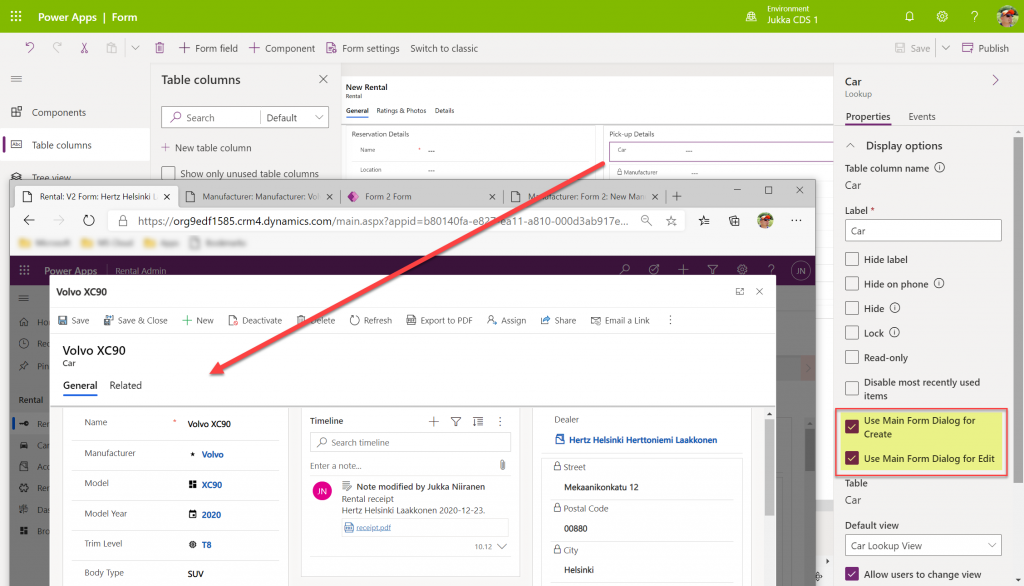
    Problem 2 is resolved by changing the “Open Task using” setting to “Main form dialog”. What does that do exactly? It gives you a modal window on top of the current record, which is a much less jarring experience than bouncing between full forms. Closing it from the X icon will allow you to keep working on the opportunity without forcing any page refresh.

    Want to learn about the Power Apps main form dialog? Read my earlier blog post on how to leverage MFDs for making it easier to work with relational data.

    Timeline configuration sprawl

    The one caveat of all this configurability that we’ve received via the modern Timeline control is that we now have a huge number of different settings we must remember to change. Performing any of the above mentioned changes is relatively easy as an isolated task, but we need to do it for all the tables and their forms where the Timeline control is used. There is no global system setting or “apply to all” option to help us. With any larger business application you’ll quickly need your own Excel sheet just to keep track of all the N settings and N forms that you must manually harmonize.

    Where things can potentially get really laborious is modifications to the card forms used for displaying activity and note data on the Timeline. If the standard date fields aren’t what we want to show, for example (created on vs. modified on vs. due date etc.), there’s a way to change most of them. However, as you can quickly see after browsing through the documentation, the card form editor from the CRM 2011 era and the modern Timeline control have nothing in common when it comes to rendering the visible UI:

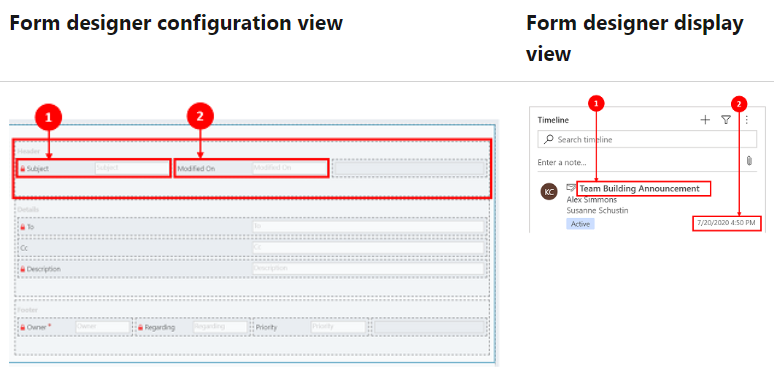
    If you want to include some custom columns from your activity tables into the Timeline cards, the good news is that it’s supported. The bad news is, you’ll likely need to keep the documentation on one screen as a reference, the form editor one the second screen, and the card form legacy editor on the third one. Good luck doing these tweaks from only your laptop screen while working away from the office!

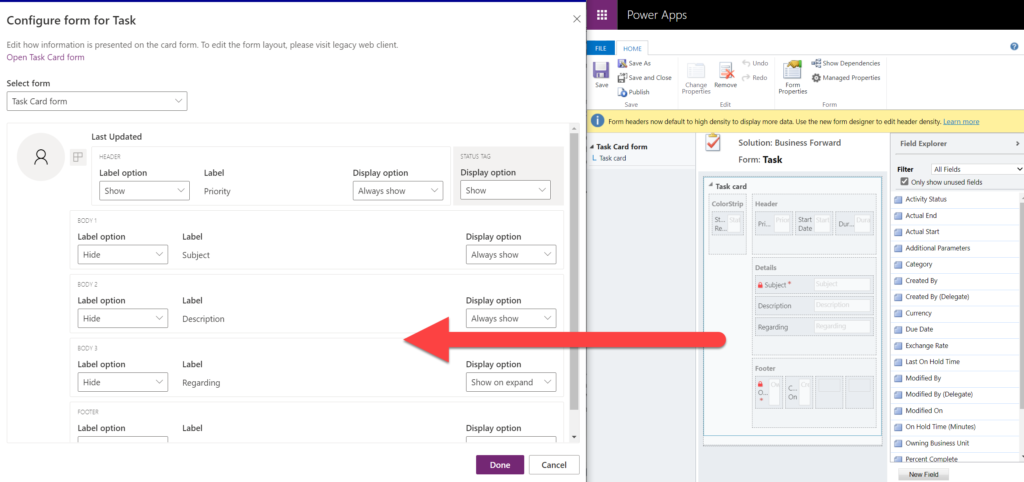
    These configuration tasks start to quickly add up. Let’s say we need to change one date field on the task card and configure its display options and label options. Perhaps our application has 20 tables where the Timeline is used for showing this activity type. Maybe we’ve also created role based forms and targeted them via different model-driven app modules, like “Sales” and “Admin”. That single requirement could mean updating the settings on maybe 30 different forms. With all the loading, saving and navigating in the Maker portal – it could easily take more than an hour to complete.

    Now, let’s say that in a Dynamics 365 project you’ve been assigned the responsibility to take care of all the details for activity and notes management features on every Timeline in the system. Sorting, filtering, control display options, supported activity types, form types per activity, actions per activity… Planning, configuring and validating all these changes will quickly consume many days, even in an SMB level CRM system. And because it’s so easy to miss a few clicks in performing this repetitive work over & over again, you’ll also need to reserve time for fixing the things that were missed.

    Achieving a consistent user experience requires plenty of work – this simple truth has not changed from the early days of Dynamics CRM projects. As Microsoft invests money in modernizing their client controls and introducing more no-code configuration options, the customers must also do their part in ensuring the changes and new possibilities in the evergreen cloud platform are taken into use in a controlled manner. Striking a balance between what can be customized and what should be customized – this remains the eternal question.

  • One-to-one relationships and forms within forms

    One-to-one relationships and forms within forms

    There’s no such thing as 1:1 relationship in Dataverse, and hence your Power Apps Model-driven apps or Dynamics 365 Customer Engagement apps can’t directly have such a data model. Only 1:N (one-to-many), N:1 (many-to-one) and N:N (many-to-many) relationships are available between tables, be it standard or custom ones.

    In practice, even the N:N relationship doesn’t actually exist in the database. While the Dataverse table configuration UI allows you to create this relationship type, it actually consists of a hidden intersect table and two 1:N / N:1 relationships that connect the actual tables together (see Dataverse table relationships documentation). Seasoned XRM professionals may even discourage the use of native N:N relationships, as you lose some control and visibility to the relationship due to its hidden nature.

    Just because it’s not available in the platform, doesn’t mean there aren’t many real life business scenarios where a requirement to have exactly one record per a record in another table. (OK, “rows” in the latest Dataverse terminology, but I prefer the business process lingo where “record” still is more appropriate.) Also, like with N:N relationships, just because it’s not directly possible to create one, doesn’t mean we couldn’t build the required functionality by using the no-code tools in Power Platform.

    In this blog post I’ll demonstrate not only how to create a 1:1 relationship but also how you can offer a pretty nice user experience for working with related records – thanks to the new Form Component Control feature. I’ve covered the feature details in an earlier blog post (“Relational data on Model-driven forms, part 2: Form Component Control”) so please refer to that for more info.

    Why would we need 1:1 relationships?

    From a theoretical data modelling perspective, you probably shouldn’t be splitting data into multiple tables if there is only a single match expected from either side. On a practical level there can be reasons why it makes sense to not cram everything into a single table, though.

    A common source of such requirements are the restrictions of access rights to data. Let’s say that the contact information of a person needs to be widely available to users of the application for various purposes (billing, marketing etc.). However, this contact also happens to be a patient, with details about his or her medical profile being recorded into the same system. Only the doctors should have access to this data. A single contact will match a single patient record (or none, if it has been created for other purposes). If these are in two separate tables, granting access rights can be easily achieved via standard Dataverse security roles: everyone sees the contact table data, but only doctors see the patient details.

    “Couldn’t we just use field level security to hide the confidential stuff?” We could, but you have to evaluate whether the approach will really scale to how the system will be used. You see, in addition to security we’ll also need to consider if we’re overloading a single table with too much data. There are hard limits of the maximum number of columns that SQL Server supports for a single table. Thanks to the value-add provided by Dataverse, adding one column into the data model can create many columns in SQL. This means you don’t have anywhere near the 1024 columns per table at your disposal. Also, if you’re working with a standard CDM entity like contact, there will already be close to 300 attributes taking up space before you extend the data model for your specific needs.

    I was recently working with a customer that is planning to use Dynamics 365 Customer Service for managing all their service requests in every department they have. This will mean that tens of different types of services will be creating case records into the system. The amount of service specific information that must be available to be captured on case records is easily hundreds, if not thousands of fields. Adding all of these to the case (incident) table wouldn’t be feasible, so instead the solution architecture was designed to incorporate “service detail” tables specific to each service. Each case will have one (or zero) of these records, so it’s a 1:1 relationship between the standard case table and these custom service detail tables.

    Establishing 1:1 in the data model

    In the scope of our example, the data model will consist of these main tables:

    • Service 1, Service 2, …, Service N: parental record under which the cases will be created. Think of these as service contracts that a contact person can have for one or more services.
    • Case: the standard Dataverse / Dynamics 365 table, with lookups to all of the aforementioned Service tables. No other service specific data is stored here.
    • Service 1 Detail, Service 2 Detail, …, Service N Detail: service specific information that should be found from under each Case, depending on which service it applies to.

    Just like the N:N relationships in Dataverse consist of two 1:N’s, the same applies to our manually created 1:1 relationship. Only this time we’re not going to need an intersect table, rather we’ll just link the two records together via the relationships like this:

    The Case record will be parental to the Service Detail record, but at the same time the Service Detail will be the Case’s parent. These will appear just as two custom relationships under our table:

    Next, we’ll want to ensure that there is always one and only one Service Detail record for a case – IF the case is related to the delivery of the specific Service. Furthermore, we’ll want to get the Service Detail created automatically immediately after case creation, so that users can start entering data on it.

    The real-time requirement rules out Power Automate that is asynchronous by nature, so we’ll use the classic XRM workflow engine instead. There will be two levels in the automation:

    1. When a Case record is created, check which of the many Services it is linked to and create a record in the corresponding Service Detail table (establish 1:N relationship).
    2. When a Service Detail record is created, update its parent Case with a reference that sets the Service Detail to also be the parent of that Case (establish N:1 relationship).

    Workflow 1 looks like this:

    It will then in turn trigger workflow 2:

    Notice that we have a check in place that stops the creation of a Service 1 Detail record if one already exists for the Case. If the lookup to Service 1 Detail is empty, we put the reference to our newly created record there and establish the 1:1 relationship.

    Working with 1:1 data in the user interface level

    This is where the Form Component Control comes in handy. In short, the control is meant to allow both the display and inline editing of a parental record’s form, embedded inside another form. An example of the standard data model use cases would be to show the fields of a the customer contact on a Case form and allow the service representatives to update them without having to open the actual Contact form.

    It works in our 1:1 scenario, whereby we can edit the Service Details fields directly on Case form. The reason is that not only is the Service Detail a child record of the Case, it is also the parent – thanks to what we’ve just built above.

    You’ll find the explanation of how to use Form Component Controls in my earlier blog post. For now you need to do the configuration in the legacy Solution Explorer side, by editing the form and setting one of the lookup fields to be rendered as Form Component Control:

    Now when we create a new Case record and have the Service 1 lookup value populated, after the first save the user can immediately continue to fill the Service 1 Detail values right within the same Case form:

    The beauty here is that for the user who’s working with a Case record, they won’t need to know there are two different Dataverse tables used for storing the data. Both the Case record details, Service 1 Details and even the Contact record details are all editable on the single screen. The world looks flat, regardless of our data model with several relationships configured behind the scenes.

    Conclusions

    Dataverse offers you plenty of configuration tools to get creative with both the data model and the UI in Model-driven Power Apps. While the standard hierarchical structure of parent-child records and table (entity) specific forms is the most common pattern, there are alternatives that may be useful when faced with more complex business requirements.

    Dividing the business data into multiple tables with 1:1 relationship may sometimes be perfectly justified, to accomodate the security and data storage requirements. The user interace of Model-driven apps today offers great tools like the Main Form Dialog and Form Component Control to simplify working with proecsses that span across different tables in the underlying database.

    If you’d like to see Microsoft implement a native one-to-one feature for Dataverse, please vote on this idea.

  • Relational data on Model-driven forms, part 2: Form Component Control

    Relational data on Model-driven forms, part 2: Form Component Control

    Our quest for improving the user experience of Power Apps Model-driven app forms and multi-table data models continues with this part 2 blog post. We will explore how the brand new Form Component Control enables us to essentially blend the forms from two different tables (entities) onto a single form for the user to easily interact with.

    In part 1 I laid out the example scenario of a Rental Car app where a single rental event record will always have a single related car record associated with it. Please go and have a look at the details in the earlier post if you want to understand the details.

    Our approach was to leverage the Quick View Form to bring in fields from the related parental table (Car) onto the child table (Rental) form. To make the data entry and editing easier we enabled the Main Form Dialog feature for the Car lookup field, which then opens the form in a modal window.

    While this UX is a lot nicer than navigating between full screen forms and page loads, it’s still not all that seamless. The user will be very much aware of the fact that he/she is working on two different tables, while ultimately we’d want to show just a single page that abstracts away all this complexity of the underlying relational data model.

    What is the Form Component Control?

    First of all, it doesn’t have a very sexy name, that’s for sure. During the past few days of exploring the feature, I’ve had to repeatedly go back to the documentation to see what the name was. Even the product team’s announcement “editing related records on a main form in a model driven app” doesn’t sound very exciting. There’s a lot easier way to describe it:

    Forms within forms.

    It’s simple, and it’s very powerful. Unlike the CRM 2013 era feature of Quick View Forms, there’s no requirement to keep the forms as “view only” , nor particularly “quick” in terms of their contents. It’s just regular forms, and they can be used within other regular forms – full edit capabilities included.

    Let’s add a Form Component Control onto our form and see how it works. Unlike with the Main Form Dialog feature discussed in part 1, this Form Component Control feature is unfortunately not yet available in the modern Power Apps form editor. So, we start with what we still need to do very often in the world of Model-driven apps, meaning hit the “Switch to classic” button to launch the classic Solution Explorer that dates back to CRM 2011.

    On the form where we have a lookup field (in our case the Car lookup on the Rental form), let’s open its properties dialog, go to the Controls tab and click “Add control”. We can see the MS provided PCF control “Form Component Control” in there. Adding it and setting it to be the default control for our web client is easy, but the configuration requires some additional information that doesn’t have a graphical UI (maybe in the modern form editor then once this feature is supported there).

    See the MS documentation page for the detailed steps to take. In short, you’ll need an XML entry that contains the table name (entityname) and the form ID of the main form you want to show for the related table. My configuration looks like this:

    <QuickForms><QuickFormIds><QuickFormId entityname="cr7d0_car">2F3B241A-4E3F-4AE3-A26F-1AB7BF804636</QuickFormId></QuickFormIds></QuickForms>

    Let’s publish the changes and go test out the experience of editing an existing Rental record where the Car record’s fields have been partially populated. On the place where I previously had the Quick View Form with its locked fields, there are now fields coming from the Car table form. Text fields, lookups, choice fields – they all work exactly the way they would if I was editing data that’s natively stored on the Rental record, rather than the related Car record.

    The save event happens as part of the hosting form, no additional tricks required. Field validation, notifications and error handling is also integrated, regardless of whether the business logic comes from the main form or the embedded form (details in the Docs).

    All in all, this works incredibly well from a user experience perspective in my initial tests. Even if you’re a Dynamics 365 or Power Apps professional you might not realize that the form actually blends two different tables into a single form.

    Main form rendering options via Form Component Control

    With the old Quick View Form feature, there was a separate form type you had to create for the table for this specific purpose. It was far more limited in contents and layout than the full table forms, which kind of made sense for the purposes of bringing a few key fields in read-only mode onto a the actual main form of a different table. QVF allowed single column only + no other useful controls than the subgrid:

    The Form Component Control knows no such boundaries. What you can use there are the existing or new main forms for any table. If you place them within a single narrow column on a multi-column form tab, then all of the form contents will be rendered within that column. Since the Unified Interface forms are inherently responsive by default (which is a big benefit compared to Canvas app screens), everything will just reflow into a layout that would resemble a phone screen – even if you’re viewing the form on a widescreen PC monitor.

    What about if we give the Form Component Control a bit more space than a 1/3 of a typical Model-driven table form? The reflow also works the other way around, meaning all of the available screen space will be used. If the area given to FCC can accommodate more columns and the source form has them, they’ll be rendered just like on the “native” viewing experience of that form.

    Below is an example of an alternative form design for the Rental table. Instead of having the related Car shown in the middle of the first form tab, I’ve added a second form tab “Car” and dedicated all the space available in it to a single lookup field that has the FCC control enabled. You’ll see from the static Business Process Flow and the form header that we’re firmly on the Rental form all the time, but the second Car tab shows things like the Timeline for that car record (with a note), further tabs for the car’s Dealer, even a Quick View Form referencing the dealer account related to the Car record – all within on FCC control.

    This to me is just mind-blowing! We are reaching Inception level UX here, with the main forms embedded AND rendered as a full form tab within another form. I could be on the Rental record form, adding an activity via the Timeline control that’s actually linked to the parental Car record. Not the Rental record where the app navigation, form header, Command Bar and everything else visible on the screen is telling me I’m on. I’ve effectively built a form UI that defies the laws of nature I’ve come to expect from Model-driven apps.

    Sure, embedded Canvas apps could do some magic like this already earlier. The big difference is that the user interface of those screens could never match exactly that of a Model-driven app. With FCC there are no visual clues distracting the UX, as everything looks and feels like it’s part of the native experience where Microsoft owns and manages the visual side.

    What about record creation instead of edit?

    The one gap that exists in the inline editing story for Microsoft’s controls like the Editable Grid or this new Form Component Control is that there’s no possibility to use them for adding new rows into a table. They offer the edit experience, but no create experience. Sure, we have the Quick Create Forms feature available for contextual data entry, but it’s not really optimal. The user shouldn’t have to think about if they are editing existing entries or creating new ones. Yes, the difference between these concepts matters to the platform on a technical level. Still, unless there’s a valid business process requirement for making the data entry experience different for create and update scenarios, it’s something I’d prefer to eliminate from the UI.

    When there’s a scenario where we essentially have a one-to-one relationship between tables (no “real” 1:1 relationship exists in Dataverse, but there are ways to fake it), one option would be to automatically create the related parental record behind the scenes. With this approach, at the moment when the user will proceed to entering data via the Form Component Control, the lookup field will already be populated and the experience will look pretty seamless:

    What I’ve done here is to create a classic XRM workflow that runs in real-time, triggered by the create event of the Rental record. (Power Automate can’t do real-time yet, so it’s a no go for flow in this case.) The workflow will create a Car record with a placeholder name “(Undefined)” and link it to the Rental record. By the time the first save event for the new Rental record takes place, the FCC can then render the fields from this placeholder Car record on the Rental form.

    In the above example GIF animation you may also spot that the Car name changes transparently from “(Undefined)” to “BMW”, due to what has been selected in the Manufacturer field. This again is another real-time workflow that’s triggered by the update event of the Car record. The end user will not need to take any actions, it’s all just the native autosave feature of Model-driven apps that populates this name field while the user is still entering data into other fields further down the Car form.

    Considerations

    If the new Form Component Control gives us not just the read capabilities from Quick View Forms but also data edit support, then should we just stop using Quick View Forms altogether? Well, it certainly is a good question. Given that QVF dates back to the CRM 2013 era user interface technologies, FCC is much more in touch with how the modern Unified Interface client has been designed to work. It’s built using the Power Apps component framework (PCF) and should in theory be the most future proof choice for Model-driven app form design.

    One downside is that the use of FCC for the pure view scenario is a bit more laborious. If we indeed would want to prevent the user from updating values from the parental record while on the child form, then these fields would need to be set as read-only on the main form itself. Which brings us to the challenge that you’ll need to keep more forms visible in the Model-driven app, whereas classic QVF’s are hidden behind the scenes and only applied as the definition when rendering the main form on which they are used.

    The create scenario I talked about earlier is also a bit of challenge when analyzed deeper. If indeed the lookup from which the Form Component Control gets the related parental table record to show isn’t populated immediately, you’ll see a message saying “source record not selected”. In most cases that’s going to be quite a confusing message for the end user to encounter, given they are unlikely to have any idea about the forms magic and relational tables being used in to construct the app’s UI.

    “Couldn’t we just hide that control until it the lookup has data?” Well, I can’t think of a no-code way to achieve this. You see, the problem is that the FCC essentially is the same field as the lookup field. Sure, you can have multiple instances of it on the same Model-driven app form. But you can’t use Business Rules to say “hide this field if this other field is empty”, because they are the one and the same. Quick View Forms handle this scenario much better, so let’s hope Microsoft will improve the functionality in FCC to accommodate this create/hide scenario better in future releases.

    WE NEED TO GO DEEPER Inception

    This first public preview release of the Form Component Control has a few limitations that you should be aware of. For instance, you can’t show more than a single tab from the form being rendered via FCC, which isn’t really a big issue unless you really are building an Inception app to confuse the hell out of the classic CRM users at least. Similarly, you can’t have FCC’s within FCC’s, which blocks some crazy recursion scenarios.

  • Relational data on Model-driven forms, part 1: Main Form Dialog

    Relational data on Model-driven forms, part 1: Main Form Dialog

    Model-driven Power Apps are built on top of the relational data model of Microsoft Dataverse (formerly CDS). Planning how you split your business data into different tables is a crucial step in ensuring that your app’s user experience (UX) is optimal for the data entry, consumption and update tasks that the users will need to live with. This is because unlike with Canvas Power Apps, the data model defines much of the user interface behaviour as well.

    The key thing to keep in mind is that you’re not supposed to build the most normalized data model possible, where every concept in your business process is spun into its own little table. Yes, you do want to leverage the power of relationships (one-to-many, many-to-one, and on some rare occasions also many-to-many) to make the data more manageable than a single flat list structure would offer. No, you don’t want to make your users have to think about the Entity Relationship Diagram (ERD) of the system to know how to navigate within your app.

    Despite of the tight coupling of the data model and the UI, there are plenty of things you can configure on Model-driven forms to improve usability. I’ll be drilling into a few recent features that can make it easier to work with related tables from within a single form.

    The scenario: Rental Car app

    I’ll be using an example app that I’ve built for my own purposes: Rental Car App. It contains functionality that allows me to track and analyze information about the rental cars that I use, by adding new Rental records for each reservation I make and then tracking the process all the way until the final invoice and related costs. At the heart of the app there’s the Rental table, which has relationships to both the rental car company information (Account table) as well as the Car table, which again links to a few supporting tables like Manufacturer and Model.

    The rental process stages are modelled via the Business Process Flow feature of Power Apps Model-driven apps. We start with 1) the reservation, then proceed to 2) pick-up at the chosen location, 3) use the car we’ve been given, 4) return it and 5) finalize the process upon ensuring we’ve captured all the required data and that the invoice was what we expected to pay.

    Each rental event will have one car associated with it. However, at the first step of the process, meaning reservation time, we won’t yet have any idea what specific vehicle that will be. (You’ll only know the ACRISS code that describes the level of the vehicle features, like “IWAR” for Intermediate, Wagon, Automatic, Air Conditioning.) Once we get to stage 2 of the process, the pick-up, we’ll be given a specific car that we can describe with properties like Manufacturer, Model, Model Year, Trim Level and so on.

    Car is the parent table of Rental, since there can only ever be a single vehicle for one rental event (for now, let’s ignore the possibility of the car breaking down and getting exchanged during the rental period). A single car will of course be used in many, many rental events. However, since the app user is the customer who’s consuming the rental service from different car rental companies, we won’t have the fleet of vehicles defined in advance for our database. The data entry of the car’s details is therefore always a step within the context of the rental process.

    So, we know that logically the car is a different type of object than the rental event, which is why it should have its own table. From a user experience perspective, though, filling in the details of the car should be just a similar task as describing the duration or price of the rental car reservation. Just a set of fields on the single form. Yet by default what the Model-driven app form will give us is a single lookup field to the related table’s car record, with the expectation that we’d go and work with the Car data on a different form than the Rental form where the rest of the details are.

    Despite of the underlying 1-to-N relationship in the data model, we can improve the user experience by leveraging a couple of neat features in Model-driven apps.

    Quick View Forms

    Model-driven Power Apps have evolved from the XRM platform that Microsoft first used for builing a CRM product of their own in 2003. Around seven years ago when Dynamics CRM 2013 was launched, it introduced this new and exciting “flat UI”. Before that, the experience of using CRM was often a maze of popup windows since opening a new record always gave you a new browser window you now had to juggle on your desktop.

    The boundaries of different entities (which is what tables were called for the first 17 years of the platform we now know as Dataverse) were therefore very tangible indeed. While form subgrids were launched in 2011 to offer some relief, it wasn’t until 2013 when we could start to make the users worry less about the data model and focus more on the business process and actual business data involved in it. A key element in this was the Quick View Form.

    Above is a screenshot from seven years ago of a case entity form that included data from not just the child entities like activities, but also from the parental record of the customer, via a Quick View Form. We can see the email and phone number of the customer, event though they are physically stored on the account entity. It’s not limited to just that N:1 data from “case:account” either, as we can reach down to N:1:N of “case:account:case” by showing all the related cases that this customer has recently opened with our support department.

    Quick View Forms were a seriously powerful feature back when they were released. I did some blogging to demonstrate the possibilities, like building a similar opportunity analytics feature that resembled (well, remotely at least) the concept of an ecommerce recommendation engine that shows “customers who bought this item also bought these other items”.

    The scenario in our Rental Car app is a lot more straightforward. We want to display the key properties of the Car record associated with the Rental record within the form that drives the rental process. By having a lookup field for Car on the form, this allows us to add a Quick View Form control to show the Car table fields embedded on the Rental table form:

    From this static screenshot it would seem like everything is in its right place and the user couldn’t be happier. Right? Well, the challenge here is that the Quick View Form really is just a view. It doesn’t allow editing any of the field values on the related parental table record, let alone creating new records. In short, it’s not as actionable as the data living natively in the Rental table.

    Main Form Dialog (MFD)

    A much more recent entrant into our Power Platform low-code toolkit for designing Model-driven application UI’s is the Main Form Dialog feature. What this allows you to do is to launch a modal window from the lookup field on a Model-driven app form. The user interface doesn’t actually move you fully away from the original record, rather it just renders the (Main) Form of the chosen record from a different table in a Dialog window. It’s not like the CRM 2011 era popup windows, since you remain within the same browser window/tab. Once you’re done with looking at the related record, clicking “X” will return you to exactly same state where you were before clicking in the lookup field. It’s not as jarring an experience as if you’d have fully navigated away from the original form.

    Originally launched as part of 2020 Release Wave 1, the MFD feature was initially available only via the API. At this moment that is still what the documentation says, but I recently discovered that the modern Power Apps form designer now has graphical tools to configure this feature:

    When selecting a lookup field in the form editor, the properties dialog on the right now contains new options to check:

    • Use Main Form Dialog for Create
    • Use Main Form Dialog for Edit

    Oh yeah! We now have the power to keep the users from unintentionally navigating away from the “home” form that acts as the anchor for all relevant details concerning the business process. In the rental car example, the user can now safely click on the Car lookup, examine the available options for properties of the car, change the values, click “Save & Close”, then end up right back to where he or she started from:

    This also works for the experience of adding a new car record. Instead of having to offer a separate Quick Create Form experience for this step that would behave differently from any other occasion where the user interacts with car data, we can launch the full record form in the Main Form Dialog:

    The key benefit with this modal window approach is that there’s almost zero chance of the user wondering into the wrong menu or page of the application after they’re done with creating, editing or just viewing the related record. There is no visible page load that would change the mental context away from the primary record, in this case the Rental event.

    Considerations

    Should you enable the Main Form Dialog feature now on all your lookup fields? Probably not. There will be times when the user may prefer to actually move along in the process and change the context to the parental record. There is no navigation path available in MFD that would support this context change. The user has the option to launch the dialog in full screen mode, but that just expands it to cover the whole screen, rather than doing a page load that would change the navigation position in the sitemap.

    There is currently no way to select which form specifically should be opened in MFD. Presumably the form will be determined by the table’s main form order, as well as the specific form the particular user has last viewed. Depending on the number of scenarios where the same table is leveraged, the forms shown by MFD can therefore be unnecessarily complex for the task at hand.

    In part 2 I will explore the possibilities of how we can streamline this process even further and make the experience of working with related parental table data almost transparent to the user. We’ll be leveraging the brand new Form Component Control to essentially combine the features from the earlier Quick View Forms and Main Form Dialogs.

  • Make your Power Apps search experience more Relevant

    Make your Power Apps search experience more Relevant

    Microsoft recently launched a brand new search experience for Model-driven Power Apps and therefore also first-party Dynamics 365 apps operating on top of CDS. This is a significant step forward in the “non-structured” search capabilities in Power Apps. The structured queries one can construct via Advanced Find were always one of the most powerful features that the XRM platform could offer on top of relational data (and remain one of my most read posts on this blog). Now also the free text based search experience is catching up nicely:

    Being a low-code application platform, there are several configuration options related to how the search features in Power Apps behave. This can also result in people missing out on how they could ensure that the search really works the way that the users would expect. In this blog post I’ll go through some common challenges that the Dynamics 365 professionals may have already learned to overcome but which can be surprising to new Power Apps makers.

    Challenge 1: Relevance Search is not enabled

    If you’re not seeing anything even remotely like the MS blog posts when performing a search in a Model-driven app, then you may well be using the limited Categorized Search instead of the fancier Relevance Search. When attempting to change the search type, you might discover that the dropdown actually doesn’t give you any choices, i.e. it’s a dead end with Categorized Search as the only option:

    Why does this Categorized Search option even exist, and why do we need to specifically enable Relevance Search? It all comes down to the on-premises legacy of the platform, where the single CRM server had to be capable of offering a standalone search option. In the cloud era we can leverage Azure Search as the external search index database to where CDS data is syncrhonized to, thus offering a far richer search experience.

    Now, Azure Search being a separate service and possibly having different types of SLAs and other legal variables than the core Power Apps or Dynamics 365 services follow, it’s not on by default even in the MS cloud. An administrator will need to navigate to the Power Platform Admin Center, choose the environment, then go under Settings / Features / Search to flip on the swith that turns on Relevance Search.

    Once it’s enabled, only then will you see the option to also turn on the new search experience (which probably will become the default option in the future). It won’t show up there immediately, so give it a lil’ time.

    Challenge 2: Relevance Seach doesn’t search my entities

    Cool, we’ve now got the new UI up & running. When we do a search from the new prominent search bar always visible at the top, the results are returned for some of the entites. But why aren’t we getting any hits for Widgets, for example? In this scenario we know there are records in there that contain matches to our search string.

    Even though Azure Search provides a richer search index for your Model-driven Power Apps, it doesn’t directly copy each and every table from CDS into it’s database automatically. When working with a Dynamics 365 environment there are some default entites covered (like accounts, contacts, opportunities). For any custom entities and especially with custom apps, you’re gonna have to explicitly tell which entities should be enabled for Relevance Search.

    To access this configuration option you’ll need to leave behind the modern Power Platform Admin Center and venture into the land of the legacy web client and Dynamics CRM era customization UI. You can either add “/main.aspx?settingsonly=true” to your environment URL or find another path into the land of more advanced options. Once there, find Settings / Customizations / Customize The System and open up the Entities menu in the Default Solution window. Now you’ll see what entities are included in your Relevance Search Index and which are not, i.e. they are in the Available Entities list:

    Select the entities you want, click OK, then Publish All Customizations and now they are enabled for the modern Relevance Search experience.

    Challenge 3: Relevance Search doesn’t search the right fields

    Hmm, why aren’t we still getting the full search results for our Widgets entity, even though we added it into Relevance Search? Well, technically you didn’t add the whole entity into the search index. By default a custom entity seems to pick up only the primary field (usually “name”) into the search scope, but it’s likely that you’ll have plenty of other important field that should also get indexed. The same goes for default entities: only a subset of the standard fields are included, and none of the custom ones are, unless you configure them to be included in Relevance Search.

    If finding the menu from where the entities list for Relevance Search is maintained was a bit tricky, then figuring out the place for specifying the field level search settings ain’t that obvious either. You see, it’s not a property of the field in the entity itself. It’s the inclusion of that field in the entity’s specific view called Quick Find View that determines what gets pushed to Azure Search database and back to Power Apps UI.

    Even though the entity view editor can already be found in the modern Maker Portal for Power Apps, these settings aren’t there yet, so I hope you didn’t close that legacy customization UI just yet!

    From the legacy Solution Explorer, open the Quick Find View for your entity, select Add Find Columns from the right and check the boxes for the fields you consider to be potentially useful for Relevance Search. Save & publish your changes, then verify that the search results match with your expectations.

    Challenge 4: Relevance Search doesn’t cover inactive records

    Sometimes the information you’re looking for isn’t found on records that are actively edited anymore, as you may be digging further into the history of your business data to check up on past transactions. In the typical CRM scenarios where Model-driven apps are leveraged this could mean searching through historical sales opportunities that are either won or lost, to find examples of what offers have been made to which clients on what specific terms.

    With the out-of-the-box configuration of Dynamics 365 or Power Apps, you won’t find them via Relevance Seach. Yes, the vast majority of records that you’re storing in CDS may well be excluded from the search index by default. This is because of the same Quick Find View we visited earlier. Not only does it control the fields being indexed, as well as the column layout of the search results page. It also controls the static filters which are applied to the search results before they are shown.

    Using the OoB opportunity entity as an example, you’ll find a system view called “Quick Find Open Opportunities” under the entity. Click on Edit Filter Criteria to reveal the fact that it indeed does only include open opportunities. While we can’t create additional Quick Find Views for entities, luckily we have the freedom to modify or delete the existing filters. So, just remove that status field filter criteria, save & publish. Now your Relevance Search will also return results from the inactive records for this entity.

    Challenge 5: Relevance Search suggestions aren’t found in the search results page

    The new search experience has a nice UX for suggesting matching records immediately as you type the letters in your the search term. Let’s say that we’re interested in the search term “relevance”. By the time we’ve entered “relev” into the search bar there’s already a number of matches in the suggestions box:

    Looks great, but I think I want to see more details, so I’ll click on “show more results” at the end of the search suggestions. Hey, where did all those matching records go?!?

    Unfortunately this is a challenge where you can’t configure way around it (at least yet). For the time being, this actually is by design. Taken from the documentation, Microsoft lists the suggestion feature separately from the actual search requests:

    Suggestions provide a list of matches to the specified search parameter value, based on an entity record’s primary field. This is different from a regular search request because a suggestion search only searches through an entity record’s primary field, while search requests search through all relevance search-enabled entity fields.

    So, the search box and the search results page follow different logic, which is why it is expected that they will show different matches. This may be seem quite complex to explain to the app end users on a detailed technical level, so it’s better to just instruct them to always apply the wildcard character * at the end of their search term. The results are likely to be closer to what they expected to see:

    Hopefully these 5 tips will help you in setting up the basis for more relevant search results and a better user experience in your Model-driven apps. For more comprehensive guidance, check out these three different levels of documentation that Microsoft provides on the Power Apps seach features:

  • 2 become 1 UI: PowerApps Roadmap from MBAS

    2 become 1 UI: PowerApps Roadmap from MBAS

    Have you looked at the MBAS Gallery yet? Microsoft Business Applications Summit 2019 was last week and already the majority of sessions have been published online for also non-attendees to enjoy. Even if you attended the conference in Atlanta, there’s a chance that you may have missed a few sessions, with there being 200+ of them in 2+1 days.

    Live recordings of sessions are nice – if you have ~200 hours to sit through them, that is. As is the case with podcasts, I rarely come across a moment in my life where there would be empty space just waiting to be filled with a 1h chunk of audio/video of people talking about something that might or might not be valuable to me. On the other hand, I’m very comfortable with skimming through endless amounts of text & pictures, in search of something that warrants my real attention and further processing. That’s where PowerPoint slides are just awesome. Bullets, tables, charts, diagrams, screenshots, OH YES!

    Last week I started going through the MBAS session catalog and downloading the slide decks for interesting sessions. (I’m not the only one who hoards PPTXs from MS events, check out MVP Jussi Roine’s blog for his tips on learning quick as a consultant.) Now I’ve got a folder with 115 PowerPoint files weighing in at 4.5 Gigabytes. Hmm, looks like some further prioritization is still needed to narrow these down. Well, one thing’s for sure: I know where I want to start diving into the content. The future of business apps awaits in this session:

    Run One UI – the future of canvas, model-driven, and Unified Interface in PowerApps (BRK2073)

    For those with Dynamics 365 Customer Engagement background, the topic of user interface unification might lead your thoughts to Unified Interface. Originally announced 2 years ago, this new client infrastructure aims to do away with the earlier divide between web client, phone, tablet and Outlook. More importantly, it’s a foundation for unbundling the application specific UI controls from the platform and opening up the road for everyone to build the kinds of controls that Sales, Service, Marketing and all the other 1st party apps contain. That story is called PCF and it’s a big deal for sure, but something even bigger is on its way.

    This  “One UI” does not simply look at the Dynamics side of the house, rather it encompasses the whole app story in Power Platform. Ever since XRM merged with PowerApps, we’ve had this somewhat awkward divide between Canvas apps and Model-driven apps. These terms don’t mean much anything to customers when explaining them the platform capabilities. For the Dynamics professionals the concept of a “Model-driven PowerApp” sounds artificial. While on the back end the CDS, admin and developer story is coming together quite nicely, on the front end we see two experiences with not too much in common – today.

    We’ve already heard Charles Lamanna make a statement that Microsoft has no intentions of keeping the app types in PowerApps separate:

    “Artificial limitations in app features will be removed, so that choosing [File – New App] will give you model or canvas experiences and everything will work across both.”

    Power 365 Show: Power Platform Changes and Answering Community Questions with Charles Lamanna

    Sounds cool! But how exactly are they going to pull off this merging of the two client frameworks with a very different history? On the platform side it was fairly simple as XRM probably offered a lot of what CDS v1 was capable of and turning it into CDS v2 was not a big issue due to low adoption rate of the less mature technology of the two. PowerApps Canvas apps on the other hand have a huge momentum going on and the number of apps in production is exploding. Dynamics 365 CE ain’t doing too bad either when it comes to growth figures in the cloud, so messing too much with it sound very risky. After all, we’re still waiting for many existing customers to even move from the classic web client to Unified Interface, so do we really need more confusion in this space?

    In the Run One UI session at MBAS we heard Clay Wesener present the master plan of how the two different app types will gradually turn into one PowerApp. Here it is:

    This is really just mashing together the start and end state from Clay’s presentation, so this time you really should reserve an hour of your time and watch the recording, to understand the finer details. And grab the slides for reference, naturally.

    A key part of the plan is that this won’t happen in a big bang. There won’t be an “Even MORE Unified Interface” launched at some grandiose marketing event, rather Microsoft will introduce capabilities from one app type to the other in a gradual fashion. PCF just arrived on Model-driven Apps as a public preview, soon it will start showing up on the Canvas side, too. Canvas Components are bringing the more structured way to define the UI into the previously blank canvas where each pixel used to run free, making it more like the grown up version familiar from enterprise business applications. These new parts are all about blurring the lines between Canvas and Model.

    (more…)
  • Unified Experiences in October 2018 Release

    Unified Experiences in October 2018 Release

    The October ’18 of Microsoft Business Applications is going to bring a whole bunch of exciting features, spread across the huge stack of products and apps that either make up or operate on the Power Platform. Much of them will be specific to an area that only some of the users or developers work with in their specific customer scenarios, but there are also going to be updates that will be visible to practically everyone. Here are some of those new experiences that we can expect to see within the next few months as the features are gradually released.

    App Navigation

    On the Model-driven App client side, there will be some changes to the navigation features in Unified Interface. Here’s what October ’18 update is going to look like for the end user:

    The product team has communicated the following changes:

    • Sitemap will now be expanded by default, so users don’t need to remember what icon stands for what entity/feature.
    • Recent and Pinned items will be more prominently displayed at the top. MRU (most recently used items) will now be a single list instead of the earlier entity specific MRU list.
    • Sitemap areas will be displayed at the bottom, with a more visible icon and area switcher feature instead of the tabbed area list on top in current version.
    • Command Bar icons will have more color and hover effects to highlight their interactive nature.
    • Both Sitemap and Command Bar color scheme will be changed to dark text on light grey background.

    These are great enhancements that are aimed at making the Unified Interface work more smoothly on the desktop browser specifically. They will not affect the mobile or Mail app, but only the screens that will have a width of 480 or more pixels. It’s awesome to see that even though the clients share the same infrastructure, not everything is forced to work exactly the same way on a big monitor vs. small phone screen.

    Hybrid Experiences on Unified Interface

    For existing Dynamics 365 CE customers who are working in the “classic” web client, the question of “can we do this in Unified Interface?” is a critical factor in deciding on the strategy of how to migrate users to the latest experiences available in the cloud. There’s a list of capabilities not yet on Unified Interface over on docs.microsoft.com that should serve as the starting point for any such planning. For a more forward looking list, the Unified Interface roadmap presented at MS Business Applications Summit 2018 is currently the best summary of what to expect:

    While there will be more and more entities and features natively supported on UCI, not everything from good ol’ Dynamics CRM is going to be rebuilt for the new client infrastructure – at least not yet. When you look at what’s happening on the broader Power Platform side, this prioritization makes a lot of sense, as porting over old UI controls as-is probably doesn’t fit with the long term platform vision. Still, you can’t just pretend that a few missing features like Advanced Find would NOT be critical to business users who’ve built their work processes around these core capabilities of Dynamics 365 CE.

    The short term solution will be to offer a “hybrid UI”, in which the controls not yet ported to UCI will be opened up in windows that render the classic web client UI. So, things like merge dialogs, personal settings, SSRS reports and Advanced Find will be accessible to users from within Unified Interface, with the existing feature set that they’ve come to expect in earlier versions. Of course they won’t be mobile friendly like the responsive UCI controls, but desktop users aren’t probably going to care all that much about this anyway.

    As we can see in the roadmap presentation, Microsoft aims to make Unified Interface the default experience first for new customers and shortly also to existing environments. There’s no need to panic over this change, though, as the plan is to introduce a “Side by Side” (SxS) option for administrators to define whether the classic web client is visible to users or not. If you have a good reason to not yet push everyone over to Unified Interface, you don’t have to – at least not with the Oct ’18 release.

    Power Platform Admin Center

    While the aforementioned changes are mostly relevant to customers who have bought Dynamics 365 Customer Engagement and are using it for either traditional CRM scenarios or more XRM style applications, it’s good to keep in mind that all these investments are actually done in the context of the greater platform. Starting from the July 2018 announcements, Power Platform is now an actual thing that Microsoft sells. To the developers and administrators it has seemed like a collection of separate product boxes of different shapes, but that experience is also about to get unified as the new Power Platform Admin Center is introduced:

    You can already access this UI from either the short URL admin.dynamics.com or the longer (official) version admin.powerplatform.microsoft.com. Today you don’t yet see too many actual admin screens of individual applications within the Power Platform Admin Center, as the menu items will mostly redirect you to existing admin centers for PowerApps, Flow, Power BI and Dynamics 365 CE. Things are going to change soon, though, as a brand new admin UI will reveal the various Dynamics 365 CE settings that you’ve earlier been able to only access from the classic web client:

    These images are taken from another Business Applications Summit presentation, “Key features coming to Microsoft PowerApps and Dynamics 365 admins”. Just like in the UCI session, there’s a great roadmap slide included that shows the stages via which the new features are planned to be rolled out:

    Now, you may not want to look at the detailed dates, since both roadmaps are already ancient history from over a month ago and things aren’t necessarily quite where the initial targets were set. Nevertheless, these are the features and experiences that will soon be out there. If you compare this to the traditional Dynamics CRM world in which many current on-prem customers with their v8.2 (at best) environments are operating in, then it’s in many ways like a whole new application platform to work with. MVP Scott Durow has drawn a great diagram of the new admin experiences in Power Platform that also helps in illustrating the huge shift that is taking place here. We’ve seen architecture diagrams like the one below for a long time now, but once the actual user experience for solution designers also starts to reflect this, I believe that will have a “powerful” impact indeed!

  • Unified Interface Form Design Notes

    Unified Interface Form Design Notes

    It’s been around a year since Microsoft announced that Dynamics 365 Customer Engagement would be moving from the world of separate web, mobile and Outlook clients into a single Unified Interface (or UCI, as in “Unified Client Infrastructure”). At that time I made a prediction that this level of shift in the client technology would be a long road, and to date that still pretty much holds true.

    Although V9 has been available for quite some time for new cloud instances and also existing customers have been upgrading as the version has become available for them a bit later, the majority of current Dynamics 365 CE users won’t yet be on UCI – at least for the desktop usage. MoCA was already replaced with UCI in V9, so the mobile UI is now on the new infrastructure, no choices there. For the web, there’s still a fair bit of capabilities not yet on Unified Interface, which makes it hard for customers to move over to it.

    Eventually everyone will need to migrate to UCI, though. It’s best to start exploring the scenarios where Unified Interface can fulfill the core needs and to gain the skills needed for designing great user experiences on this new client type. Even though the majority of the customizations will be rendered the same in UCI as on the current web client, there are still details that you should pay attention to. This is a collection of a few observations I’ve made when building a Dynamics 365 Customer Engagement App on UCI. Specifically, I’ll focus on the entity form rendering here, as a continuation of the previous post where I covered the new Card Form type.

    The Header

    Let’s start from the top. Form headers are where you would have previously placed up to 4 fields that you wanted to be always visible to the user when opening the form and scrolling down along it. Great for highlighting properties of the record that users needed to be aware of.

    In UCI there can still be just as many fields on the form header, but unfortunately they won’t always be shown. Even on a 1920*1080 screen resolution you may only see the first 2 fields on the form. The rest are hidden behind a small downward arrow icon that the user would have to discover and the click on to see the remaining header fields. I’m pretty sure most will never even realize the fields’ existence.

    When using a smaller mobile device screen the rendering changes quite significantly. Since on a vertical screen there’s no space for showing a header next to the record primary field (the name), in this form factor the header actually becomes the very first form section to be shown to the user. The nice thing is that it’s really “in your face” for the user. The downside is that this may not be the most logical information to be shown at the start of the form – or at least it will differ from what the user might expect to find there. Especially when creating new records these header fields rarely are the ones where you’d start the data entry process.

    For now, I don’t really have a good guidelince on how to consistently leverage the form header with UCI. You probably want to minimize the number of fields shown there, instead of capitalizing on the full 4 field opportunity, and stick to 1-2 fields max.

    The Footer

    Like the header fields, also the form footer has enjoyed a persistent presence on the XRM entity form. Now with UCI and Dynamics 365 CE, this is no longer the case. On a PC screen the fields do get shown, though, but not in a very nice way.

    As an example, a fairly common use case for the footer has been to present a few entity default fields that were hidden in CRM 2013 upgrade when the record properties dialog was removed from the UI. I’m referring to the created/modified on/by information, which can be very useful in determining the validity of the CRM data and persons responsible of the updates. You can still put them there, but currently the rendering looks so messy that I’d prefer not to show that to customers:

    The icons of these fields are often overlapping, even in full screen. This also highlights one of the current issues with UCI, meaning it doesn’t respect the user’s format settings and instead forces “AM” & “PM” upon users who live in a country where these concepts are never used. (Do also watch out for the date fields that sometimes reverse the order of day and month around, creating interesting results with things like appointment data entry.)

    The upside of the new design is that the footer fields don’t add up an extra row at the bottom, instead they are incorporated into the gray bar containing the record status and update indicators. This is very welcome, since in the old web client with especially entities using the BPF control, you’d sometimes have barely any vertical space left for working on the actual record fields, thanks to all the padding at the top & the bottom. Striking a balance with these responsive screen layouts surely isn’t an easy task for the engineers, with requirements for both information density and touch friendliness being presented to them.

    On a mobile screen you will not see the fields of the footer at all. It doesn’t appear to be rendered anywhere else on the form, so any information presented in this form section will be inaccessible in some scenarios. Much like the header, I would also advise not to put many fields in the footer if you plan on using Unified Interface (or if your users need them while out on the road).

    The Tabs

    The return of the visible tabs is certainly one of the big UX improvements compared to the old web client. Having these anchors visible right at the start of the form’s loading is a great help especially with information heavy forms like what accounts tend to have. Adding the “Related” menu to the end of the tab list to reveal the child entities is also much better than the mystery arrow in the middle of the old Nav Bar at the top of the screen. Left navigation and Proper Tabs, woo-hoo! Go UCI!

    Except that much like the header and footer, the tabs aren’t persistent either. The moment you start scrolling down the form, the tab labels get removed from the screen. Doh! Oh well, I guess we’ll just need to scroll down a bit further without the help of those anchors…

    Except we can’t. Once we reach the end of the tab, it’s a hard stop. No matter how much you spin your mouse wheel or swipe your finger on a touch screen, there will be no more of the form revealed to you. You see, in order to go further DOWN on the form you’ll need to scroll all the way UP, reveal the tab labels and then click/press on them. The longer your forms are, especially when reflown as a single column view on a smartphone screen, the longer it will take for your users to reach the next tab.

    Having the tabs as containers with hard boundaries might be an understandable design choice from a UX perspective. Getting lost on an endless list of scrolling fields and sections will not be fun for the users, so bringing some structure into this navigation experience is welcome. On the mobile form factor there’s also the Semantic Zoom option to help the user understand the form’s different tabs and sections. Just a shame that also the Semantic Zoom icon is hidden once move down an inch on the form…

    Here’s an idea to upvote: Ability to Dock “Tabs” on top of Unified Client Interface Tabs.

    We’re Getting There

    Despite of these few challenges, there is a lot to like about the way Unified Interface changes the user experience of entity forms:

    • Quick View Forms truly blend into the native form fields in UCI, whereas with the legacy web client the rendering was always quite clumsy.
    • Timeline is far better at exposing related activities, notes, posts than the earlier tabbed UI hiding most of the content.
    • Subgrids are actually actionable, with access to full grid features like sorting, select multiple.
    • Subgrid content rendering can be customized via custom control configuration options like Card Forms.
    • Business Process Flow consumes less vertical space (although BPF stage fields being hidden by default may cause challenges).
    • Visual hierarchy is much more obvious than even with the web client “refresh UI”.

    A big bonus is also the fact that by default you’ll get the same form customizations for desktop and for mobile users. It may or may not be suitable for real life mobile use cases, but at least you get the starting point for designing a mobile optimized UCI App to be targeted for specific scenarios that only need a subset of full form functionality.

    The key thing to keep in mind when considering the choice between the classic web client and UCI is this, though: UCI is the future. It will be continuously updated with more supported features and optimized for the end user experience with the latest browsers and devices. These updates don’t even require the customer to schedule their version upgrades via the CDU calendar, since from V9 onward all the Dynamics 365 online updates will be deployed automatically to customer environments. See the new continuous deployment policy that Microsoft just announced for more details.

    More and more areas of the classic XRM UI will be moved over to Unified Interface with every release. Although we don’t yet know any dates for end of support for the web client nor the target date for UCI’s full parity, the next wave of features in October 2018 release will be published as release notes on July 23rd at the Microsoft Business Application Summit. Better keep an eye on that one!

  • Trial & Error: Understanding Dynamics 365 CE Trials

    Trial & Error: Understanding Dynamics 365 CE Trials

    With SaaS products like Dynamics 365, getting the process of running a free trial right is crucial for the commercial success of products. This is why you may have seen Microsoft also perform a lot of changes into the process how you’ve been able to spin up trials of CRM Online instances, nowadays known as Dynamics 365 Customer Engagement. Or “Dynamics 365 for X”, with the “X” being an App like Sales, Customer Service, Field Service or Project Service.

    This App model is one of the reasons why the seemingly simple process of provisioning a new cloud database to host your CRM trial data has turned into a bit of a beast recently. It’s no longer a one-size-fits-all offering, rather Microsoft is trying to tailor the trial experience based on the business process that is most relevant for the potential customer. The intentions are good, but the results can lead to a lot of confusion when dealing with an inherently complex platform like XRM where users never follow just a single track through a few predetermined use cases. Here’s a few notes on what I recently learned about how the trials currently work.

    Classic Trials

    If you’ve been working with Dynamics 365 recently, either by deploying it for customers, managing your internal instances or studying to become a certified Dynamics 365 professional, you’ve probably encountered this selection:

    Here you get an option to select either one of the Apps, go for the full suite of “all of these”, or if you’re really paying close attention, skipping the App selection by ticking the box “none of these, don’t customize my organization”. Today when I was in need of setting up a new trial to test the Sales related features specifically, I opted to install the Sales App via this provisioning screen.

    After a short while, I was able to access this new trial instance. That in itself can of course be a challenge, since there’s no guarantee that the Office 365 App launcher or the home.dynamics.com screen will refresh to show you the link to the Dynamics 365 instance. Knowing the direct URL of the instance picker (https://port.crm4.dynamics.com/G/Instances/InstancePicker.aspx in EMEA) speeds up this process, and soon I was faced with the Sales specific clean app list. My Finnish language “Myynti” app for the legacy web UI was there, as was the less elegantly named “Sales-keskus” hybrid of English/Finnish, which of course points to the Sales Hub based on Unified Interface.

    Since I needed to do some solution installation here, the first thing I had to do was to promote myself to the Admin role. That’s something you’d never need to do outside of the trial experience, as being the user who provisioned the Dynamics 365 instance you’d most likely have sufficient roles in the Office 365 administration side to see the admin menus directly here. But these are trials we’re talking about and the whole point of the tailored experience is that you DON’T see things that are not relevant to you, because that’s a scary UX for people not familiar with the platform.

    Now that I had the power to configure the instance to my liking, I proceeded to first checking out the default UI on the account form. Here I noticed that actually my nice’n clean Sales UX was cluttered with stuff that I didn’t ask for. Taken from the English UI here, you’ll notice that the account form tab actually has sections for Project Price Lists, Field Service and Scheduling. Not to mention the related records navigation that was at least 20 items long. Where did my sleek Unified Interface “Sales Hub” go?

    When going to the Solutions menu, it’s obvious where these items are coming from. The “Sales trial” in fact contains in total 16 solutions, which is equivalent to choosing the “all of them” option on the trial setup screen. It’s all here, even though you didn’t ask for it: Customer Service, Field Service, Project Service and their accompanying trial customizations. No, none of these will actually show up as installed solutions for the instance if you view them via the Dynamics 365 Admin Center. The same laws of physics obviously don’t apply for trial instances as they would for actual production or sandbox instances. (more…)

  • From AppSource to Solutions to Dynamics 365 Apps

    From AppSource to Solutions to Dynamics 365 Apps

    In my previous blog post I presented the various different meanings that an App can have in Dynamics 365 Customer Engagement. Now that we’re aware of this jungle, let’s grab a machete and start making our way deeper into the heart of it, to understand how a system customizer can survive in there.

    Before there was Microsoft AppSource for Dynamics 365, the methods available for distributing apps in a generic sense were pretty basic: you downloaded a zip file (or several) from a location provided by some party, then navigated to the solutions menu in your XRM environment and started importing them. When there were updates to those apps, you needed to repeat the procedure. If there were some other configuration steps needed in getting the application properly set up, you had to read the friendly manual and complete those. In a more tech savvy environment the Package Deployer might have been used here, but that was hardly a task for the accidental CRM administrator.

    What AppSource aims to change in the Dynamics 365 app distribution process is similar to what the smartphone app stores did a decade ago, i.e. simplify the steps for the customer and also provide a better channel for app developers to deliver their updates. When you go to AppSource and choose to either install a free App or start a trial on a paid one, the next screen will provide an instance selector to determine where in your Office 365 tenant you want to put this App in. Also presented are the checkboxes for agreeing on both Microsoft’s as well as the ISV’s legal terms.

    From here you’ll be taken into Dynamics 365 Administration Center. This part of the process nor the UI of the admin center isn’t very intuitive, so let’s pause here for a moment. While you’ll land on the Solutions view of an Instance after clicking on “Agree”, on the logical level we should be paying attention to the Applications tab instead. The chosen ISV (or MS) App will have been added as a row in the applications list, which applies to the whole tenant. In this example we see that North52 Business Process Activities is now available in our tenant. It doesn’t have any configuration options in this UI, but the Microsoft apps like Portal Add-on or Voice of the Customer both have an additional “Configure” button that is accessed via this Manage Applications screen.

    If we click back to the Instances tab in the admin center, select one of our instances and click the Solutions icon on the right side, we’re now presented with the list of solutions available to this instance via the AppSource delivery channel. It is not the same as going to your XRM instance and clicking Settings – Solutions, as there can be more solutions within that instance. For example, the organization specific solutions that you’ve created as a container for your own customizations. Not even the managed/unmanaged status of those solution has anything to do with what’s shown in the admin center, because whatever zip files you imported directly into your XRM instance as a solution is only visible from within the XRM UI.

    The solutions list in the admin center is also different in the way that it shows also the solutions you haven’t installed in the instance. These are applications that someone, either MS or your D365 admin, has made available in your tenant and possibly installed them into some other instance (a test sandbox, for example). To get them installed you don’t have to go to AppSource, rather you can start the process from here.

    What makes this view so relevant for the Dynamics 365 instance administrator is that here’s where you’ll see what solutions have upgrades available. In the above example, Microsoft has released a new version of the Relationship Insights solution. Since they don’t want to accidentally break your dev/test/production orgs by changing the solutions on their own, they are rather giving you the controls to click on the “Update” icon for the particular instance when you’re ready for it. This same process is applied also for third party ISV solutions to deliver updated versions of their apps.

    Now when we have deployed the app from AppSource and the Solutions view in the Dynamics 365 Administration Center for our chosen instance shows the status as “installed”, let’s use the Office 365 app launched to navigate to our Dynamics 365 start page, meaning home.dynamics.com. And… there’s nothing new here. Even if we click the “Sync” button to refresh the My Apps view, our AppSource app doesn’t appear. What gives?

    At this point we need to take a step back from the UI and think about how these different components relate with one another. On the highest level we have AppSource, which is more of a marketing UI for products. From there we get Applications into our Dynamics 365 Administration Center. These manifest themselves as single solution rows for an instance when viewed via the admin center, but they can actually contain N separate solution files (look at Dynamics 365 Portals, for example). Finally, these solutions may or may not contain Apps – from 0 to N. This diagram illustrates these four conceptual levels and their relationships:

    In our example we’ve installed North52, which is an administrator/customizer tool designed for “building simple or complex business rules using point-click editor, eliminating C# and JavaScript coding”. In short, it’s an app for configuring apps, but it’s not a business app in itself. That doesn’t mean it wouldn’t need a UI, of course, but the Command Bar shortcuts and the dedicated home page web resource with navigation options quite frankly is much better suited for this type of a power user tool than the new Unified Interface apps that are supposed to work even on 4″ mobile phone screens.

    This brings us back to the App Module concept that was briefly mentioned in my earlier blog post. Before V9 and the Unified Interface there wasn’t so much benefit in building separate Apps for different functional areas of the XRM platform, as we had the one master UI for the instance available anyway. When the features are migrated over to the new Unified Interface, basically everything must be an App. In v9.0 we’ve yet to see how the more complex admin features will be implemented as Unified Interface versions, so currently it’s a somewhat jarring experience of 2011 meets 2018 for the system customizers.

    Even when all the actual business application functionality has moved over to Unified Interface, there will still be many scenarios in which presenting an AppSource app as a Dynamics 365 App Module App doesn’t necessarily make any sense. UI extensions like Checklists will not have much use outside the actual business entity in which they are used. Any app that connects to an external web service to enrich the contents of Dynamics 365 records mainly needs a configuration admin UI somewhere. Sure, there’s nothing stopping developers from using the App Designer to define an App for their solutions, since all you technically need is a single HTML web resource to publish an App with a single menu item. However, separating the tool from the XRM instance in which it lives isn’t going to make the UX of configuring features any easier, so I’m not really hoping for the app clutter to increase this way.

    Both the AppSource marketplace and the App Module in Dynamics 365 Customer Engagement provide significant improvement on how the business application features can be presented to business users and decision makers. What they don’t do is completely remove the need for Dynamics 365 system administrators to understand how the various layers and parts of the application platform are wired. XRM will likely remain an environment that’s just inherently more complex than an iPhone screen with its pretty app icons lined up just the way the single device user likes to see them.