What more could be said about XrmToolBox that hasn’t already been posted online? The year is soon 2026 and XTB remains a critical part of Power Platform – built and maintained by the community.
One area where the long history of XrmToolBox reveals itself is in the user interface of the application itself. As well as the official website of xrmtoolbox.com that is built on a legacy version of Power Pages. Technically, all the information is there. In practice, the UX can be challenging – especially for newcomers to this ecosystem.
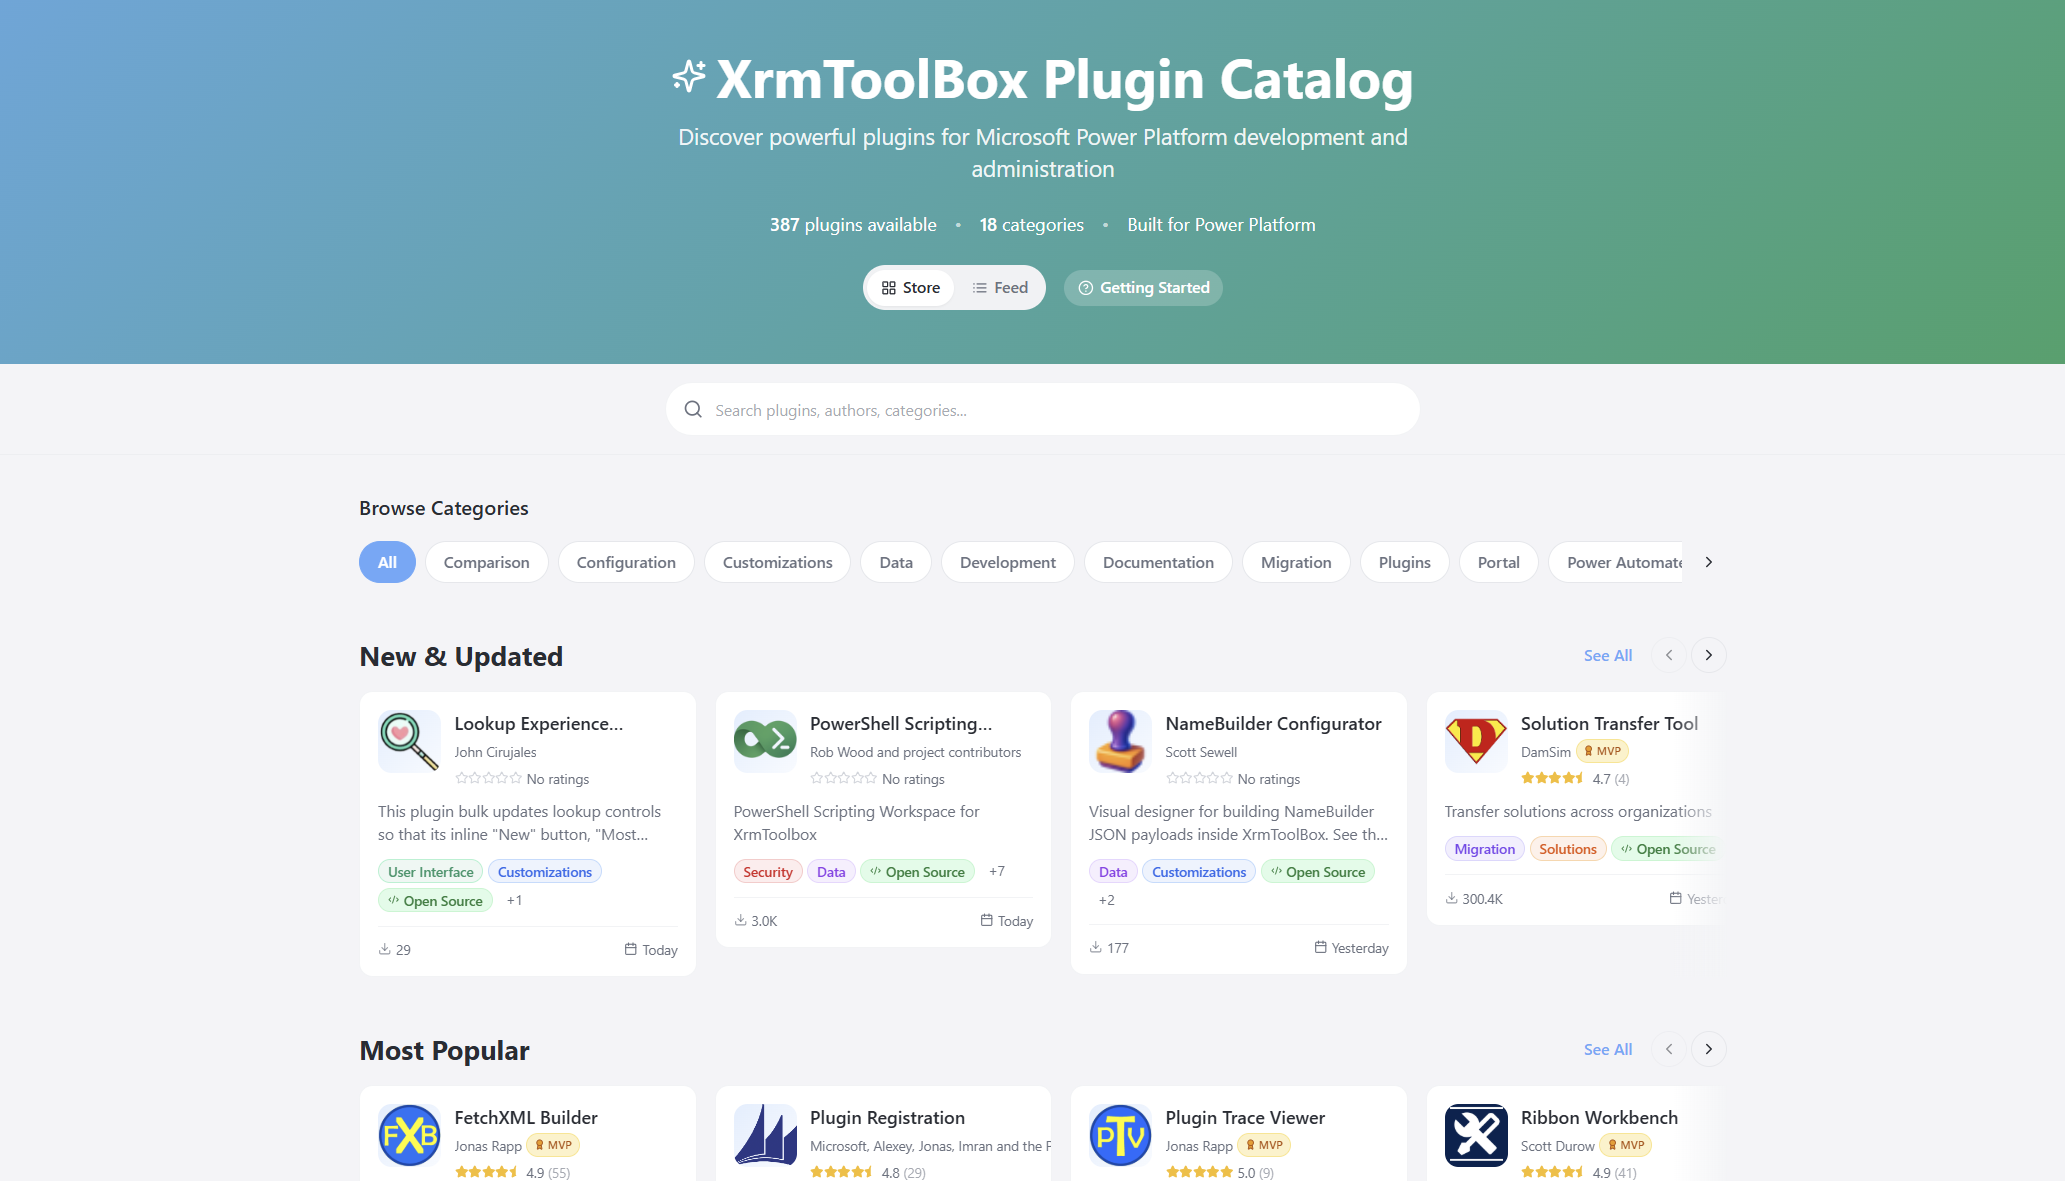
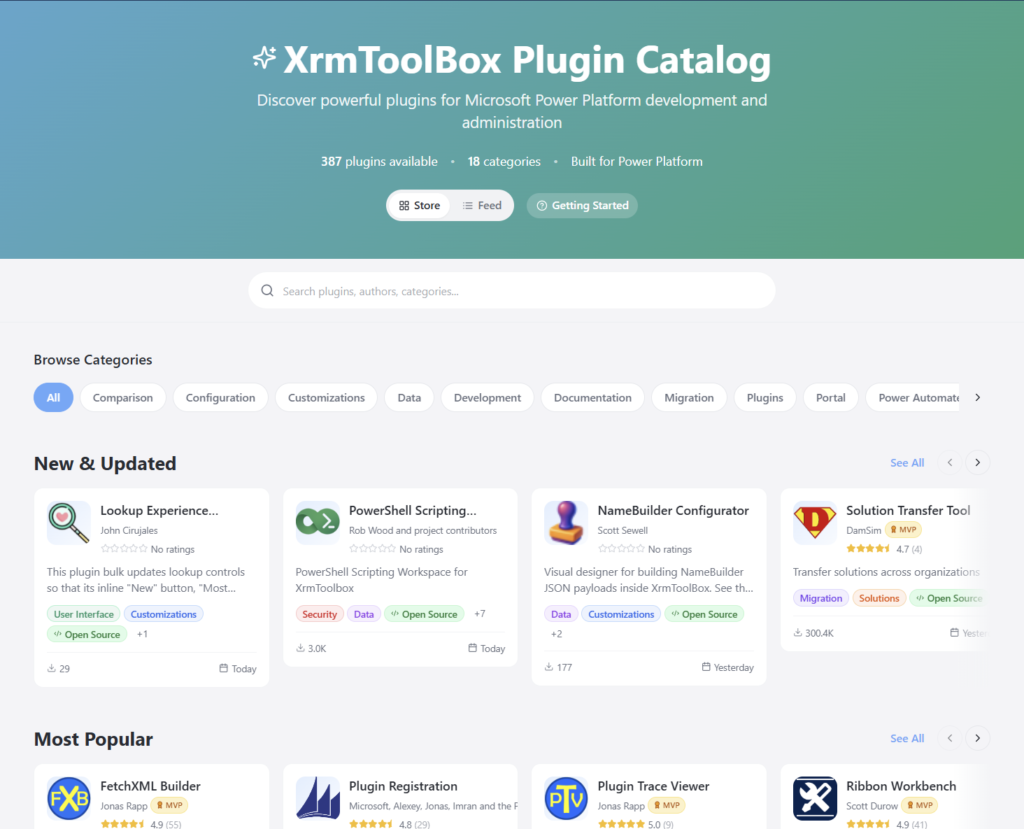
I wanted to see if I could do something about this. That’s how the XrmToolBox Plugin Catalog came to be:
The live site URL is xrm.jukkan.com. In short, it’s a vibe-coded website on top of the list of 387+ XrmToolBox plugins that have been developed and published by various community members. You can browse by category, search by name/description/author, see the latest release notes, discover more plugins from the same author, and so on. There’s even a short getting started section for those who are new to XrmToolBox.
It’s worth noting that there’s no new data used here. All the dynamic information comes from the official Power Pages site of XrmToolBox, via one daily data sync of the Plugins table rows in Dataverse. The XrmToolBox Plugin Catalog is hosted on GitHub pages and the data is pulled via an OData feed using GitHub Actions. So, both are running on acquired Microsoft technology (Power Pages comes from Adxstudio Portals, GitHub comes from… GitHub).
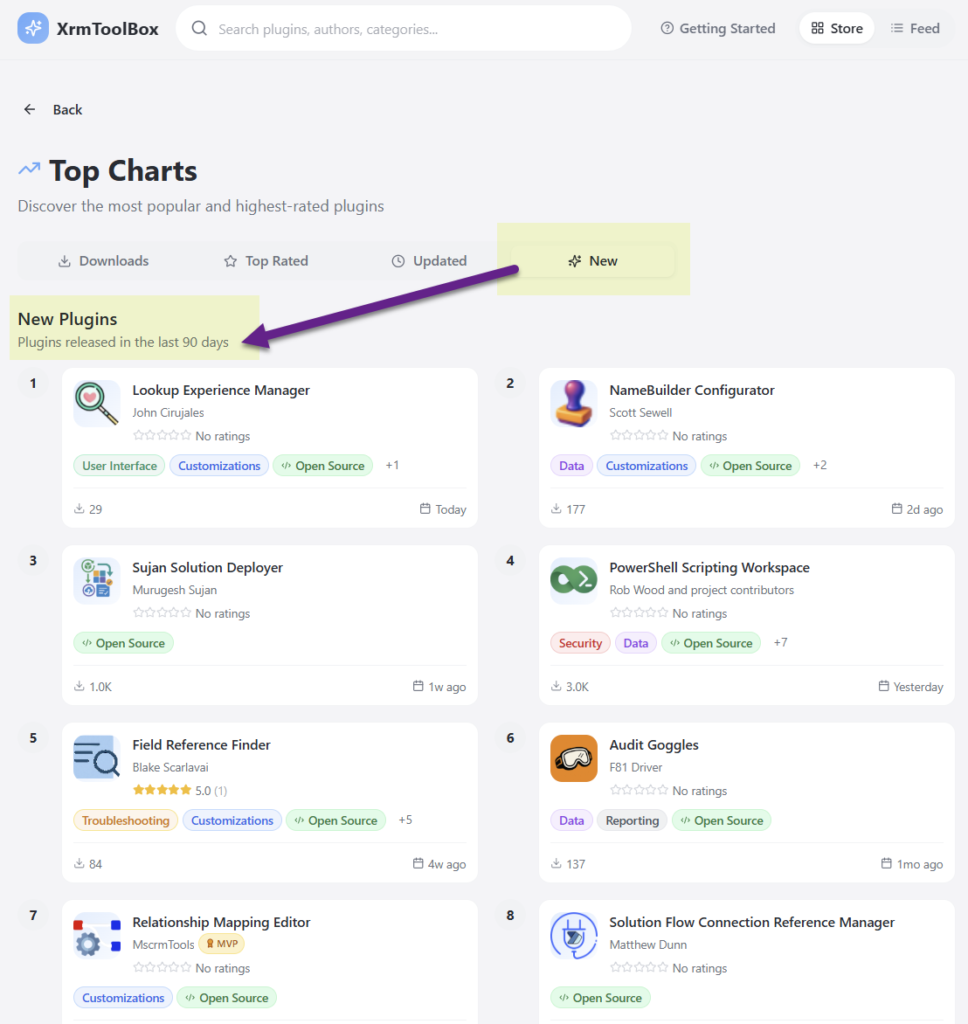
It’s just the same data, presented in a different way. Visually, it’s a React-based site that behaves like you’d expect a website to behave today. But it’s not just about rounded corner boxes and gradients. It’s also about prioritizing content in a way that serves the user better. Such as the Top Charts that allow anyone to check the recently added or updated XrmToolBox plugins from the past 90 days:
I wrote about the launch of XrmToolBox Plugin Catalog in a recent newsletter issue. I didn’t want to repeat myself, yet I was interested in seeing an alternative format for describing the “what”, “how” and “why” of this initaitive. So, I gave the text to Google NotebookLM and asked it to create a presentation out of it. I think it did a pretty nice job:
The site’s repo is on GitHub, obviously. You’re welcome to open an issue there if you encounter problems with the site or have ideas about improvements!
Oh, and don’t forget to support Tanguy Touzard and the makers of all the tools in the ‘Box. The Real Developers who have put in the hard work of writing all the code. Long before LLMs democratized code to such a level where I can today just prompt AI coding assistants and ask them to build pretty websites for me.
When you’re starting to use a brand new computer or phone, usually one of the first things you’re presented with are these questions:
What language do you want me to speak?
Where are you located?
This allows the device to understand not just the preferred UI language and your physical location. It also enables it to make educated guesses on:
Which formats make sense to you for number, date and time fields.
What time zone you are living in.
Now, let’s move from devices to software, namely model-driven Power Apps. Do you recall seeing similar onboarding prompts when starting to use (or build) apps? Nope, Microsoft doesn’t ask such questions.
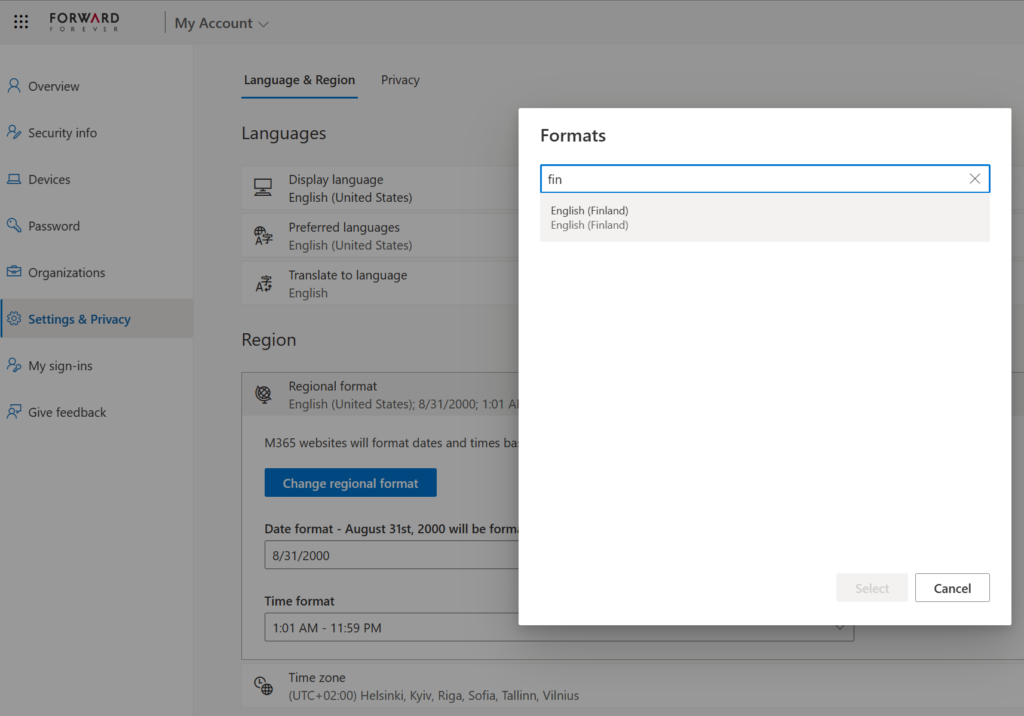
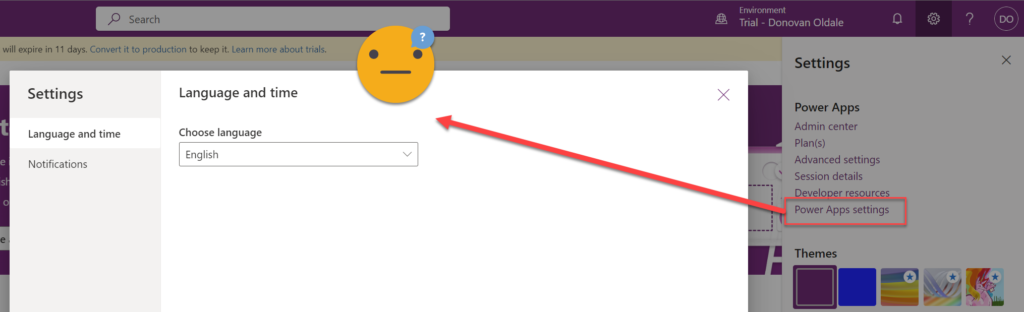
“I guess they already have that information and are automatically setting things up the way I want them.” Yeah, you might think so. That’s a false assumption, unfortunately. Changing your Microsoft 365 account settings for your tenant isn’t going to get synchronized down to the business applications used in the MS cloud. Meaning, this selector here has no impact on the apps that live in Power Platform environments:
Power Apps canvas apps follow the regional settings from the user’s browser. This can lead to confusion as well, but at least the field formats should be something the users encounter on other websites. In canvas apps there is also the ability for the app maker to force specific locale settings per each control in the app UI. See examples in this article.
Model-driven Power Apps include Dynamics 365 apps from the CRM side. I would guess that for a sizable share of model-driven Power Apps users their settings are likely to be at least partially incorrect. What’s worse is:
Fixing them is quite unintuitive.
Admins can’t do much to help users with this.
In this post I will explain the parts of the Power Platform user settings management story that are broken today. My intention is to spread awareness on issues that many app makers and admins may have ignored, and which their app end users may be suffering from.
In a follow-up post I’ll provide an example of a solution that could make life easier for everyone who uses, deploys or administers Power Apps.
First: blame CRM
There are many great benefits that Power Apps has gained from being merged into another Microsoft platform that first saw the light of day as Dynamics CRM (well, “Microsoft CRM”, to be precise). User settings management is not one of them, unfortunately.
The user settings functionality probably served its purpose back in the on-premises days of CRM servers. Today, this legacy from around two decades ago creates some incomprehensible experiences for an audience many times the size of that which ever interacted with Dynamics CRM.
Power Apps, be it canvas or model-driven apps, live inside Power Platform environments. It is becoming a standard feature that such environments include a Dataverse database. This is essentially what one CRM database was back in the days. Today, larger tenants may easily have hundreds of such database instances.
Dataverse hosts many essential parts of Microsoft’s low-code platform. It provides the solution framework for moving apps and related components across dev-test-prod environments, for example.
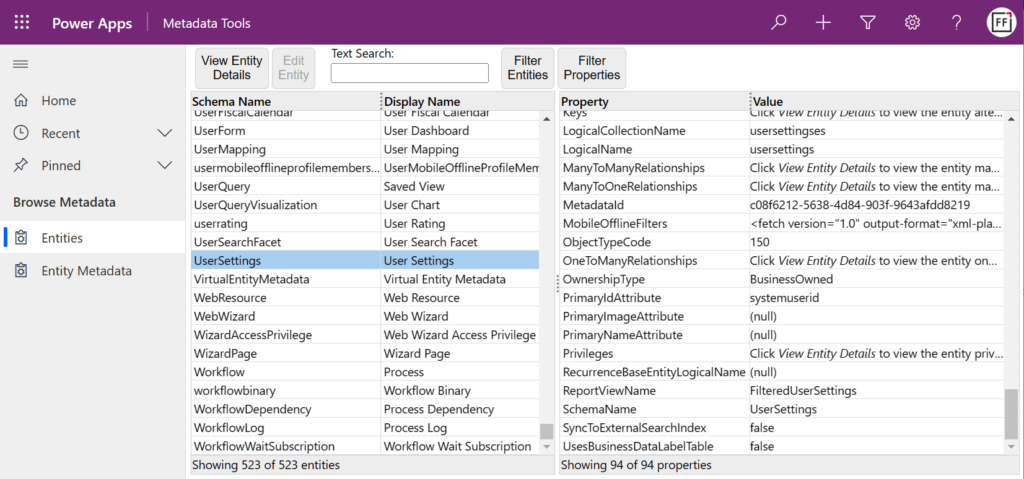
There are hundreds of tables (previously “entities”) in the standard schema, with some being meant for storing business data and others for data needed by the system itself. The User Settings table is what the topic of this blog post revolves around.
Each to their own (format)
When your app is connecting to tables in Dataverse and presenting it to the user, the decision of the number, currency, date and time field formats is made on the server side. It defines whether your app UI shows “one million dollars” as:
$1,000,000.00
1 000 000,00 $
$1.000.000,00
Or any other variation. The place and purpose of dots, commas, spaces, currency symbols depends on what the format has been set to on the database side. For each user account.
That’s the important part: it’s not a global setting of the database/environment. Every user may see different things. We are all different as human beings, and it’s a wonderful feature for the system to reflect that as well.
Us humans are also wonderful in our abilities to interpret what the format being used by the system might be. All the three examples above would say “one million dollars” to most people, even if only one format is the official sequence of strings used in whichever region they live in.
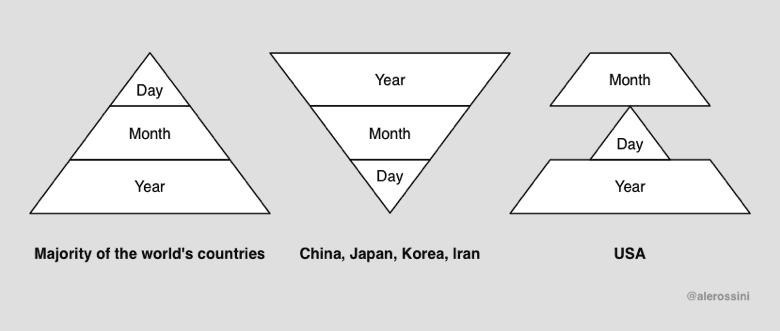
With dates, it can be a bigger struggle. Today when writing this blog post, the date is 2/3/2023 – for some part of the world. If you come from the land of Microsoft, it means February 3rd. For basically everyone outside the US, it would mean March 2nd (which is the correct value here). ISO 8601 would be the best format from a logic perspective, yet for some reason 2023-03-02 hasn’t become the norm. Oh well.
We may be able to guess the right date format based on context. Where it gets really dangerous, though, is with time zones. They are invisible to the app user and you’ll have no way to know whether you’re seeing the correct value in any date field of the app.
Why’s that? Because dates in Dataverse are often stored in date and time columns. This means that while the clock on my PC currently says “2023-03-02 21:10”, the user looking at a record in Power Apps may see:
2023-03-02, or
2023-03-03
In Finland it’s March 2nd, but in India it’s already March 3rd. Not only is the value that’s shown to the user determined based on their time zone setting. It also affects the value that is written to the database when the said user enters new/updated data.
There are ways to get around this dilemma, using Date Only or Time-Zone Independent columns in Dataverse. That’s not going to help the app end user, though, since A) the column type it’s not visible to them nor B) configurable for their preferences.
One classic gotcha of the time zone settings is that they affect all user accounts – also calls made via the API instead of the UI. If you’re writing integrations to or code running inside Dataverse, you’ll need to dig a lot deeper into the topic than the shovel that I can give you is good for. Head towards a blog like Scott Durow’s and learn from the master.
Setting the user’s own settings
Now that we’ve established that user settings like time zone and field format are very important things, let’s look at how a user can make sure that they are indeed set correctly.
Say you’re using a Power Apps canvas app and want to check your user settings. Where do you click in the app? That’s the neat part: you don’t. Even if you have the Power Apps navigation bar visible (which might have been hidden intentionally), none of the menu options give you access to the user settings used by the app.
OK, let’s assume that you have been granted maker level access to the environment hosting this app (end users often will not have this option). We go to the Maker portal on make.powerapps.com and click around the similar cogwheels.
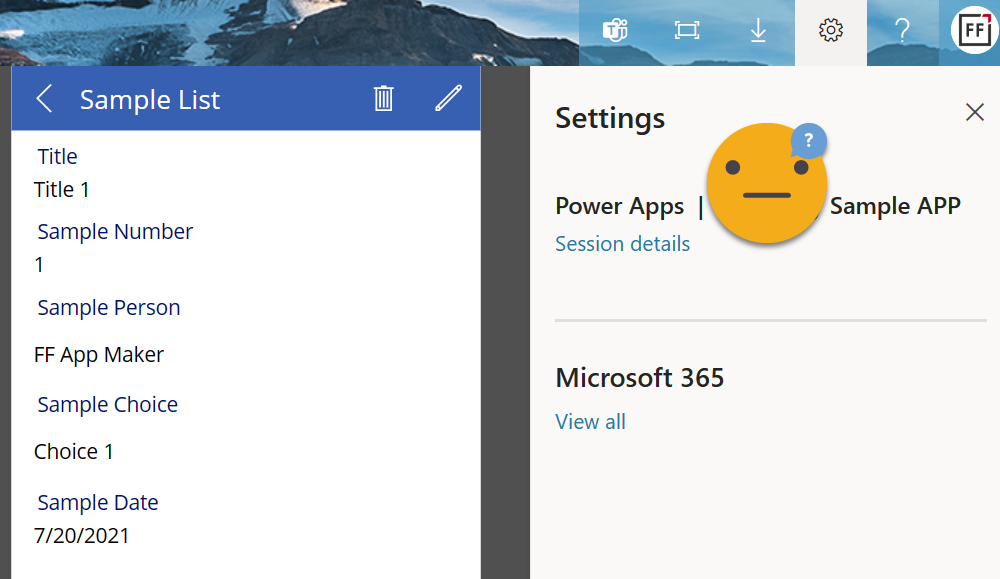
From under “Power Apps settings” we get to a promising menu dialog that has a “language and time” tab. Unfortunately, there’s nothing related to time in there. Furthermore, we’re not looking to change our language settings, rather the regional format.
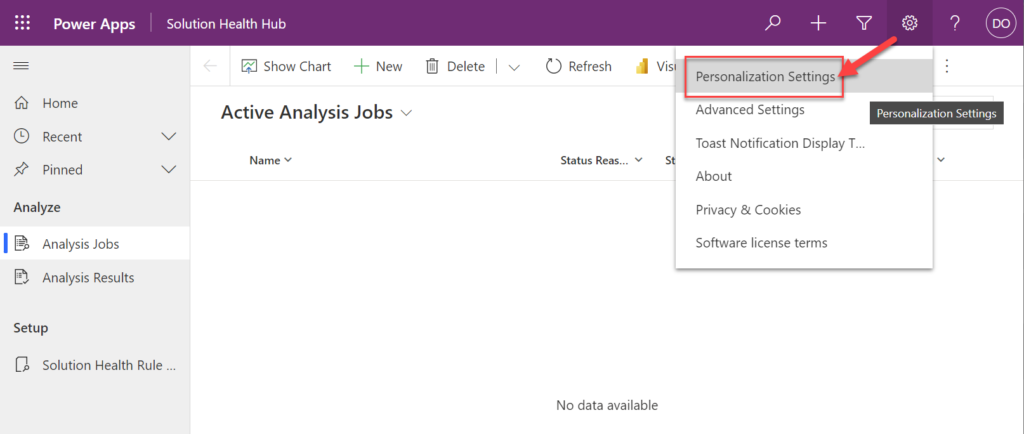
Most people will have already given up at this point. Yet if you’re not afraid to click on obscure menu options, you might find a model-driven app in the same environment. Like the omnipresent Solution Health Hub that Microsoft wants to provision everywhere without asking for permission. This time we’re actually lucky to have it as the only model-driven app in our environment.
Let’s open it up. Don’t worry about that “Active Analysis Jobs” view that opens by default, no one understand what these things are about. What we’re really hunting for is cogwheels and we luckily do discover a new one, in the exact same place as the earlier ones. This opens with a promising menu option: “personalization settings”.
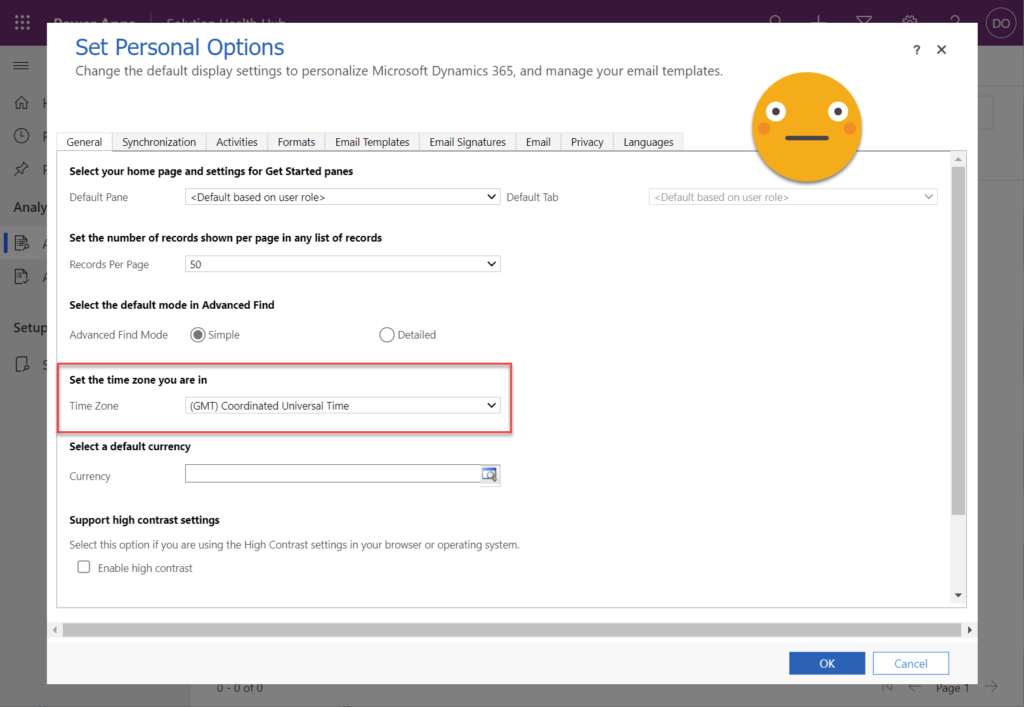
“NOOO!!! MY EYES!!! WHAT IS THIS THING?!?!?” No, don’t panic. You’re in the right place – even though it looks like nothing you’ve encountered in Microsoft 365 apps. What we have here is the classic Dynamics CRM web client UI presented inside a modal dialog window of the Unified Interface. Yes, it reads “Dynamics 365” everywhere but trust me, this is part of Power Apps.
On the General tab you’ll find the Time Zone dropdown menu. If it reads something else than you expected, change the value now. Then hop over to the Formats tab and do the same check/change for the Current Format field.
Click OK. Close the window. Take a deep breath. You made it.
Just don’t forget what exactly you did to get to the user settings screen. Because these settings are environment specific. The next time an internal app is deployed in your organization, it may well be hosted inside a different Power Platform environment. With user settings that are completely independent from the ones you just updated.
“As an administrator, I want to end the pain…”
Given how many potential blockers there are for a Power Apps end user to ever discover nor even be allowed to navigate to the user settings screen, this is something the Power Platform administrators should definitely look into. Is there a way to change the settings on behalf of another user?
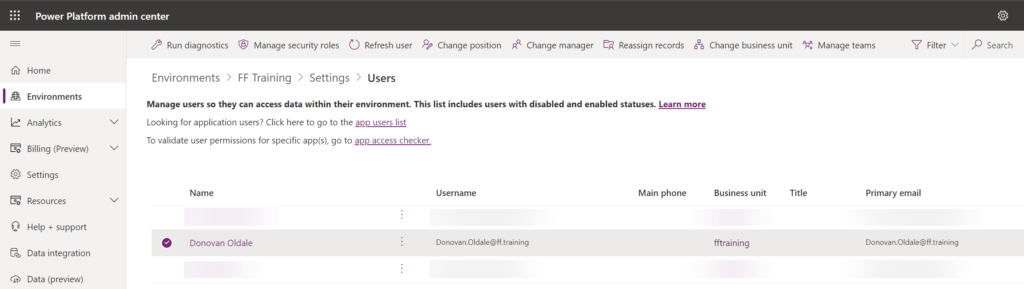
Let’s find out. We’ll go to PPAC (Power Platform Admin Center) and navigate to the environment. From the Users list we open up one user account and study the options available.
We see a nice flyout menu that resembles Microsoft 365 admin center experience in many ways. Unfortunately it doesn’t contain anything related to time zone or format settings. Behind the three dots, there’s a “Manage user in Dynamics 365” option. By now we’ve already become aware of how broadly Power Platform relies on things that say “Dynamics” so we know we probably have to click on it.
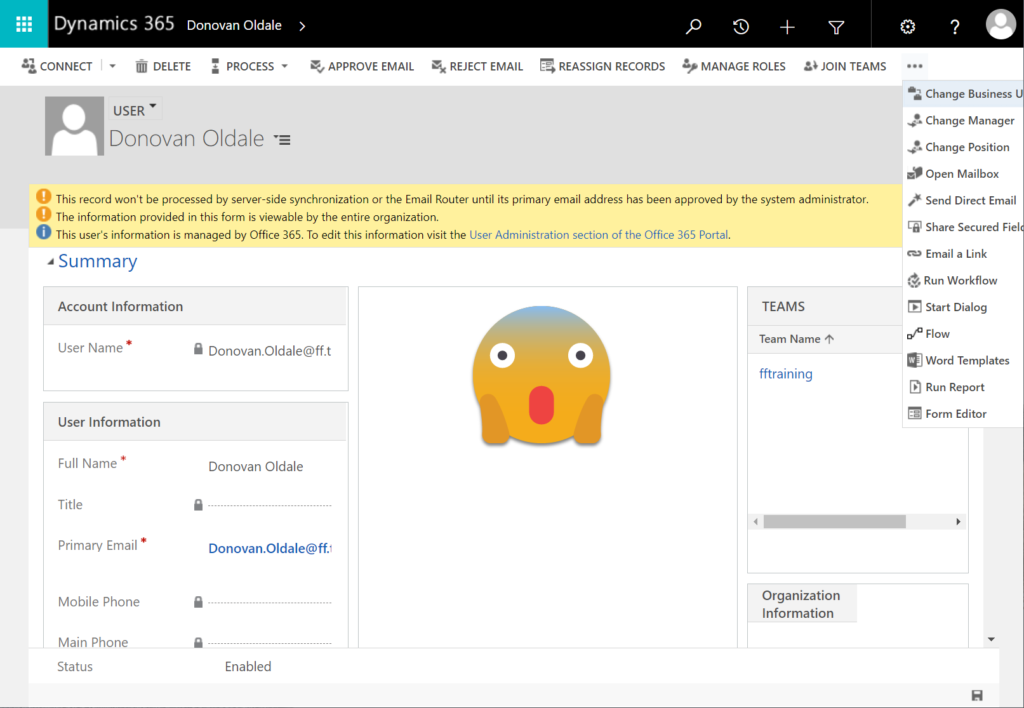
The initial loading of the page may take a few seconds/minutes/weeks, but once it opens up we see… OH DEAR LORD!!! Not only did we move to Dynamics 365, we actually travelled back in time into CRM 2013 user interface.
We’re presented with notification banners shouting scary things at us. We have a form that contains fields, grids and feeds that seem to be design to just confuse us. We have an endless menu bar with options like “reject email” (wouldn’t we all want to reject it?) and “change position” (would fetal position be a good option right now?).
What we don’t have is access to any of the user settings. This is by design. Sure, no one said it’s a good design, but it is what it is. The answer to our original question is: there is no out-of-the-box option for system administrators to change user level settings on behalf of another user.
It’s design like this that has given inspiration to a countless number of community tools, many of which are available in XrmToolBox. If you need to administer Power Apps that have any dependencies to Dataverse, the first thing on your To Do list should be installing this software on your local PC.
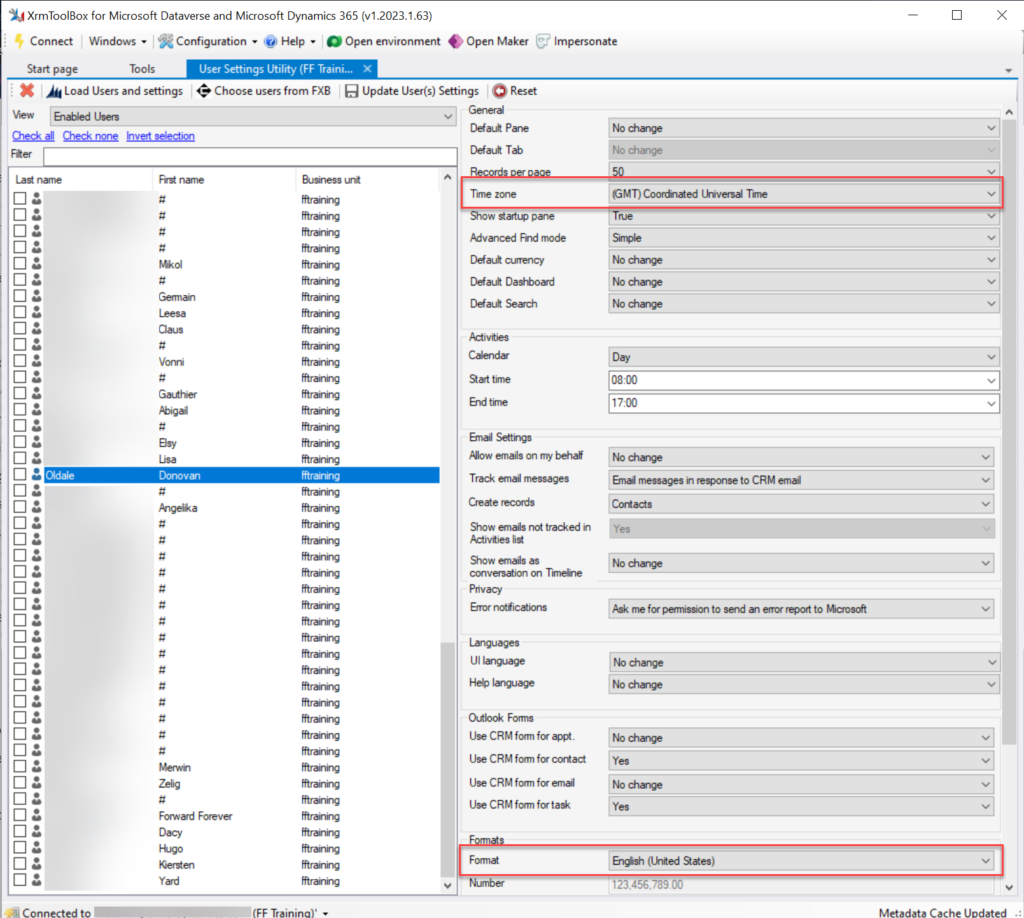
XrmToolBox User Settings Utility is the plugin you’ll want to reach for in the toolbox. Once you establish a connection to a Power Platform environment (always choose the “Microsoft Login Control” option, btw), you can click “load users and settings” to see every user account in the environment. Select one of them to check the current values.
Not only can you modify the settings (time zone, format and many more) for another user. You can also do this in bulk for all selected users. “Woohoo! Now the settings are fixed!”
Until the next user comes along. Or you have a new Power Platform environment that needs equal treatment. Again and again. Being a desktop application, you unfortunately can’t automate the actions that XrmToolBox does. Well, unless you go crazy with Power Automate desktop and build an RPA bot for this…
Is there any better way?
The bright side of having the user settings data stored in a Dataverse table is that we are empowered to use the platform’s tools to build user interfaces and automations for managing it. With low-code.
I have come across a few blog post with examples of how to use Power Automate cloud flows and/or Power Apps canvas apps to update the user settings. For example, my colleague at Forward Forever, MVP Timo Pertilä, recently wrote an article about how to set the number formatting for model-driven Power Apps (auto-translated from Finnish).
As it just so happens, I had also started exploring these possibilities at the exact same time as Timo. My approach is a bit different, since the goal was to resolve the issue not just on a single environment level. So, I’ve created a tool that allows any user to go and update their own settings across multiple environments. Stay tuned for my next blog post where I present the solution.
It’s the little things in a user interface that can drive me nuts – at least when I keep running into them repeatedly.
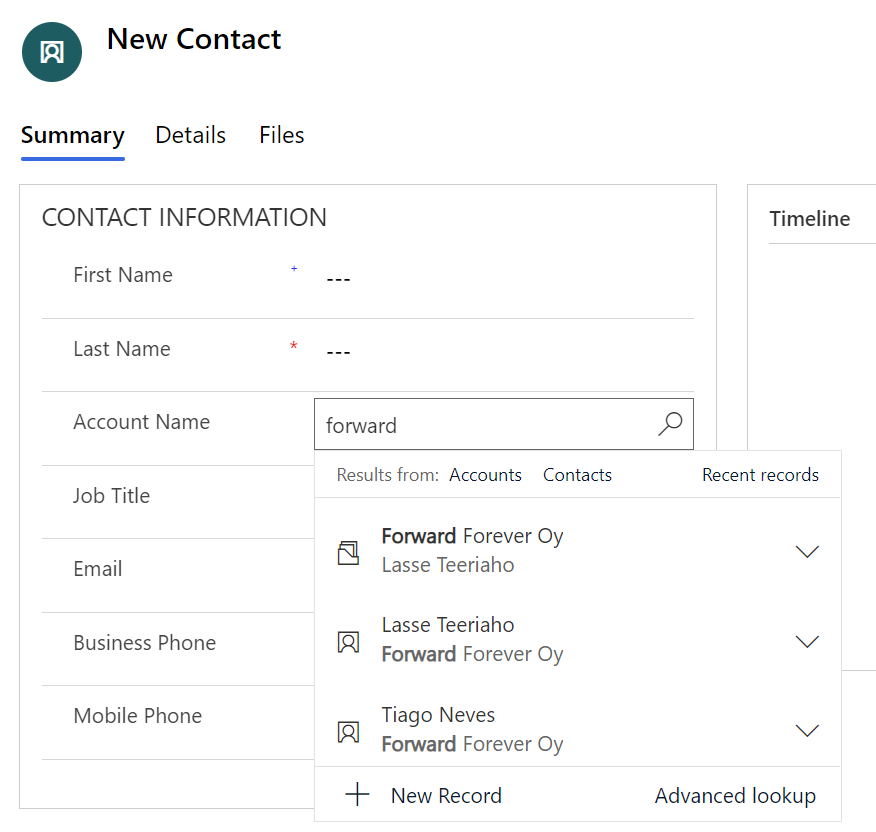
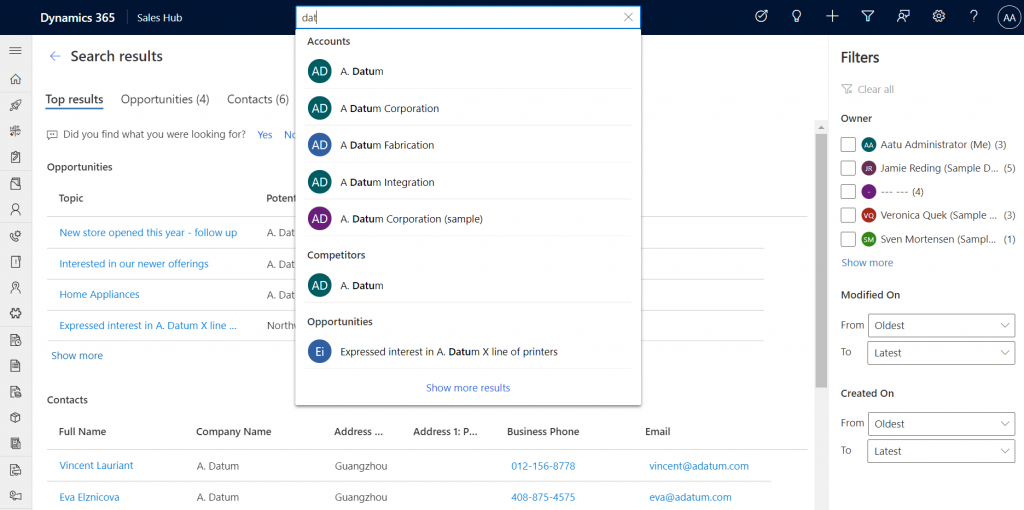
One such detail in Dynamics 365 CE apps / Model-driven Power Apps is the scenario where you’re creating a new contact record and linking it to a parent account. Filling in the lookup field gives a nice little preview of the matching records. Like this:
Now, look at the first two results: aren’t they actually saying the same thing, but in different order?
At least I have a hard time distinquishing which record I should pick when I want to link this new contact under the account Forward Forever Oy. So, why is row nr. 1 the right answer and row nr. 2 the absolutely wrong choice to pick here?
The underlying dilemma is that this lookup field is a customer field (column). It can reference either an account or a contact record (row). It’s one of those non-simple types of lookups that Dataverse has contained since forever, thanks to it being originally designed for the purpose of being a CRM database.
Now, in a B2B CRM scenario you would almost never want anyone to link child contacts under other contacts. Unfortunately, even after 2 decades of shipping a mighty fine CRM product, Microsoft still hasn’t considered it worthwhile to offer customer organizations a configuration option to force contacts to be linked only to parent accounts.
Being an extensible enterprise business application platform, you can of course get a developer to write some JavaScript to change the default behaviour of the lookups that bother you. As for me personally, I always like to explore if there are no-code ways that would allow me to achieve a similar result without adding even a few lines of script into the environment for the future me / someone else to manage.
In this case what I want to do is this: don’t show the Primary Contact field in the lookup view of an account. As we’ve seen, it can be highly confusing, since this very same contact itself can also show up in the list of results. For a contact, it’s very logical that the parent account should be shown in the lookup preview results. (and used as a search field). For accounts, the Primary Contact value would likely be irrelevant in 99% cases when looking up records.
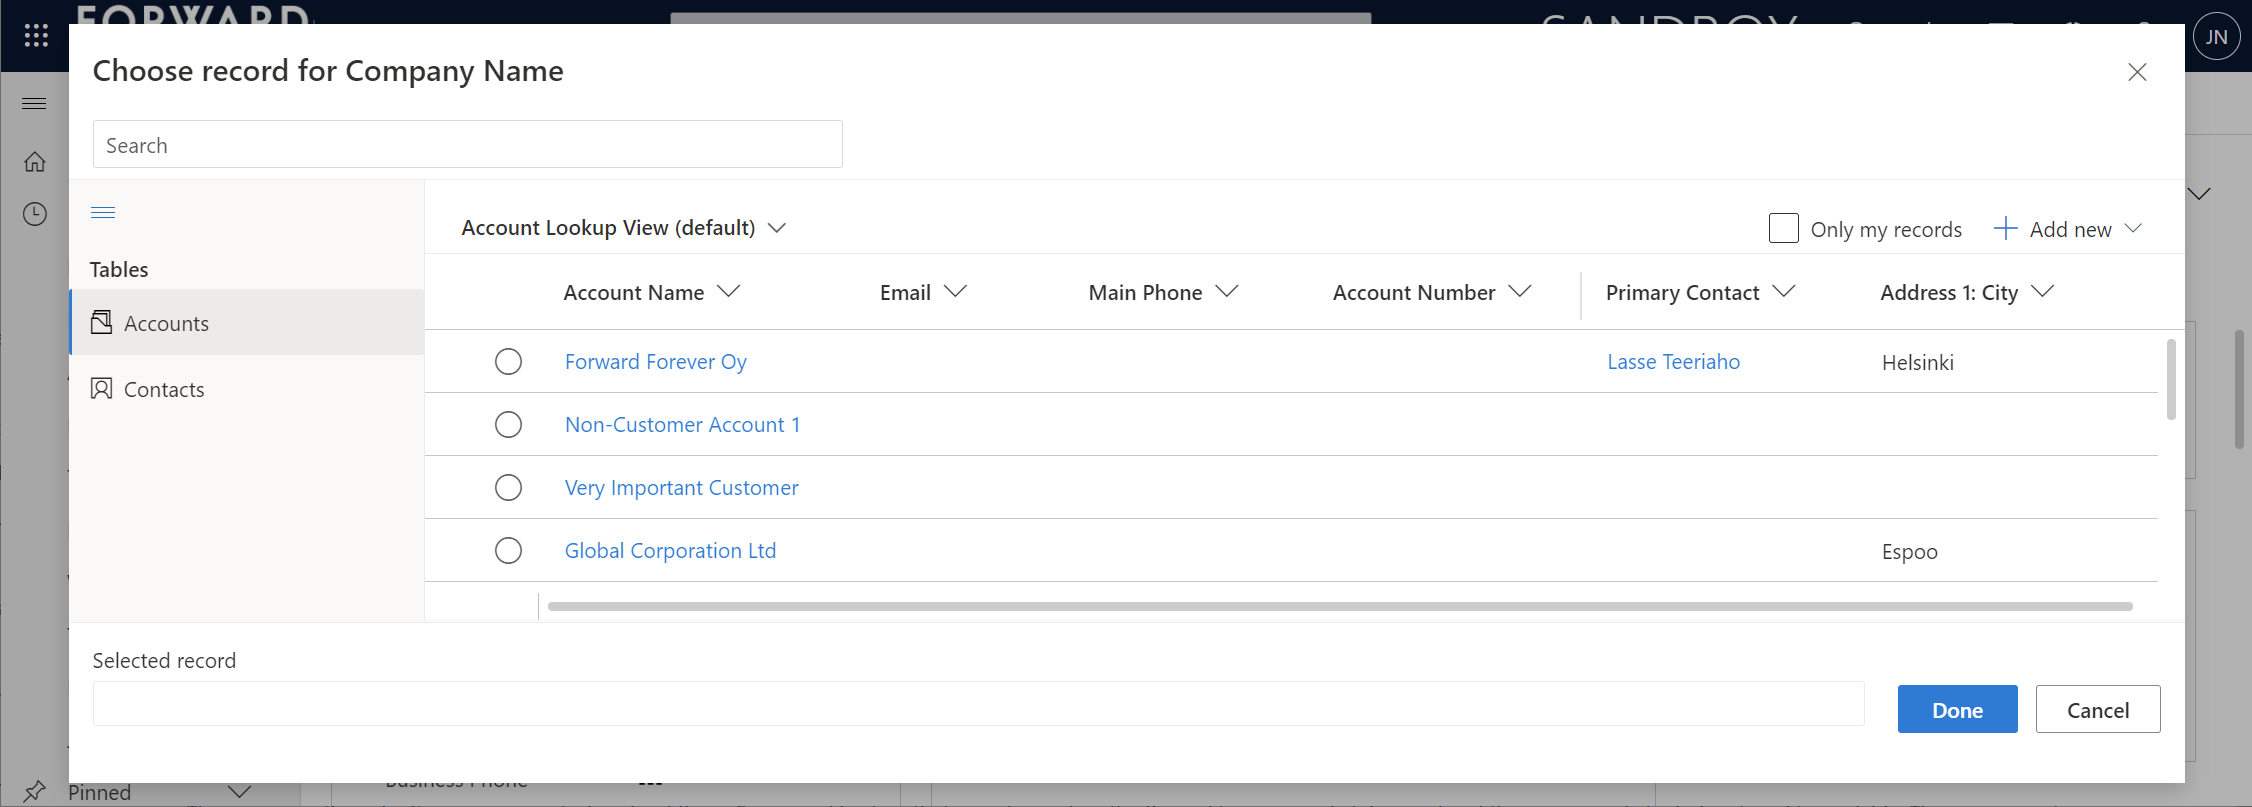
To give Microsoft some credit on the UX front, they have invested in developing a new Advanced Lookup feature that gives the end-users more filtering options to find the right record to link to. Opening up this modal dialog also gives us a way to examine why the previews behave the way they do.
Initially this lead me to scratch my bald head even more. Based on what the documentation says about lookup field behavior, I shouldn’t see the Primary Contact field value in the dropdown preview of the lookup, as there are columns like Account Number before it in the view.
“For system lookups that allow for multiple table types, the first two columns of the table lookup view are shown.”
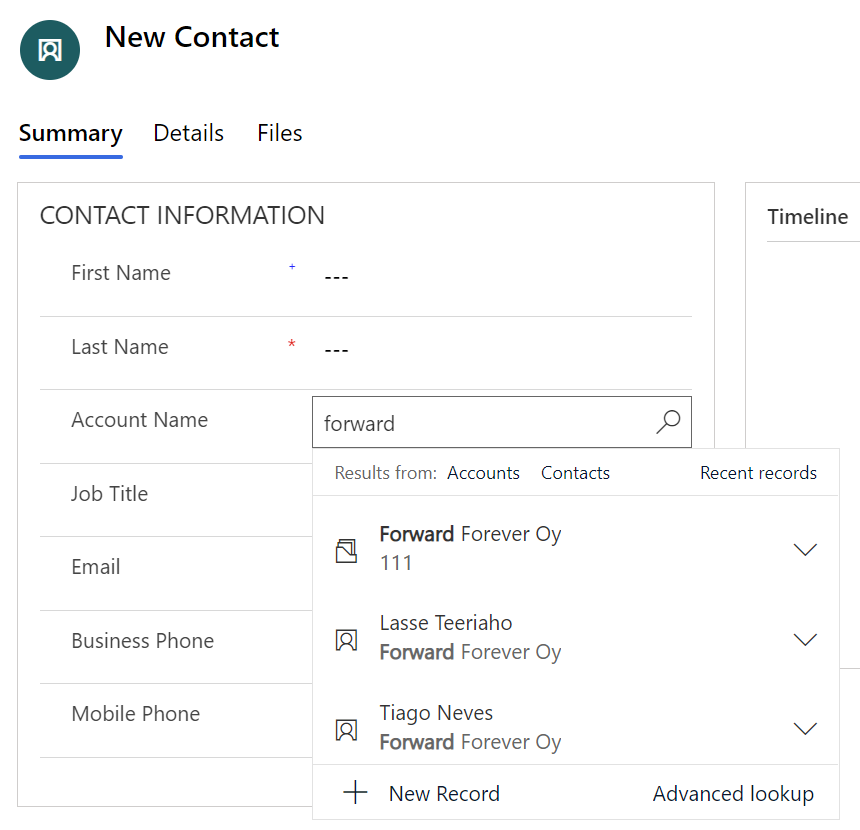
It turns out this is not true anymore. To demonsrate the real behavior, l added an Account Number “111” for Forward Forever Oy account record. This is what happens with the lookup preview:
Ah. The current lookup in the modern Unified Interface is so darn clever that it shows the first non-empty column from the lookup view.
The solution is simple then. You can just add columns at the beginning of the table’s lookup view that are always going to have data. These will then push further left the lookup fields that aren’t relevant in the dropdown preview. This means you can still keep the other fields visible by default when opening the Advanced Lookup dialog. Even that confusing Primary Contact field can be left there, just in case we need it.
There’s no such thing as 1:1 relationship in Dataverse, and hence your Power Apps Model-driven apps or Dynamics 365 Customer Engagement apps can’t directly have such a data model. Only 1:N (one-to-many), N:1 (many-to-one) and N:N (many-to-many) relationships are available between tables, be it standard or custom ones.
In practice, even the N:N relationship doesn’t actually exist in the database. While the Dataverse table configuration UI allows you to create this relationship type, it actually consists of a hidden intersect table and two 1:N / N:1 relationships that connect the actual tables together (see Dataverse table relationships documentation). Seasoned XRM professionals may even discourage the use of native N:N relationships, as you lose some control and visibility to the relationship due to its hidden nature.
Just because it’s not available in the platform, doesn’t mean there aren’t many real life business scenarios where a requirement to have exactly one record per a record in another table. (OK, “rows” in the latest Dataverse terminology, but I prefer the business process lingo where “record” still is more appropriate.) Also, like with N:N relationships, just because it’s not directly possible to create one, doesn’t mean we couldn’t build the required functionality by using the no-code tools in Power Platform.
In this blog post I’ll demonstrate not only how to create a 1:1 relationship but also how you can offer a pretty nice user experience for working with related records – thanks to the new Form Component Control feature. I’ve covered the feature details in an earlier blog post (“Relational data on Model-driven forms, part 2: Form Component Control”) so please refer to that for more info.
Why would we need 1:1 relationships?
From a theoretical data modelling perspective, you probably shouldn’t be splitting data into multiple tables if there is only a single match expected from either side. On a practical level there can be reasons why it makes sense to not cram everything into a single table, though.
A common source of such requirements are the restrictions of access rights to data. Let’s say that the contact information of a person needs to be widely available to users of the application for various purposes (billing, marketing etc.). However, this contact also happens to be a patient, with details about his or her medical profile being recorded into the same system. Only the doctors should have access to this data. A single contact will match a single patient record (or none, if it has been created for other purposes). If these are in two separate tables, granting access rights can be easily achieved via standard Dataverse security roles: everyone sees the contact table data, but only doctors see the patient details.
“Couldn’t we just use field level security to hide the confidential stuff?” We could, but you have to evaluate whether the approach will really scale to how the system will be used. You see, in addition to security we’ll also need to consider if we’re overloading a single table with too much data. There are hard limits of the maximum number of columns that SQL Server supports for a single table. Thanks to the value-add provided by Dataverse, adding one column into the data model can create many columns in SQL. This means you don’t have anywhere near the 1024 columns per table at your disposal. Also, if you’re working with a standard CDM entity like contact, there will already be close to 300 attributes taking up space before you extend the data model for your specific needs.
I was recently working with a customer that is planning to use Dynamics 365 Customer Service for managing all their service requests in every department they have. This will mean that tens of different types of services will be creating case records into the system. The amount of service specific information that must be available to be captured on case records is easily hundreds, if not thousands of fields. Adding all of these to the case (incident) table wouldn’t be feasible, so instead the solution architecture was designed to incorporate “service detail” tables specific to each service. Each case will have one (or zero) of these records, so it’s a 1:1 relationship between the standard case table and these custom service detail tables.
Establishing 1:1 in the data model
In the scope of our example, the data model will consist of these main tables:
Service 1, Service 2, …, Service N: parental record under which the cases will be created. Think of these as service contracts that a contact person can have for one or more services.
Case: the standard Dataverse / Dynamics 365 table, with lookups to all of the aforementioned Service tables. No other service specific data is stored here.
Service 1 Detail, Service 2 Detail, …, Service N Detail: service specific information that should be found from under each Case, depending on which service it applies to.
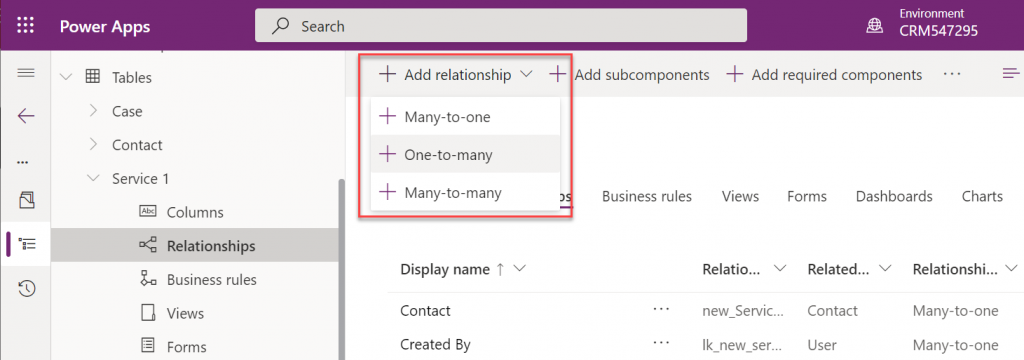
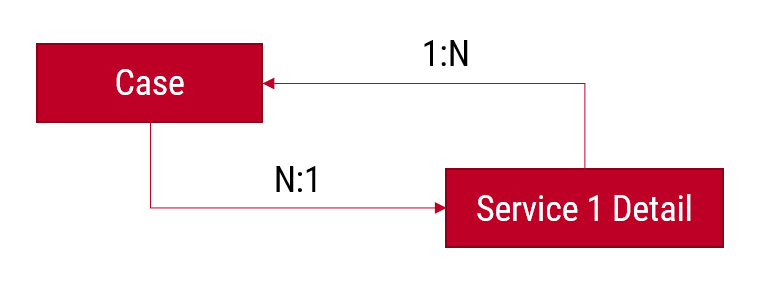
Just like the N:N relationships in Dataverse consist of two 1:N’s, the same applies to our manually created 1:1 relationship. Only this time we’re not going to need an intersect table, rather we’ll just link the two records together via the relationships like this:
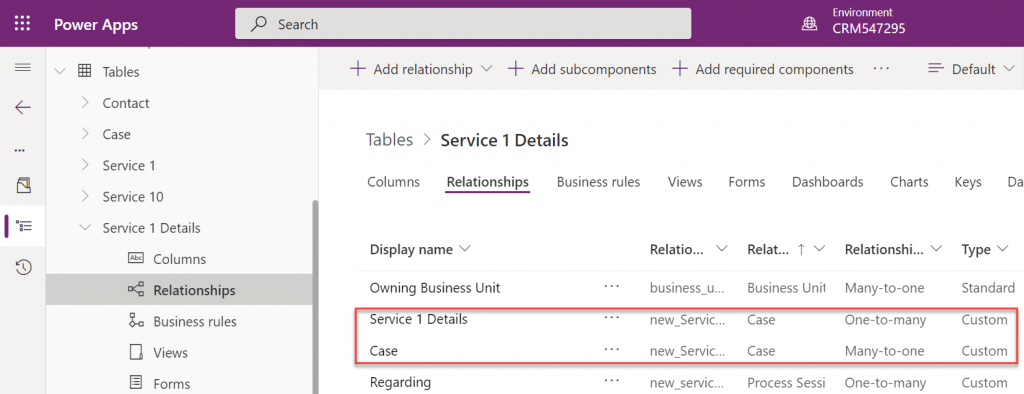
The Case record will be parental to the Service Detail record, but at the same time the Service Detail will be the Case’s parent. These will appear just as two custom relationships under our table:
Next, we’ll want to ensure that there is always one and only one Service Detail record for a case – IF the case is related to the delivery of the specific Service. Furthermore, we’ll want to get the Service Detail created automatically immediately after case creation, so that users can start entering data on it.
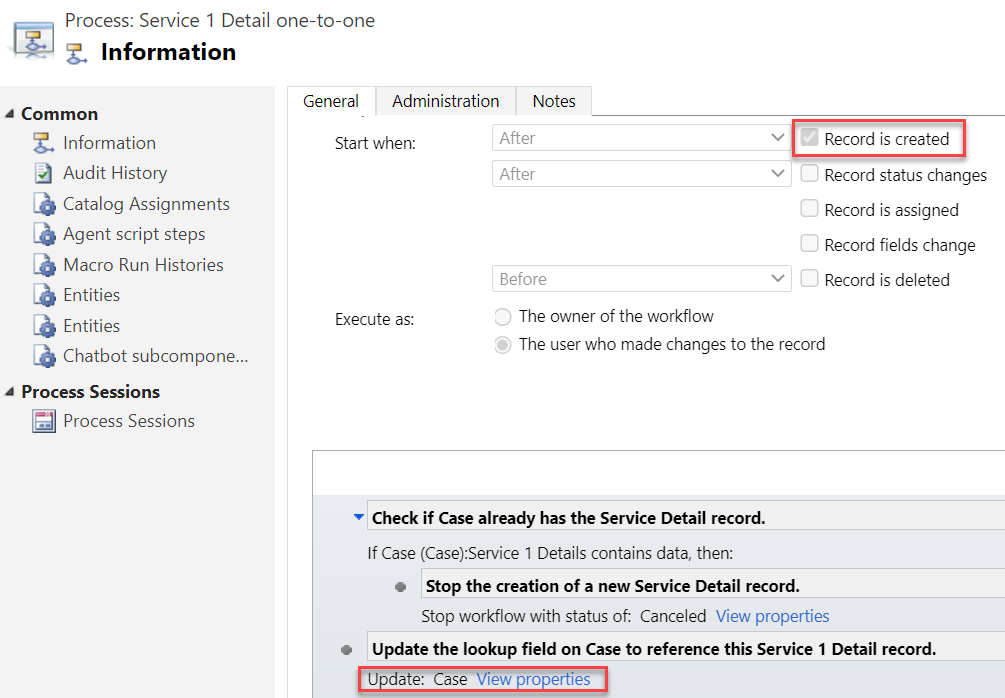
The real-time requirement rules out Power Automate that is asynchronous by nature, so we’ll use the classic XRM workflow engine instead. There will be two levels in the automation:
When a Case record is created, check which of the many Services it is linked to and create a record in the corresponding Service Detail table (establish 1:N relationship).
When a Service Detail record is created, update its parent Case with a reference that sets the Service Detail to also be the parent of that Case (establish N:1 relationship).
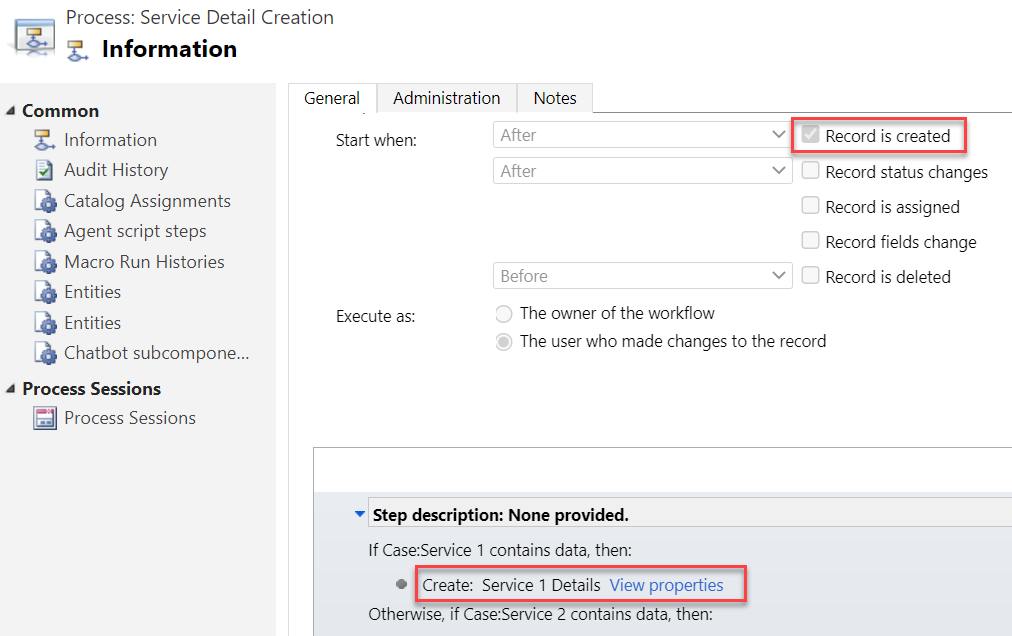
Workflow 1 looks like this:
It will then in turn trigger workflow 2:
Notice that we have a check in place that stops the creation of a Service 1 Detail record if one already exists for the Case. If the lookup to Service 1 Detail is empty, we put the reference to our newly created record there and establish the 1:1 relationship.
Working with 1:1 data in the user interface level
This is where the Form Component Control comes in handy. In short, the control is meant to allow both the display and inline editing of a parental record’s form, embedded inside another form. An example of the standard data model use cases would be to show the fields of a the customer contact on a Case form and allow the service representatives to update them without having to open the actual Contact form.
It works in our 1:1 scenario, whereby we can edit the Service Details fields directly on Case form. The reason is that not only is the Service Detail a child record of the Case, it is also the parent – thanks to what we’ve just built above.
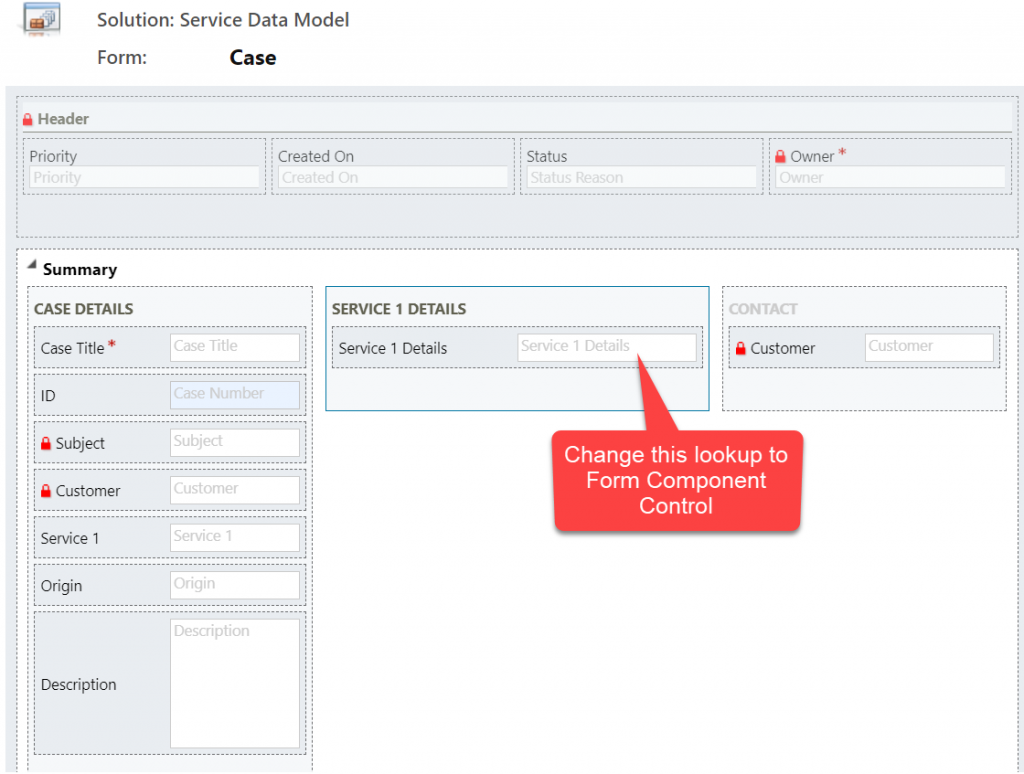
You’ll find the explanation of how to use Form Component Controls in my earlier blog post. For now you need to do the configuration in the legacy Solution Explorer side, by editing the form and setting one of the lookup fields to be rendered as Form Component Control:
Now when we create a new Case record and have the Service 1 lookup value populated, after the first save the user can immediately continue to fill the Service 1 Detail values right within the same Case form:
The beauty here is that for the user who’s working with a Case record, they won’t need to know there are two different Dataverse tables used for storing the data. Both the Case record details, Service 1 Details and even the Contact record details are all editable on the single screen. The world looks flat, regardless of our data model with several relationships configured behind the scenes.
Conclusions
Dataverse offers you plenty of configuration tools to get creative with both the data model and the UI in Model-driven Power Apps. While the standard hierarchical structure of parent-child records and table (entity) specific forms is the most common pattern, there are alternatives that may be useful when faced with more complex business requirements.
Dividing the business data into multiple tables with 1:1 relationship may sometimes be perfectly justified, to accomodate the security and data storage requirements. The user interace of Model-driven apps today offers great tools like the Main Form Dialog and Form Component Control to simplify working with proecsses that span across different tables in the underlying database.
If you’d like to see Microsoft implement a native one-to-one feature for Dataverse, please vote on this idea.
I’ve got a confession to make: even though I’ve been building Model-driven apps long before they even were Power Apps (back in the XRM era), I’ve struggled to understand how I can make them visible to the end users in the modern experiences Microsoft offers.
In this post I’ll address two different challenges. First, how to enable end users to have access to your Model-driven app. Second, how to protect them from seeing irrelevant apps.
“Why isn’t the app sharing menu working?”
Once you’ve built your Model-driven app are ready to release it, you need to make it visible not just to the app makers and system admins but also regular users. This involves using the Share menu from the list of apps available in the environment.
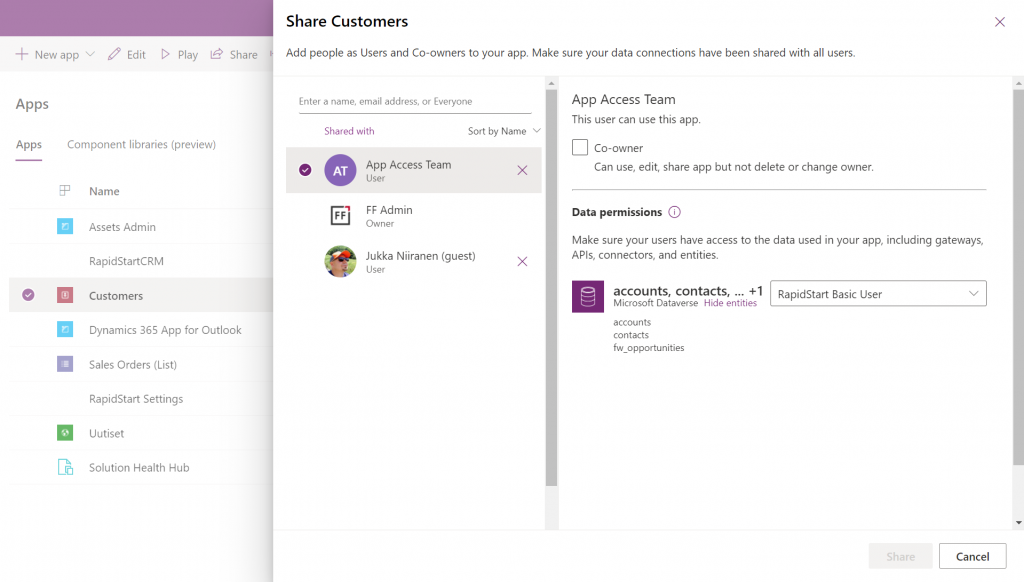
Working in the Power Apps Maker portal, it’s pretty obvious the things we see here have been built with Canvas apps in mind. When it comes to sharing a Canvas app, the steps are fairly logical. You click the 3 dots next to the app, select “Share” and are shown this dialog:
You add users or groups, set their data permissions via the many available security roles within Dataverse, click Share, after which the users get an (optional) email message. All good!
Try the same steps with a Model-driven app and your users will see… nothing. It’s not just that there isn’t an email message with the app URL sent to them. They actually don’t have access to the app at all, even if you provide them the URL directly. Why isn’t the share action working from here?
If you’ve worked with the Dynamics 365 App Modules before, you might remember that you needed to specify which security roles have access to which app. Just like with role-based forms, too. Now, that particular role assignment UI existed in the legacy web client that has been deprecated and there doesn’t seem to be an equivalent in the Maker portal anymore. Does this mean we don’t have to perform this step, rather the sharing of the app to the users takes care of this automatically?
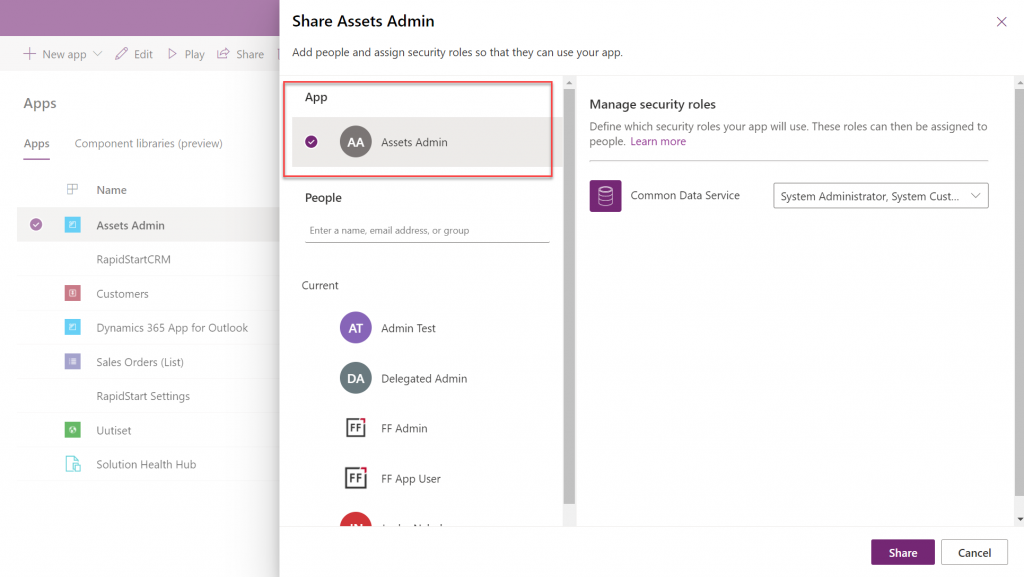
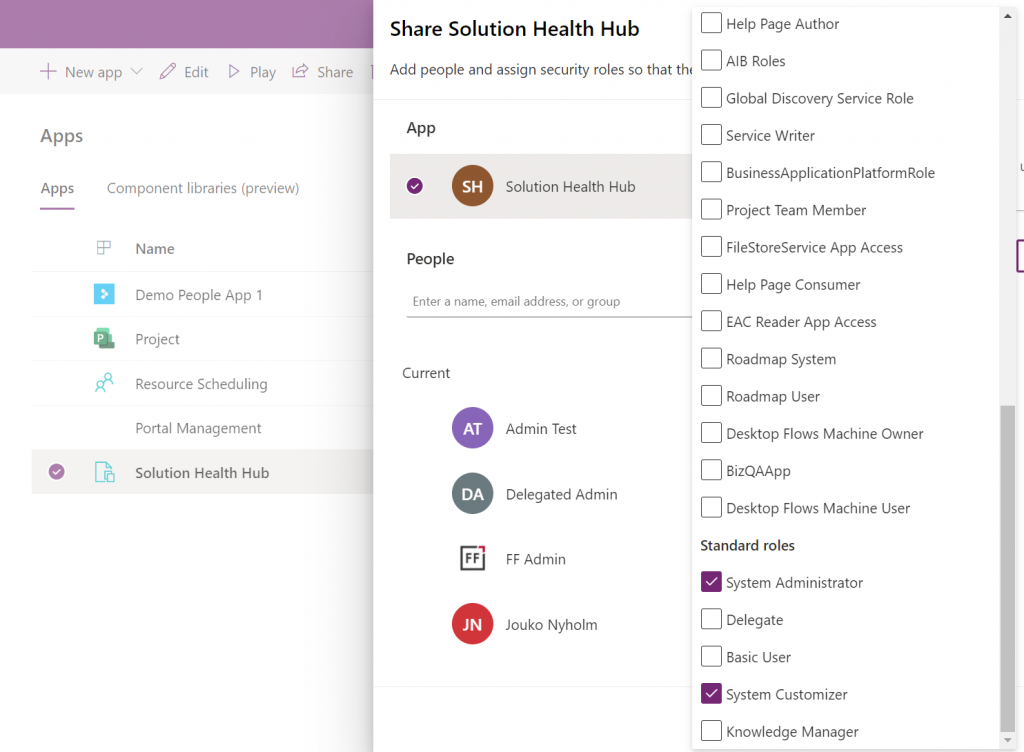
At some point I assumed so, but this isn’t actually the case. After a long hard look at the documentation, I finally realized that the MS product team had squeezed this functionality into the Canvas sharing dialog in quite an unintuitive way. You see, you’re not only using it to share the app to the users, but also for “sharing” the app to a security role:
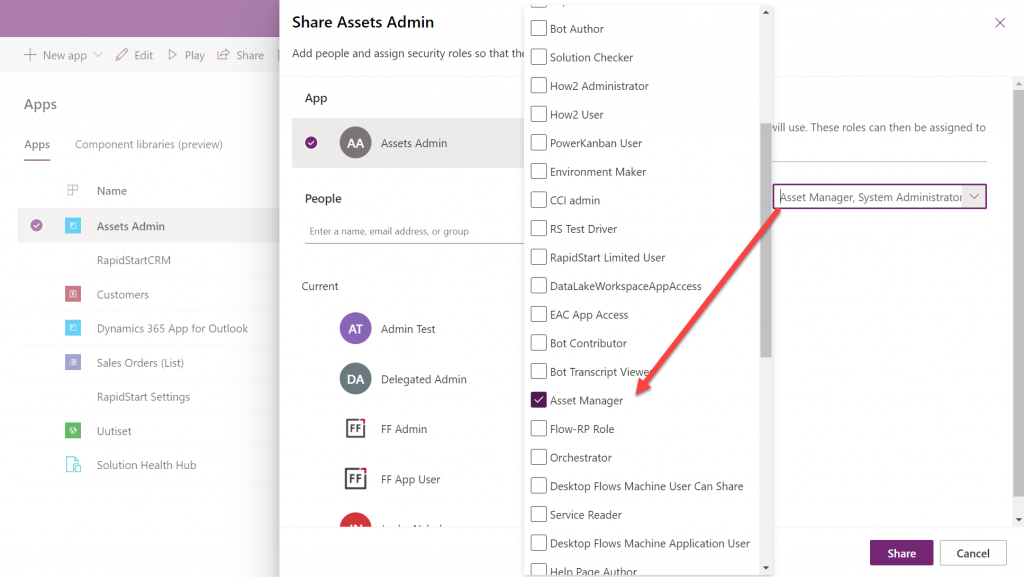
So, rather than sharing the app to the users, stay on the higlighted App section that’s at the top of the list. Pick the correct security role from the list and then click “Share”:
Now all users with the specified security role will have access to the app when trying the URL shared with them. Yes, you didn’t actually need to explicitly share the app to them via this menu at all! Sure, you can use it for adding the required security roles for these users, if they haven’t already acquired through other means, like group membership. But the whole concept of “app sharing” is still completely irrelevant to Model-driven apps, from what I can see. It’s only this misleading UI that may give you the impression that you can achieve visibility to Model-driven apps via a sharing action when in fact it’s still security role based like it was back in XRM.
This leads us to the next question around Model-driven app visibility that has been puzzling me:
“Where can I find the apps I have access to?”
If the app user is not a maker in the particular environment, they logically won’t have access to the Power Apps Maker portal to view the list of apps in it. So, from where exactly should they be viewing the list of all the apps shared to them?
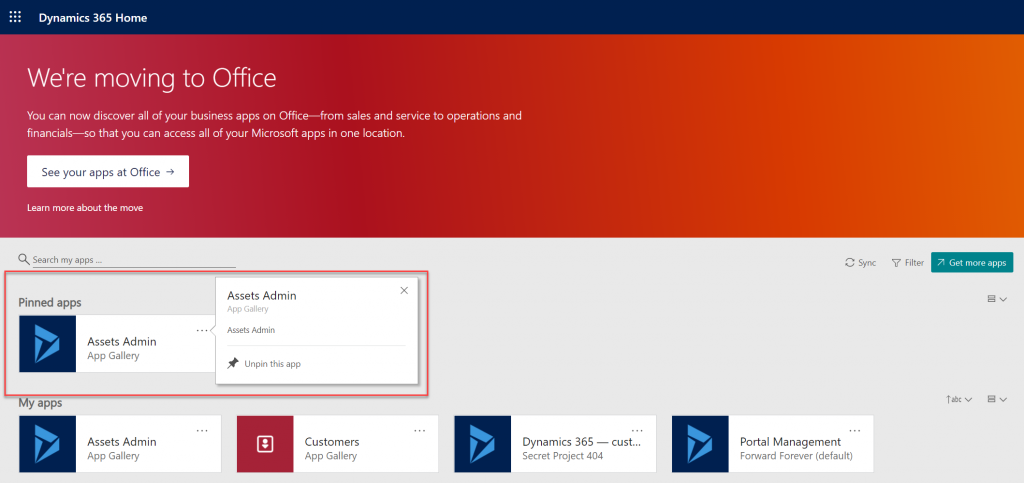
If we have past experience from the world of XRM then we’d probably navigate to the Dynamics 365 Home page at home.dynamics.com. This page should be showing all the apps that the user has access to, which it currently does. We can pin our newly shared Model-driven app to the top of the list for easy access:
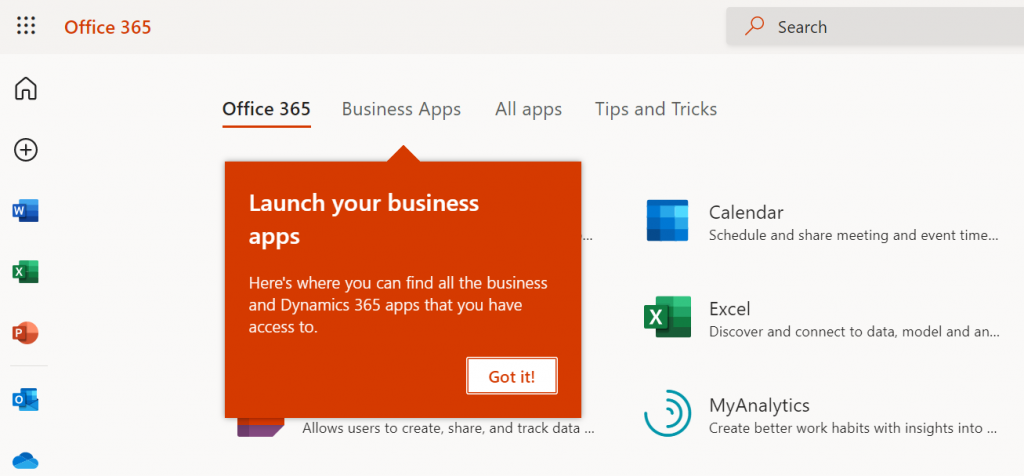
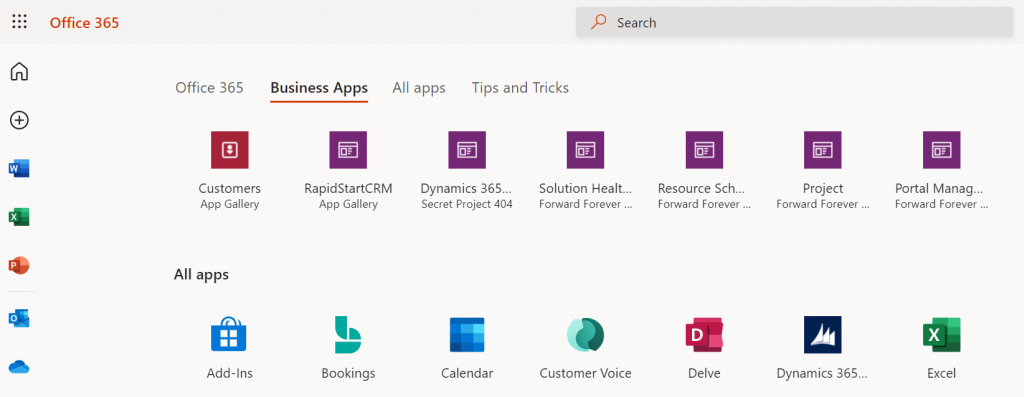
Oh, right. “We’re moving to Office” says the banner, since this Dynamics 365 Home page has been deprecated a while ago. In fact, based on the original deprecation message this page should have started to automatically redirect you to office.com/apps already. Today we still have the option to visit the legacy page, but let’s move over to the modern Office experience. We’re greeted with the “launch your business apps” onboarding dialog that points us to the Business Apps tab at the Office 365 home page:
Looking at the list of apps, though, we probably won’t see our brand new app here right away. There’s a pretty significant delay in the list of business apps getting updated here. Unlike the old Dynamics 365 Home, which suffered from a similar delay, we don’t have a “Sync” button to make this process any quicker.
While we’re waiting for our new Model-driven app to show up on the Office 365 home page, we may start to wonder what apsp actually are listed here. For instance, why is Solution Health Hub showing up there for a normal user with no admin nor maker roles?
Perhaps the Model-driven apps visibility isn’t entirely security role based after all. Whatever the reason why these Microsoft built apps like Solution Health Hub or Resource Scheduling from the default environment show up for a non-admin user, it’s not exactly a pleasant user experience. The Office 365 home page doesn’t offer us any pinning or filtering features like the old Dynamics 365 home page did, so there’s not much an end user could do to clean up the mess.
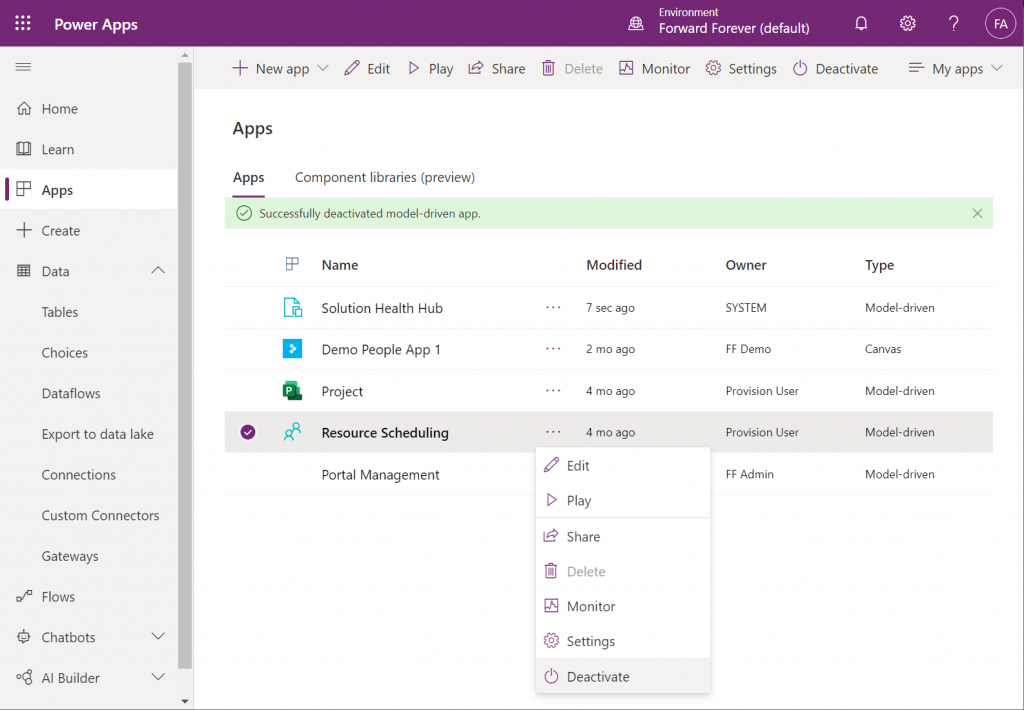
As a system administrator, though, we actually do have a way to trim the list of apps – even when they are first-party MS apps. Thanks to fellow MVP Alex Shlega, I recently learned that Model-driven apps can now be deactivated and activated. So, let’s go to the Maker portal in the default environment, pick the apps we want to hide from office.com/apps and select “Deactivate”:
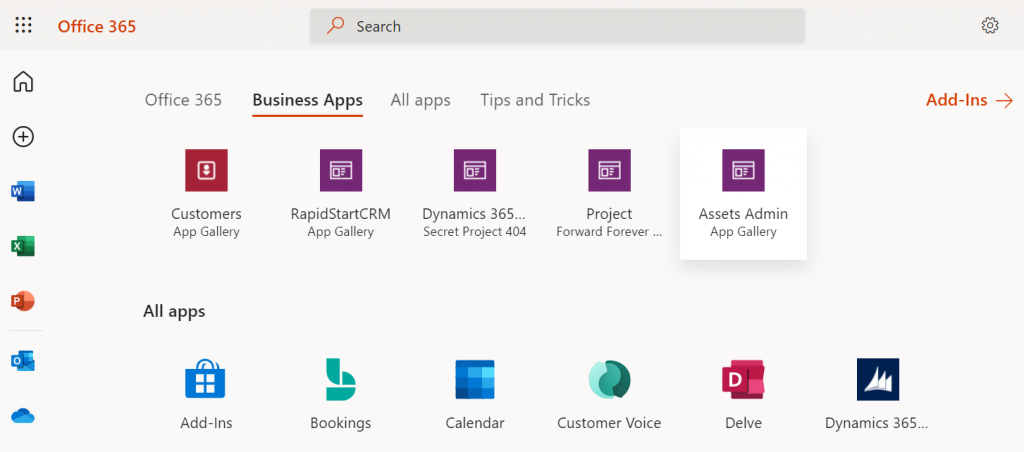
Much better! Not only have the unwanted apps disappeared from the Business Apps list, but also our newly configured Model-driven app has appeared there during our small exercise.
There still remains one item on that app list that I can’t figure out a way to remove from the user. That “Dynamics 365 – custom” app from the Secret Project 404 environment is actually the result of a Dataverse for Teams environment provisioned by this end user. Now, since we have no way to directly navigate to the full Maker portal of such an environment and they shouldn’t support any Model-driven apps to begin with, these apps are something only MS can clear away in a future update hopefully
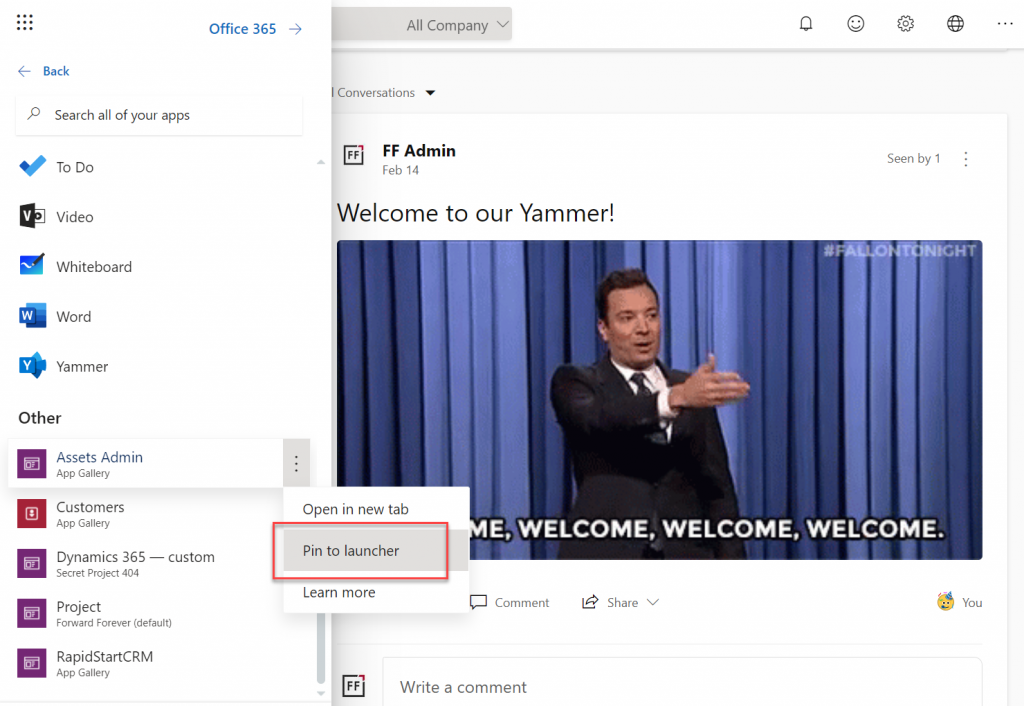
Thankfully there’s another place where the end user has more control over the app list than the Office 365 home page. Whenever you’re using some other Microsoft 365 service and need to open up a Power App, it’s a lot more convenient to use the waffle menu from the top left corner rather than the full home page.
Thanks to Thomas Sandsør for reminding me about the customizability of this app launcher. This is of course the place where a user should be instructed to pin their new Model-driven app for easy access:
One final point to make about Model-driven apps visibility is around Microsoft Teams. You should definitely consider pinning the apps into relevant Teams channels as tabs, to maximize the likelihood of the end users remembering to use them. As for a complete list of Power Apps available to the user, currently no such place exists within Teams, so you should pay attention to the Office menus as the portal to display your Power Apps app catalog for desktop users.
Update 2021-12-07: Office App Launcher new visibility criteria defined
Microsoft has recently changed the behavior of their app lists, with an update communicated via Microsoft 365 Message center message MC290818. Since many people will not have access to MC content and it will probably disappear at some point, I’ll post the contents here in full:
To help improve the app exploration and discovery experience for users, beginning mid-November 2021, the Office App Launcher, All Apps (https://office.com/apps), and app search experiences will be updated to only list relevant Dynamics 365 apps, Power Apps apps, and Azure Active Directory integrated apps.
Following this update, the Office App Launcher, All Apps, and app search experiences will only list Dynamics 365 apps, Power Apps apps, and Azure AD integrated apps that meet one of the following criteria:
Dynamics 365 apps and Power Apps apps:
Apps a user has launched in the last 7 days
Apps created by a user
Apps an admin has marked as ‘featured’ in the tenant
User accessible Microsoft published Dynamics 365 apps
Dynamics 365 apps or Power Apps apps that meet the above criteria will be shown in the App Launcher, the Business Apps section of the All Apps experience, and in app search results. Note that the time between when an app is shared with a user and when it appears in an Office experience is expected to be 24 hours.
Azure AD Integrated Apps:
Apps an admin or user has added to an Azure AD collection
Azure AD integrated apps meeting the criteria above will be shown grouped by collection name in the All Apps experiences, as well as individually listed in the App Launcher and in app search results. A link to the My Apps portal where users can create Azure AD collections will be added to the All Apps experiences as part of this update.
How does this affect me? Dynamics 365 apps, Power Apps apps, and Azure AD integrated apps that don’t meet the above criteria will no longer be listed in the Office App Launcher, All Apps, and app search experience. Users can take the following steps to access these apps and have them listed again in their experiences.
For Dynamics 365 apps and Power Apps apps, if a user cannot find an app they are looking for will need to first launch it in the browser via its Uniform Resource Identifier (URI). Note that admins and makers can get an app’s URI by selecting an app in the Power Platform admin center or via https://make.powerapps.com by selecting details, then selecting web link. Once the app is launched, it will be listed in the Office App Launcher, All Apps, and app search experiences.
For Azure AD integrated apps, a user can locate the full list in the “Apps” collection of the My Apps portal. Users can create collections for quick access to their favorite or most often used Azure AD integrated apps. Once the Azure AD integrated app is added to a collection, it will be listed in the Office App Launcher, All Apps, and app search experiences.
What action do I need to take? This message is to inform you of an upcoming change, no action is required. However, if you want to guarantee specific Dynamics 365 apps, Power Apps apps, and Azure AD integrated apps are available to users following this update, please perform either of the following:
Our quest for improving the user experience of Power Apps Model-driven app forms and multi-table data models continues with this part 2 blog post. We will explore how the brand new Form Component Control enables us to essentially blend the forms from two different tables (entities) onto a single form for the user to easily interact with.
In part 1 I laid out the example scenario of a Rental Car app where a single rental event record will always have a single related car record associated with it. Please go and have a look at the details in the earlier post if you want to understand the details.
Our approach was to leverage the Quick View Form to bring in fields from the related parental table (Car) onto the child table (Rental) form. To make the data entry and editing easier we enabled the Main Form Dialog feature for the Car lookup field, which then opens the form in a modal window.
While this UX is a lot nicer than navigating between full screen forms and page loads, it’s still not all that seamless. The user will be very much aware of the fact that he/she is working on two different tables, while ultimately we’d want to show just a single page that abstracts away all this complexity of the underlying relational data model.
What is the Form Component Control?
First of all, it doesn’t have a very sexy name, that’s for sure. During the past few days of exploring the feature, I’ve had to repeatedly go back to the documentation to see what the name was. Even the product team’s announcement “editing related records on a main form in a model driven app” doesn’t sound very exciting. There’s a lot easier way to describe it:
Forms within forms.
It’s simple, and it’s very powerful. Unlike the CRM 2013 era feature of Quick View Forms, there’s no requirement to keep the forms as “view only” , nor particularly “quick” in terms of their contents. It’s just regular forms, and they can be used within other regular forms – full edit capabilities included.
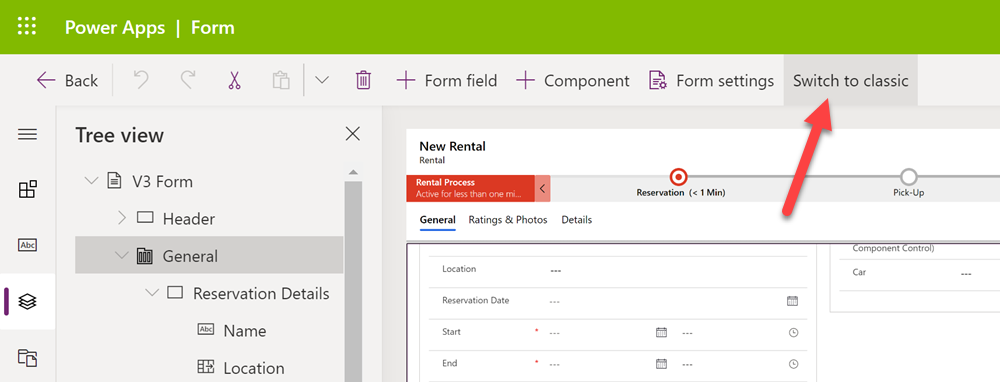
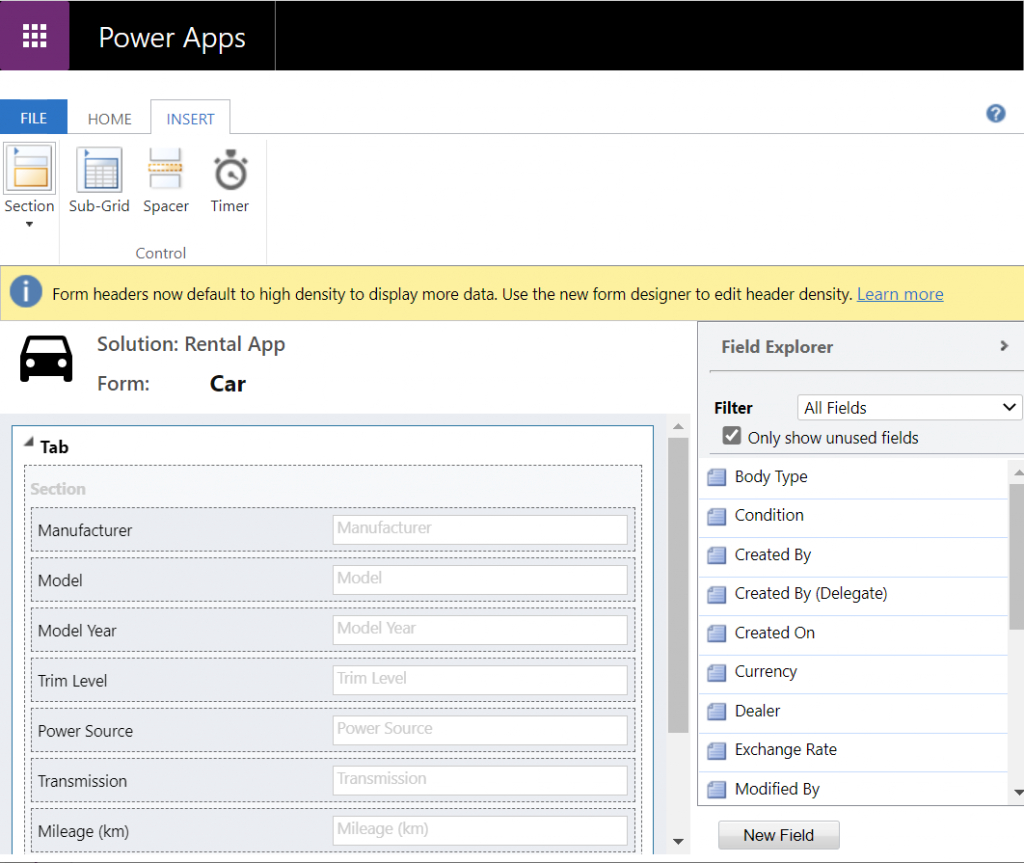
Let’s add a Form Component Control onto our form and see how it works. Unlike with the Main Form Dialog feature discussed in part 1, this Form Component Control feature is unfortunately not yet available in the modern Power Apps form editor. So, we start with what we still need to do very often in the world of Model-driven apps, meaning hit the “Switch to classic” button to launch the classic Solution Explorer that dates back to CRM 2011.
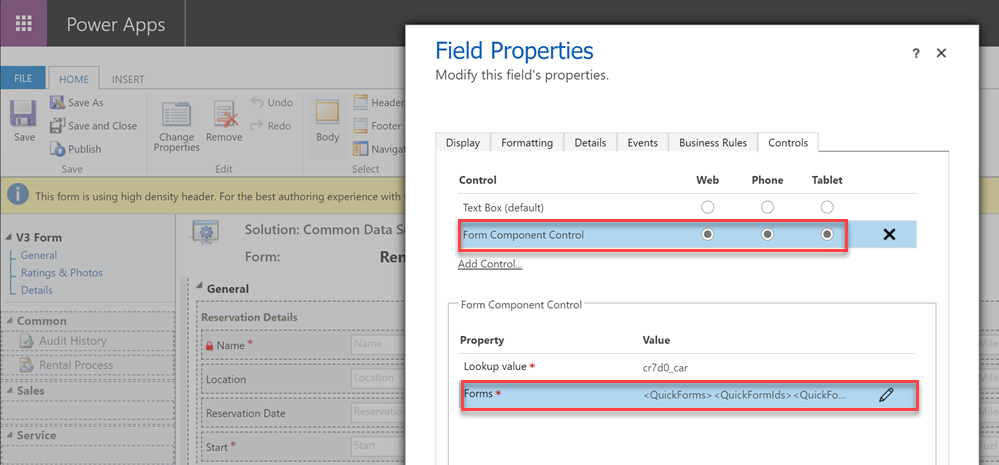
On the form where we have a lookup field (in our case the Car lookup on the Rental form), let’s open its properties dialog, go to the Controls tab and click “Add control”. We can see the MS provided PCF control “Form Component Control” in there. Adding it and setting it to be the default control for our web client is easy, but the configuration requires some additional information that doesn’t have a graphical UI (maybe in the modern form editor then once this feature is supported there).
See the MS documentation page for the detailed steps to take. In short, you’ll need an XML entry that contains the table name (entityname) and the form ID of the main form you want to show for the related table. My configuration looks like this:
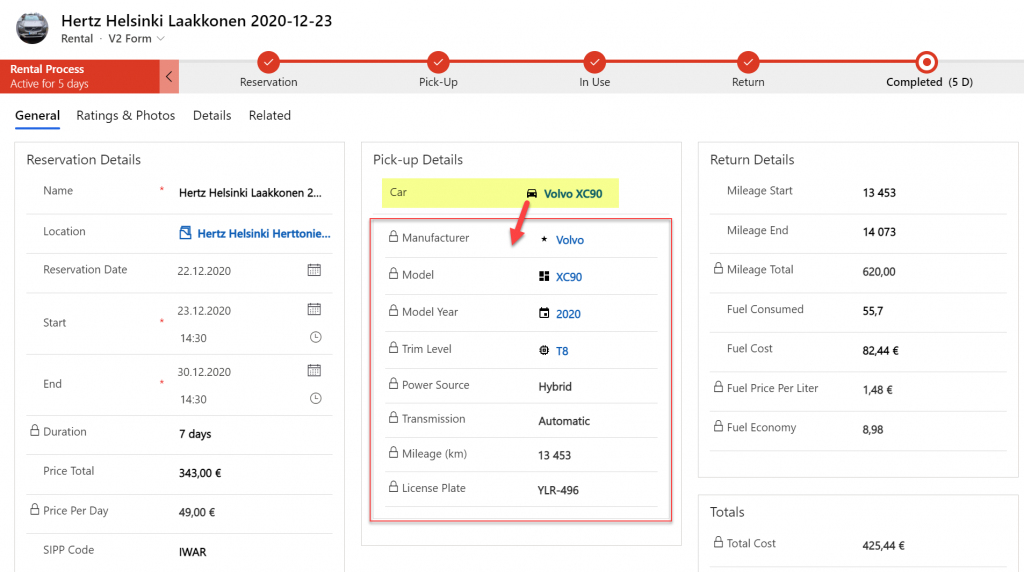
Let’s publish the changes and go test out the experience of editing an existing Rental record where the Car record’s fields have been partially populated. On the place where I previously had the Quick View Form with its locked fields, there are now fields coming from the Car table form. Text fields, lookups, choice fields – they all work exactly the way they would if I was editing data that’s natively stored on the Rental record, rather than the related Car record.
The save event happens as part of the hosting form, no additional tricks required. Field validation, notifications and error handling is also integrated, regardless of whether the business logic comes from the main form or the embedded form (details in the Docs).
All in all, this works incredibly well from a user experience perspective in my initial tests. Even if you’re a Dynamics 365 or Power Apps professional you might not realize that the form actually blends two different tables into a single form.
Main form rendering options via Form Component Control
With the old Quick View Form feature, there was a separate form type you had to create for the table for this specific purpose. It was far more limited in contents and layout than the full table forms, which kind of made sense for the purposes of bringing a few key fields in read-only mode onto a the actual main form of a different table. QVF allowed single column only + no other useful controls than the subgrid:
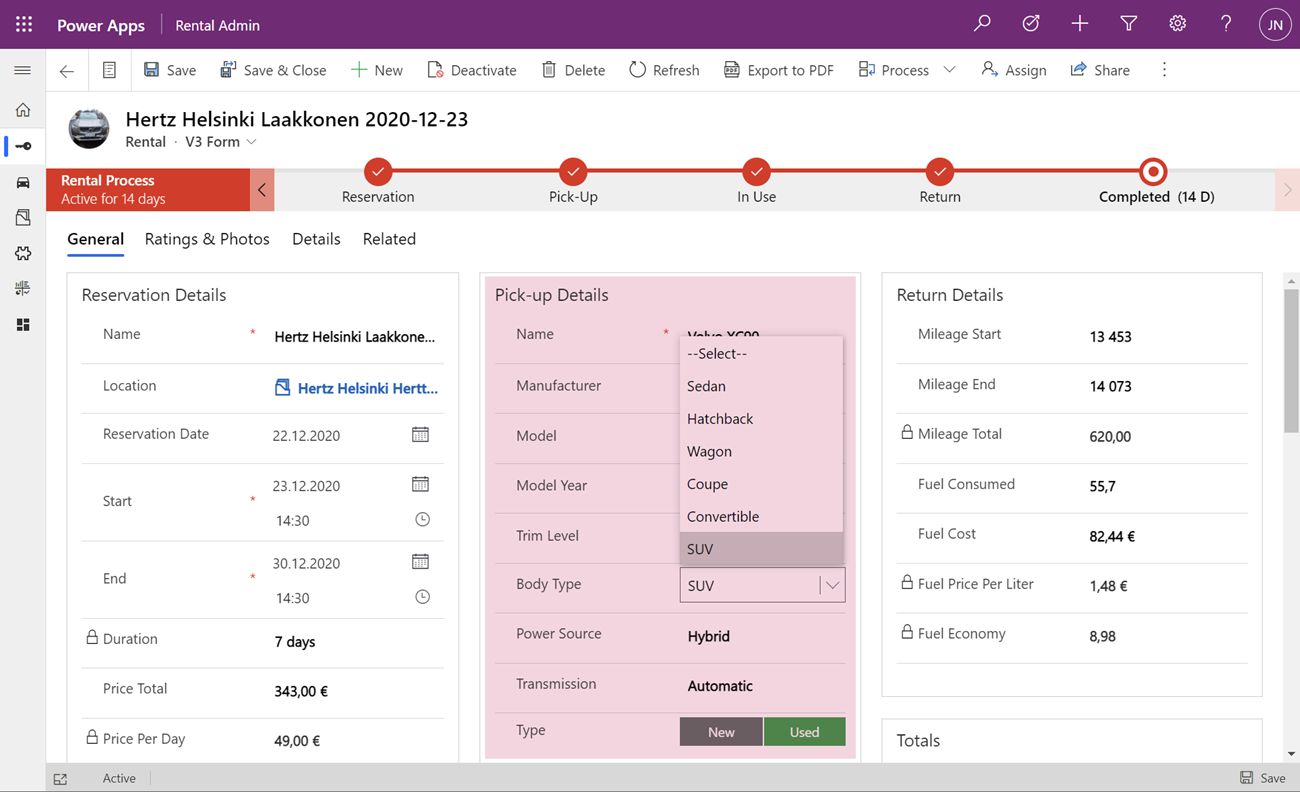
The Form Component Control knows no such boundaries. What you can use there are the existing or new main forms for any table. If you place them within a single narrow column on a multi-column form tab, then all of the form contents will be rendered within that column. Since the Unified Interface forms are inherently responsive by default (which is a big benefit compared to Canvas app screens), everything will just reflow into a layout that would resemble a phone screen – even if you’re viewing the form on a widescreen PC monitor.
What about if we give the Form Component Control a bit more space than a 1/3 of a typical Model-driven table form? The reflow also works the other way around, meaning all of the available screen space will be used. If the area given to FCC can accommodate more columns and the source form has them, they’ll be rendered just like on the “native” viewing experience of that form.
Below is an example of an alternative form design for the Rental table. Instead of having the related Car shown in the middle of the first form tab, I’ve added a second form tab “Car” and dedicated all the space available in it to a single lookup field that has the FCC control enabled. You’ll see from the static Business Process Flow and the form header that we’re firmly on the Rental form all the time, but the second Car tab shows things like the Timeline for that car record (with a note), further tabs for the car’s Dealer, even a Quick View Form referencing the dealer account related to the Car record – all within on FCC control.
This to me is just mind-blowing! We are reaching Inception level UX here, with the main forms embedded AND rendered as a full form tab within another form. I could be on the Rental record form, adding an activity via the Timeline control that’s actually linked to the parental Car record. Not the Rental record where the app navigation, form header, Command Bar and everything else visible on the screen is telling me I’m on. I’ve effectively built a form UI that defies the laws of nature I’ve come to expect from Model-driven apps.
Sure, embedded Canvas apps could do some magic like this already earlier. The big difference is that the user interface of those screens could never match exactly that of a Model-driven app. With FCC there are no visual clues distracting the UX, as everything looks and feels like it’s part of the native experience where Microsoft owns and manages the visual side.
What about record creation instead of edit?
The one gap that exists in the inline editing story for Microsoft’s controls like the Editable Grid or this new Form Component Control is that there’s no possibility to use them for adding new rows into a table. They offer the edit experience, but no create experience. Sure, we have the Quick Create Forms feature available for contextual data entry, but it’s not really optimal. The user shouldn’t have to think about if they are editing existing entries or creating new ones. Yes, the difference between these concepts matters to the platform on a technical level. Still, unless there’s a valid business process requirement for making the data entry experience different for create and update scenarios, it’s something I’d prefer to eliminate from the UI.
When there’s a scenario where we essentially have a one-to-one relationship between tables (no “real” 1:1 relationship exists in Dataverse, but there are ways to fake it), one option would be to automatically create the related parental record behind the scenes. With this approach, at the moment when the user will proceed to entering data via the Form Component Control, the lookup field will already be populated and the experience will look pretty seamless:
What I’ve done here is to create a classic XRM workflow that runs in real-time, triggered by the create event of the Rental record. (Power Automate can’t do real-time yet, so it’s a no go for flow in this case.) The workflow will create a Car record with a placeholder name “(Undefined)” and link it to the Rental record. By the time the first save event for the new Rental record takes place, the FCC can then render the fields from this placeholder Car record on the Rental form.
In the above example GIF animation you may also spot that the Car name changes transparently from “(Undefined)” to “BMW”, due to what has been selected in the Manufacturer field. This again is another real-time workflow that’s triggered by the update event of the Car record. The end user will not need to take any actions, it’s all just the native autosave feature of Model-driven apps that populates this name field while the user is still entering data into other fields further down the Car form.
Considerations
If the new Form Component Control gives us not just the read capabilities from Quick View Forms but also data edit support, then should we just stop using Quick View Forms altogether? Well, it certainly is a good question. Given that QVF dates back to the CRM 2013 era user interface technologies, FCC is much more in touch with how the modern Unified Interface client has been designed to work. It’s built using the Power Apps component framework (PCF) and should in theory be the most future proof choice for Model-driven app form design.
One downside is that the use of FCC for the pure view scenario is a bit more laborious. If we indeed would want to prevent the user from updating values from the parental record while on the child form, then these fields would need to be set as read-only on the main form itself. Which brings us to the challenge that you’ll need to keep more forms visible in the Model-driven app, whereas classic QVF’s are hidden behind the scenes and only applied as the definition when rendering the main form on which they are used.
The create scenario I talked about earlier is also a bit of challenge when analyzed deeper. If indeed the lookup from which the Form Component Control gets the related parental table record to show isn’t populated immediately, you’ll see a message saying “source record not selected”. In most cases that’s going to be quite a confusing message for the end user to encounter, given they are unlikely to have any idea about the forms magic and relational tables being used in to construct the app’s UI.
“Couldn’t we just hide that control until it the lookup has data?” Well, I can’t think of a no-code way to achieve this. You see, the problem is that the FCC essentially is the same field as the lookup field. Sure, you can have multiple instances of it on the same Model-driven app form. But you can’t use Business Rules to say “hide this field if this other field is empty”, because they are the one and the same. Quick View Forms handle this scenario much better, so let’s hope Microsoft will improve the functionality in FCC to accommodate this create/hide scenario better in future releases.
This first public preview release of the Form Component Control has a few limitations that you should be aware of. For instance, you can’t show more than a single tab from the form being rendered via FCC, which isn’t really a big issue unless you really are building an Inception app to confuse the hell out of the classic CRM users at least. Similarly, you can’t have FCC’s within FCC’s, which blocks some crazy recursion scenarios.
Microsoft recently launched a brand new search experience for Model-driven Power Apps and therefore also first-party Dynamics 365 apps operating on top of CDS. This is a significant step forward in the “non-structured” search capabilities in Power Apps. The structured queries one can construct via Advanced Find were always one of the most powerful features that the XRM platform could offer on top of relational data (and remain one of my most read posts on this blog). Now also the free text based search experience is catching up nicely:
Being a low-code application platform, there are several configuration options related to how the search features in Power Apps behave. This can also result in people missing out on how they could ensure that the search really works the way that the users would expect. In this blog post I’ll go through some common challenges that the Dynamics 365 professionals may have already learned to overcome but which can be surprising to new Power Apps makers.
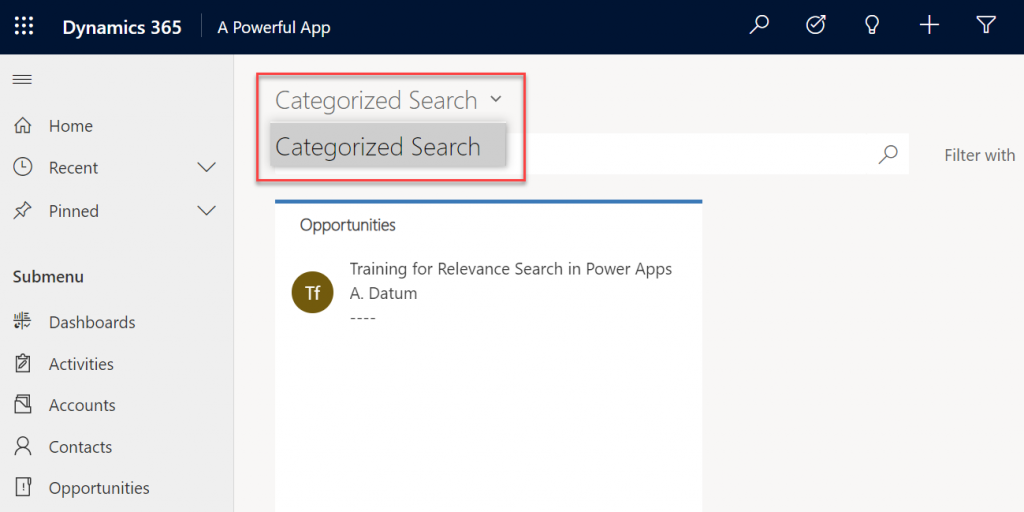
Challenge 1: Relevance Search is not enabled
If you’re not seeing anything even remotely like the MS blog posts when performing a search in a Model-driven app, then you may well be using the limited Categorized Search instead of the fancier Relevance Search. When attempting to change the search type, you might discover that the dropdown actually doesn’t give you any choices, i.e. it’s a dead end with Categorized Search as the only option:
Why does this Categorized Search option even exist, and why do we need to specifically enable Relevance Search? It all comes down to the on-premises legacy of the platform, where the single CRM server had to be capable of offering a standalone search option. In the cloud era we can leverage Azure Search as the external search index database to where CDS data is syncrhonized to, thus offering a far richer search experience.
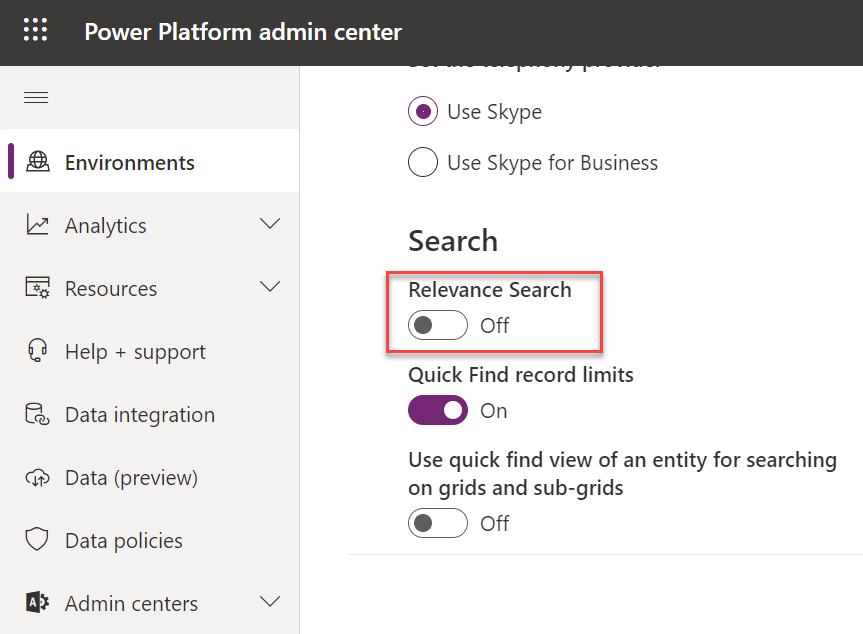
Now, Azure Search being a separate service and possibly having different types of SLAs and other legal variables than the core Power Apps or Dynamics 365 services follow, it’s not on by default even in the MS cloud. An administrator will need to navigate to the Power Platform Admin Center, choose the environment, then go under Settings / Features / Search to flip on the swith that turns on Relevance Search.
Once it’s enabled, only then will you see the option to also turn on the new search experience (which probably will become the default option in the future). It won’t show up there immediately, so give it a lil’ time.
Challenge 2: Relevance Seach doesn’t search my entities
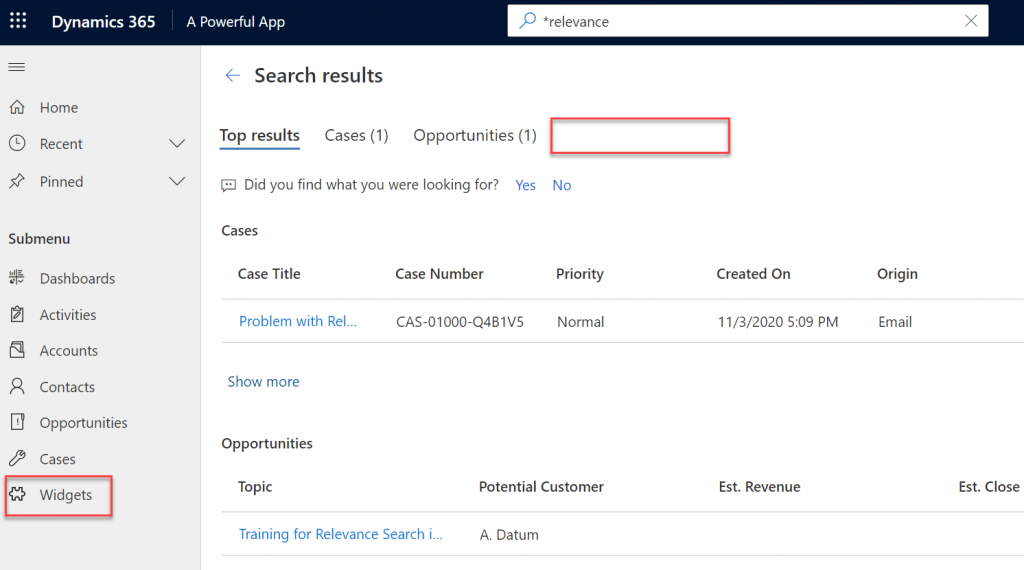
Cool, we’ve now got the new UI up & running. When we do a search from the new prominent search bar always visible at the top, the results are returned for some of the entites. But why aren’t we getting any hits for Widgets, for example? In this scenario we know there are records in there that contain matches to our search string.
Even though Azure Search provides a richer search index for your Model-driven Power Apps, it doesn’t directly copy each and every table from CDS into it’s database automatically. When working with a Dynamics 365 environment there are some default entites covered (like accounts, contacts, opportunities). For any custom entities and especially with custom apps, you’re gonna have to explicitly tell which entities should be enabled for Relevance Search.
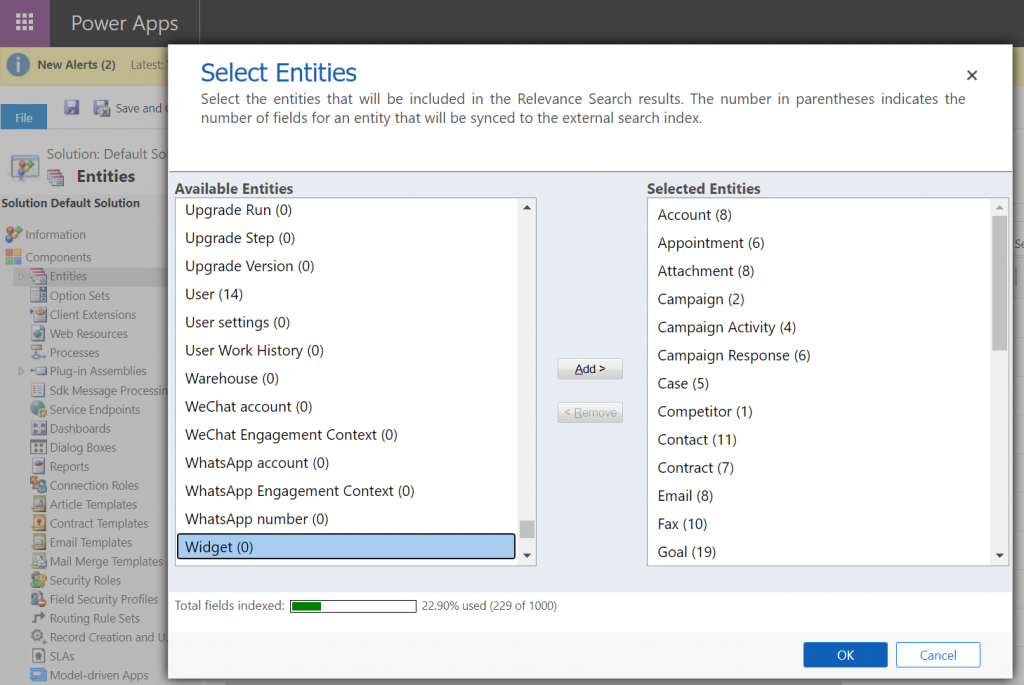
To access this configuration option you’ll need to leave behind the modern Power Platform Admin Center and venture into the land of the legacy web client and Dynamics CRM era customization UI. You can either add “/main.aspx?settingsonly=true” to your environment URL or find another path into the land of more advanced options. Once there, find Settings / Customizations / Customize The System and open up the Entities menu in the Default Solution window. Now you’ll see what entities are included in your Relevance Search Index and which are not, i.e. they are in the Available Entities list:
Select the entities you want, click OK, then Publish All Customizations and now they are enabled for the modern Relevance Search experience.
Challenge 3: Relevance Search doesn’t search the right fields
Hmm, why aren’t we still getting the full search results for our Widgets entity, even though we added it into Relevance Search? Well, technically you didn’t add the whole entity into the search index. By default a custom entity seems to pick up only the primary field (usually “name”) into the search scope, but it’s likely that you’ll have plenty of other important field that should also get indexed. The same goes for default entities: only a subset of the standard fields are included, and none of the custom ones are, unless you configure them to be included in Relevance Search.
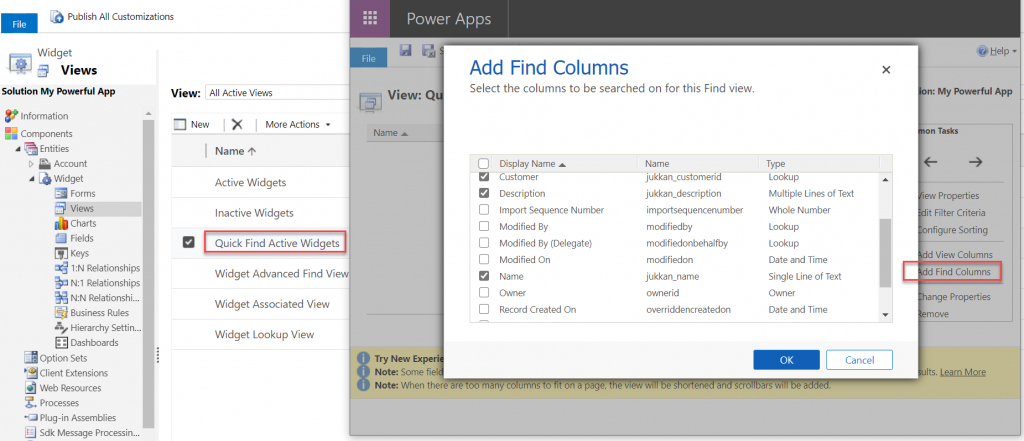
If finding the menu from where the entities list for Relevance Search is maintained was a bit tricky, then figuring out the place for specifying the field level search settings ain’t that obvious either. You see, it’s not a property of the field in the entity itself. It’s the inclusion of that field in the entity’s specific view called Quick Find View that determines what gets pushed to Azure Search database and back to Power Apps UI.
Even though the entity view editor can already be found in the modern Maker Portal for Power Apps, these settings aren’t there yet, so I hope you didn’t close that legacy customization UI just yet!
From the legacy Solution Explorer, open the Quick Find View for your entity, select Add Find Columns from the right and check the boxes for the fields you consider to be potentially useful for Relevance Search. Save & publish your changes, then verify that the search results match with your expectations.
Challenge 4: Relevance Search doesn’t cover inactive records
Sometimes the information you’re looking for isn’t found on records that are actively edited anymore, as you may be digging further into the history of your business data to check up on past transactions. In the typical CRM scenarios where Model-driven apps are leveraged this could mean searching through historical sales opportunities that are either won or lost, to find examples of what offers have been made to which clients on what specific terms.
With the out-of-the-box configuration of Dynamics 365 or Power Apps, you won’t find them via Relevance Seach. Yes, the vast majority of records that you’re storing in CDS may well be excluded from the search index by default. This is because of the same Quick Find View we visited earlier. Not only does it control the fields being indexed, as well as the column layout of the search results page. It also controls the static filters which are applied to the search results before they are shown.
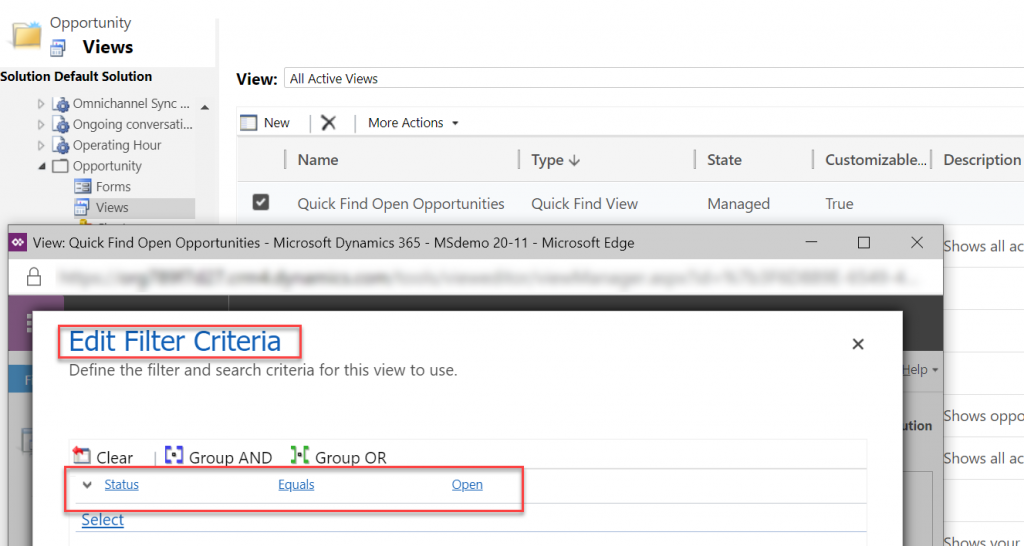
Using the OoB opportunity entity as an example, you’ll find a system view called “Quick Find Open Opportunities” under the entity. Click on Edit Filter Criteria to reveal the fact that it indeed does only include open opportunities. While we can’t create additional Quick Find Views for entities, luckily we have the freedom to modify or delete the existing filters. So, just remove that status field filter criteria, save & publish. Now your Relevance Search will also return results from the inactive records for this entity.
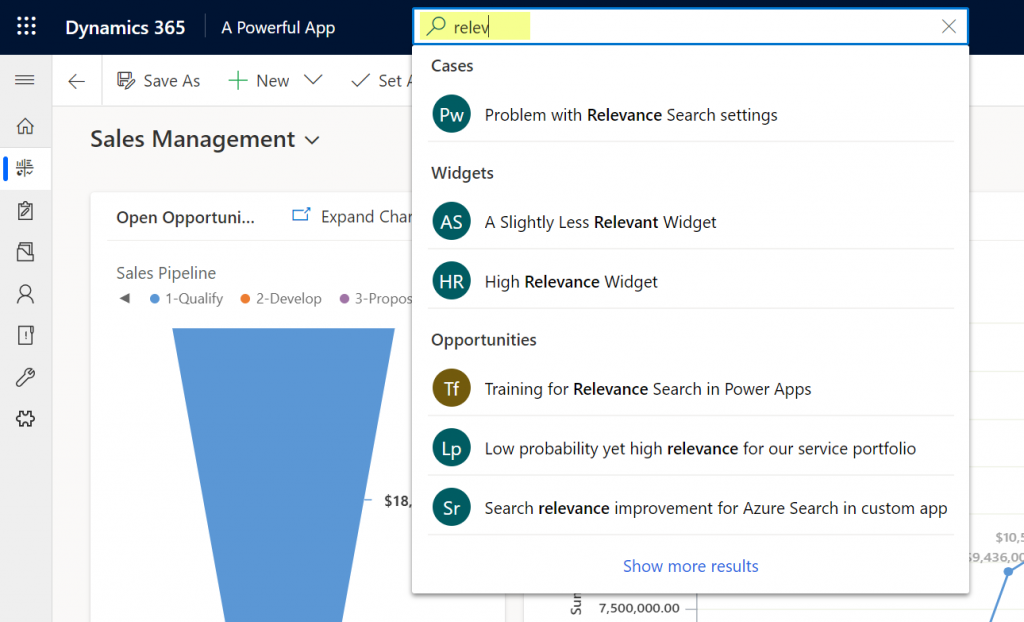
Challenge 5: Relevance Search suggestions aren’t found in the search results page
The new search experience has a nice UX for suggesting matching records immediately as you type the letters in your the search term. Let’s say that we’re interested in the search term “relevance”. By the time we’ve entered “relev” into the search bar there’s already a number of matches in the suggestions box:
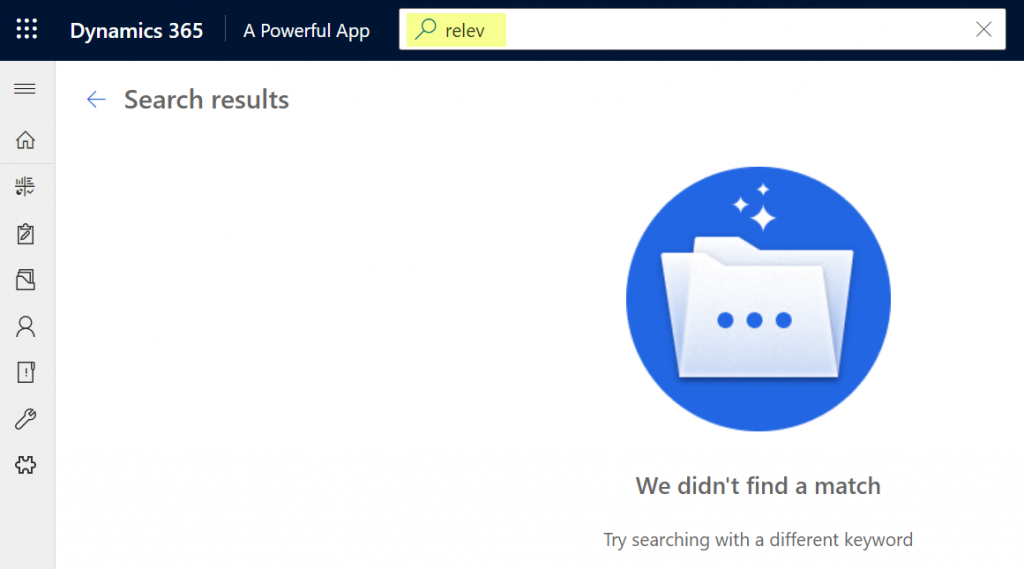
Looks great, but I think I want to see more details, so I’ll click on “show more results” at the end of the search suggestions. Hey, where did all those matching records go?!?
Unfortunately this is a challenge where you can’t configure way around it (at least yet). For the time being, this actually is by design. Taken from the documentation, Microsoft lists the suggestion feature separately from the actual search requests:
Suggestions provide a list of matches to the specified search parameter value, based on an entity record’s primary field. This is different from a regular search request because a suggestion search only searches through an entity record’s primary field, while search requests search through all relevance search-enabled entity fields.
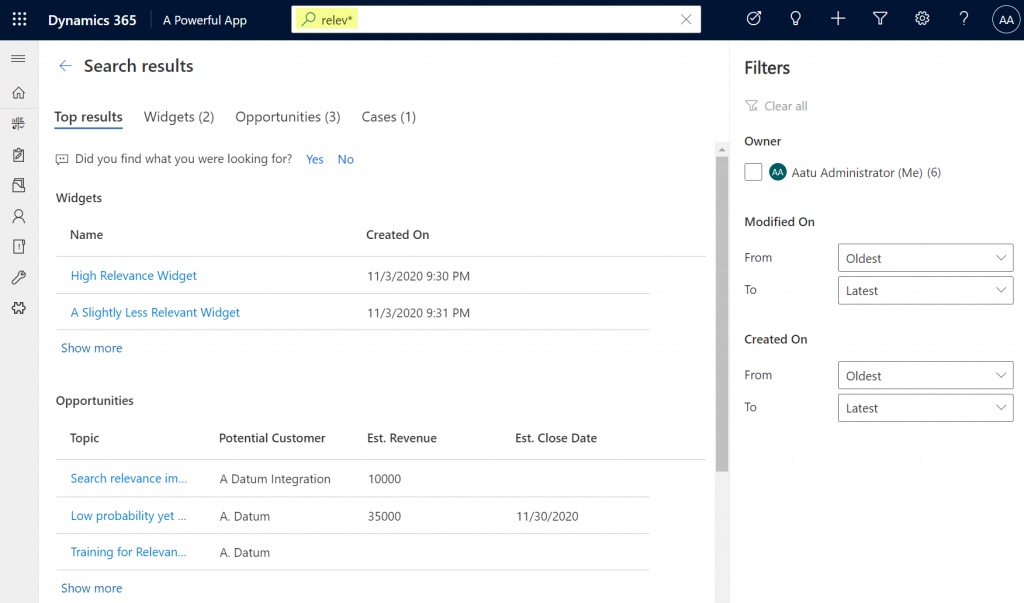
So, the search box and the search results page follow different logic, which is why it is expected that they will show different matches. This may be seem quite complex to explain to the app end users on a detailed technical level, so it’s better to just instruct them to always apply the wildcard character * at the end of their search term. The results are likely to be closer to what they expected to see:
Hopefully these 5 tips will help you in setting up the basis for more relevant search results and a better user experience in your Model-driven apps. For more comprehensive guidance, check out these three different levels of documentation that Microsoft provides on the Power Apps seach features:
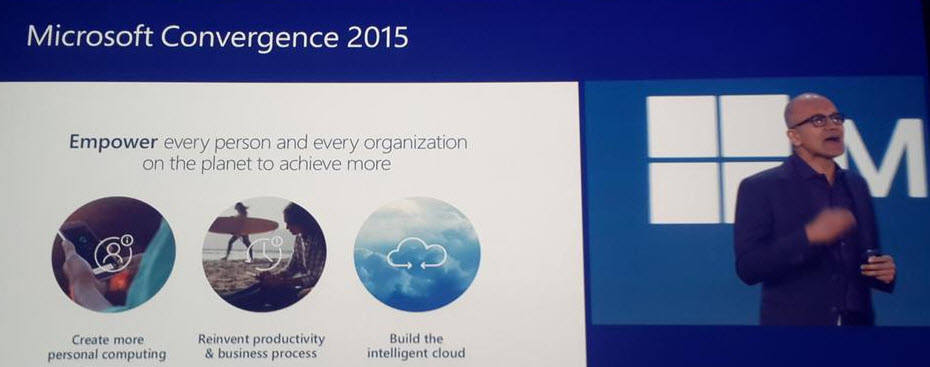
Hey, did you notice what happened in Atlanta last week? Yup, it was again that time of the year when the Dynamics CRM & ERP crowd gathers together at Microsoft Convergence. Instead of packing my bags and hopping on a plane, I once again opted to staying at the comfort of my own home and instead opened up Tweetdeck to keep an eye on all the great content being shared by Dynamics community members on the social networks.
With Satya Nadella himself opening up the event, it was clear that this year Convergence was going to be about a much broader spectrum of Microsoft solutions than just the Dynamics products. Although Satya is a former CRM blogger, he wasn’t there just to prove he still can build cool mashups with the XRM toolkit but rather to tell the higher level story of what business benefits companies can expect to gain from using the latest and greatest cloud technologies that Microsoft today offers. This is of course the fundamental reason behind why applications like Dynamics CRM are being deployed, and with the ever growing complexity of technologies intertwined together to support digital business, it’s important to increase the customers’ awareness of the types of end results they could be pursuing with the use of this technology.
So, while technology is just the means to an end and CRM is just one (central) part of a modern business technology stack, it’s still the area in which I personally strive to deliver the biggest positive impact to our customers. That is why I’ve decided to write down a few notes about what Convergence 2015 announcements you should pay attention to if you also happen to work with Dynamics CRM.
CRM Online Spring ’15 (v7.1) Is Almost Here
Known by the codename “Carina”, the next CRM release scheduled for this spring was officially revealed at Convergence 2015. The “What’s New” page for the upcoming version is already live and so is the admin content on TechNet, as well as the developer content on MSDN. The official name for Spring ’15 appears to be “CRM Online 2015 Update 1“, which is a bit of an awkward choice since based on the aforementioned documentation Vega a.k.a. CRM 2015 was called “CRM Online 2015 Update” (without a number, so presumably “Update 0”). Oh well, we all know product marketing names at Microsoft are an eternal mystery, so it’s easier if we stick to the recently simplified version numbers instead. Vega was CRM 7.0 and this next update is CRM 7.1 (but before that we’ll still get UR1 which is 7.0.1…).
Okay, enough with the numbers. Considering that 7.1 isn’t a new Dynamics CRM major version release but merely a minor version, there sure are plenty of new features and enhancements packed into this next release. I won’t try to list them here as you’re better of reviewing the above links, but the one feature that you simply can’t miss is the new Navigation Bar. You can see it live in action in this video and let me tell you from my experience with using a Carina preview org, it’s love at first click!
Arguably the single biggest gripe people had with the refreshed UI introduced in CRM 2013 was the Nav Bar with its ability to only show ~7 menu items on a single screen, then requiring you to scroll right and play really close attention to not moving your mouse cursor too far or the whole menu would collapse. Microsoft has now taken the menu structure introduced in Dynamics Marketing (which has a lot of menu items in its navigation) and brought it over to the world of Dynamics CRM. We now get a “hamburger” menu button that opens the first level (Sales, Service, Marketing, etc.) and clicking on one of them shows us all the included menus aligned vertically, broken down into subgroups. While this does show many more items to the user at once, it’s still a considerably smaller cognitive burden than trying to remember where you need to click to reveal a menu item that’s not on the screen, which happens all the time with the current version.
The initial reaction to the new Nav Bar from the CRM folks over on Twitter was extremely positive. This feature in combination with the revised MRU menu (most recently used items) that supports pinning records and views into the Nav Bar is certainly going to improve the user experience of Dynamics CRM considerably. Although it’s still advisable to optimize the structure and contents of the Sitemap to remove unnecessary items and promote the most important menus, the larger menu canvas is very much needed in more complex environments with a high number of custom entities that simply need to be shown to the users somewhere.
The one thing that’s somewhat inconvenient about this updated navigation is that it will be initially made available only to CRM Online users. Yes, in case you have missed it, Carina / v7.1 is an Online-only release that will not be made available to on-premises customers. This was the initial plan already one year ago with the Leo release, but that then eventually turned into an Online+onprem release as Microsoft Dynamics CRM 2013 Service Pack 1 was made available for download to all CRM 2013 customers. Don’t expect to see such a change of heart this time around. The new features announced are expected to become available to on-premises customers in the next major release “Ara” (8.0) later this year. (more…)
Multitasking isn’t necessarily the most efficient working method for us humans with only a very limited capacity for concurrent threads in our CPU. The reality however is that the days of an information worker are filled with a never ending dance of switching between apps and windows. With large Full-HD monitors (and soon 40 inch 4K screens) it would simply be a waste of space not to have several applications, documents or web pages open simultaneously, to make it easier to combine information from different sources to get our jobs done.
CRM 2013 has been redesigned for a single window UI paradigm that kills the need for most popup windows while working in the end user areas of the application. This works great when searching for information related to a particular account, opportunity etc. but there are situations when you need to work with the data in more detail, to compare the contents of multiple records, for example. At times like these you can find yourself wishing you had those multiple CRM windows you could switch between.
Instead of having to manually open several different sessions of CRM in your browser, you can leverage the built-in navigation paths for popping records open in a new window. In a list view you can right-click on a record to reveal the menu that offers this feature:
If you’ve already clicked open the record you want to continue working with while navigating onto a different part of the application, you’ll find an icon in the top right corner of the form that will allow you to pop the current record open onto a new browser window:
Great, so there are ways to have the individual records open simultaneously. Now, as a person who mainly works with CRM system customization and configuration instead of the data, I often find myself wishing to have two different parts of the application open at any given time: the end user records and the solution management interface. This way I can more easily pinpoint the views, fields, form components etc. from the end user UI that I want to manipulate in the customization UI. Ever since CRM 2013 arrived it has therefore become a routine for me to open two copies of the CRM organization in separate browser tabs, usually by copy-pasting the URL from the first tab onto a brand new one and hitting enter.
When working with CRM Online organizations I noticed that if you access CRM via the Office 365 Admin portal as a system administrator, you’re by default taken to the CRM Settings area instead of your home page as defined in the Default Pane and Default Tab of your personal settings. The reason is that the URL gets appended with a few additional parameters and ends up looking like this: https://orgname.crm4.dynamics.com/main.aspx?Origin=Portal&page=Settings&area=nav_administration. While I almost never want to go to that Administration page directly, it did give me an idea for a little productivity tweak that I can use for shaving off a few clicks from my average working day.
As we can see from the URL, there are parameters for variables called “page” and “area”. The last one looks like a sitemap subarea ID (you can review these via several config tools, such as the Sitemap Editor found in XrmToolbox), so the first one must be the sitemap area ID then. Hmm, I wonder if I changed the link to point to the Solutions subarea ID instead, would that take me to the list of solutions that I so frequently need to access? Let’s try https://orgname.crm4.dynamics.com/main.aspx?Origin=Portal&page=Settings&area=nav_solution and see what happens:
Yup, that’s exactly where we land. Now, if only there was a way to make this a generic link that I could apply in any of the zillion CRM organizations that I need to work with… Hey, wait a minute! That’s precisely what I did just a while ago with the global Advanced Find button! All I need to do now is to apply the awesome script from Sonoma Partners’ Blake Scarlavai and create a Javascript bookmark that will take me to the Solutions menu instead of Advanced Find. As we’ve already cracked the URL code, we can now change the part between the last quotation marks to append the CRM URL with our destination of choice:
While we’re at it, let’s also go and build another URL that takes us to the accounts view, which is a fairly safe bet to have as the “get out of the admin land” navigation link (although not every org may have it in the sitemap). Following the same logic as above, our Javascript bookmark contents will be:
Once we paste the scripts into the URL fields of bookmarks on our browser and add them to the toolbar, there’s now a powerful set of quick access buttons to take us to the frequently visited areas of the CRM application in any CRM 2013 organization that we have currently open in the active browser tab.
If you’re not working within the customization area of CRM that much but would rather just have a faster way to switch between different areas and entity lists than what the touch optimized Navigation Bar of CRM 2013 enables, I suggest you take a look at a brand new solution from MVP Scott Durow (of Ribbon Workbench fame) called Start Menu for Microsoft Dynamics CRM 2013. Instead of organization agnostic Javascript bookmarks in a browser, the solution from Scott takes the CRM 2013 Command Bar to where no ribbon has gone before and introduces a true power user menu for accessing any part of the CRM application from (almost) anywhere, by rendering the sitemap contents as a dropdown menu available on all Command Bar enabled entities. Here it is in action:
Last but not least, if you have any thoughts on how the CRM 2013 navigation options should be developed further in upcoming releases, be sure to review these links to feature suggestions on Microsoft Connect and cast your vote for the ones that you feel would help your organization’s users to be more productive when working with Dynamics CRM. Thank you.
Today I was working on upgrading the customizations of a CRM 2011 org to CRM 2013 forms and restructuring the layouts to fit the new UI. This environment had a custom entity called “Travel Information”, which was used for storing details related to event travel for employees. Here’s what the form looked like when opening a test record:
Hmm, that’s three times the word “information” on the first few lines of the form. With further form sections for “Hotel information”, “Rental car information” etc. it seemed like there’s hardly any room for the actual information among all these labels claiming to be it. So, I decided to clean things up a bit.
Form Tab Label
When you create a new custom entity, you’ll get the first tab added on the form by default with the name “General” and quite often it remains the place where the commonly used and business required fields of the entity will get presented. It may be hard to come up with a very descriptive name for such a collection of fields, as was the case here with the “Information” label given to it.
The form tabs can be used for expanding and collapsing the tabs to show/hide fields, but most of the times it will be unlikely that you’d want the first tab ever to be collapsed on the form. So why do we need the label there in the first place? Let’s navigate into the form customization UI and hide it.
By clearing the checkbox for “show the label of this tab on the Form” we can clean up unnecessary text away from the form and help the users focus on the actual field contents instead.
Form Name
In situations where there are more than one form for an entity (and the user has access to them), it’s necessary to show the form selector control at the top of the form. But in our example, there is only a single main form for this entity, so why does the form name “Information” still show up there?
With the default entities of CRM 2013 there has been a new naming convention introduced to distinguish between the legacy forms from CRM 2011 and the updated entity forms with the new layout and components. For example, the account entity will have a legacy form called “Information” and a new form called “Account”. If the user only has access to the latter one, then the name of the form will actually not be displayed there. Instead you’ll only see the name of the entity, thus avoiding unnecessary repetition like “Account: Account”.
How could we achieve the same outcome with a custom entity? Simple: we’ll just have to do what the Dynamics CRM product team has done with their default entities and name the form exactly the same way as the entity. In this example, by updating the Form Name attribute found on the Form Properties dialog from “Information” to “Travel Information”, this same behavior should kick in when CRM loads up our custom entity form.
Yup, no more form names displaued on the form. As we can see from the end result, we’ve now managed to remove redundant labels from the form quite nicely, leaving only the entity name visible above the primary name field of the entity.