Tag: Quick View form

  • Relational data on Model-driven forms, part 2: Form Component Control

    Relational data on Model-driven forms, part 2: Form Component Control

    Our quest for improving the user experience of Power Apps Model-driven app forms and multi-table data models continues with this part 2 blog post. We will explore how the brand new Form Component Control enables us to essentially blend the forms from two different tables (entities) onto a single form for the user to easily interact with.

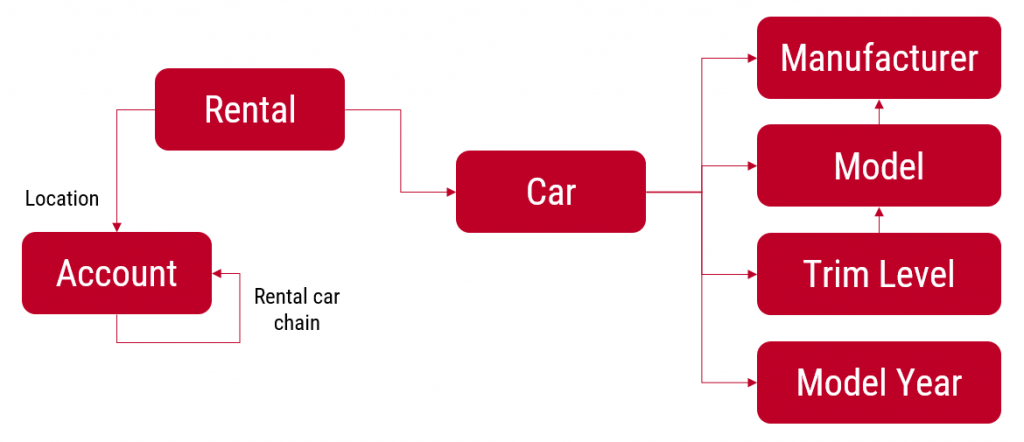
    In part 1 I laid out the example scenario of a Rental Car app where a single rental event record will always have a single related car record associated with it. Please go and have a look at the details in the earlier post if you want to understand the details.

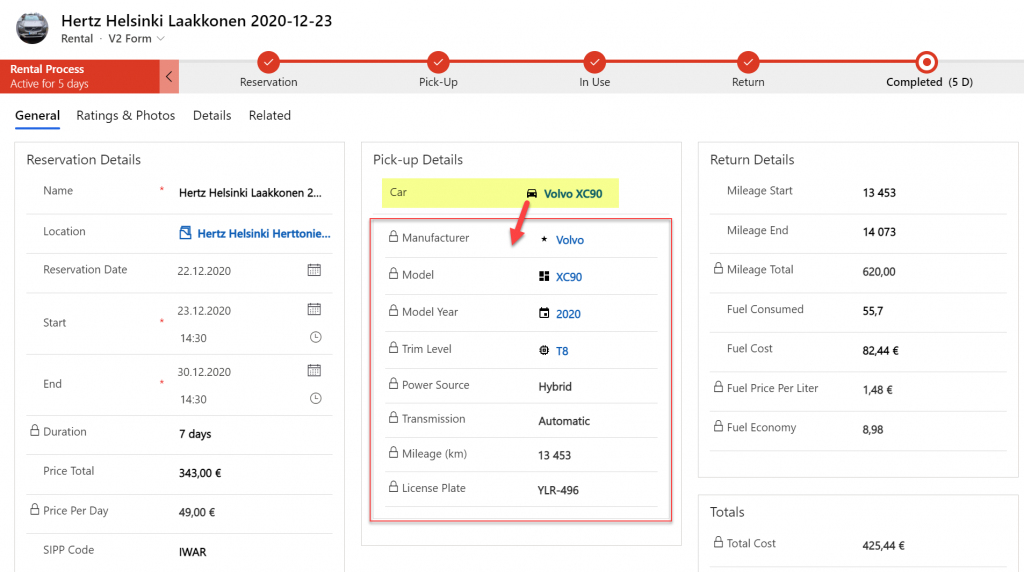
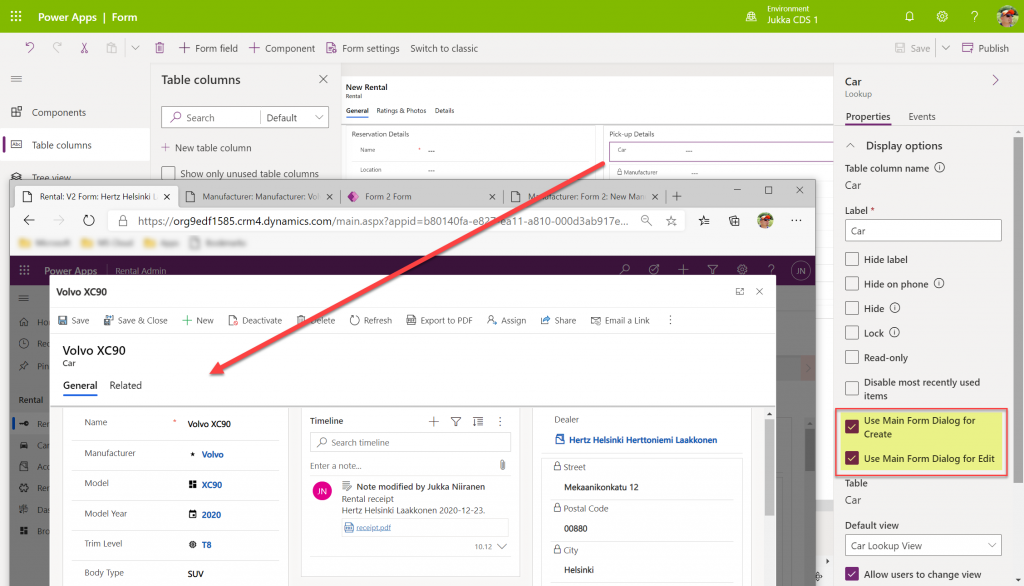
    Our approach was to leverage the Quick View Form to bring in fields from the related parental table (Car) onto the child table (Rental) form. To make the data entry and editing easier we enabled the Main Form Dialog feature for the Car lookup field, which then opens the form in a modal window.

    While this UX is a lot nicer than navigating between full screen forms and page loads, it’s still not all that seamless. The user will be very much aware of the fact that he/she is working on two different tables, while ultimately we’d want to show just a single page that abstracts away all this complexity of the underlying relational data model.

    What is the Form Component Control?

    First of all, it doesn’t have a very sexy name, that’s for sure. During the past few days of exploring the feature, I’ve had to repeatedly go back to the documentation to see what the name was. Even the product team’s announcement “editing related records on a main form in a model driven app” doesn’t sound very exciting. There’s a lot easier way to describe it:

    Forms within forms.

    It’s simple, and it’s very powerful. Unlike the CRM 2013 era feature of Quick View Forms, there’s no requirement to keep the forms as “view only” , nor particularly “quick” in terms of their contents. It’s just regular forms, and they can be used within other regular forms – full edit capabilities included.

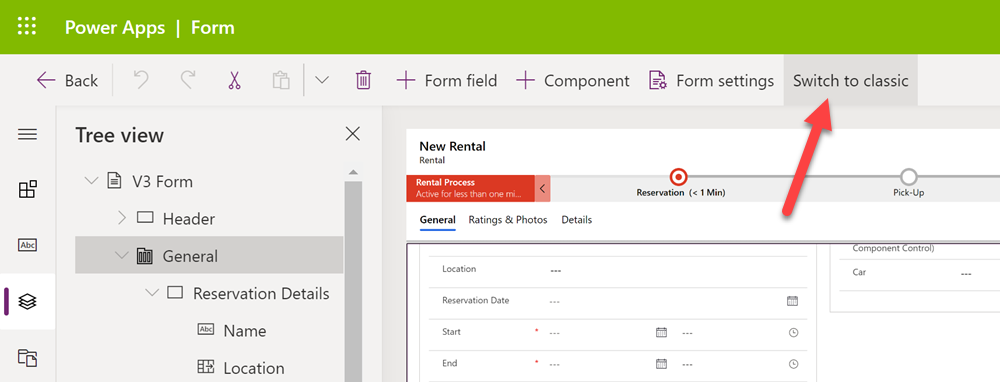
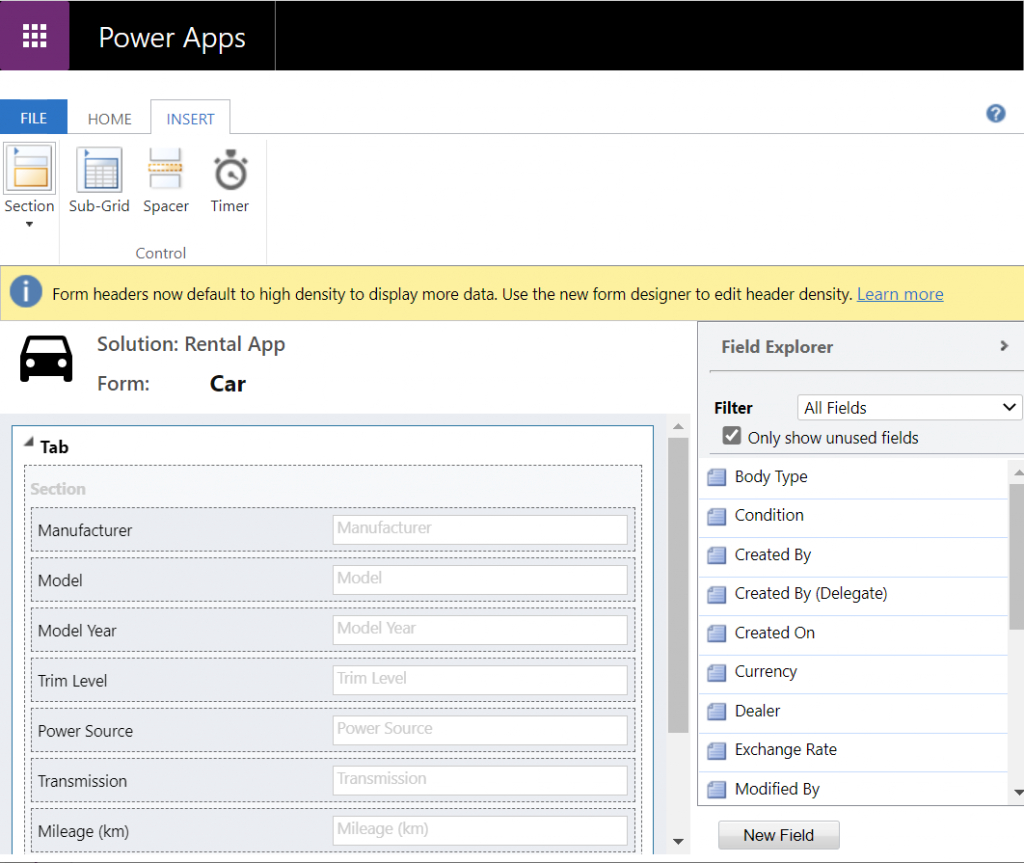
    Let’s add a Form Component Control onto our form and see how it works. Unlike with the Main Form Dialog feature discussed in part 1, this Form Component Control feature is unfortunately not yet available in the modern Power Apps form editor. So, we start with what we still need to do very often in the world of Model-driven apps, meaning hit the “Switch to classic” button to launch the classic Solution Explorer that dates back to CRM 2011.

    On the form where we have a lookup field (in our case the Car lookup on the Rental form), let’s open its properties dialog, go to the Controls tab and click “Add control”. We can see the MS provided PCF control “Form Component Control” in there. Adding it and setting it to be the default control for our web client is easy, but the configuration requires some additional information that doesn’t have a graphical UI (maybe in the modern form editor then once this feature is supported there).

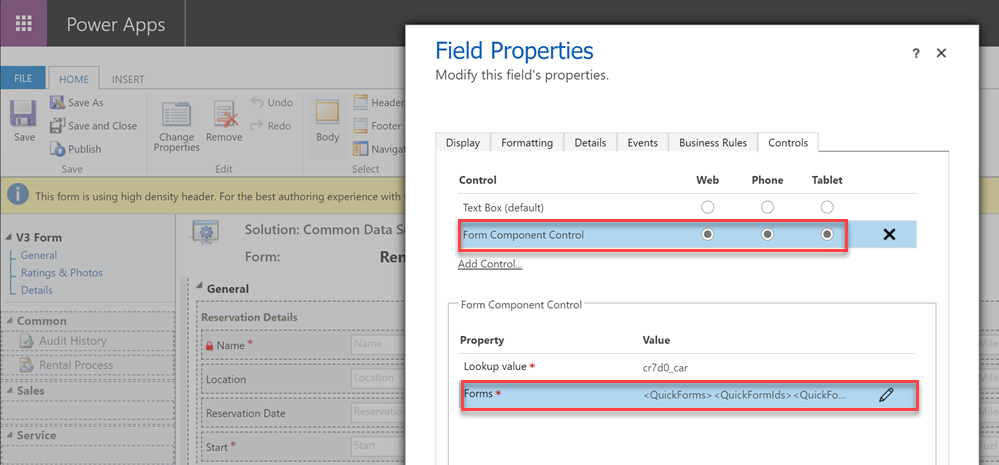
    See the MS documentation page for the detailed steps to take. In short, you’ll need an XML entry that contains the table name (entityname) and the form ID of the main form you want to show for the related table. My configuration looks like this:

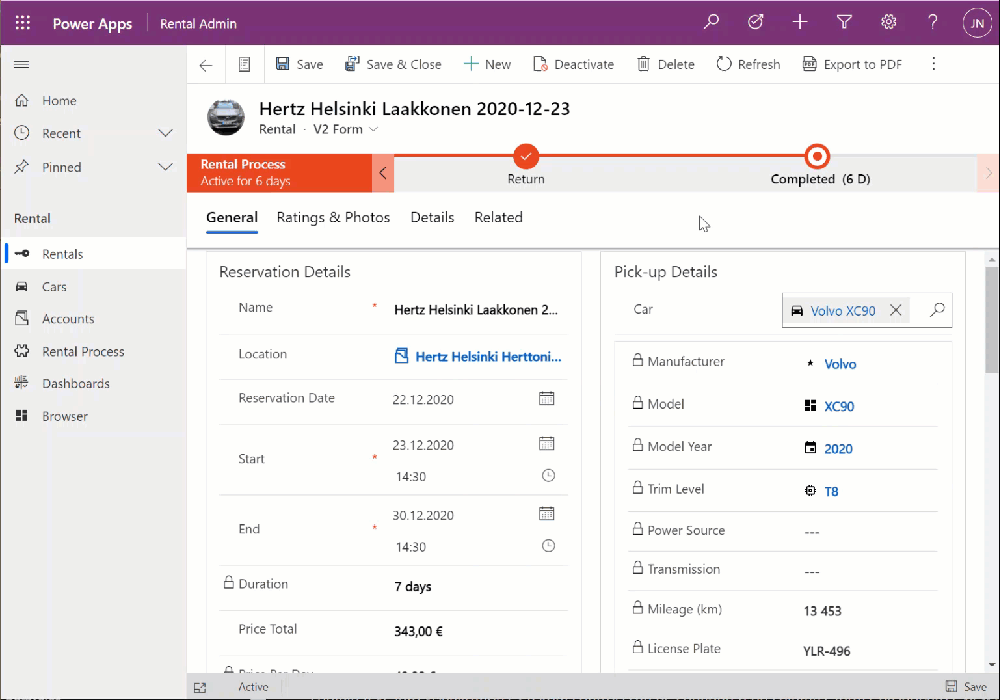
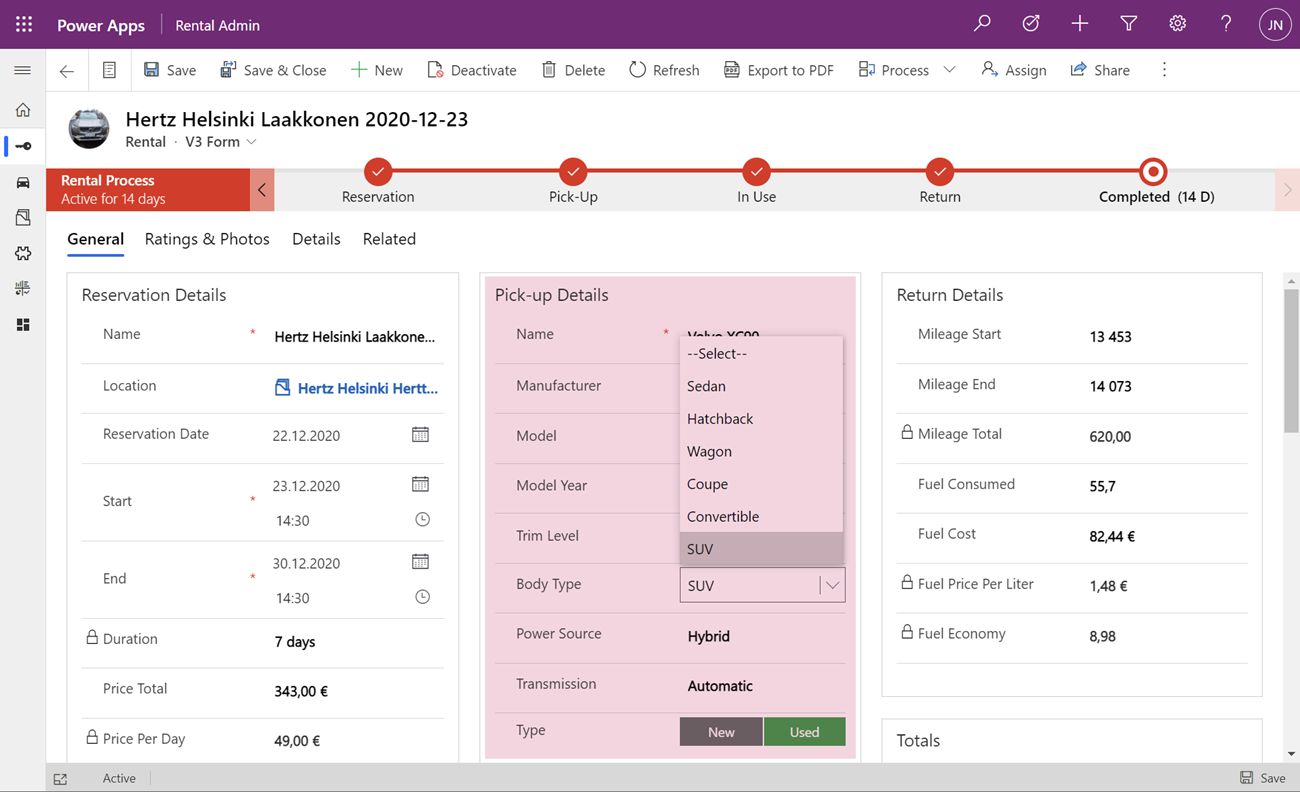
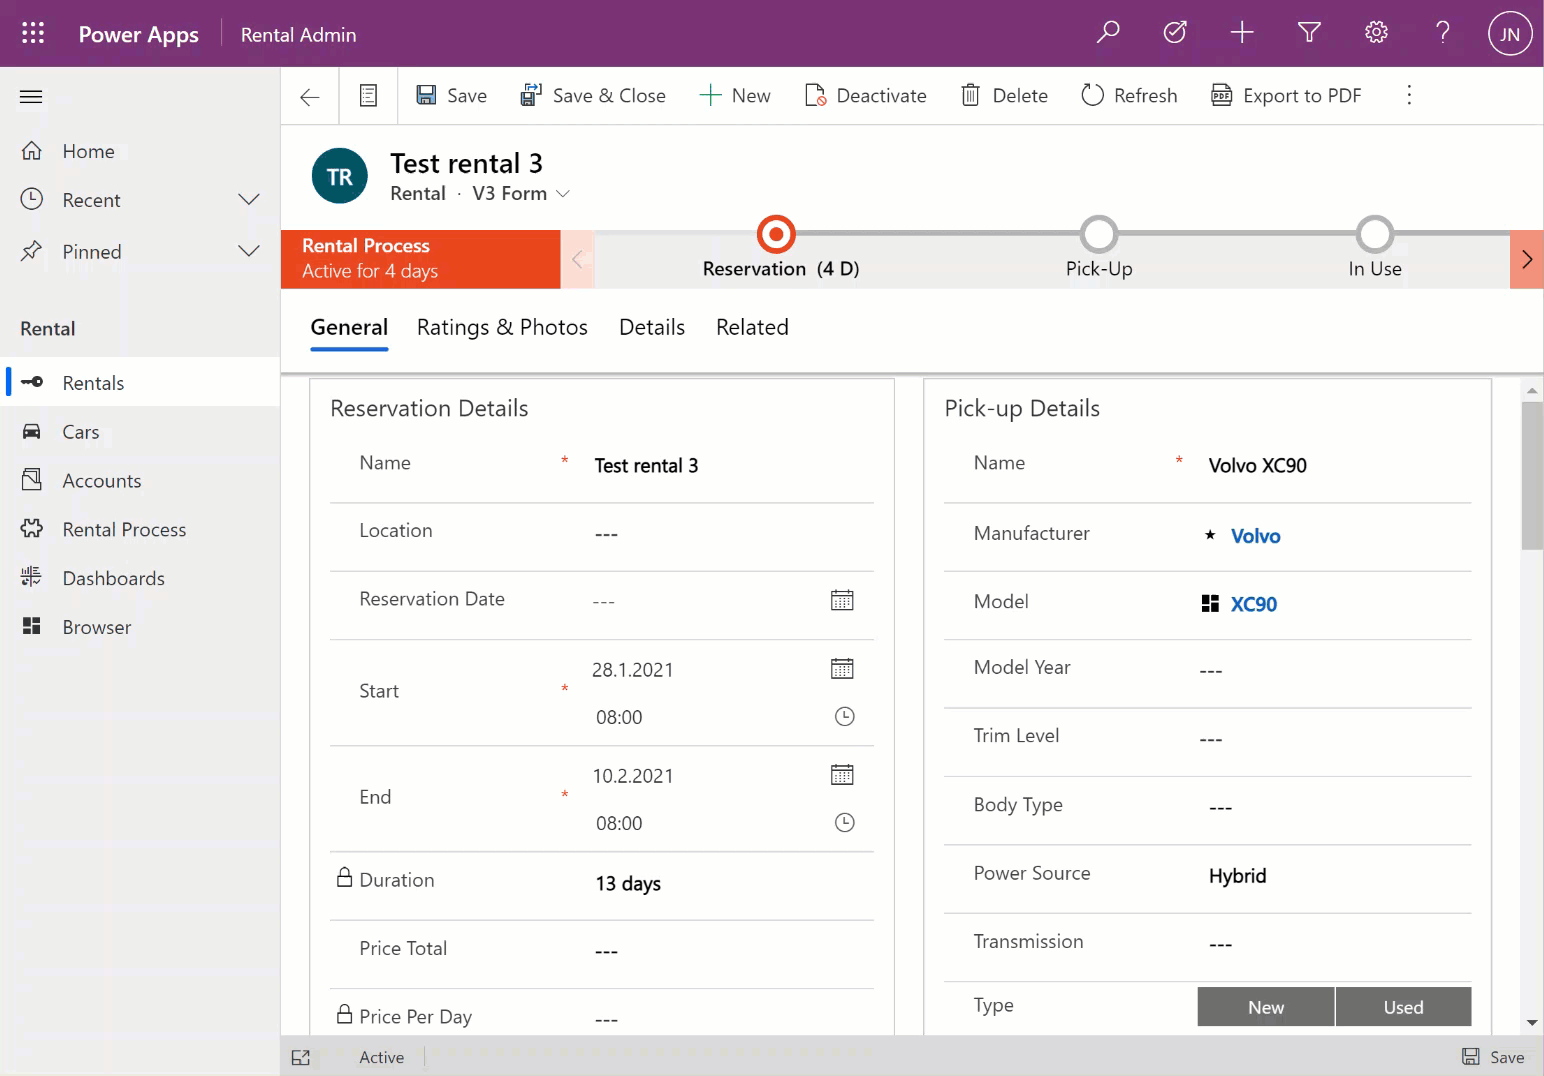
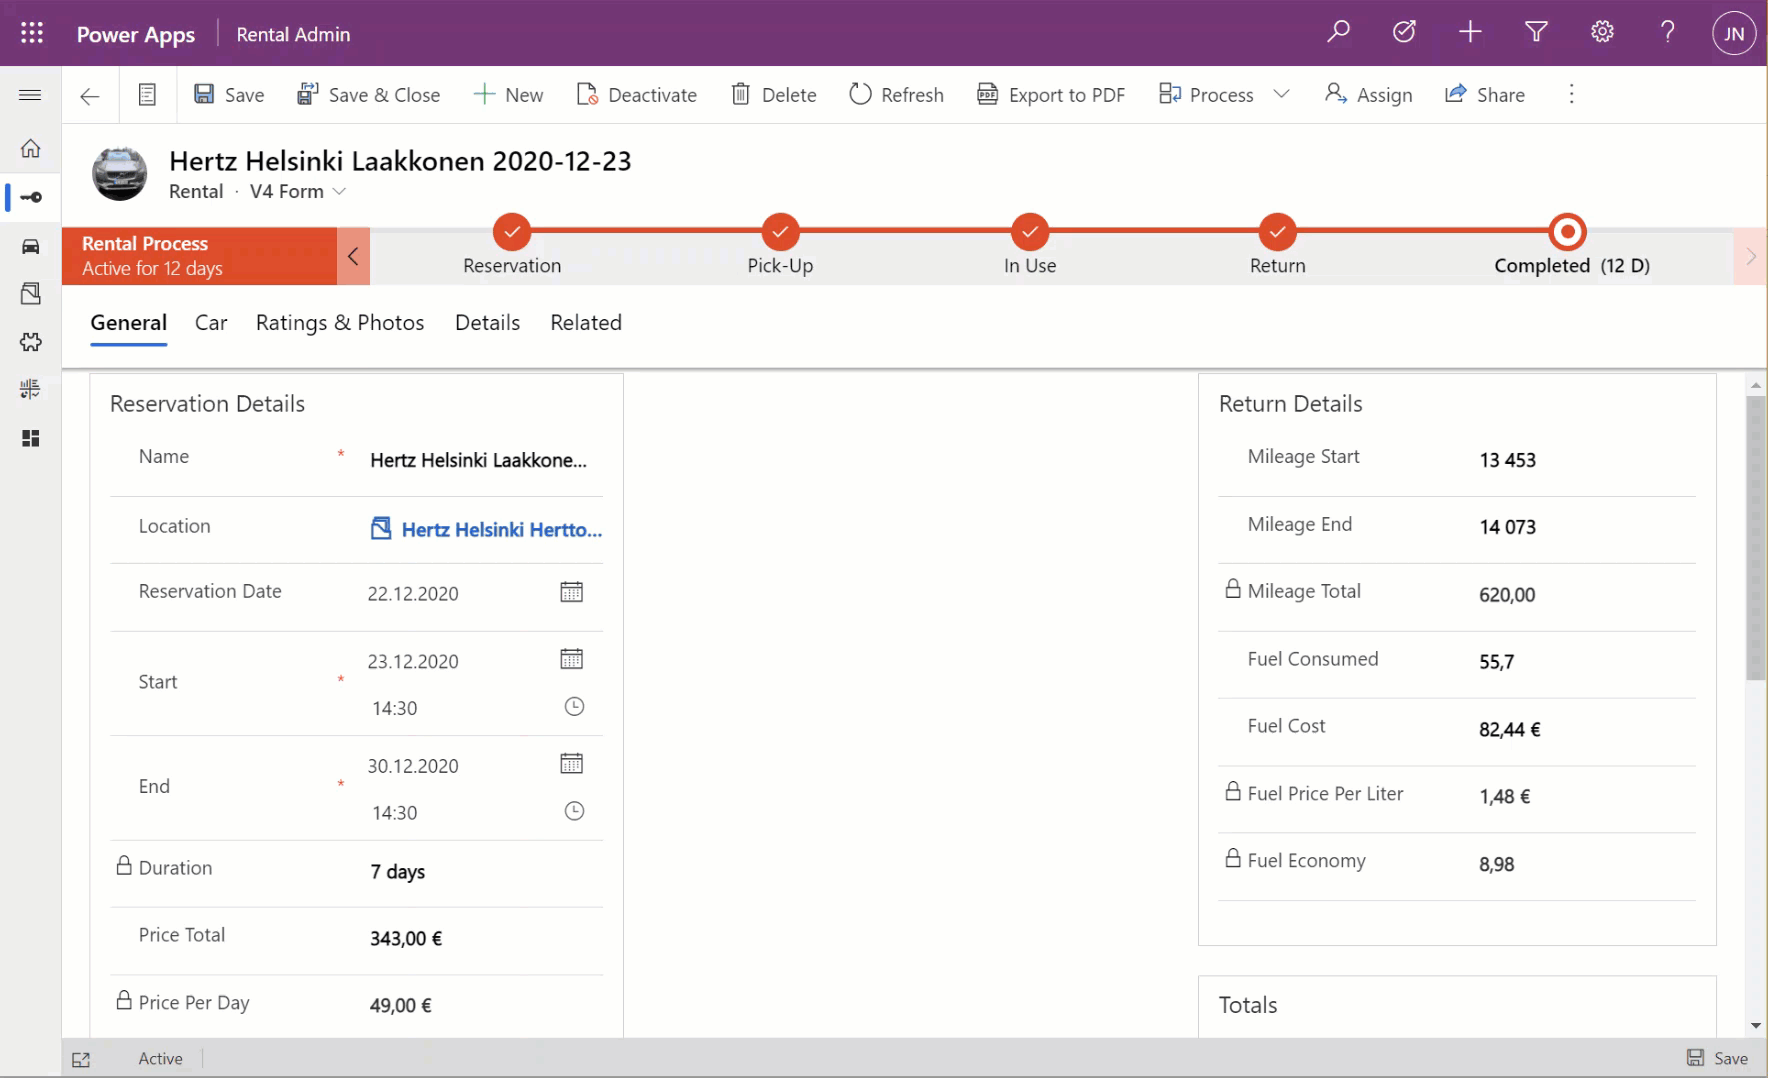
    <QuickForms><QuickFormIds><QuickFormId entityname="cr7d0_car">2F3B241A-4E3F-4AE3-A26F-1AB7BF804636</QuickFormId></QuickFormIds></QuickForms>

    Let’s publish the changes and go test out the experience of editing an existing Rental record where the Car record’s fields have been partially populated. On the place where I previously had the Quick View Form with its locked fields, there are now fields coming from the Car table form. Text fields, lookups, choice fields – they all work exactly the way they would if I was editing data that’s natively stored on the Rental record, rather than the related Car record.

    The save event happens as part of the hosting form, no additional tricks required. Field validation, notifications and error handling is also integrated, regardless of whether the business logic comes from the main form or the embedded form (details in the Docs).

    All in all, this works incredibly well from a user experience perspective in my initial tests. Even if you’re a Dynamics 365 or Power Apps professional you might not realize that the form actually blends two different tables into a single form.

    Main form rendering options via Form Component Control

    With the old Quick View Form feature, there was a separate form type you had to create for the table for this specific purpose. It was far more limited in contents and layout than the full table forms, which kind of made sense for the purposes of bringing a few key fields in read-only mode onto a the actual main form of a different table. QVF allowed single column only + no other useful controls than the subgrid:

    The Form Component Control knows no such boundaries. What you can use there are the existing or new main forms for any table. If you place them within a single narrow column on a multi-column form tab, then all of the form contents will be rendered within that column. Since the Unified Interface forms are inherently responsive by default (which is a big benefit compared to Canvas app screens), everything will just reflow into a layout that would resemble a phone screen – even if you’re viewing the form on a widescreen PC monitor.

    What about if we give the Form Component Control a bit more space than a 1/3 of a typical Model-driven table form? The reflow also works the other way around, meaning all of the available screen space will be used. If the area given to FCC can accommodate more columns and the source form has them, they’ll be rendered just like on the “native” viewing experience of that form.

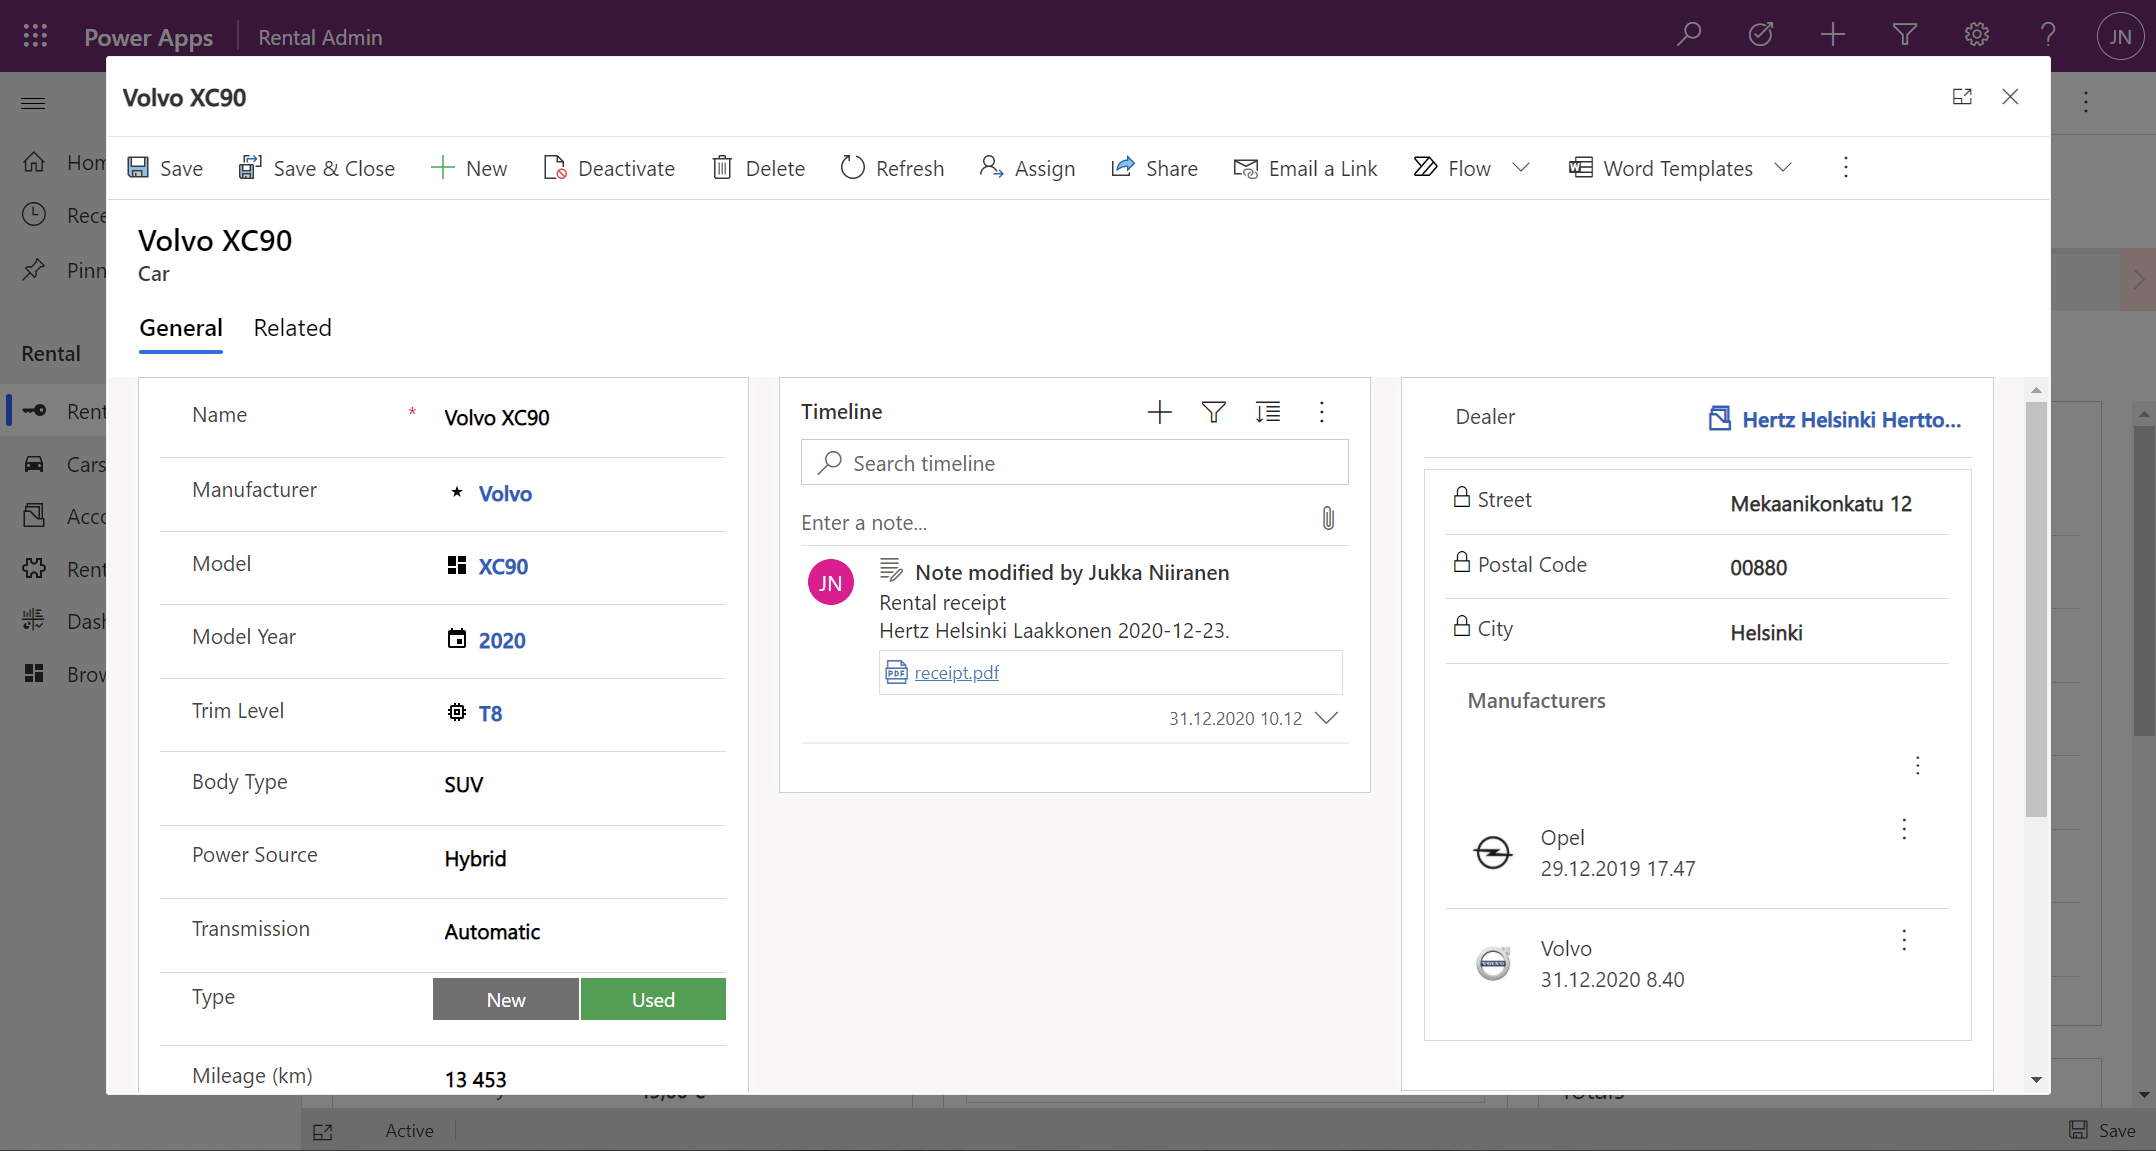
    Below is an example of an alternative form design for the Rental table. Instead of having the related Car shown in the middle of the first form tab, I’ve added a second form tab “Car” and dedicated all the space available in it to a single lookup field that has the FCC control enabled. You’ll see from the static Business Process Flow and the form header that we’re firmly on the Rental form all the time, but the second Car tab shows things like the Timeline for that car record (with a note), further tabs for the car’s Dealer, even a Quick View Form referencing the dealer account related to the Car record – all within on FCC control.

    This to me is just mind-blowing! We are reaching Inception level UX here, with the main forms embedded AND rendered as a full form tab within another form. I could be on the Rental record form, adding an activity via the Timeline control that’s actually linked to the parental Car record. Not the Rental record where the app navigation, form header, Command Bar and everything else visible on the screen is telling me I’m on. I’ve effectively built a form UI that defies the laws of nature I’ve come to expect from Model-driven apps.

    Sure, embedded Canvas apps could do some magic like this already earlier. The big difference is that the user interface of those screens could never match exactly that of a Model-driven app. With FCC there are no visual clues distracting the UX, as everything looks and feels like it’s part of the native experience where Microsoft owns and manages the visual side.

    What about record creation instead of edit?

    The one gap that exists in the inline editing story for Microsoft’s controls like the Editable Grid or this new Form Component Control is that there’s no possibility to use them for adding new rows into a table. They offer the edit experience, but no create experience. Sure, we have the Quick Create Forms feature available for contextual data entry, but it’s not really optimal. The user shouldn’t have to think about if they are editing existing entries or creating new ones. Yes, the difference between these concepts matters to the platform on a technical level. Still, unless there’s a valid business process requirement for making the data entry experience different for create and update scenarios, it’s something I’d prefer to eliminate from the UI.

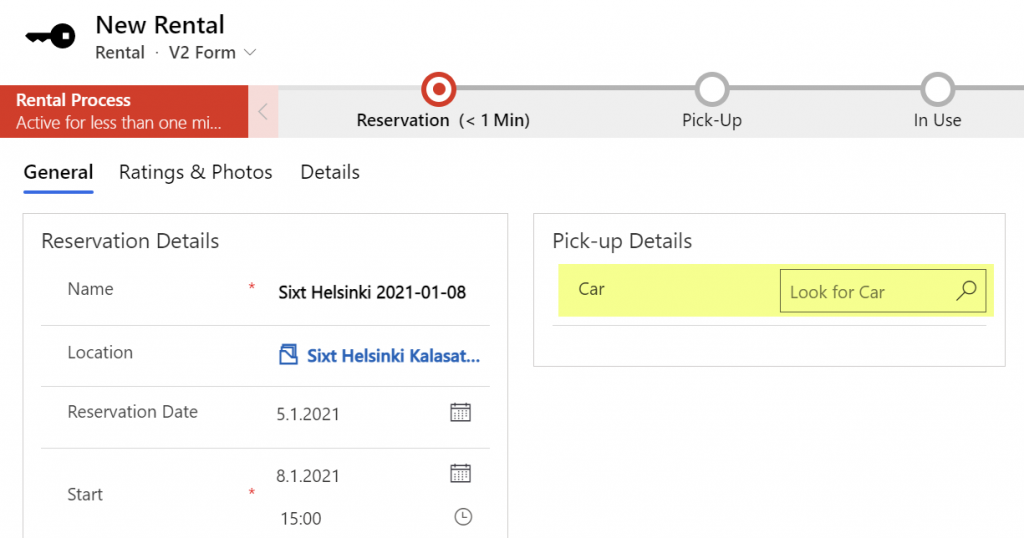
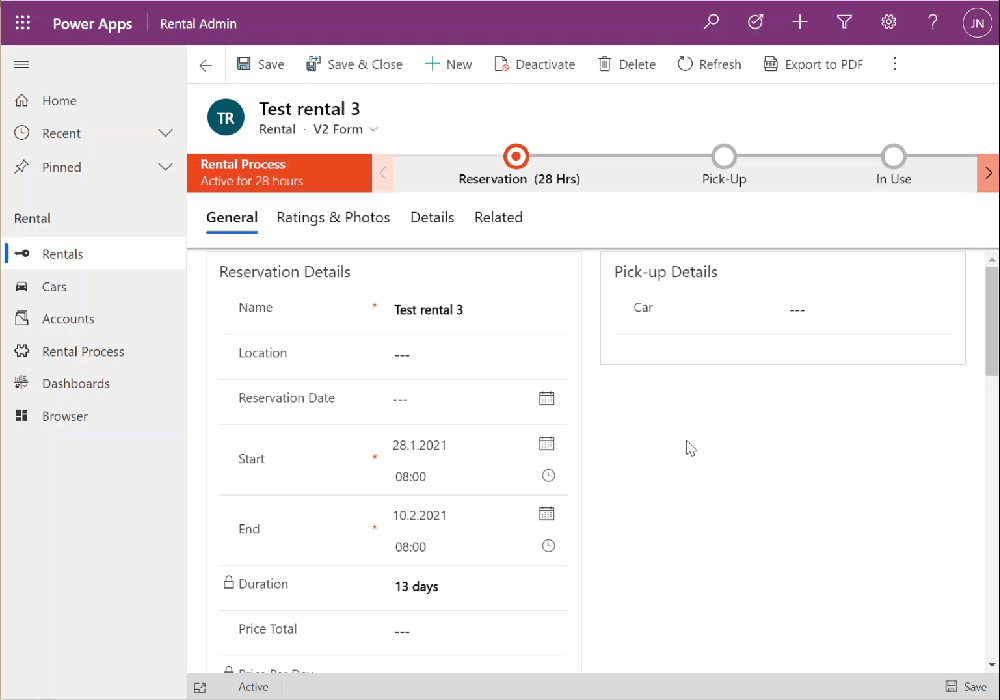
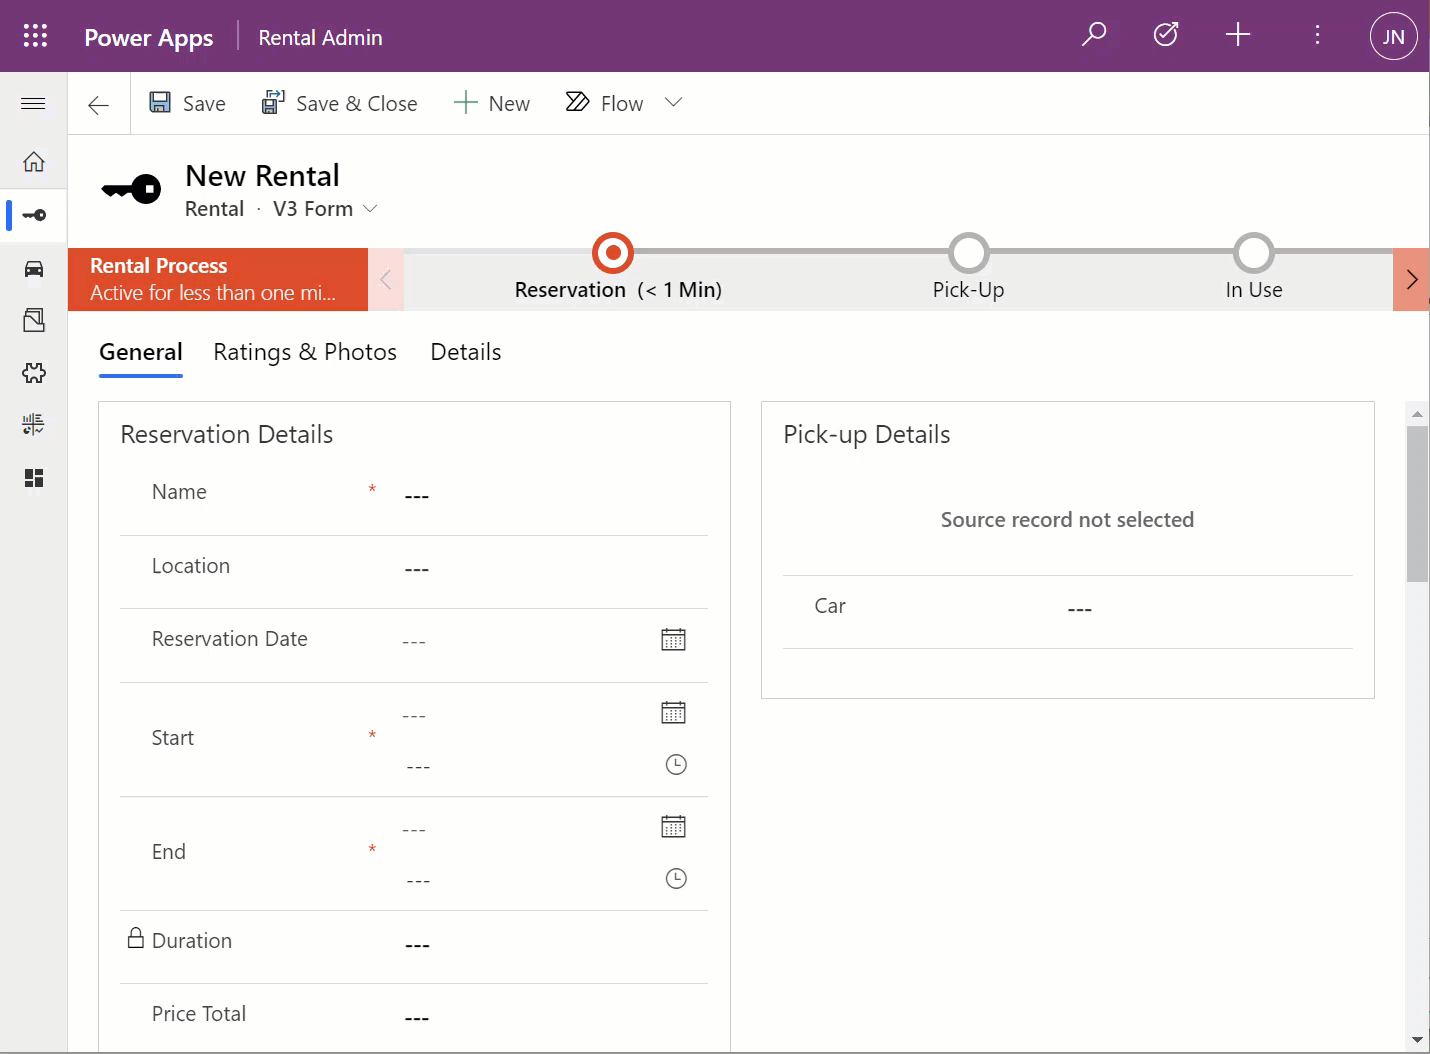
    When there’s a scenario where we essentially have a one-to-one relationship between tables (no “real” 1:1 relationship exists in Dataverse, but there are ways to fake it), one option would be to automatically create the related parental record behind the scenes. With this approach, at the moment when the user will proceed to entering data via the Form Component Control, the lookup field will already be populated and the experience will look pretty seamless:

    What I’ve done here is to create a classic XRM workflow that runs in real-time, triggered by the create event of the Rental record. (Power Automate can’t do real-time yet, so it’s a no go for flow in this case.) The workflow will create a Car record with a placeholder name “(Undefined)” and link it to the Rental record. By the time the first save event for the new Rental record takes place, the FCC can then render the fields from this placeholder Car record on the Rental form.

    In the above example GIF animation you may also spot that the Car name changes transparently from “(Undefined)” to “BMW”, due to what has been selected in the Manufacturer field. This again is another real-time workflow that’s triggered by the update event of the Car record. The end user will not need to take any actions, it’s all just the native autosave feature of Model-driven apps that populates this name field while the user is still entering data into other fields further down the Car form.

    Considerations

    If the new Form Component Control gives us not just the read capabilities from Quick View Forms but also data edit support, then should we just stop using Quick View Forms altogether? Well, it certainly is a good question. Given that QVF dates back to the CRM 2013 era user interface technologies, FCC is much more in touch with how the modern Unified Interface client has been designed to work. It’s built using the Power Apps component framework (PCF) and should in theory be the most future proof choice for Model-driven app form design.

    One downside is that the use of FCC for the pure view scenario is a bit more laborious. If we indeed would want to prevent the user from updating values from the parental record while on the child form, then these fields would need to be set as read-only on the main form itself. Which brings us to the challenge that you’ll need to keep more forms visible in the Model-driven app, whereas classic QVF’s are hidden behind the scenes and only applied as the definition when rendering the main form on which they are used.

    The create scenario I talked about earlier is also a bit of challenge when analyzed deeper. If indeed the lookup from which the Form Component Control gets the related parental table record to show isn’t populated immediately, you’ll see a message saying “source record not selected”. In most cases that’s going to be quite a confusing message for the end user to encounter, given they are unlikely to have any idea about the forms magic and relational tables being used in to construct the app’s UI.

    “Couldn’t we just hide that control until it the lookup has data?” Well, I can’t think of a no-code way to achieve this. You see, the problem is that the FCC essentially is the same field as the lookup field. Sure, you can have multiple instances of it on the same Model-driven app form. But you can’t use Business Rules to say “hide this field if this other field is empty”, because they are the one and the same. Quick View Forms handle this scenario much better, so let’s hope Microsoft will improve the functionality in FCC to accommodate this create/hide scenario better in future releases.

    WE NEED TO GO DEEPER Inception

    This first public preview release of the Form Component Control has a few limitations that you should be aware of. For instance, you can’t show more than a single tab from the form being rendered via FCC, which isn’t really a big issue unless you really are building an Inception app to confuse the hell out of the classic CRM users at least. Similarly, you can’t have FCC’s within FCC’s, which blocks some crazy recursion scenarios.

  • Relational data on Model-driven forms, part 1: Main Form Dialog

    Relational data on Model-driven forms, part 1: Main Form Dialog

    Model-driven Power Apps are built on top of the relational data model of Microsoft Dataverse (formerly CDS). Planning how you split your business data into different tables is a crucial step in ensuring that your app’s user experience (UX) is optimal for the data entry, consumption and update tasks that the users will need to live with. This is because unlike with Canvas Power Apps, the data model defines much of the user interface behaviour as well.

    The key thing to keep in mind is that you’re not supposed to build the most normalized data model possible, where every concept in your business process is spun into its own little table. Yes, you do want to leverage the power of relationships (one-to-many, many-to-one, and on some rare occasions also many-to-many) to make the data more manageable than a single flat list structure would offer. No, you don’t want to make your users have to think about the Entity Relationship Diagram (ERD) of the system to know how to navigate within your app.

    Despite of the tight coupling of the data model and the UI, there are plenty of things you can configure on Model-driven forms to improve usability. I’ll be drilling into a few recent features that can make it easier to work with related tables from within a single form.

    The scenario: Rental Car app

    I’ll be using an example app that I’ve built for my own purposes: Rental Car App. It contains functionality that allows me to track and analyze information about the rental cars that I use, by adding new Rental records for each reservation I make and then tracking the process all the way until the final invoice and related costs. At the heart of the app there’s the Rental table, which has relationships to both the rental car company information (Account table) as well as the Car table, which again links to a few supporting tables like Manufacturer and Model.

    The rental process stages are modelled via the Business Process Flow feature of Power Apps Model-driven apps. We start with 1) the reservation, then proceed to 2) pick-up at the chosen location, 3) use the car we’ve been given, 4) return it and 5) finalize the process upon ensuring we’ve captured all the required data and that the invoice was what we expected to pay.

    Each rental event will have one car associated with it. However, at the first step of the process, meaning reservation time, we won’t yet have any idea what specific vehicle that will be. (You’ll only know the ACRISS code that describes the level of the vehicle features, like “IWAR” for Intermediate, Wagon, Automatic, Air Conditioning.) Once we get to stage 2 of the process, the pick-up, we’ll be given a specific car that we can describe with properties like Manufacturer, Model, Model Year, Trim Level and so on.

    Car is the parent table of Rental, since there can only ever be a single vehicle for one rental event (for now, let’s ignore the possibility of the car breaking down and getting exchanged during the rental period). A single car will of course be used in many, many rental events. However, since the app user is the customer who’s consuming the rental service from different car rental companies, we won’t have the fleet of vehicles defined in advance for our database. The data entry of the car’s details is therefore always a step within the context of the rental process.

    So, we know that logically the car is a different type of object than the rental event, which is why it should have its own table. From a user experience perspective, though, filling in the details of the car should be just a similar task as describing the duration or price of the rental car reservation. Just a set of fields on the single form. Yet by default what the Model-driven app form will give us is a single lookup field to the related table’s car record, with the expectation that we’d go and work with the Car data on a different form than the Rental form where the rest of the details are.

    Despite of the underlying 1-to-N relationship in the data model, we can improve the user experience by leveraging a couple of neat features in Model-driven apps.

    Quick View Forms

    Model-driven Power Apps have evolved from the XRM platform that Microsoft first used for builing a CRM product of their own in 2003. Around seven years ago when Dynamics CRM 2013 was launched, it introduced this new and exciting “flat UI”. Before that, the experience of using CRM was often a maze of popup windows since opening a new record always gave you a new browser window you now had to juggle on your desktop.

    The boundaries of different entities (which is what tables were called for the first 17 years of the platform we now know as Dataverse) were therefore very tangible indeed. While form subgrids were launched in 2011 to offer some relief, it wasn’t until 2013 when we could start to make the users worry less about the data model and focus more on the business process and actual business data involved in it. A key element in this was the Quick View Form.

    Above is a screenshot from seven years ago of a case entity form that included data from not just the child entities like activities, but also from the parental record of the customer, via a Quick View Form. We can see the email and phone number of the customer, event though they are physically stored on the account entity. It’s not limited to just that N:1 data from “case:account” either, as we can reach down to N:1:N of “case:account:case” by showing all the related cases that this customer has recently opened with our support department.

    Quick View Forms were a seriously powerful feature back when they were released. I did some blogging to demonstrate the possibilities, like building a similar opportunity analytics feature that resembled (well, remotely at least) the concept of an ecommerce recommendation engine that shows “customers who bought this item also bought these other items”.

    The scenario in our Rental Car app is a lot more straightforward. We want to display the key properties of the Car record associated with the Rental record within the form that drives the rental process. By having a lookup field for Car on the form, this allows us to add a Quick View Form control to show the Car table fields embedded on the Rental table form:

    From this static screenshot it would seem like everything is in its right place and the user couldn’t be happier. Right? Well, the challenge here is that the Quick View Form really is just a view. It doesn’t allow editing any of the field values on the related parental table record, let alone creating new records. In short, it’s not as actionable as the data living natively in the Rental table.

    Main Form Dialog (MFD)

    A much more recent entrant into our Power Platform low-code toolkit for designing Model-driven application UI’s is the Main Form Dialog feature. What this allows you to do is to launch a modal window from the lookup field on a Model-driven app form. The user interface doesn’t actually move you fully away from the original record, rather it just renders the (Main) Form of the chosen record from a different table in a Dialog window. It’s not like the CRM 2011 era popup windows, since you remain within the same browser window/tab. Once you’re done with looking at the related record, clicking “X” will return you to exactly same state where you were before clicking in the lookup field. It’s not as jarring an experience as if you’d have fully navigated away from the original form.

    Originally launched as part of 2020 Release Wave 1, the MFD feature was initially available only via the API. At this moment that is still what the documentation says, but I recently discovered that the modern Power Apps form designer now has graphical tools to configure this feature:

    When selecting a lookup field in the form editor, the properties dialog on the right now contains new options to check:

    • Use Main Form Dialog for Create
    • Use Main Form Dialog for Edit

    Oh yeah! We now have the power to keep the users from unintentionally navigating away from the “home” form that acts as the anchor for all relevant details concerning the business process. In the rental car example, the user can now safely click on the Car lookup, examine the available options for properties of the car, change the values, click “Save & Close”, then end up right back to where he or she started from:

    This also works for the experience of adding a new car record. Instead of having to offer a separate Quick Create Form experience for this step that would behave differently from any other occasion where the user interacts with car data, we can launch the full record form in the Main Form Dialog:

    The key benefit with this modal window approach is that there’s almost zero chance of the user wondering into the wrong menu or page of the application after they’re done with creating, editing or just viewing the related record. There is no visible page load that would change the mental context away from the primary record, in this case the Rental event.

    Considerations

    Should you enable the Main Form Dialog feature now on all your lookup fields? Probably not. There will be times when the user may prefer to actually move along in the process and change the context to the parental record. There is no navigation path available in MFD that would support this context change. The user has the option to launch the dialog in full screen mode, but that just expands it to cover the whole screen, rather than doing a page load that would change the navigation position in the sitemap.

    There is currently no way to select which form specifically should be opened in MFD. Presumably the form will be determined by the table’s main form order, as well as the specific form the particular user has last viewed. Depending on the number of scenarios where the same table is leveraged, the forms shown by MFD can therefore be unnecessarily complex for the task at hand.

    In part 2 I will explore the possibilities of how we can streamline this process even further and make the experience of working with related parental table data almost transparent to the user. We’ll be leveraging the brand new Form Component Control to essentially combine the features from the earlier Quick View Forms and Main Form Dialogs.

  • Customizing Lead Qualification Process in CRM 2015

    Customizing Lead Qualification Process in CRM 2015

    This is the first part in an article series where I’ll be presenting a few customization tips & tricks that you can use in Microsoft Dynamics CRM 2015 to enhance the functionality used in a typical sales process. The content was first shown in my live webcast on MSDynamicsWorld.com on May 6th: “A Non-Developer’s Guide to Smarter Sales Processes in Microsoft Dynamics CRM 2015.” As promised during the webcast, I’ll be releasing all the slides here on my blog, but since there was a lot of details to go through in the 1h session, it will be split into three separate articles, to improve the accessibility to this information for those who didn’t attend the live webcast.

    The overarching theme of this series is to show you how the creative combination of the various customization tools available in Dynamics CRM 2015 can be used for building whole new functionality into the application – without having to write any custom code. The emphasis is on the word combination, since very often you’ll need to use several different pieces of the platform’s customization tools to achieve the end result. This isn’t something that you can easily learn just by reading the official product documentation that typically focuses on the introduction of a single feature at a time. With the examples in this article series I hope to demonstrate what these combinations could look like, in the context of customizing the standard application behavior in the sales process.

    MSDynamicsWorld_Smarter_Sales_Process_scenarios

    The techniques are by no means exclusive to the sales area of Dynamics CRM. Any process that you manage with our CRM/XRM application can surely benefit from the type of custom functionality that you can build via Business Process Flows, Real-time Workflows, Business Rules, Calculated Fields and Rollup Fields. The absolutely best way to gain an understanding of what you can achieve with the point & click customization tools in Dynamics CRM is to experiment with the tools in a sandbox environment, so I encourage you to go and try out these scenarios in an actual working CRM system. (Why not spin up a new CRM Online trial org and also get access to all the new CRM Online 2015 Update 1 goodies while at it?)

    What’s Wrong with CRM 2015 Lead Qualification?

    Those of you that have been working with Dynamics CRM for more than just a couple of years will probably remember how the things used to work before CRM 2013. When clicking on the Qualify button on a lead record, the user was presented with a dialog that allowed them to choose whether a new account, contact and opportunity record should be created from this lead. In the new world of Business Process Flows and no-popup UI of CRM 2013 (and CRM 2015), such options are no longer presented to the user. While this makes for a smooth user experience in general, it creates severe conflicts with many real life business processes of companies who either A) don’t use opportunities or B) don’t want to directly convert each lead into an opportunity. There are lots of suggestions on MS Connect (registration required, see here) to restore the ability for users to select not to create an opportunity from a qualified lead, but so far we haven’t seen any changes in the product to accommodate this.

    CRM_Lead_Qualification_Dialog

    So, if CRM wants to create opportunities but the user doesn’t, what could a mere system customizer do, without any knowledge of how to write plugins or scripts to develop new functionality by using the CRM SDK? Well, I’ve come up with a reasonably good workaround that uses the following solution components to establish a true user driven lead qualification process:

    • Branching Business Process Flow (BPF) to show stages that don’t take the user to the opportunity entity
    • Real-time Workflow to hand the lead status change and record creation instead of the built-in, non-configurable business logic of Dynamics CRM
    • Business Rules to conditionally show/hide fields for account/contact details on the form
    • Quick View Forms to present the records created from lead qualification process on the lead form after it’s closed

    You can find the detailed description of how I’ve configured each components from the below presentation:

    (For those of you who are not reading this article directly on survivingcrm.com and can’t see the embedded SlideShare presentation, click this link to access it.)

    I hope that this example has given you some ideas on how the lead management process and related Dynamics CRM functionality could be further developed in your own CRM organization. Stay tuned for part two of this Smarter Sales Process series, where we’ll be moving to the opportunity record and exploring how the estimated revenue information can more easily be managed by using the Calculated Fields feature introduced in Microsoft Dynamics CRM 2015 release. If you simply can’t wait for it or want to see the lead qualification process in action, then the webcast recording is available on YouTube already today.