Tag: Canvas apps

  • Sharing Dataverse for Teams apps outside the team

    Sharing Dataverse for Teams apps outside the team

    When you’re building Power Apps within a Microsoft Teams based Dataverse environment, the most common target group of app users is obviously people who belong to that team. This is very logical when the purpose of the app is to collaborate as a team on something that might have otherwise been an Excel sheet shared with all team members.

    The simplified table security model of Dataverse for Teams with Owner/Member/Guest (“OMG”) levels instead of custom security roles makes things easy to manage when everyone is equal. But what about when you’d need to have more granularity on who gets to do what? What if in addition to the owners (app admins) and members (managers) you also need a level further down this hierarchy: the “normal” users?

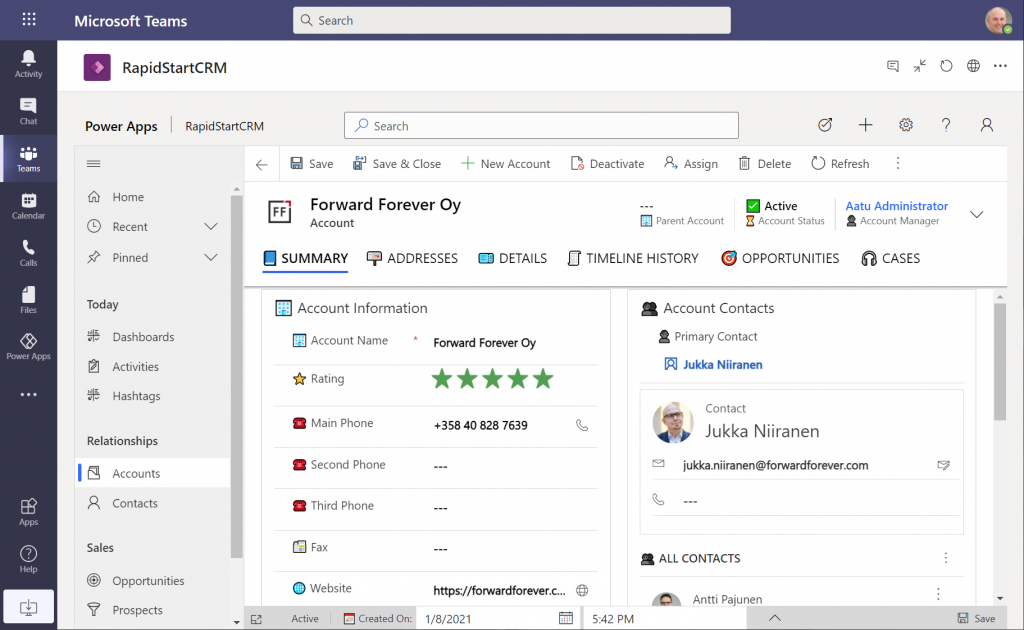
    Colleagues with access

    This is where the concept of a “broad distribution app” comes in handy. It allows you to grant access to the app for users who are not part of the team that’s hosting the Dataverse for Teams environment. Here’s how the Docs on Dataverse for Teams table permissions describe this:

    “With Power Apps for Teams, you can share an app with Azure AD security group whose members need not be part of the Teams team where the app was built. This enables you to add users to the application without having to add them to the specific team, and opens up “Broad Distribution” scenarios. For example, you may want to build an app that is enabled for every accountant in the organization, or even every employee in that organization.”

    The ability to share an app with one Azure AD security group makes Dataverse for Teams quite an attractive platform for low-code apps that have a high number of potential users. Not many organizations have yet committed to covering all their employees with a Power Apps Per User license that unlocks premium features like Dataverse. Since every user who’s licensed for Teams via Office 365 / Microsoft 365 is allowed to use apps running on Dataverse for Teams, this option significantly lowers the barrier to start building apps on top of a true relational database designed for business applications – as opposed to running your complex processes on top of several SharePoint / Microsoft Lists.

    Sharing with colleagues in practice

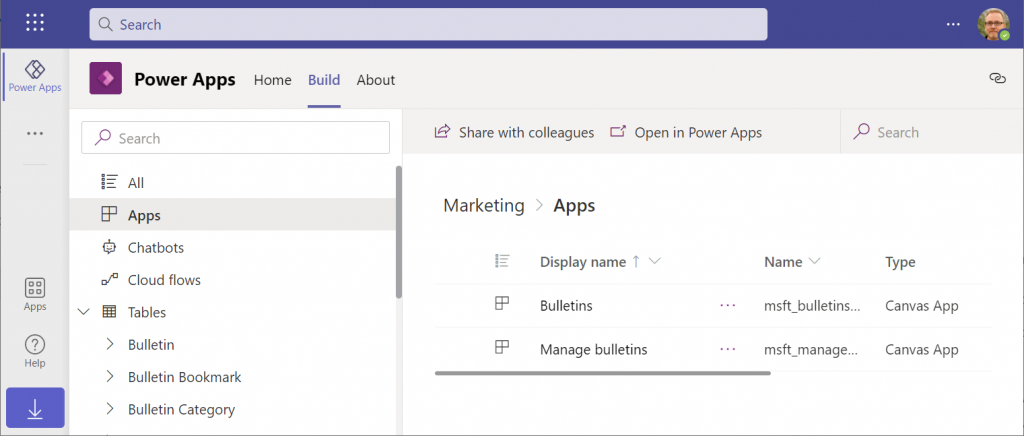
    Let’s say you’ve built an app within a Dataverse for Teams environment and are ready to publish it to the whole organization. In this demo scenario we are using the Bulletins sample app for Teams. We’ve created an Azure AD security group called “Access All Apps”. The first thing we need to do is go an add the necessary access rights to each table used by the app. For example, when it comes to the Bulletin table, users should be able to read all records but not create/modify/delete them, so we grant the “Reference” level to this group:

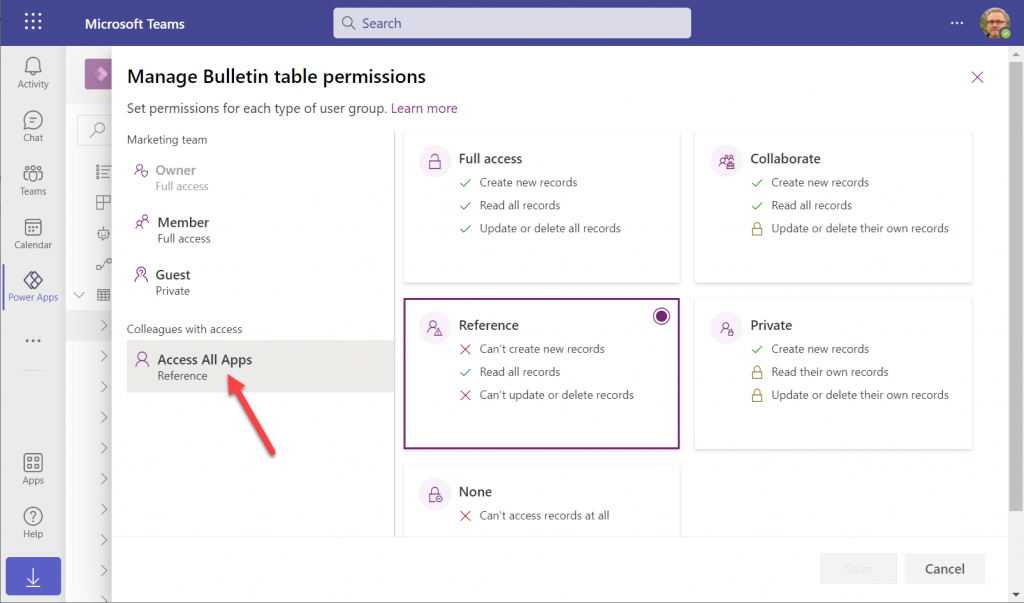
    You’ll need to do a lot of clicking for an app like Bulletins that has 11 tables, so be sure you’re selecting the “colleagues with access” section before assigning the permission level on each page.

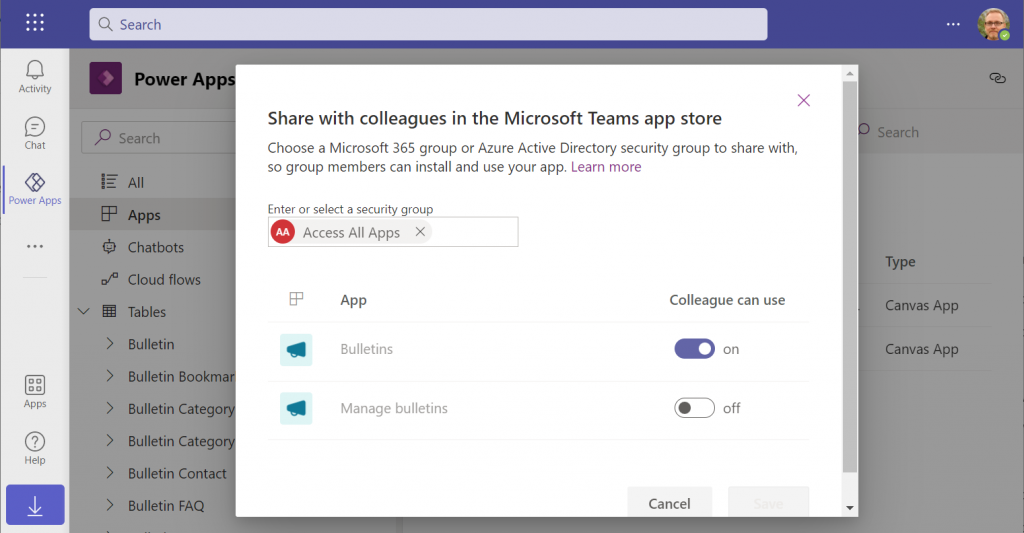
    Next, let’s share the Power Apps canvas app itself with this group. Again, you’ll need to be careful with where to click in the navigation maze that is the Power Apps for Teams app. Go to the Apps list of the Dataverse for Teams environment but don’t select the app. Otherwise you won’t see the “share with colleagues” toolbar button.

    In the modal dialog window, choose which apps from this Dataverse for Teams environment you wish to make accessible with the chosen security group. This is where you’ll notice that while you could have tens of different apps within on environment, there’s no ability to choose which Azure AD security group gets to see which apps – since there can only be one.

    Adding apps to Teams channels

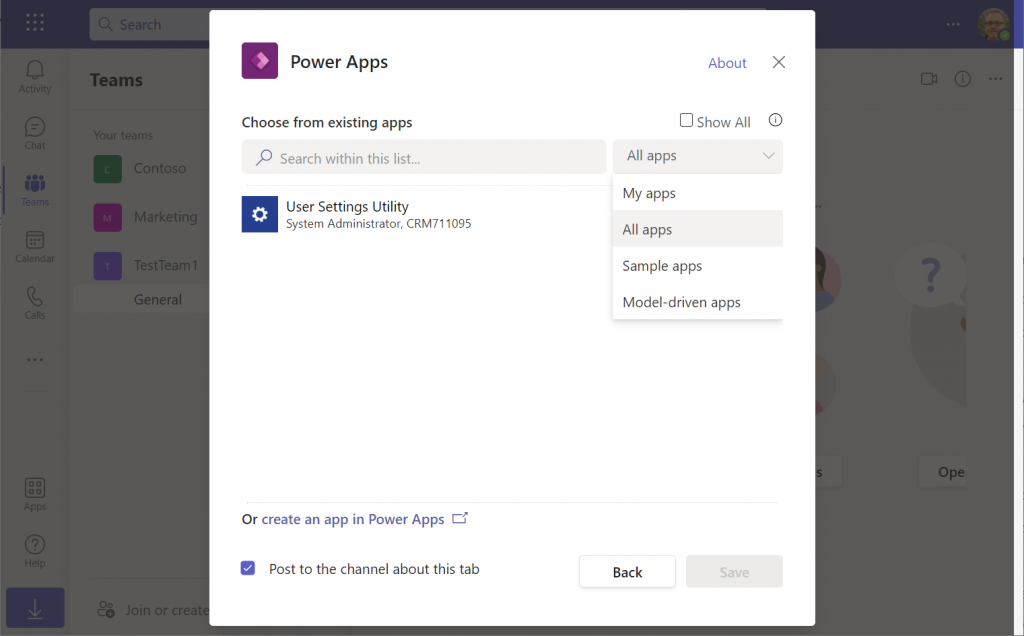
    If we were to now go to our target team and add a new Power Apps tab to the channel, we would not find our Bulletins app there. Nope, not even under that “sample apps” filter, since that actually shows a list of Power Apps sample apps like Asset Checkout that are part of all Power Apps environments. Dataverse for Teams sample apps like Bulletins are a completely separate thing, of course.

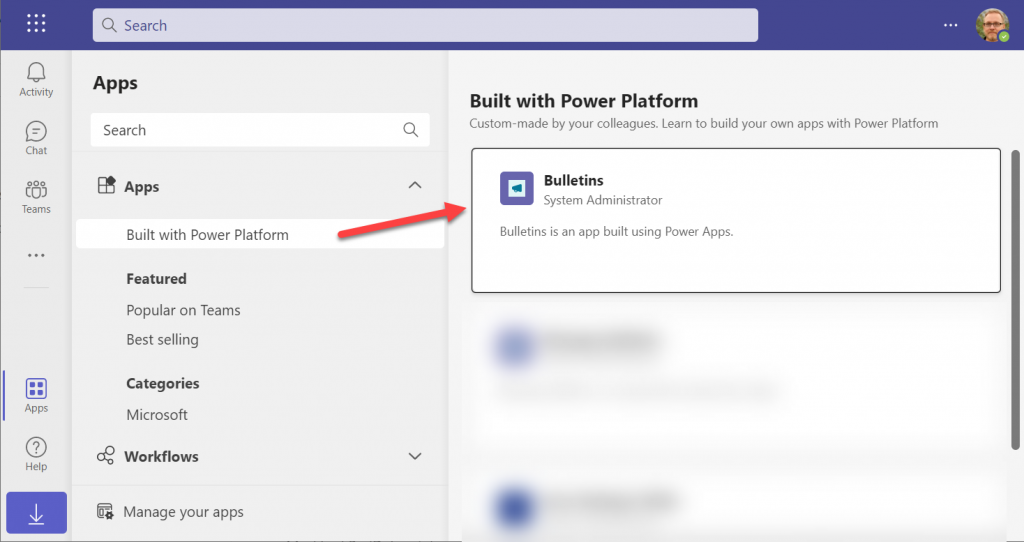
    The logic is different when it comes to Power Apps that have been built within Dataverse for Teams. You need to go back to the Power Apps for Teams app, i.e. the Maker experience. Click on the Build tab, choose your environment, find your app, select it for real this time, then choose “Add to Teams”.

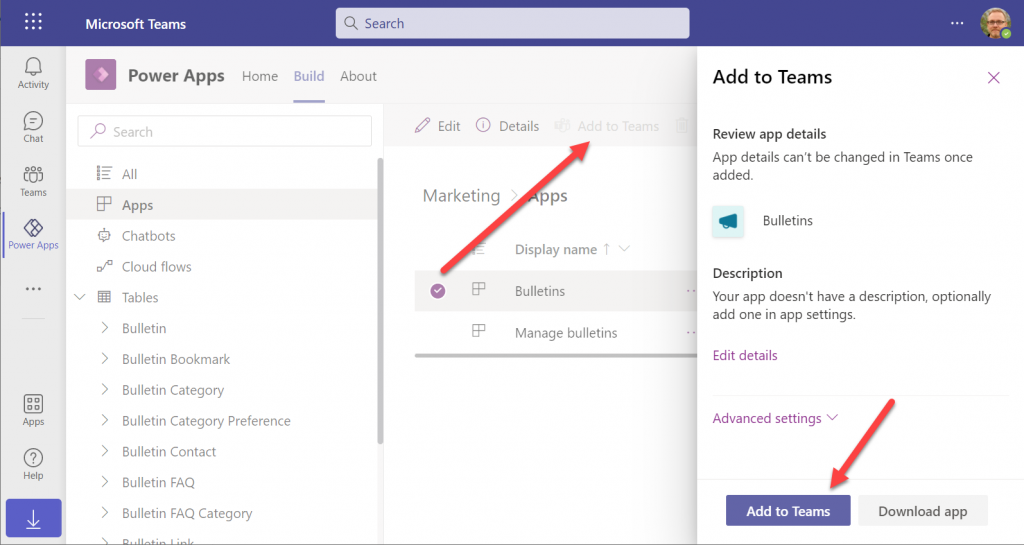
    You don’t get to choose a team or a channel, though. That’s because this process actually publishes your app into the Teams app store. It will become available under the “Built with Power Platform” section:

    OK, fair enough. It’s an app built within Teams, so it makes sense to use the same distribution mechanism as apps developed with custom code. The other Power Apps in your tenant are “external content” that you can freely pin to channel tabs. Dataverse for Teams apps are same but different.

    Blocked by Teams permissions

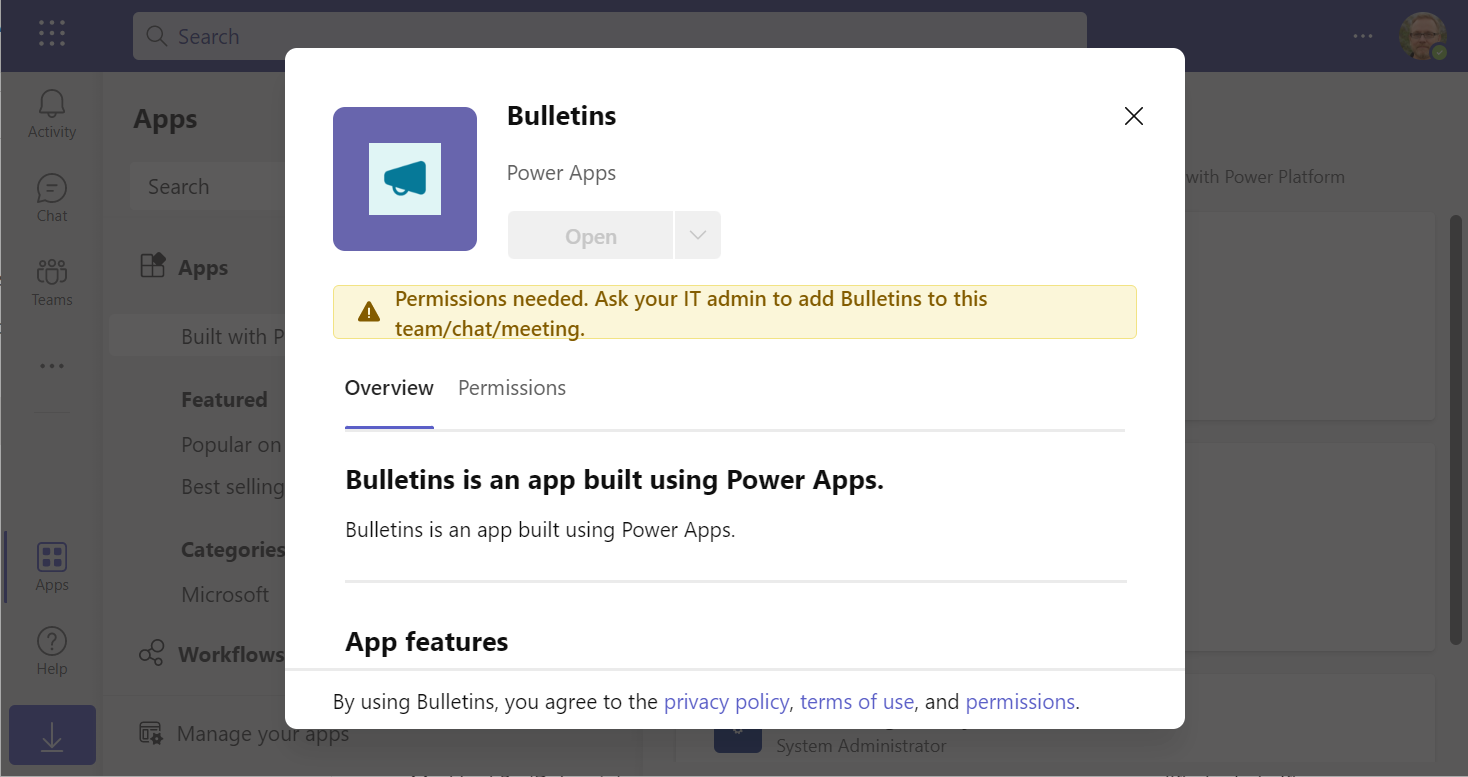
    This is actually the reason why I started writing this blog post in the first place. Ever since the broad distribution apps were announced in January 2021, adding them to a team from the app store worked without any additional hoops to jump through. Recently that has changed in a way that is not yet reflected in any MS documentation.

    In a new tenant with the default settings for Microsoft Teams, you may be blocked from installing the Dataverse for Teams based apps after doing the “Add to Teams” dance. Instead the app store may present you with the following error message:

    Permissions needed. Ask your IT admin to add [app name] to this team/chat/meeting.

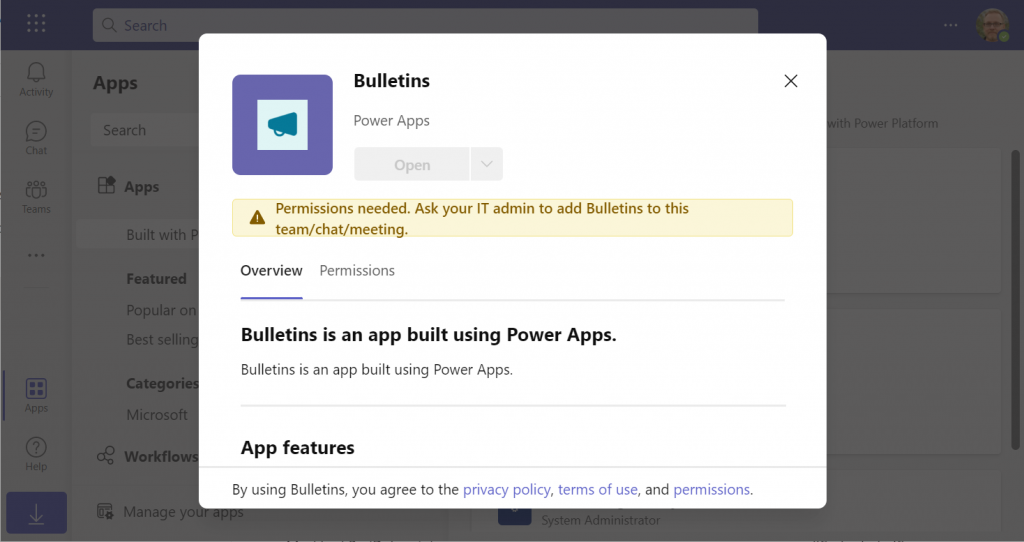
    You will get this message even if you are the Global Administrator of the tenant, so it’s not about the user permissions. It is rather the Teams policies that are blocking the deployment of Power Apps created within Teams.

    To solve this issue, you’ll need to contact the Teams administrator of your tenant and ask them to verify that the following setting is turned on:

    Teams apps – Setup policies – Global (Org-wide default) – Upload custom apps – On

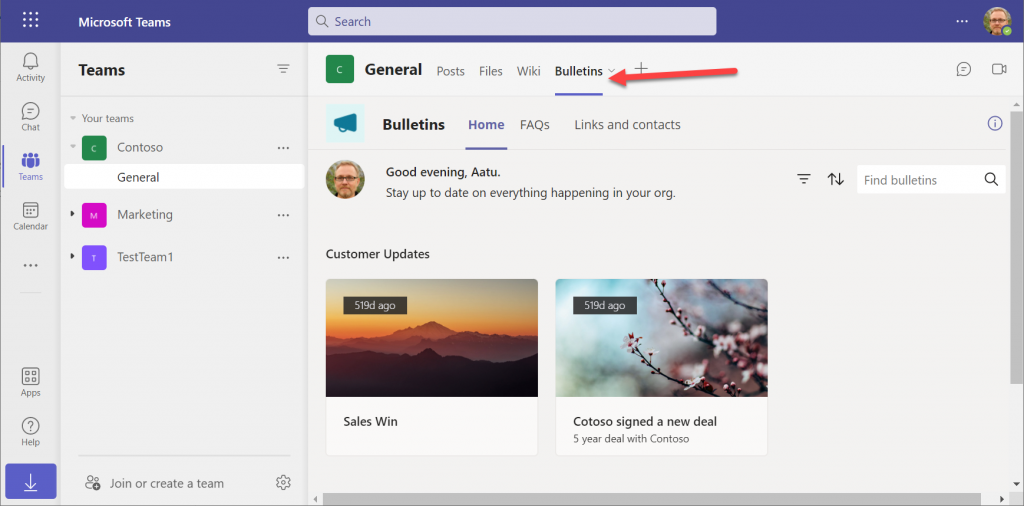
    After this change, you’ll be able to open the Bulletins app in the Teams app store, select “add to team” and create a channel tab in any team that you are a member of.

    I can tell for a fact that the requirement for the “upload custom apps” policy didn’t always used to be required (or it was enabled by default). In one of our demo tenants I had previously used the “share with colleagues” feature to add Dataverse for Teams apps outside the hosting team. The existing tabs worked just fine, but adding new apps became blocked until the apps policy in the Microsoft Teams Admin Center was modified.

    It’s a bit unfortunate if this will indeed become a permanent requirement for IT admins to grant the permission for “upload custom apps”, just to share the Dataverse for Teams app into a different team. Compared to normal Power Apps, there are a number of quirks like this that the app makers need to be aware of. Be sure to also check out my earlier blog post where I explore what it’s like to work with solutions in Dataverse for Teams.

    Update 2022-06-17: In case you’re wondering how the general approval process would actually work for Teams store apps where the approval request prompt is shown, check out this great blog post from Tony Redmond: “Users Can Request Access to Teams Store Apps”.

    Update 2022-08-11: there’s a new feature rolling out, called “Microsoft Teams user request configuration to external systems (URL redirect)”, allowing Teams admins to configure a custom URL + message for the app requests in the Teams app store. Read more here.

  • Dataverse meets Teams: my presentation at #TeamsNation 2022

    Dataverse meets Teams: my presentation at #TeamsNation 2022

    I had the pleasure of attending the Teams Nation conference on March 23rd, alongside more than 4000 Microsoft Teams community members. Not only that, they also allowed a former XRM geek like me to do a presentation on the Power Platform track. So I did.😄

    Since I’ve recenly been working a lot with Dataverse for Teams, that was a natural topic to cover in a Teams related event. My session was titled “Dataverse meets Teams: low-code app opportunities for everyone”.

    I first explained the big picture of what Dataverse means, the demonstrated three different apps our team has built on top of DV4T. Finally, a few words on the known limitations of the Teams based Dataverse environments and how you need to take them into consideration in your solution architecture design.

    The slides are available for download on SlideShare, or you can browse through them in the embedded version below:

    The session recording from Teams Nation 2022 is also now available on YouTube:

    If you’re planning to build apps into a Dataverse for Teams environment, then be sure to also check out my earlier blog post on the solution management experience in DV4T.

  • Canvas app source code editing with VS Code in your browser

    Canvas app source code editing with VS Code in your browser

    The experimental feature for connecting Power Apps Canvas apps with Git version control is pretty amazing. You can read this blog post from my FF colleague Timo Pertilä to see how it looks like for app makers: Power Apps and Git version control.

    What doesn’t feel quite as amazing for a low-code guy like me is the steps needed for configuring the local Visual Studio Code client to connect with a GitHub repo. Timo has also blogged about these steps.

    I’m not sure how many people are yet aware of the really magical feature that GitHub offers: the github.dev web-based editor. In short, what this allows you to do is skip all of the local configuration steps and launch an instance of VS Code directly from a GitHub repo – in your browser. Here it is in action:

    (Grab this MP4 video if the GIF animation doesn’t show up properly.)

    What are the steps needed? First, we completely everything in Timo’s first blog post. Create a GitHub repo, then enable the experimental feature in Canvas app settings. Note: you will now have irreversibly linked your app to GitHub, so don’t do this for any “real” app just yet.

    After linking the repo Power Apps will automatically copy all of the app source code there. Open up GitHub.com and browse to the /Src folder to find YAML source code files for your Canvas app screens.

    Open a YAML file you want to edit. Then, it’s time for MAGIC! Press the period key (.) on your keyboard and watch VS Code load up in the current browser window, with the file you were looking at over on github.com.

    You’ve now got immediate access to the wide variety of editing features of VS Code, to perform updates on any file in that repo you’re in. How does github.dev do this? Here’s the answer:

    The web-based editor runs entirely in your browser’s sandbox. The editor doesn’t clone the repository, but instead uses the GitHub Repositories extension to carry out most of the functionality that you will use. Your work is saved in the browser’s local storage until you commit it. You should commit your changes regularly to ensure that they’re always accessible.

    A simple example of the benefits is that we can visually track all the changes performed on our YAML file. Then, as we’re ready to commit it, just add a commit message and everything will be synced to the repo.

    Whenv we’re back in the Power Apps studio, clicking on the sync button will retrieve the latest updates from GitHub:

    And there we have it! A new value for the “app name” label that we edited in VS Code, with nothing but GitHub.com and a single “.” keypress.

    Could we one day do all of this directly from within the Power Apps Maker portal / studio? Well, as you can see, Microsoft has a lot of the infrastructure already in place to make the online browsing and editing of Canvas app source code technically possible.

  • What will Power Fx mean for Model-driven Power Apps?

    What will Power Fx mean for Model-driven Power Apps?

    By now many of you will have read about the announcement Microsoft made at Ignite 2021 on their “low-code programming language for everyone”. I’ve written about the wider role of Power Fx in the high level Power Platform story in the Forward Forever team blog, which will give you all the basic information on what/why/how/when:

    Recently I also recorded a quick 10 minute video discussion I had with Julie Yack from 365.training where I had a chance to verbally express some of my thoughts on Power Fx:

    I’ve personally started my low-code journey with Microsoft Business Applications back when the concept of XRM was first promoted, which is why most of my hands-on experience with Power Apps lies firmly on the Model-driven side. Power Fx as a formula language originates from a time when the two app types (Canvas & Model-driven) were still completely separate product offerings. If you’ve always built Canvas apps, there’s essentially nothing new for you in Power Fx. If you’ve only worked with the Model-driven business apps (Dynamics 365), there will be plenty of changes ahead.

    In this blog post I’ll share some initial thoughts on how I see the arrival of Power Fx potentially affecting the way Model-driven Power Apps are built.

    Why Model-driven needs Power Fx

    There has traditionally been a clear divide between no-code and pro-code tasks when building apps the XRM way – meaning customizing and extending Dynamics 365 Customer Engagement apps in most cases. You’ve had a GUI for clicking your way through a variety of configuration options the application platform offers, to perform tasks like:

    • Define entities, fields and relationships
    • Determine the layouts of your forms, sitemaps and views
    • Design business logic via workflows, business rules, BPF

    Our reliance on the almighty mouse pointer as the sword with which we fight our way through a battle field full of fierce business problems might be considered a weakness. Sure, we’ve often managed to emerge as the no-code hero who’s been able to tackle a business requirement most bystanders would have expected to require custom code. Yet there’s frequent frustration to be experienced when the particular configuration option we would have needed was not present in the graphical user interface (GUI).

    Such problems don’t need to be very complex to become unsolvable. All it takes is for the specific function to have fallen outside of the scope of features that the Microsoft product team has managed to squeeze into the platform’s built-in toolkit. Sometimes you might find a community tool that generates the required JavaScript for you, or a custom workflow activity comes and extends the built-in actions to let you implement that specific calculation your customer needs.

    Yet it remains mostly a black box for the non-pro developers: the next time you run into a similar limitation, you’re likely to again need help from the pro-devs to move forward. Venturing beyond the GUI tends to always push us into uncharted territory.

    What the announcement of Power Fx promises is far more empowering. “Formula based Power Apps Model-driven customizations” sounds like you could actually get a peek of the underlying logic layer in text format rather than a finite list of picklist options to choose from. At the same time you probably would not need to assume responsibility of any software code implementation details. The lower level of how the conditions defined by your formula are actually met by the big computer running in the cloud would not be your concern.

    This aligns with the promise of declarative programming:

    The maker describes what they want their logic to do, not exactly how or when to do it. This allows the compiler to optimize by performing operations in parallel, deferring work until needed, and pre-fetching and reusing cached data.

    Power Fx documentation on the language’s design principles

    For me, the big reason to steer clear from copy-pasting JavaScript snippets from websites and tweaking them to be used in business applications built for customers is that I’m all too aware of what I don’t know. While I can often read what the specific scripts are doing, I don’t fully understand why they work vs. why they would not work under different circumstances. It would be far too easy for me to accidentally create something that breaks in the near future – not because of a bug in Microsoft’s code but a bug in my code.

    Formulas that are written in Power Fx (today only in Canvas apps) are very different. Sure, they can be very complex as well, but there’s no knowledge required from outside the domain of Power Apps. If I pick a tutorial video from Shane Young’s YouTube catalog that explains the usage of a particular function in Canvas apps, most of the time I get it. I can immediately adapt it for my own scenarios, and get helpful Intellisense error messages from Power Apps Maker Studio when there’s something missing from my function (well, not always helpful messages, but at least an indicator of “keep trying”).

    Taking the step to writing your Power Fx formulas instead of just clicking around the GUI helps in unleashing your creativity in app design and significantly expanding the realm of what’s possible. There’s also big potential in improving the efficiency of the app building process when you can copy-paste text based formuals instead of having to repeat a series of clicks in the MS admin portals that seem to only get slower and slower as years go by…

    Why Power Fx may be scary for Model-driven app makers

    Canvas apps have been promoted as the way to create “pixel perfect experiences” tailored to the end users’ specific requirements and needs. This is a completely different starting point for low-code app creation than the traditional business apps in CRM style projects where you are mostly customizing an existing application. On a high level, everything will look & behave pretty much the same way every time.

    I’d argue that many of the limitations in Model-driven apps are in reality a safety net for the no-code app makers. Back in 2019 I did a presentation on the topic “Canvas apps for the Model-driven mind”, which describes the kind of leap that is needed both on mental and practical level for an XRM pro to turn into a modern Power Apps app maker. Power Fx will now play a big role in this transformation.

    The relational Dataverse data model that sits behind every Model-driven Power App largely dictates how the app UI will function. As a result, there’s not too much creativity required nor allowed in creating the visual side of your business application. Navigation and Command Bar buttons will be generated for you, and you can rely on them being constantly presented to the user. Everything’s responsive out of the box, too.

    The other side of Power Apps that’s not built on relational data structures and predefined UI grids is the world where everything runs on Power Fx. In Canvas apps the buttons don’t exist until you drop them on the screens and they do absolutely nothing until you add a piece of Power Fx text into the OnSelect property. Any dynamic behavior that’s desired for the app’s controls (visibility, size) must be expressed in Power Fx for their respective properties.

    Building Canvas apps doesn’t require you to have programming skills, but it does quickly push you much closer to the experience of custom app development. You’re no longer merely a system customizer like in Dynamics 365 scenarios, now you’re an app maker. The whole purpose of the low-code tooling is that it blurs the lines between traditional developer roles, thus powering the new “fusion teams” that may share many of their tools – and now also the programming language.

    As a result, it becomes less obvious what you can & can’t do without custom code extensions when building Power Apps. Configuration expressed as text based formulas can be vastly more powerful than GUI based options, allowing the most creative makers to achieve functionality that others might assume to be impossible with the available tools.

    Journey towards “just Power Apps”

    Back in Summer 2019 Microsoft revealed their long term roadmap on how the two types of Power Apps would eventually converge into one. We haven’t yet seen much concrete changes on how Model-driven and Canvas could coexist within a single app, apart from the embedding feature. The original plans for launching custom pages as a “canvas” within Model-driven apps were removed from 2o20 release wave 2 and no new target dates have been announced for it.

    There is likely a wealth of moving parts in this puzzle that have dependencies between each other, so it’s no wonder this merging of Model and Canvas apps is taking time. Power Fx is a clear step towards making the new app building story consistent. Plenty of new functionality is likely to be needed, though, as you’re not simply replacing one programming language with another. Rather it’s the case of expanding bespoke GUI tools with a low-code programming language that can also be used to express the same logic.

    Exactly what the new Power Fx based “form and commanding customization in Power Apps” promised at Ignite will consist of remains to be seen. Calculated columns defined with Power Fx are much easier to grasp. The same goes for the conversion of Business Rules into Power Fx formulas, since already today the Text View in the editor looks a bit like these.

    Making that If-Then-Else box editable would be a simple step. However, turning the actions in Business Rules into something that you could define with Power Fx and apply on a Model-driven form will surely require some more platform unification work. Show/hide fields, set required, prompt for errors… They all sound straightforward from a logic perspective, but how will such concepts be extended to cover not just Canvas sceen controls but Model form controls is going to be interesting to watch.

    This is probably why Business Rules are in the same “future roadmap” bucket as the Power Automate flows for receiving Power Fx coverage. It’s not yet easy to envision how the declarative logic of Excel that Power Fx tries to follow wherever possible is going to be applicable to these more imperative scenarios. What would a flow written in Power Fx look like and is it really going to be easier for app makers to grasp than the current GUI?

  • Account address capture & mapping with Power Apps

    Account address capture & mapping with Power Apps

    In the Power Apps team blog there was an announcement of the GA availability of Geospatial Features for Canvas apps. In short, we now have a preview of two new controls powered by Azure Maps:

    • Address Input control which suggests the correct address based on partial street names and autocompletes attributes like city, postal code, country, latitude/longitude.
    • Interactive Map control to show one or more records from a dataset as pins or cards on a visual map .

    I decided to do a quick test of how to leverage these new capabilities in a simple scenario where we are managing account address information via a Canvas app running on a phone screen. Here is the end result:

    Simple yet effective! Let’s explore the steps I needed to perform to achieve this functionality.

    Source data

    As a starting point, I’m using a pure Dataverse environment with no Dynamics 365 components. Instead, I’ve installed the free RapidStartCRM solution to give me a simplified CRM data model, plus a fully working Model-driven Power App. I could embed this inside Microsoft Teams and use it via a channel tab, for example:

    In our scenario I want to offer the users a simplified UI to be used on a phone screen, with only a small subset of the full features found in the Model-driven app. I’ll focus just on the account data, which means I can simply start by going to make.powerapps.com and choose to generate the mobile app based on a data source. In this case I’ll select the account table in the Dataverse environment where RapidStartCRM is deployed. This gives me the basic 3-screen UI for browsing, viewing and editing records (yeah, I know, “rows” – but I refuse to adopt this part of the latest MS BizApps naming bingo results just yet).

    I want to create a custom data entry UX for this demo scenario, so I’ve added a “+” button at the bottom of the gallery screen to launch a new screen where I’ll be leveraging the geospatial features.

    Address Input control

    It’s never a fun task to enter the address details when creating new account records, especially when on a mobile device. Instead of asking the user to fill the various fields included in an address, we’ll add the new Address input control from the Input menu onto our “Add new account” screen. From the control’s documentation page we can see there are a number of input properties we could use, but it works quite well just by dropping it as a field onto the form and starting to enter text:

    In my case, I did limit the country set to “FI” to give me just Finnish streets for my demo app. It looks like you need to enter the street name and number before anything is suggested by the Azure Maps API, but you’re allowed to have small typos in the street name, so there’s some fuzzy matching logic applied here.

    The real benefit of the Address input control is in the 19 output properties you get from it. Ultimately I’ll want to use them to A) show the map control based on lat/lon and B) store the data onto the new account record the app will create. But first, it’s nice to see the control’s output on the screen while updating values, so I’ve added a few labels where I display the results from the selected address. To do this, I’ll reference properties like AddressInput1.PostalCode and AddressInput1.Municipality to construct a nice looking string for the text property of the label:

    This exercise will also help me in identifying how I’ll need to concatenate properties like StreetName and StreetNumber to create a valid value for the Dataverse account table’s Street 1 field eventually.

    Map control

    Seeing a map view where the address we’ve inputted is physically located is a big factor in the app’s user experience. We’ll want to give visual confirmation to the user that the address is actually at a location where they expected it to be, plus the ability to zoom in/out on the map to explore the surroundings. So, while in the Power Apps maker studio, let’s click on the Media dropdown and add the Map control onto our screen.

    Hmm, how do we then tell the Map control to zoom in to the address we’ve selected in the Address input control? I had to browse the Interactive map component documentation for quite a while to figure out a way to do this, as it wasn’t entirely obvious how to visualize an individual address rather than a table of records. What I ended up doing was to go into the OnChange property of the Address input control and create a SelectedAddress variable to be set to the chosen address whenever the field’s value changes:

    Set(SelectedAddress, Table({Label:tiAccountName.Text, Longitude:AddressInput1.SelectedLongitude, Latitude:AddressInput1.SelectedLatitude}))

    Note that in my app I’ve got a Text input control tiAccountName into which the user is requested to type in the name of the new account being created, before proceeding to work with the Address input control. I’m picking that name as the label to be shown on the map pin.

    Then in the properties of the Map control I’m setting the values of ItemsLabels, ItemsLatitudes and ItemsLongitudes properties to reference my SelectedAddress variable’s respective properties:

    There’s a variety of other input properties for the Map control, many of which I didn’t yet tweak in my demo app. For example, setting the default location to be that of the current location of the user’s device might be a good idea, but a quick test in the browser didn’t yet tell me how exactly I’d then replace that with my custom location from the variable. I’m sure the will be plenty of ways to optimize these map parameters when connecting them with your app’s business logic and data.

    Saving the account + address

    Finally we need to store the account name and address details onto a new Dataverse record in the account table. As we aren’t working with the form control here, it’s time to use the Patch function. I always need to check the Docs page for the exact syntax, but when working with simple text fields in the target table, the formula isn’t all that complex. On my Save button of the “Add new account” screen I’m running this:

    I’m storing the results of the Patch function also inside a NewAccount variable, so that I could reference the values further in the UI if needed (confirmation dialogs, for example). No error handling or anything else fancy here in the demo app, instead I’m just navigating the user to a “Success!” screen after the record has (hopefully) been saved in Dataverse:

    The “Success!” screen has an invisible timer control set to auto start and a duration of 3000 milliseconds. In the OnTimerEnd I’m doing housekeeping like setting the SelectedAddress variable to Blank(), resetting the Account name text input, then navigating the user onto the account browse screen that will show our newly created account somewhere in the gallery. Another option would of course be to take the user onto the full Edit Screen of the record, to enter further details via the standard form control if needed:

    That’s all there is to it! All in all, my first impression from these new geospatial features is quite a positive one. It’s important to note that since they are using Azure Maps service behind the scenes, these controls have the “premium diamond” next to them in the UI. This means you’ll need to have a premium license like Power Apps Per App or Power Apps Per User for users who are taking advantage of these address mapping features. Also keep in mind that the Power Platform environment where your app lives in must be enabled for geospatial features by the admin.

  • Using CSS color names for SVG icons in Power Apps Canvas app

    Using CSS color names for SVG icons in Power Apps Canvas app

    In my previous post we took the contents of an open source SVG icon library from GitHub and imported that into a Canvas app as a static Excel table, with the help of Power Query. This time we’ll explore how working with the icon colors can be expanded compared to the standard functionality offered by Power Apps Maker Studio.

    Standard color picker

    If we are inserting any of the out-of-the-box icons into our app screen, Power Apps offers a color picker that works the same as when defining the color of a text font. The first option is the standard palette with theme colors and, um, “standard” colors:

    Then there’s the “any color you could imagine” option where you can either pick the color from the sliders, type in the hex code or use the RGBA code:

    The third option is a bit more hidden, so you’ll only find it when using the formula bar. You see, Power Apps actually supports also the CSS color names, so you could type in the value as “DarkBlue” and get exactly that for your icons:

    The Power Apps documentation contains a list of built-in colors supported and their CSS color names. Now, the idea of having the standard CSS palette with its easy to understand color names instead of cryptic Hex codes or RGB values sounds attractive for a low-code citizen developer like me. However, there isn’t really any convenient way to browse through these colors and see the results in the Canvas app UI. Unless we build one for ourselves!

    Custom color picker

    Just like with the SVG icon definitions, we can use the option for importing static reference data from an Excel table to enhance the app maker experience. What we’d need first is a suitable list of the CSS color names, alongside their attributes. Rather than searching for the perfect table online, I just grabbed the data from this CSS Color Codes page on RapidTables. What I especially liked about this page was that the colors were grouped based on the color “family”, meaning different tables for red colors, orange colors, yellow colors and so on. That’s the way I’d really want the colors to be organized, rather than the alphabetic list over on docs.microsoft.com. With some copy & paste, I ended up with an Excel table like this:

    You can grab my .xlsx file here. Let’s import that into our app via the Excel static data connector, as a table called ColorTable:

    We can now add a gallery control into our app and use the columns from our ColorTable as values for the fields in this palette browsing gallery:

    “Wait, how did that visual color indicator get there?” Oh, that’s easy! We just added a rectangle into the gallery and used the ColorValue function to reference the Color Name column from the table that we imported from Excel:

    What I didn’t add there into our gallery yet was the Color Group information. That’s because I want to have this as a separate parameter that I can use to narrow down the list of CSS color names presented in the list. Let’s name the first gallery to “galColors” and create a second horizontal gallery called “galColorGroup”, which will contain a list of all the group names included in our Excel table.

    How do we get just a single “Green” and not all of the 19 different instances of that same text string in the source table’s “Color Group” column? We use the Distinct function and tell it we’re looking for data in the ColorTable data source and the distinct values should come from this particular column:

    The Distinct function returns a table with the single column “Result” as seen from the formula bar preview. We’ll add label into our gallery and populate the text value with this Result directly. To set the fill of the label’s rectangle area we’ll use the same ColorValue function as in our first gallery and point that to the Result column. Now we’ve got ourselves a galColorGroup gallery with 11 distinct values visualized:

    Let’s use the selected Color Group now as a filter to list only that group’s CSS color names in the other gallery. For galColor the Items parameter should read:

    Filter(ColorTable, 'Color Group' = galColorGroup.Selected.Result)

    While we’re at it, let’s also add labels on top of each gallery to state the currently selected value. For galColorGroup, we’ll want both the group’s name as well as the number of items returned after the Filter has been applied in the galColor gallery. We’ll concatenate the selected item’s name plus the CountRows result from the galColor gallery into a single text string like this:

    "Color group: " & galColorGroup.Selected.Result & " (" & CountRows(galColor.AllItems) & ")"

    For the second label, the selected color’s CSS name is enough for us:

    "Color: " & galColor.Selected.'Color Name'

    Now we can click on a value in the Color Group gallery like “Gray” and be presented with a filtered list of the 10 available shades of grey:

    Using selected CSS color name as SVG icon color

    The last bit is connecting the color with the icon library we imported in my earlier blog post. As a quick recap, the SVG icon shapes can be defined in the image property of a Power Apps image control by constructing the XML in the following way:

    "data:image/svg+xml;utf8, " & EncodeUrl(
        "<svg version='1.1' id='Layer_1' xmlns='http://www.w3.org/2000/svg' xmlns:xlink='http://www.w3.org/1999/xlink' x='0px' y='0px'
    	 viewBox='0 0 24 24' style='enable-background:new 0 0 24 24;' xml:space='preserve'>
    <path fill='" & "Black" & "' d='" & ThisItem.path & "'/>
    </svg>"
    )

    You’ll notice that while we pulled the path’s attribute “d” from the dynamic value of ThisItem.path, we had left the path’s fill attribute hardocded as “Black”. Changing this to a dynamic value will allow us to render the SVG icons in any color we’ve chosen elsewhere. To make this work in conjunction with the CSS color name picker functionality we’ve built into our app, let’s add a button above galColor and use the OnSelect event to set a variable called SelectedColor to be the CSS color name of our choice:

    Now we’ll just change the SVG icon’s XML definition to reference this variable’s value as the fill color:

    This allows us to combine the earlier SVG icon gallery with our CSS color name gallery and make the color choice reflected visually immediately on all the visible icons:

    The visual part is what I love about this example of working with icons and colors in Power Apps. It’s a great exercise for learning how to work with data sources from the outside world and seeing how the Power Apps Canvas app UI changes as you modify your formulas and shape your galleries. Being able to inject dynamic values into XML that the app then renders in real time is a demonstration of how the low-code app development tools available in Power Platform can serve to unlock your creative powers, even if you have no skills on actual “pro code” development. Understanding how different color values can be passed on from one place to another and transformed via functions along the way also teaches you a lot more than using the standard color picker to set the static fill value of a single control.

    For me personally, it’s also an exploration of how to leverage configuration data when building Canvas apps. Coming from the Model-driven app customization world of XRM, my mind is still somewhat fixed on thinking via metadata, even though I’m trying to make the leap into UX first Canvas apps building (see this presentation for some of my tips on surviving that leap from Dynamics 365 to Power Apps). The possibility of importing static tables from Excel that are then preserved within the app is an interesting option to try and make the app building process a bit more structured than what the maker tools in Power Apps offer. I’m going to continue my experimentation and try to turn this example app into something that could offer reusable logic and configuration data when generating brand new apps.

  • Using SVG icons in Power Apps Canvas apps

    Using SVG icons in Power Apps Canvas apps

    When creating business applications on Microsoft Power Platform, a major difference between the traditional “CRM style” Model-driven apps and the modern “mobile first” Canvas apps is the possibility of visualizing data and available features in the app. Yes, having well-structured data to begin with is of course a fundamental requirement of being able to construct a meaningful business app. The freedom of pixel perfect visuals that Power Apps can deliver in the Canvas style apps is, however, an important factor when it comes to the perceived value that the end users can get from accessing the app.

    If you’re willing to spend time in generating static images for all the different areas of your app UI and, more importantly, to reflect the state of your app in relation to the data that the user is viewing, then the sky’s the limit for what you could achieve with Power Apps. Now, considering that these low-code/no-code tools aren’t exactly targeted for professional app development teams that would have designers equipped with the tools & skills to create amazing graphics on demand, we often need to explore more frugal ways to make the app visuals serve their purpose. For those of us with next to zero skills in graphic design, sources of free / open source digital illustrations like IconFinder are like a gift from above. There are also a number of awesome icon libraries available on GitHub. Here’s an example of Simple Icons:

    Static graphics like PNG files can already do wonders to your Power App UI, but wouldn’t it be nice if you could also leverage the more scalable and adaptable SVG’s (Scalable Vector Graphics)? Especially for monochrome line drawings like the ones you’ll see a lot in today’s flat app UI, an SVG with transparent background and also a configurable color would be highly useful. Unfortunately, Power Apps today doesn’t support SVG file manipulation when imported as images. There’s a built-in set of icons that come with the Maker studio, which most probably are vector graphics, but you cannot add your own icons into that list. What this means is that if you import an SVG image into your app, there’s not going to be any more parameters available for you to adjust than if you had brought in a JPEG. Doh!

    A Canvas app that I’m currently building requires a large number of icons that should be dynamically changed based on a variable. For the purpose of mapping the suitable icon with a specific value and testing the UI, I wanted to bring in a whole library of icons and play around with it in Power Apps Maker Studio. In order to have better control over the icon appearance, I wanted to be able to modify the actual XML definition that makes up the SVG icon. Here are the steps how I managed to get the data inside the app and also how to render the SVG icons from the XML that I dynamically modify with formulas.

    Combining your SVG files into an Excel table

    Excel is a data source in Power Apps that allows you to import a static table of data into the app and store it there for all the app users to consume, without having to work with connections to external data sources. This type of resource file was quite convenient for my purposes, so the first thing I had to figure out was how to get a folder full of SVG files imported into an Excel table where each icon’s definition is represented on one row. In the above example of Simple Icon library, this would be the contents of the folder “\simple-icons-develop\icons”.

    Power Query in Excel has the “From Folder” option available when using “Get Data / From File”, which brings in not just a single file but rather all the files inside a specific folder. Great, that’s what I needed! Oh, but the source files I have are SVG which Excel doesn’t understand. No problem, let’s just change the file type to XML by renaming the files with by running this in the Command Prompt after navigating to that folder:

    ren *.svg *.xml

    This is what we should now have:

    Now we’re ready to consume the folder contents in Excel. Using “From Folder” and selecting “Transform Data” in the import prompt, we see a view like this:

    A good start, but we need to do some transformations to this data. First, in the Content column, click on the two downward arrows for “Combine Files” and see the results:

    Awesome, now we’re actually inside the XML file structure! What we’re really after is the <path> element in SVG , which is the ultimate drawing that creates the lines, curves and shapes. We don’t have to understand anything about its syntax (well, at least I don’t) but we need this data to get Power Apps to render the SVG shape inside an image control. Since it’s currently a table in the Power Query Editor, we click on the two parting arrows to expand its contents, which consists of a single attribute called “d”.

    We’ve now got everything we need, so the last steps are in removing unnecessary columns and renaming the existing ones. The first three ones are what we want to save into our Excel table, so let’s simplify the column names to “name”, “title” and “path”, then click Close & Load. You should have a beautiful Excel file with as many rows as you had files in the source folder. Before saving and closing the .xlsx, give the table a sensible name that you want to have showing up as the data source name in Power Apps.

    Visualizing SVG data from Excel inside Power Apps

    How does one actually turn the XML definition data into a visible image in Power Apps? There’s a great blog post from Laura GB titled PowerApps – SVG Introduction, which gives us all the details needed to make the Image control render our SVG data. To see how it works in practice, let’s first bring in our Simple Icons Excel table into Power Apps as a data source:

    Next we can add a horizontal gallery onto our screen an choose to use the imported table “icons” as our data source:

    Our table has the three columns we left in there when working with Power Query. From the default mapping we can see that the gallery item’s Subtitle1 label has “ThisItem.path” as the Text value. This is the data we’ll want to use in the image control of the gallery item, but first we’ll need to wrap it into something that gives Power Apps the context around it needed to render the SVG image, since we only imported the one attribute and not the complete XML. However, since this XML part will be exactly the same for any icons that we want to display from this Excel table, it can consist of static text, inside which we’ll inject a few dynamic values with the Power Apps formulas. Adapted from Laura’s post, this is how the Image property of the Image control inside the Gallery item should look like:

    "data:image/svg+xml;utf8, " & EncodeUrl(
        "<svg version='1.1' id='Layer_1' xmlns='http://www.w3.org/2000/svg' xmlns:xlink='http://www.w3.org/1999/xlink' x='0px' y='0px'
    	 viewBox='0 0 24 24' style='enable-background:new 0 0 24 24;' xml:space='preserve'>
    <path fill='" & "Black" & "' d='" & ThisItem.path & "'/>
    </svg>"
    )

    The important part is how we construct the “d” attribute from ThisItem.path on line 4, as that will be the only dynamic value in our SVG for now. Here’s what the result will look like:

    It works! We can now design a gallery that will allow us to conveniently browser through the complete collection of 1007 icons in the library, by having a live “thumbnail” of the icon in a smaller 100*100 image control. To then view the selected icon in a larger format, let’s add a new image control outside the gallery and set it’s Image property to reference the Image of the selected item from Gallery1. Since these are vector graphics, there should be no loss of quality, no matter how large we set the image size to be:

    If we now want to use these imported SVG icons from anywhere else in our app, we can just do a LookUp to the data source with the icon name and return its path, like this:

    LookUp(icons, name = "microsoftexcel", path)

    Using this when wrapped within the same formula we used earlier for showing the gallery’s selected item’s path will now give us a rendering of the SVG icon that matches our LookUp function:

    “Hmm, wont this kind of library of a thousand icons make our app size huge?” Not really. Since we are only storing the shapes instead of the pixels, the payload will actually be very compact for each icon. In this example with the Simple Icons library, here’s how much storage the different parts consumed:

    • Icons folder from the GitHub project: 1.5 MB
    • Excel file with icon XML imported via Power Query: 661 KB
    • .msapp file of the example app with static Excel data imported: 592 KB

    By taking just what we need (the shape information) and leaving out the static XML file’s overhead we’ve actually managed to shrink the 1007 icons into a much smaller space with our Power App. The other benefit is that further adjustment like icon color can now be set in our own formulas. In a follow-up post I’ll continue adding features into this icon library browser app to make use of exactly this capability.

  • Why would you store images and files in CDS?

    Why would you store images and files in CDS?

    The Common Data Service is often though as a relational data store that resembles the former XRM database. While there is backward compatibility in the sense that you can do everything with CDS that you could in XRM (Online), the real power of the cloud platform comes from going beyond those limits. Earlier I’ve talked about how The Real Common Data Emerges as we start to work with a variety of different data types and even reaching out into the Azure Data Lake as part of leveraging the Dynamics 365 first-party apps. This time I want to drill deeper into the specifics of images and files as new field types available in CDS.

    Feature announcements from Microsoft

    The concept of CDS heterogenous data storage was demonstrated back in Business Application Summit 2019 in June. As illustrated below, alongside the traditional SQL database for relational data, CDS now offers also the option for binary (file) data stored in Azure Blob Storage and log data in CosmosDB, as well as search indexes offered via Azure Search. All of these are are available under the common entity schema and business logic defined in CDS, without requiring the app makers to think about what data goes into which specific service and how. This is how the Power Platform provides a higher level of abstraction compared to code based app development on top of the raw Azure services.

    Fast forward a few months to Ignite 2019 in November, where Ryan Jones presented a session on “Connecting Power Apps, Power Automate, Power BI and the Common Data Service with data”. The capabilities promised for the new image data type were as follows:

    And here’s the equivalent slide for file data type:

    In December 2019 there have now been announcements made on the Power Apps blog about Introducing File and Image datatype, as well as the availability of the public preview of file attributes on Power Apps Canvas apps. Things are still in the process of rolling out and support for Model-driven apps hasn’t yet even been demonstrated anywhere, so this isn’t something you can jump into using right away.

    Scenarios for files in CDS

    Traditionally in the world of CRM projects we’ve always advised against putting files into the database. “Keep ’em in SharePoint” has been the standard answer, which still makes a lot of sense for any collaboration on content creation, document versioning and so on. The SharePoint document management integration in CDS offers an out-of-the-box experience that generates document locations linked to specific records in CDS and allows working with them through the Model-driven app UI. If you’re happy with auto-generated folders under a single document library on a single SharePoint site for all the records of a particular CDS entity (like accounts), there’s no need to look any further. In real world customer environments the OoB integration is often not sufficient, and I’m really glad that things are improving with the Microsoft Teams based document management integration offering a more practical security and data location model. (Note that currently the Teams integration can’t be enabled for pure CDS environments without Dynamics 365 apps.)

    The problem that still remains is that both the direct SharePoint-CDS integration as well as the Teams-SharePoint-CDS combo don’t offer much business process context for the files. It’s more of a helpful tip like “hey, if you’re looking for documents related to this account/project/order/inspection, try searching from this folder”, rather than a very specific instruction about which particular file contains information on what step of a business process managed in CDS. You also can’t really verify whether a required document exists in the system before proceeding further in the process, since all you have is links to a folder which might or might not contain that file – or multiple copies and various different file types when what you’d really need is a single required PDF, like a signed agreement document.

    With the new file and image datatypes, you can actually define a specific field to store a specific type of document or image. This will let you know exactly what the business purpose of a particular piece of binary data is, which means you can develop app functionality like user interface and business logic around it. It’s no longer just 0…N files linked from another system (like SharePoint), it becomes an integral part of your business process. The demo that Ryan Jones did at Ignite about an inspections app is a good example of what the “strongly typed” image and file data could be in practice:

    Having rich metadata about what a particular document represents in the real world is great, but what’s an even bigger benefit is the security model around it. As anyone with an XRM background knows, the ways in which you can configure the security model in CDS is very advanced, offering granular control of who can create, read, update and delete data. You have security roles, business unit hierarchies, position hierarchies, owner teams, access teams, sharing, even field level security. Any security logic that you apply on the entity that’s hosting the file or image field will also guard access to the binary content. If you’ve ever tried to sync the security information between a Dynamics 365 based CRM system storing customer records and the SharePoint environment storing the related documents, you’ll know how difficult and error prone this attempt is. The security concepts of those two systems are inherently different and even Microsoft is unlikely ever offer anything close to 1:1 integration (Teams is about as close as you can get.) For access control of sensitive documents and images, these new datatypes in CDS are therefore a very attractive option.

    Attachments (annotations) vs. file/image datatype

    Let’s not forget that it has always been possible to store binary data in CDS, even in the on-premises days. All your tracked Dynamics 365 emails will have automatically uploaded their every attachment into the Note entity. Additionally the users have been able to add notes with attachments on the Timeline of any entity where the attachment feature has been enabled.

    As part of the new storage capacity model launched in April 2019, Microsoft will have already migrated all of the attachments previously stored in the SQL database to Azure Blob Storage behind the scenes for any Online environment. However, this doesn’t make the attachments feature any more modern and you should seriously consider not using it in the future (where possible). While there is a somewhat better security story with the data all being behind CDS APIs, you won’t find any customization options here to align the data in Notes entity with your business requirements nor the desired application UI. It’s a fixed way of representing file data alongside the customizable relational business data model, inherited from the Dynamics CRM days rather than a feature designed for the Power Platform era.

    In the meantime, with the lack of better support for image handling, many of us have surely explored the capabilities of building a Power Apps Canvas App that could perform what the above Ignite inspection demo app does. Dropping a camera control on the Canvas App is so easy, yet storing the captured image into CDS alongside the other inspection data has been next to impossible. Yes, attachments as a separate control has been available for Power Apps makers for quite some time, but patching the image data from somewhere else into a new CDS attachment record is the tricky part. Complex record references like the Regarding field on the Note entity in CDS have long been a stumbling block for Canvas Apps, and as of today you still can’t write data to that field. Jumping through hoops made of Flows and Custom Connectors is hardly the kind of seamless experience you’d expect from a low-code application platform when working with camera images, so there definitely has been a big demand for the image datatype to come and replace the clunky attachment feature.

    Back when CDS was just the storage place for structured data that was accessed via the metadata driven UI of Model-driven apps for CRM scenarios, there weren’t that many places where visually pleasing stuff like images could have been used. The entity image with its glorious 144×144 resolution has been cool for demo data, but how many customers have actually ended up populating logos, profile pics, product images or other visuals in there? With the rise of citizen developers armed with Canvas apps that offer pixel perfect UI development, the situation is now quite different and there’s an expectation to be able to work with full-size images as well as showing thumbnails for visualizing the business records.

    Things to keep an eye on

    As mentioned earlier, we haven’t yet been able to truly validate in real life Power Apps what functionality files and images support. I’m expecting there will be further chapters in the story of how heterogenous storage in Common Data Service evolves over time, so the first release for Canvas Apps and later Model-driven apps may not yet be feature complete. How the data will work with PCF controls/components and other features of Power Platform (automation, offline, search, AI…) is going to be a big factor in deciding whether storing files and images into the dedicated CDS datatypes is the right call for your app. Of course you’ll also need to examine the options from the other Microsoft clouds: Azure and Office.

    If you’re doing custom code development and expect to deal with a large amount of binary data in your app, doing the math on storage cost between the configuration friendly CDS and raw Azure Blob Storage is probably going to be an item on your solution design agenda. Just like with relational data, CDS is always going to be priced as a premium service compared to things like Azure SQL, because it provides you so many layers of additional features you’d otherwise have to build and maintain. Storage is only one part of the equation, but of course you’ll need to ensure the business case is valid when consuming Power Platform storage capacity with its associated services.

    If the applications you build are aiming to support the collaboration of information workers over unstructured data like Word documents with co-authoring and several versions, then that data clearly doesn’t belong into CDS. Use MS Teams as the security mechanism where possible and allow the users to work with the documents through SharePoint, offline synced OneDrive folders, Office applications on any device etc. If there is an end product that comes from this collaborative process and needs to be carried along in a structured business process, then that file could well be stored into a CDS file attribute.

    It will be interesting to see how Microsoft will align these file & image attribute features with the existing attachments feature. Having a predefined number of fields per entity where you can drop a single file is obviously quite a different experience than an open “folder” that could accept as many files as needed. Although on the schema level, also the Notes (annotation) collection only accepts just one attachment per each note and the rest is just UI. Whether we’ll receive a true customizable Notes feature from MS with metadata support and a modern control to complement the standard Timeline visualization on the Model-driven app as well as the attachments control on the Canvas side is something that remains to be seen. I’m also expecting to see some community contributed PCF controls in the near future around the new datatypes.

  • Canvas Apps for the Model-driven mind: how to make that leap

    Canvas Apps for the Model-driven mind: how to make that leap

    Business applications come in all shapes and sizes. In the Microsoft ecosystem, we now have a broader set of tools to choose from, compared to the past strategies of Build vs. Buy, i.e. writing code to develop a custom application vs. using an application platform to configure the desired functionality. The birth of Power Platform and especially PowerApps as the underlying platform technology for creating business apps brought together two very different methods of configuration: Canvas Apps and Model-driven Apps.

    It’s safe to say that hardly anyone in the world is currently a master of both application types. If you’ve been introduced into world of business applications via Dynamics CRM, XRM and Dynamics 365 Customer Engagement, then you will by default solve the customers’ problems with a Model-driven approach. For those that have been working with tools like SharePoint, InfoPath and the Office 365 suite of information worker productivity apps, the solution is very likely to be envisioned as a Canvas App. Persons with less professional history from either of these MS clouds will probably gravitate towards the mobile-first experience of Canvas Apps when getting to know the capabilities of PowerApps today.

    There is very real value in being able to identify the logical objects involved in the functionalities required from a business app and turning that into a sensible, scalable data model. This is the XRM mindset of starting from the back end data and processes when designing solutions. If you have been developing these skills in the classic CRM style projects for several years, then you possess superpowers that few Citizen Developers could ever match. Congratulations! However, now you need to start practicing the exact opposite approach for how to solve problems: forget the data and start from the user experience.

    You may already be aware of how massively Microsoft is investing in the new business models that Power Platform unlocks. Hopefully this has lead you to at least experiment with creating Canvas Apps based on existing data sources like CDS (if you still call it Dynamics [something], then hey: that’s perfectly alright!). While exploring these tools, perhaps you’ve also noticed how parts of the old XRM admin and customization features have started appearing in the PowerApps (and Flow) maker experiences. This level of awareness is a great start, but it’s not taking you very far yet in the process of changing how you think about solving business problems. You need to go much deeper, to unlearn the limits our model based world and embrace the possibilities of a modern Enterprise Low-Code Application Platform.

    At 365 Saturday Kyiv and more recently at Power Platform Saturday Oslo I’ve done sessions on this transformation process, aimed at the XRM professionals. These include setting the scene on how & why the different app types are merging together, what are the key differences in solution design process for Canvas vs. Model, and how to get started in being part of this new #PowerAddicts movement. The slide deck includes a “Top 10 tips for starting Canvas App development on top of CDS” section, which should hopefully make the journey a bit easier than it has been for me, back when I started on it around one year ago. See below for the presentation or go directly to SlideShare my Slides archive to enjoy it in full fidelity.

    Now the question is: have YOU already started your journey into the UX driven Canvas App world? If yes, what have been the biggest revelations or obstacles that you have encountered? If not, what are some of the roadblocks that have kept you from making that leap from the familiar Model-driven business applications into the expanding opportunities that PowerApps Canvas apps have to offer? Please do share your experiences in the blog comments, as I’m quite sure this an area where many professionals are searching for guidance and peer support.

  • 2 become 1 UI: PowerApps Roadmap from MBAS

    2 become 1 UI: PowerApps Roadmap from MBAS

    Have you looked at the MBAS Gallery yet? Microsoft Business Applications Summit 2019 was last week and already the majority of sessions have been published online for also non-attendees to enjoy. Even if you attended the conference in Atlanta, there’s a chance that you may have missed a few sessions, with there being 200+ of them in 2+1 days.

    Live recordings of sessions are nice – if you have ~200 hours to sit through them, that is. As is the case with podcasts, I rarely come across a moment in my life where there would be empty space just waiting to be filled with a 1h chunk of audio/video of people talking about something that might or might not be valuable to me. On the other hand, I’m very comfortable with skimming through endless amounts of text & pictures, in search of something that warrants my real attention and further processing. That’s where PowerPoint slides are just awesome. Bullets, tables, charts, diagrams, screenshots, OH YES!

    Last week I started going through the MBAS session catalog and downloading the slide decks for interesting sessions. (I’m not the only one who hoards PPTXs from MS events, check out MVP Jussi Roine’s blog for his tips on learning quick as a consultant.) Now I’ve got a folder with 115 PowerPoint files weighing in at 4.5 Gigabytes. Hmm, looks like some further prioritization is still needed to narrow these down. Well, one thing’s for sure: I know where I want to start diving into the content. The future of business apps awaits in this session:

    Run One UI – the future of canvas, model-driven, and Unified Interface in PowerApps (BRK2073)

    For those with Dynamics 365 Customer Engagement background, the topic of user interface unification might lead your thoughts to Unified Interface. Originally announced 2 years ago, this new client infrastructure aims to do away with the earlier divide between web client, phone, tablet and Outlook. More importantly, it’s a foundation for unbundling the application specific UI controls from the platform and opening up the road for everyone to build the kinds of controls that Sales, Service, Marketing and all the other 1st party apps contain. That story is called PCF and it’s a big deal for sure, but something even bigger is on its way.

    This  “One UI” does not simply look at the Dynamics side of the house, rather it encompasses the whole app story in Power Platform. Ever since XRM merged with PowerApps, we’ve had this somewhat awkward divide between Canvas apps and Model-driven apps. These terms don’t mean much anything to customers when explaining them the platform capabilities. For the Dynamics professionals the concept of a “Model-driven PowerApp” sounds artificial. While on the back end the CDS, admin and developer story is coming together quite nicely, on the front end we see two experiences with not too much in common – today.

    We’ve already heard Charles Lamanna make a statement that Microsoft has no intentions of keeping the app types in PowerApps separate:

    “Artificial limitations in app features will be removed, so that choosing [File – New App] will give you model or canvas experiences and everything will work across both.”

    Power 365 Show: Power Platform Changes and Answering Community Questions with Charles Lamanna

    Sounds cool! But how exactly are they going to pull off this merging of the two client frameworks with a very different history? On the platform side it was fairly simple as XRM probably offered a lot of what CDS v1 was capable of and turning it into CDS v2 was not a big issue due to low adoption rate of the less mature technology of the two. PowerApps Canvas apps on the other hand have a huge momentum going on and the number of apps in production is exploding. Dynamics 365 CE ain’t doing too bad either when it comes to growth figures in the cloud, so messing too much with it sound very risky. After all, we’re still waiting for many existing customers to even move from the classic web client to Unified Interface, so do we really need more confusion in this space?

    In the Run One UI session at MBAS we heard Clay Wesener present the master plan of how the two different app types will gradually turn into one PowerApp. Here it is:

    This is really just mashing together the start and end state from Clay’s presentation, so this time you really should reserve an hour of your time and watch the recording, to understand the finer details. And grab the slides for reference, naturally.

    A key part of the plan is that this won’t happen in a big bang. There won’t be an “Even MORE Unified Interface” launched at some grandiose marketing event, rather Microsoft will introduce capabilities from one app type to the other in a gradual fashion. PCF just arrived on Model-driven Apps as a public preview, soon it will start showing up on the Canvas side, too. Canvas Components are bringing the more structured way to define the UI into the previously blank canvas where each pixel used to run free, making it more like the grown up version familiar from enterprise business applications. These new parts are all about blurring the lines between Canvas and Model.

    (more…)